Android studio 軟體介紹
阿新 • • 發佈:2018-11-22
工程專案結構解析:
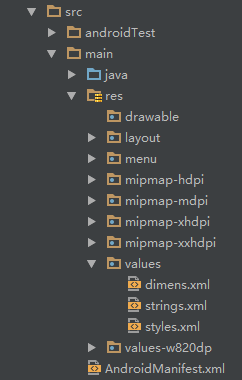
下圖分支是開發過程中重要的部分,所以著重講一下

- java:寫java程式碼的地方,業務功能都在這裡實現
- res:存在各種資原始檔的地方,有圖片,字串,動畫,音訊和各種XML形式的檔案等等
res資原始檔夾介紹:
說到res目錄,還有說一下assets目錄(這裡沒有,可以自己建立),兩者的區別在於是否res目錄下的所有資原始檔都會在R.java檔案下生成對應的資源id,而assets目錄不會。res目錄可以直接通過資源id訪問到對應的資源,而assets則需要通過AssetManager以二進位制流的形式來讀取。[R檔案可以理解問字典,res下的每個資源都會在這裡生成一個唯一的id!]
- 圖片資源(drawable)
- drawable:存放各種點陣圖檔案,(.png,.jpg ,.9png ,.gif等)除此之外可能還會有其他的drawable型別的XML檔案
- mipmap-hdpi:高等解析度,一般把圖片放在這裡
- mipmap-mdpi:中等解析度,很少放圖片,除非相容的手機很舊
- mipmap-xhdpi:超高解析度,手機螢幕材質越來越好
- mipmap-xxhdpi:超超高解析度,這個在高階機上有所體現
- 佈局資源:
layout:該目錄存放的就是佈局檔案,另外在一些特定的機型上,需要做螢幕適配,比如480*320這樣的手機,會另外建立 一套佈局,就行:layout-480x320這樣的資料夾
- 選單資源:
menu:在以前有物理選單按鈕,即menu鍵的手機上,用的較多,現在用的並不多,選單項相關的資源xml可在這裡編寫
- values目錄:
- demens.xml:定義尺寸資源
- string.xml:定義字串資源
- styles.xml:定義樣式資源
- colors.xml:定義顏色資源
- arrays.xml:定義陣列資源
- attrs.xml:自定義控制元件的屬性
- theme主題檔案和styles很相似,但是會對整個應用中的Actvitiy或指定Activity起作用,一般是改變視窗外觀的!可在Java程式碼中通過setTheme使用,或者在Androidmanifest.xml中為<application...>新增theme的屬性! PS:你可能看到過這樣的values目錄:values-w820dp,values-v11等,前者w代表平板裝置,820dp代表螢幕寬度;而v11這樣代表在API(11),即android 3.0後才會用到的!
- raw目錄:用於存放各種原生資源(音訊,視訊或一些XML檔案等等)。可以通過openRawResource(int id)來獲得資源的二進位制流!其實和Assets差不多,不過這裡面的資源會在R檔案那裡生成一個資源id而已
- 動畫,動畫有兩種:屬性動畫和補間動畫
- animator:存放屬性動畫的XML檔案
- anim:存放補間動畫的XML檔案
如何使用這些資源:
由於所有的資原始檔都會在R.java檔案下生成一個資源id,所有可以通過這個資源id來完成這個資源的訪問,使用情況有兩種:java程式碼中使用和XML程式碼中使用
java中使用:
- java文字
txtName.setText(getResources().getText(R.string.name)); - 圖片
imgIcon.setBackgroundDrawableResource(R.drawable.icon); - 顏色
txtName.setTextColor(getResouces().getColor(R.color.red)); - 佈局
setContentView(R.layout.main);- 控制元件
setContentView(R.layout.main);XML程式碼中使用:
通過@xxx即可得到,比如這裡獲取文字和圖片:
<TextView
      android:text="@string/hello_world"
      android:layout_width="wrap_content"
      android:layout_height="wrap_content"
      android:background = "@drawable/img_back"/>
深入瞭解三個檔案:
MainActivity.java:
package jay.com.example.firstapp;

import android.support.v7.app.AppCompatActivity;
import android.os.Bundle;

public class MainActivity extends AppCompatActivity {
    @Override
    protected void onCreate(Bundle savedInstanceState) {
        super.onCreate(savedInstanceState);
        setContentView(R.layout.activity_main);
    }
}
程式碼分析:

佈局檔案:activity_main.xml:
<RelativeLayout xmlns:android="http://schemas.android.com/apk/res/android"
    xmlns:tools="http://schemas.android.com/tools"
    android:layout_width="match_parent"
    android:layout_height="match_parent"
    tools:context=".MainActivity">

    <TextView
        android:layout_width="wrap_content"
        android:layout_height="wrap_content"
        android:text="@string/hello_world" />

</RelativeLayout>
程式碼分析:

配置檔案:AndroidManifest.xml:
<?xml version="1.0" encoding="utf-8"?>
<manifest xmlns:android="http://schemas.android.com/apk/res/android"
    package="jay.com.example.firstapp" >

    <application
        android:allowBackup="true"
        android:icon="@mipmap/ic_launcher"
        android:label="@string/app_name"
        android:theme="@style/AppTheme" >
        <activity
            android:name=".MainActivity"
            android:label="@string/app_name" >
            <intent-filter>
                <action android:name="android.intent.action.MAIN" />

                <category android:name="android.intent.category.LAUNCHER" />
            </intent-filter>
        </activity>
    </application>

</manifest>
程式碼分析:

