
Spring Cloud Eureka高可用落地實戰
阿新 • • 發佈:2018-11-22
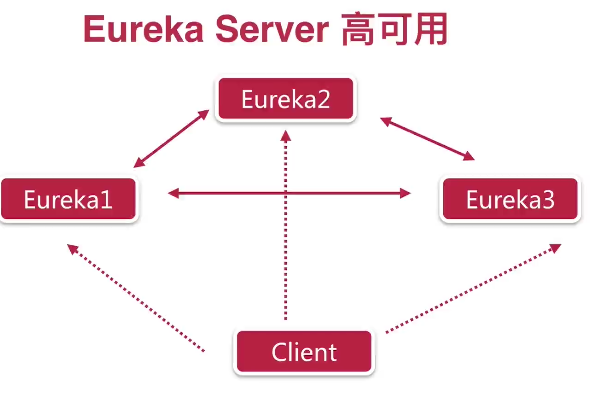
一、原理
如圖所示,多臺Server端之間相互註冊(這裡以兩臺Server為例),Client端向所有的Server端註冊。
二、Server端配置
1. 新增依賴
<dependency>
  <groupId>org.springframework.cloud</groupId>
   <artifactId>spring-cloud-starter-netflix-eureka-server</artifactId>
</dependency>
2. 使用@EnableEurekaServer註解,開啟Server端
@EnableEurekaServer
@SpringBootApplication
public class TestEurekaApplication {

    public static void main(String[] args) {
        SpringApplication.run(QmkxServerEurekaApplication.class, args);
    }
}
3. 增加配置
為了配置方便,這裡使用主機名代替IP,此處以單機為例,若多臺機器,改為相應IP即可。
hosts配置:
127.0.0.1   peer1
127.0.0.1   peer2
application-peer1.yml配置:
server:
  port: 2181
eureka:
  client:
    service-url:
      defaultZone: http://peer2:2182/eureka/
  instance:
    hostname: peer1
    prefer-ip-address: true
application-peer2.yml配置:
server:
  port: 2182
eureka:
  client:
    service-url:
      defaultZone: http://peer1:2181/eureka/
  instance:
    hostname: peer2
    prefer-ip-address: true
三、Client端配置
1. 新增依賴
<dependency>
  <groupId>org.springframework.cloud</groupId>
   <artifactId>spring-cloud-starter-netflix-eureka-client</artifactId>
</dependency>
2. 使用@EnableDiscoveryClient註解,開啟註冊功能
@EnableDiscoveryClient
@SpringBootApplication
public class TestUserApplication {
    public static void main(String[] args) {
        SpringApplication.run(TestUserApplication.class, args);
    }
}
3. 修改配置檔案,新增所有的Server,用逗號隔開
# 註冊中心
eureka:
  instance:
    prefer-ip-address: true
  client:
    service-url:
      defaultZone: http://peer1:2181/eureka/,http://peer2:2182/eureka/
四、檢視Eureka
