
【程式碼】第11章 APP的爬取
11.1 Charles的使用
電腦win10安裝Charles,安裝受信任的證書;
替換安裝目錄的charles.jar,得到破解版;
為解決亂碼問題,網上一些做法:
將SSL代理設定裡add,Host填 * ,port填443;
Charles.ini加上UTF-8;
Tools裡Rewrite 設定application/jaon;charset=UTF-8
然而一些結果仍是亂碼,此問題待考慮
索尼xzp G8142,安卓版本8.0.0,開啟並點選所連線的wifi,高階選項,手動代理,設定電腦ip和Charles預設的8888port,瀏覽器中開啟證書地址安裝。
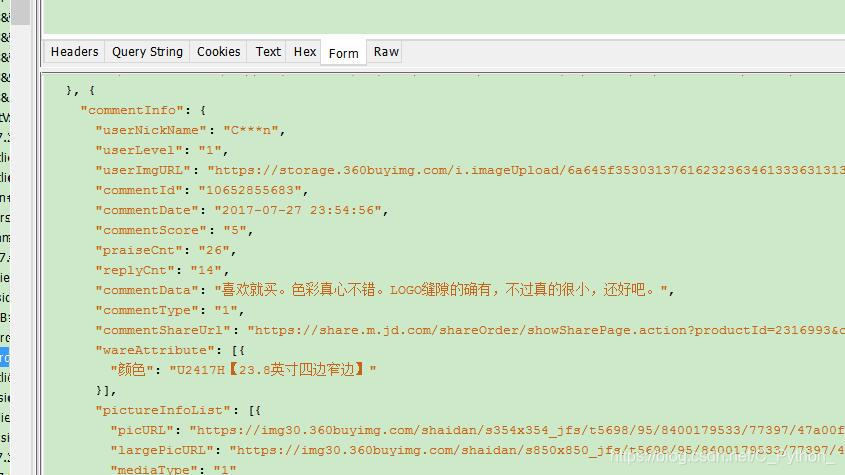
測試結果:
微信公共號評論可以檢視,微信和qq圖片可以檢視,證明是連通的!
開啟京東APP時彈出提示 "證書長度為1,是否繼續" ,出現很多次!估計是安卓版本問題。(貌似安裝7以上不信任證書)
原書中的jd商品評論壓根就沒看到,然後換成索尼Z3,安卓4.4.4後成功!
11.2 mitmproxy的使用
下載mitmproxy win.exe
要查詢到.mitmproxy資料夾(因不在安裝目錄下),安裝mitmproxy-ca-cert.p12證書
複製mitmproxy-ca-cert.pem證書到手機(在設定-安全-從SD卡安裝),設定WiFi的IP/Port(類似Charles)
開啟mitmweb.exe或mitmdump.exe可以監控,但不能操作修改Query(書中示例)
6.mitmdump的使用
為方便,使用pycharm編輯指令碼,指令碼在pycharm開啟的Terminal路徑下執行mitmdump -s Scripts.py
例項重寫了http中的request、response方法
import mitmproxy.http
from mitmproxy import ctx

def request(flow:mitmproxy.http.HTTPFlow):
	# flow是mitmproxy.http.HTTPFlow物件

	# 改請求頭
    flow.request.headers['User-Agent'] = 'MitmProxy'
    print(flow.request.headers)
    ctx.log.info('info')
    ctx.log.warn('warn')
    ctx.log.error('error')

    # request功能
    # request = flow.request
    # info = ctx.log.info
    # info(request.url)
    # info(str(request.headers))
    # info(str(request.cookies))
    # info(request.host)
    # info(request.method)
    # info(str(request.port))
    # info(request.scheme)

    # 修改url,轉發假cookies(此處為baidu),被嚇到了。。。。
    flow.request.url = 'https://www.baidu.com'

def response(flow: mitmproxy.http.HTTPFlow):
    response = flow.response
    info = ctx.log.info
    info("status_code $$"+str(response.status_code))
    info("headers $$"+str(response.headers))
    info("cookies $$"+str(response.cookies))
    info("text $$"+str(response.text))
11.4 appium的基本使用
環境配置版本:
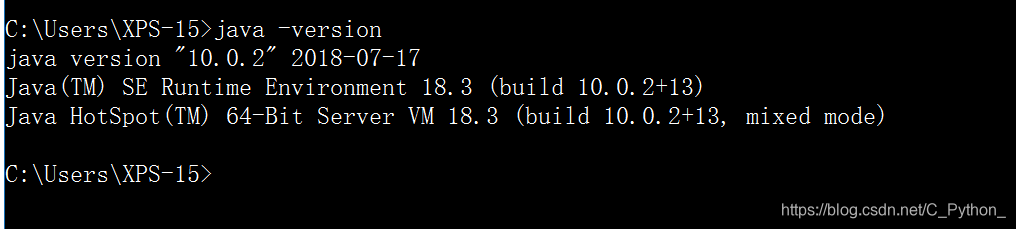
java version “10.0.2” 2018-07-17
Java™ SE Runtime Environment 18.3 (build 10.0.2+13)
Java HotSpot™ 64-Bit Server VM 18.3 (build 10.0.2+13, mixed mode)
Android studio 3.2.1 (Android emulator打開了一下,沒怎麼設定)
Android Debug Bridge version 1.0.40
Node v10.13.0
Appium v1.9.1
Appium Doctor v.1.6.0
Appium-Python-Client (Python client for Appium 1.5 version 0.30)
Android 4.4.4 / 8.0.0
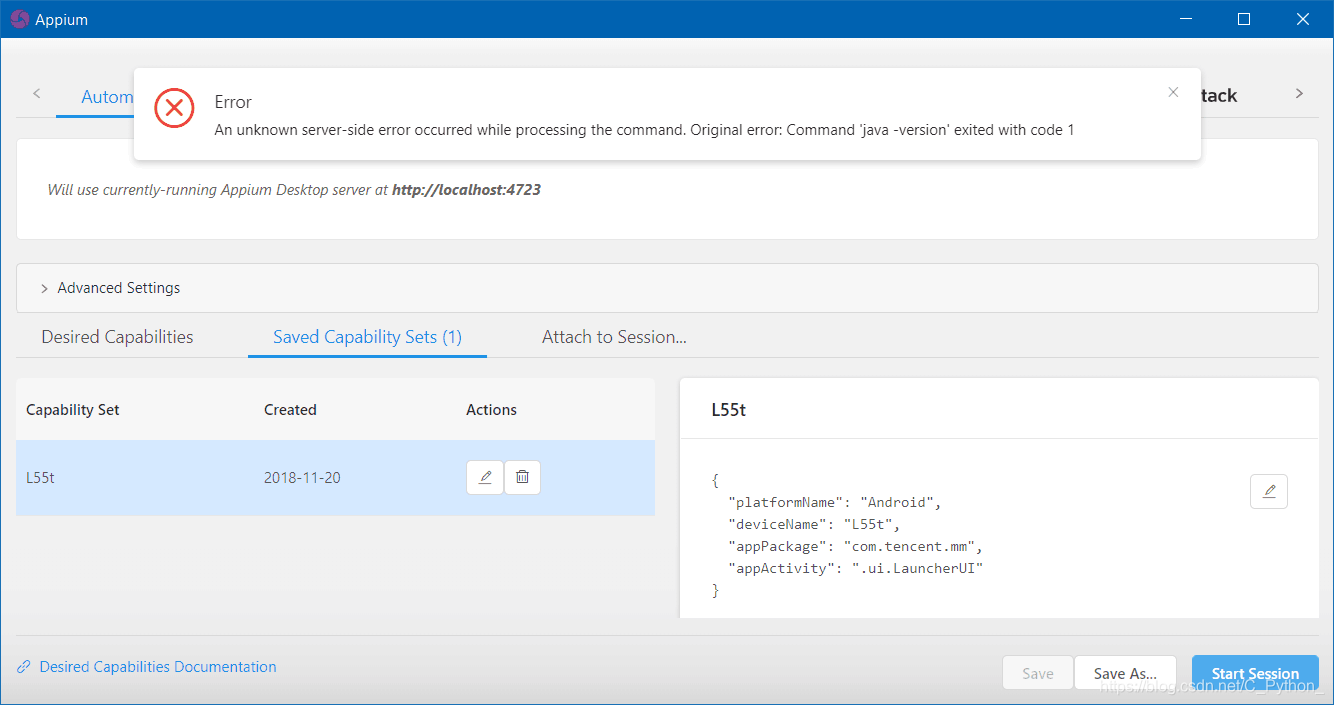
win10下安裝的appium.exe始終報錯,各種版本(1.82、1.24)都撲街,報java -version 錯誤,1.1.0在GitHub下載不了,在某網盤下載又報其他錯誤。。。。。。估計是jdk版本問題吧
 於是我用Node.js安裝appium和appium-doctor,用pycharm的appium模組成功開啟微信介面,輸入手機號,但是沒有圖形介面檢視元素,令人遺憾
from appium import webdriver
from selenium.webdriver.common.by import By
from selenium.webdriver.support.ui import WebDriverWait
from selenium.webdriver.support import expected_conditions as EC


server = 'http://127.0.0.1:4723/wd/hub'
desired_caps = {
                'platformName': 'Android',
                'deviceName': 'L55t',
                'platformVersion': '4.4.4',
                'appPackage': 'com.tencent.mm',
                'appActivity': '.ui.LauncherUI'
                }
driver = webdriver.Remote(server, desired_caps)
wait = WebDriverWait(driver, 30)
# 點選登入
login = wait.until(EC.presence_of_element_located((By.ID, 'com.tencent.mm:id/cjk')))
login.click()
# 輸入手機號
phone = wait.until(EC.presence_of_element_located((By.ID, 'com.tencent.mm:id/h2')))
phone.set_text('18888288828')
登入微信時遇到問題:
輸入密碼時使用自帶的輸入法無法切換出去,導致無法定位登入按鈕元素,所以改成使用appium的無介面輸入法:將鍵值對加到desired_caps,配置到driver裡即可
desired_caps["unicodeKeyboard"] = "True"
desired_caps["resetKeyboard"] = "True"
adb命令設定輸入法:
# 顯示所有輸入法:
adb shell ime list -s

# 切換Google、appium輸入法
adb shell ime set com.google.android.inputmethod.pinyin/.PinyinIME
adb shell ime set io.appium.android.ime/.UnicodeIME
又遇到新近註冊的賬號需要下載新版本,否則無法登入的問題,暫時沒找到解決辦法。。。。。
from appium import webdriver
import appium, os
from selenium.webdriver.common.by import By
from selenium.webdriver.support.ui import WebDriverWait
from selenium.webdriver.support import expected_conditions as EC

from pymongo import MongoClient


PLATFORM = 'Android'
PLATFORM_VERSION = '4.4.4'
DEVICE_NAME = 'L55t'
APP_PACKAGE = 'com.tencent.mm'
APP_ACTIVITY = 'ui.LauncherUI'
DRIVER_SERVER = 'http://localhost:4723/wd/hub'
TIMEOUT = 300
MONGO_URL = 'localhost'
MONGO_PORT = 27017
MONGO_DB = 'moments'
MONGO_COLLECTION = 'moments'


class Moments:
    def __init__(self):
        self.desired_caps = {
            'platformName': PLATFORM,
            'deviceName': DEVICE_NAME,
            'platformVersion': PLATFORM_VERSION,
            'appPackage': APP_PACKAGE,
            'appActivity': APP_ACTIVITY,
            # 安裝appium輸入法
            'unicodeKeyboard': True,
            'resetKeyBoard': True
        }
        # 驅動配置,延時
        self.driver = webdriver.Remote(DRIVER_SERVER, self.desired_caps)
        self.wait = WebDriverWait(self.driver, TIMEOUT)
        # mongodb 連線配置
        # self.client = MongoClient(host=MONGO_URL, port=MONGO_PORT)
        # self.db = self.client(MONGO_DB)
        # self.collection = self.db(MONGO_COLLECTION)
	# 模擬登入
    def login(self):
    	# 登入按鈕
        login = self.wait.until(EC.presence_of_element_located((By.ID, 'com.tencent.mm:id/cjk')))
        login.click()
	    # 手機號
        phone_num = self.wait.until(EC.presence_of_element_located((By.ID, 'com.tencent.mm:id/h2')))
        phone_num.set_text(USERNAME)
	    # 下一步按鈕
        next_btn = self.wait.until(EC.presence_of_element_located((By.ID, 'com.tencent.mm:id/adj')))
        next_btn.click()
	    # 密碼
        password = self.wait.until(
            EC.presence_of_element_located((By.XPATH, "//*[@resource-id='com.tencent.mm:id/h2'][1]")))
        PASSWORD = input('輸入密碼')
        password.set_text(PASSWORD)
	    # 提交登入表單
        submit = self.wait.until(EC.element_to_be_clickable((By.ID, 'com.tencent.mm:id/adj')))
        submit.click()
	# 進入朋友圈
    def enter(self):
        tab = self.wait.until(EC.presence_of_element_located((By.XPATH, "//*[@resource-id='come.tencent.mm:id/bw3'][3]")))
        tab.click()

        moments = self.wait.until(EC.presence_of_element_located((By.ID, 'com.tencent.mm:id/atz')))
        moments.click()

	# 滑動
	# 得到當前頁面所有狀態
	# 遍歷每條狀態(暱稱,正文,日期)
	# 處理時間,將時間差改成標準時間
	# MongoDB儲存資料

    def main(self):
        self.login()
        self.enter()


if __name__ == '__main__':
    moments = Moments()
    moments.main()