Android進階:步驟四:Android 接入百度地圖API 基礎實現
內容概括:
- 註冊申請百度地圖開發平臺賬號 這裡是地址 如何申請百度地圖的賬號也有官方文件:在這裡
- 申請祕鑰(AK)、快速獲取釋出版SHA1和測試版SHA1和包名
- (文件裡面也有如果建立應用以及申請的教程,但在Android Studio中實現更加簡單)
- 百度地圖的Android Studio的配置
- app上實現百度地圖的基礎功能
- app實現切換百度地圖的型別(基本和衛星地圖)
- 實現定位功能
- 顯示附近商家
一、建立接入百度地圖的應用 這裡是連結 必須先註冊驗證成功
1.下面建立應用的介面
2.應用名稱隨意:我這裡填寫baiduMap
3.我們選擇應用型別為Android SDK
4.啟動服務預設全選就好
5.釋出版SHA1和測試版SHA1是什麼?怎麼簡單獲取這才是重點
也就是所謂的debug版本和release版本的數字簽名,這裡不做過多解析,一種加密演算法來保證app安全的。

怎麼簡單獲取應用的釋出版SHA1和測試版SHA1?
我們開啟Android Studio新建一個工程(命名為BaiduMapDemo)
注意紅色框框內就是我們這個應用的包名可以修改:我這裡寫的是
包名:com.demo.baidumap
其他設定預設,建立成功。

建立好工程後,我們找到Gradle Scripts
1.點選工程下的build.gradle

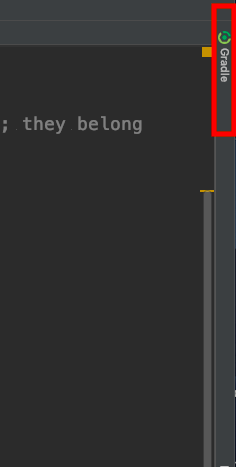
2.點選螢幕右邊隱藏一個側邊區域(Gradle)

3.如果點選後出現的是空白頁面點選,藍色按鈕就會出現了

4.那麼找到,android包下的signingReport 雙擊(雙擊)
雙擊後再AS的下面Run介面 就會出現

5.我們要的測試版(debug)的SHA1在這裡了
這個就是測試版的SHA1:
SHA1: DA:6C:6E:D6:09:98:8B:7D:1C:93:47:03:EC:C2........省略
----------
Variant: debug
Config: debug
Store: /Users/mac/.android/debug.keystore
Alias: AndroidDebugKey
MD5: 91:83:72:3C:C4:74:5A:8D:99:28:59:BE:90:A0:10:C8
SHA1: DA:6C:6E:D6:09:98:8B:7D:1C:93:47:03:EC:C2........省略
Valid until: 2048年3月1日 星期日
----------
6、怎麼獲取釋出版的SHA1
1.Build——>Generate Singed APK

2.預設app即可,next

3.點選create new...

4.第一個是你存放檔案的路徑,注意: 字尾名是.keystore (因為它要生成一個.keystore的檔案)
password 自定 我這裡是android 所有都設定成了android 要記下這個密碼,下面的填寫任意
填寫完成點選OK


不需要點選next,這時候你存放的路徑就有一個.keystore檔案了

6.拿到.keystore檔案後,開啟終端
複製這行命令:
keytool -list -v -keystore
空一個格,將你的.keystore檔案拉進終端,就會自動識別它所在的路徑
enter鍵,後提示輸入輸入金鑰庫口令: 就是上面那個密碼 我這裡是android

7.輸入密碼之後,就會出現釋出版的SHA1了

這裡我們兩個SHA1都拿到了
返回百度地圖開發平臺的應用建立介面

填寫相應的SHA1即可,注意包名千萬不能寫錯,SHA1也是,錯了就無法用到百度地圖sdk了,注意檢查上面是否有遺漏步驟
提交後,你就有一個訪問應用的AK了,接下來配置有用

二、百度地圖的Android Studio的配置
1.下載百度地圖sdk的jar包這裡是地址 在產品下載
這裡我們選擇自定義下載 我們選擇了 你可以全部選擇,因為接下來的實現效果只用上這麼多所有我們選擇了3個基礎功能
- 基礎定位
- 基礎地圖
- 計算工具

下載開發包和示例程式碼和類參考,如要進行深入開發,可以看他的demo
下載完成後解壓

看不懂我的操作的,可以看看官方的配置文件
1.拷貝BaiduLBS_Android.jar(我們所需要的jar包在BaiduLBS_AndroidSDK_Lib ▸ libs裡面)放到工程app/libs目錄下
找不到libs目錄?你可能隱藏了雙擊上面就會顯示出來了

2.在src/main/目錄下新建jniLibs目錄,並把 armeabi目錄和x86目錄載入到jniLibs目錄中


注意:
這裡我只放了armeabi和x86的兩個平臺的包,而官方建議是放所有的平臺,也就是4個,但是每一個體積有4M多,放入更多就會使app的體積變大,所以這裡放2個,接下來的操作都是文件裡不涉及的,是為了解決放2個而導致的問題的
放四個可以參考官方文件:
3.新增配置解決2個平臺引入新的問題
1.開啟module的build.gradle
在defaultConfig模組中新增一個ndk模組 如下(目的保證所有的應用只生成兩個平臺的,不生成其他平臺的so不加會導致奔潰)
   compileSdkVersion 27
    defaultConfig {
        applicationId "com.demo.baidumap"
        minSdkVersion 19
        targetSdkVersion 27
        versionCode 1
        versionName "1.0"
        testInstrumentationRunner "android.support.test.runner.AndroidJUnitRunner"

        ndk{
            abiFilters 'armeabi','x86'
        }

    }
2.新增jar檔案的依賴 同樣是在build.gradle,中
dependencies模組中新增依賴 :implementation files('libs/BaiduLBS_Android.jar') 然後同步一下dependencies { implementation fileTree(include: ['*.jar'], dir: 'libs') implementation 'com.android.support:appcompat-v7:27.1.1' implementation 'com.android.support.constraint:constraint-layout:1.1.3' implementation files('libs/BaiduLBS_Android.jar') testImplementation 'junit:junit:4.12' androidTestImplementation 'com.android.support.test:runner:1.0.2' androidTestImplementation 'com.android.support.test.espresso:espresso-core:3.0.2' }3.應用混淆
整合地圖SDK的應用,在打包混淆的時候,需要注意與地圖SDK相關的方法不可被混淆。混淆方法如下:
-keep class com.baidu.** {*;}
-keep class mapsdkvi.com.** {*;}
-dontwarn com.baidu.**
注意:保證百度類不能被混淆,否則會出現網路不可用等執行時異常
複製上面的程式碼,開啟proguard-rules.pro
然後貼上到末尾,貼上進去其實並沒有生效
接下來,在來到build.gradle裡面開啟混淆配置
在buildTypes模組中(這是初始的樣子)
  buildTypes {
        release {
            minifyEnabled false
            proguardFiles getDefaultProguardFile('proguard-android.txt'), 'proguard-rules.pro'
        }
    }
修改後 開啟混淆配置為true
 buildTypes {
        release {
            minifyEnabled true
            proguardFiles getDefaultProguardFile('proguard-android.txt'), 'proguard-rules.pro'
        }
    }
之後還有在build.gradle模組中配置我們剛剛上面的keystore檔案
1.將.keystore檔案拷貝到module目錄下
做如下配置:新建signingConfigs模組,並且在buildTypes中引入
下面的keyAlias和密碼是你建立.keystore寫的
   signingConfigs{
        releaseConfig{
            storeFile file('baidumap.keystore')
            storePassword 'android'
            keyAlias 'android'
            keyPassword 'android'
        }

    }
    buildTypes {
        release {
            minifyEnabled true
            signingConfig signingConfigs.releaseConfig
            proguardFiles getDefaultProguardFile('proguard-android.txt'), 'proguard-rules.pro'
        }
    }
注意: 此時可以通過點選右邊Gradle,雙擊工程的android目錄下signingReport,就獲取到release和debug兩個的SHA1,檢查一下是否和在百度地圖開發平臺寫的一致,我檢查了一遍,發現開發版SHA1的不一致,以signingReport出來的為準.(切記,還有包名不要寫錯)
包名在build的defaultConfig模組也可以看到:applicationId "com.demo.baidumap"
1.開發版SHA1
2.測試版SHA1
3.包名
三者確保沒有寫錯!
三、 app上實現百度地圖的基礎功能
1.在module的AndroidManifest.xml配置
(1)在application中新增開發金鑰(AK)
示例:
<application>
    .....
    <meta-data
        android:name="com.baidu.lbsapi.API_KEY"
        android:value="開發者 key" />
......
</application>
開發者Key是建立應用完成後的訪問應用的AK
(2)新增所需許可權
注意: 許可權應新增在 appliction 之外,如新增到appliction 內部,會導致無法訪問網路,不顯示地圖。
  <uses-permission android:name="android.permission.ACCESS_NETWORK_STATE"/>
    <!--獲取裝置網路狀態,禁用後無法獲取網路狀態-->
    <uses-permission android:name="android.permission.INTERNET"/>
    <!--網路許可權,當禁用後,無法進行檢索等相關業務-->
    <uses-permission android:name="android.permission.READ_PHONE_STATE" />
    <!--讀取裝置硬體資訊,統計資料-->
    <uses-permission android:name="com.android.launcher.permission.READ_SETTINGS" />
    <!--讀取系統資訊,包含系統版本等資訊,用作統計-->
    <uses-permission android:name="android.permission.ACCESS_WIFI_STATE" />
    <!--獲取裝置的網路狀態,鑑權所需網路代理-->
    <uses-permission android:name="android.permission.WRITE_EXTERNAL_STORAGE"/>
    <!--允許sd卡寫許可權,需寫入地圖資料,禁用後無法顯示地圖-->
    <uses-permission android:name="android.permission.WRITE_SETTINGS" />
    <!--獲取統計資料-->
    <uses-permission android:name="android.permission.CAMERA" />
    <!--使用步行AR導航,配置Camera許可權-->
(3) 在佈局xml檔案中新增地圖控制元件;
acitivity_main.xml
<?xml version="1.0" encoding="utf-8"?>
<LinearLayout xmlns:android="http://schemas.android.com/apk/res/android"
    xmlns:tools="http://schemas.android.com/tools"
    android:layout_width="match_parent"
    android:layout_height="match_parent"
    tools:context=".MainActivity">

    <com.baidu.mapapi.map.MapView
        android:id="@+id/id_baidumap"
        android:layout_width="match_parent"
        android:layout_height="match_parent"
        android:clickable="true" />

</LinearLayout>
(4)新建一個BaiduMapApplication類繼承Application 在oncreate方法中寫如下:
- 注意:在SDK各功能元件使用之前都需要呼叫
- SDKInitializer.initialize(getApplicationContext());,因此我們建議該方法放在Application的初始化方法中
public class BaiduMapApplication extends Application {
    @Override
    public void onCreate() {
        super.onCreate();
        //在使用SDK各元件之前初始化context資訊,傳入ApplicationContext
        SDKInitializer.initialize(this);
        //自4.3.0起,百度地圖SDK所有介面均支援百度座標和國測局座標,用此方法設定您使用的座標型別.
        //包括BD09LL和GCJ02兩種座標,預設是BD09LL座標。
        SDKInitializer.setCoordType(CoordType.BD09LL);
    }
}
然後到AndroidManifest.xml更改我們的Application (別忘了)
加入: android:name=".BaiduMapApplication"
    <application
        android:allowBackup="true"
        android:icon="@mipmap/ic_launcher"
        android:label="@string/app_name"
        android:roundIcon="@mipmap/ic_launcher_round"
        android:supportsRtl="true"
        android:name=".BaiduMapApplication"
        android:theme="@style/AppTheme">
(5) 建立地圖BaiduMapActivity,管理地圖生命週期;
public class BaiduMapActivity extends AppCompatActivity {

    private MapView mMapView = null;

    @Override
    protected void onCreate(Bundle savedInstanceState) {
        super.onCreate(savedInstanceState);
        setContentView(R.layout.activity_main);
        //獲取地圖控制元件引用
        mMapView = findViewById(R.id.bmapView);

    }

    @Override
    protected void onDestroy() {
        super.onDestroy();
        //在activity執行onDestroy時執行mMapView.onDestroy(),實現地圖生命週期管理
        mMapView.onDestroy();
    }

    @Override
    protected void onResume() {
        super.onResume();
        //在activity執行onResume時執行mMapView. onResume (),實現地圖生命週期管理
        mMapView.onResume();
    }

    @Override
    protected void onPause() {
        super.onPause();
        //在activity執行onPause時執行mMapView. onPause (),實現地圖生命週期管理
        mMapView.onPause();
    }
}
完成以上步驟後(開啟失敗,請仔細檢查是否遺漏哪些步驟),執行程式,即可在您的應用中顯示地圖。
如果沒有遺漏,請檢查你的釋出版SHA1 和測試版SHA1
(點選Gradle—>android—>雙擊signingReport在run插入 release和debug的SHA1是否和百度地圖建立應用填寫的一致)
和包名是否寫錯

四、調通示例百度Map的Demo
我們下載了BaiduLBS_AndroidSDK_Sample.zip 官方的示例demo
解壓後我們把BaiduLoc_AndroidSDK_v7.5_Demo包中Studio版本的BaiduLocDemo的app檔案(此時是一個module)匯入到我們的工程中
File——>New——>import Module——>選擇要匯入的module
匯入之後,會提示一些錯誤,比如版本不匹配,或者是compile 要修改成implementation
執行之後你還有可能出現
Failed to extract native libraries, res=-113的錯誤

意味著你的模擬器不支援,可以新建一個arm平臺的模擬器(不建議非常慢),當然用真機更好
注意,版本大於23之後要動態新增許可權
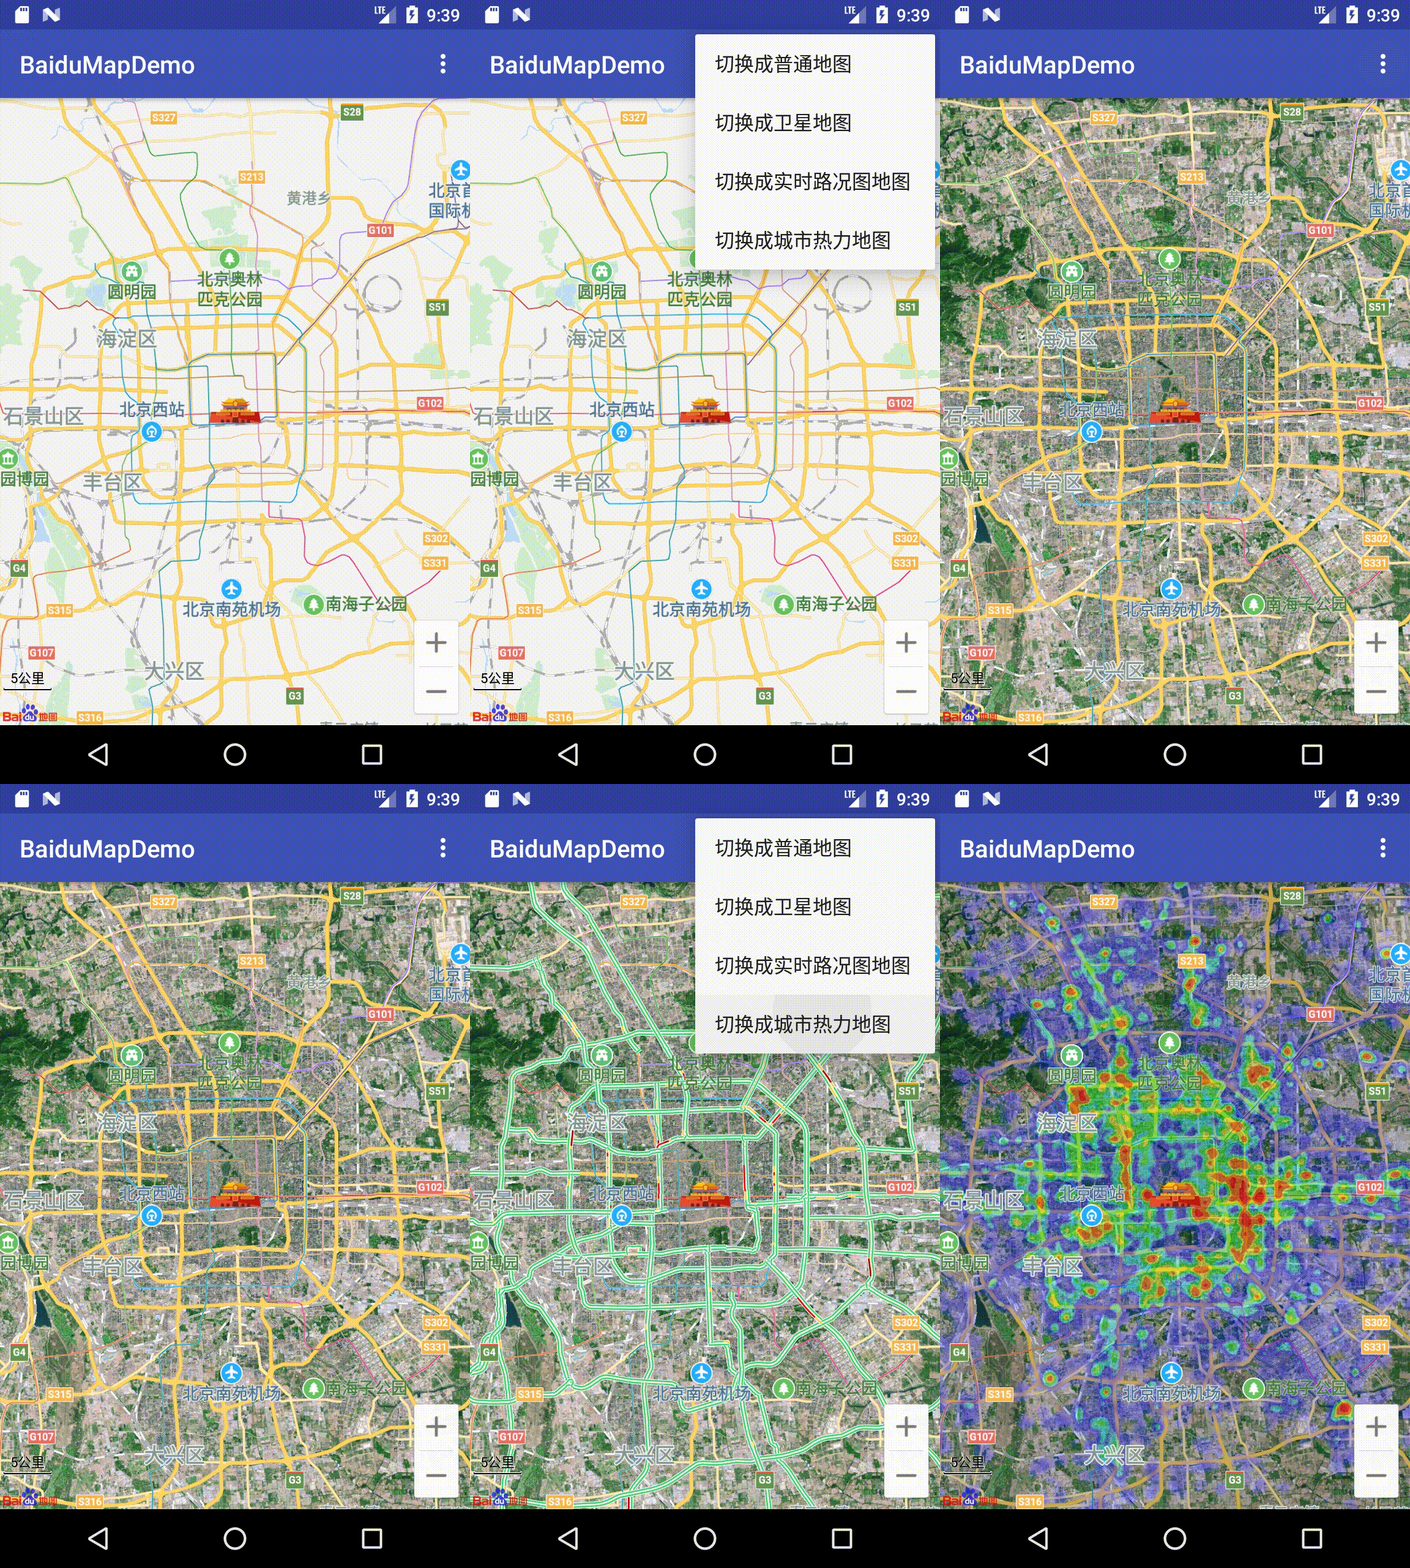
五、app實現切換百度地圖的型別(基本和衛星地圖)
import android.support.v7.app.AppCompatActivity;
import android.os.Bundle;
import android.view.Menu;
import android.view.MenuItem;

import com.baidu.mapapi.map.BaiduMap;
import com.baidu.mapapi.map.MapView;

public class BaiduMapActivity extends AppCompatActivity {

    public static final int ITEM_ID_NORMAL_MAP = 101;
    public static final int ITEM_ID_SATELLITE = 102;
    public static final int ITEM_ID_TIME = 103;
    public static final int ITEM_ID_HOT = 104;
    private MapView mMapView = null;
    private BaiduMap mBaiduMap;

    @Override
    protected void onCreate(Bundle savedInstanceState) {
        super.onCreate(savedInstanceState);
        setContentView(R.layout.activity_main);
        //獲取地圖控制元件引用
        mMapView = findViewById(R.id.bmapView);
        //拿到map物件
        mBaiduMap = mMapView.getMap();
    }

    /**
     * 建立新增選單
     *
     * @param menu
     * @return
     */
    @Override
    public boolean onCreateOptionsMenu(Menu menu) {
        menu.add(Menu.NONE, ITEM_ID_NORMAL_MAP, 0, "切換成普通地圖");
        menu.add(Menu.NONE, ITEM_ID_SATELLITE, 0, "切換成衛星地圖");
        menu.add(Menu.NONE, ITEM_ID_TIME, 0, "切換成實時路況圖地圖");
        menu.add(Menu.NONE, ITEM_ID_HOT, 0, "切換成城市熱力地圖");
        return super.onCreateOptionsMenu(menu);
    }

    /**
     * 選單點選事件
     *
     * @param item
     * @return
     */
    @Override
    public boolean onOptionsItemSelected(MenuItem item) {
        switch (item.getItemId()) {
            case ITEM_ID_NORMAL_MAP:
                mBaiduMap.setMapType(BaiduMap.MAP_TYPE_NORMAL);
                mBaiduMap.setTrafficEnabled(false);
                mBaiduMap.setBaiduHeatMapEnabled(false);
                break;
            case ITEM_ID_SATELLITE:
                mBaiduMap.setMapType(BaiduMap.MAP_TYPE_SATELLITE);
                mBaiduMap.setTrafficEnabled(false);
                mBaiduMap.setBaiduHeatMapEnabled(false);

                break;
            case ITEM_ID_TIME:
                mBaiduMap.setTrafficEnabled(true);
                mBaiduMap.setBaiduHeatMapEnabled(false);
                break;
            case ITEM_ID_HOT:
                mBaiduMap.setBaiduHeatMapEnabled(true);
                mBaiduMap.setTrafficEnabled(false);
                break;
        }
        return super.onOptionsItemSelected(item);
    }

    @Override
    protected void onDestroy() {
        super.onDestroy();
        //在activity執行onDestroy時執行mMapView.onDestroy(),實現地圖生命週期管理
        mMapView.onDestroy();
    }

    @Override
    protected void onResume() {
        super.onResume();
        //在activity執行onResume時執行mMapView. onResume (),實現地圖生命週期管理
        mMapView.onResume();
    }

    @Override
    protected void onPause() {
        super.onPause();
        //在activity執行onPause時執行mMapView. onPause (),實現地圖生命週期管理
        mMapView.onPause();
    }
}
效果:

六、實現定位功能
1.定位SDK的配置
(1)AndroidManifest.xml中新增定位許可權
1.使用定位SDK,需在Application標籤中宣告service元件,每個App擁有自己單獨的定位service,程式碼如下:
<service
android:name="com.baidu.location.f"
android:enabled="true" android:process=":remote">
</service>
2. 除新增service元件外,使用定位SDK還需新增如下許可權:(注意許可權可能和上方之前的有些重複,要去掉)
<!-- 這個許可權用於進行網路定位-->
<uses-permission android:name="android.permission.ACCESS_COARSE_LOCATION"></uses-permission>
<!-- 這個許可權用於訪問GPS定位-->
<uses-permission android:name="android.permission.ACCESS_FINE_LOCATION"></uses-permission>
<!-- 用於訪問wifi網路資訊,wifi資訊會用於進行網路定位-->
<uses-permission android:name="android.permission.ACCESS_WIFI_STATE"></uses-permission>
<!-- 獲取運營商資訊,用於支援提供運營商資訊相關的介面-->
<uses-permission android:name="android.permission.ACCESS_NETWORK_STATE"></uses-permission>
<!-- 這個許可權用於獲取wifi的獲取許可權,wifi資訊會用來進行網路定位-->
<uses-permission android:name="android.permission.CHANGE_WIFI_STATE"></uses-permission>
<!-- 用於讀取手機當前的狀態-->
<uses-permission android:name="android.permission.READ_PHONE_STATE"></uses-permission>
<!-- 寫入擴充套件儲存,向擴充套件卡寫入資料,用於寫入離線定位資料-->
<uses-permission android:name="android.permission.WRITE_EXTERNAL_STORAGE"></uses-permission>
<!-- 訪問網路,網路定位需要上網-->
<uses-permission android:name="android.permission.INTERNET" />
<!-- SD卡讀取許可權,使用者寫入離線定位資料-->
<uses-permission android:name="android.permission.MOUNT_UNMOUNT_FILESYSTEMS"></uses-permission>
2.初始化LocationClient類
import android.content.Context;

import com.baidu.location.BDAbstractLocationListener;
import com.baidu.location.BDLocation;
import com.baidu.location.LocationClient;
import com.baidu.location.LocationClientOption;

/**
 * 實現獲取定位資訊返回給我們的主Activity
 */
public class LocationInstance {
    /**
     * 第一步:初始化LocationClient類
     */
    public LocationClient mLocationClient;
    private MyLocationListener myListener;

    //BDAbstractLocationListener為7.2版本新增的Abstract型別的監聽介面
//原有BDLocationListener介面暫時同步保留。具體介紹請參考後文第四步的說明
    public LocationInstance(Context context, MyLocationListener myListener) {
        mLocationClient = new LocationClient(context);
        //宣告LocationClient類
        mLocationClient.registerLocationListener(myListener);
        //註冊監聽函式

        /**
         * 第二步:配置定位SDK引數
         */
        LocationClientOption option = new LocationClientOption();
        option.setLocationMode(LocationClientOption.LocationMode.Hight_Accuracy);
        option.setCoorType("bd09ll");
        option.setScanSpan(1000);
        option.setOpenGps(true);
        option.setLocationNotify(true);
        option.setIgnoreKillProcess(false);
        option.SetIgnoreCacheException(false);
        option.setWifiCacheTimeOut(5 * 60 * 1000);
        option.setEnableSimulateGps(false);
        option.setIsNeedAddress(true);
        mLocationClient.setLocOption(option);
    }

    /**
     * 第三步.實現BDAbstractLocationListener介面
     */
    public static class MyLocationListener extends BDAbstractLocationListener {
        @Override
        public void onReceiveLocation(BDLocation location) {
            //此處的BDLocation為定位結果資訊類,通過它的各種get方法可獲取定位相關的全部結果
            //以下只列舉部分獲取經緯度相關(常用)的結果資訊
            //更多結果資訊獲取說明,請參照類參考中BDLocation類中的說明

            double latitude = location.getLatitude();    //獲取緯度資訊
            double longitude = location.getLongitude();    //獲取經度資訊
            float radius = location.getRadius();    //獲取定位精度,預設值為0.0f

            String coorType = location.getCoorType();
            //獲取經緯度座標型別,以LocationClientOption中設定過的座標型別為準

            int errorCode = location.getLocType();
            //獲取定位型別、定位錯誤返回碼,具體資訊可參照類參考中BDLocation類中的說明
        }
    }

    /**
     * 第四步:設定定位的開始和結束的方法
     * 1s定位一次非常耗電的操作
     */
    public void start() {
        mLocationClient.start();
    }

    public void stop() {
        mLocationClient.stop();
    }


}
3.在主介面中拿到例項
    private LocationInstance mLocationInstance;
    private BDLocation lastLocation;//存放最新一次的位置
....


    @Override
    protected void onCreate(Bundle savedInstanceState) {
        super.onCreate(savedInstanceState);
        setContentView(R.layout.activity_main);
        .....
        //初始化定位
        initLocation();
    }
 /**
     * 初始化定位獲取例項的方法
     */
    private void initLocation() {
        mLocationInstance = new LocationInstance(
                this,
                new LocationInstance.MyLocationListener() {
                    @Override
                    public void onReceiveLocation(BDLocation location) {
                        super.onReceiveLocation(location);
                        //在這裡拿到返回的Location的資訊
                        lastLocation=location;
                        Log.d("MAP",
                                location.getAddrStr()+","+"" +
                                        location.getLatitude()+","+
                                        location.getLongitude());
                    }
                });
    }

    /**
     * 開啟Location
     */
    @Override
    protected void onStart() {
        mLocationInstance.start();
        super.onStart();
    }

    /**
     * 關閉Location
     */
    @Override
    protected void onStop() {
        mLocationInstance.stop();
        super.onStop();
    }
4.動態申請許可權
此時執行程式,如果是android6.0 sdk23之前都可以顯示定位資訊
但是:android6.0之後一些許可權需要動態申請才行
所有寫一個SplashActivity在沒進入主介面的時候來獲取許可權,如果必要的許可權沒有獲取到
就退出應用,並提升使用者還有哪些許可權沒獲取;
下次開啟之後,只要獲取未獲取的許可權即可,不用重新再獲取一遍
參考這篇文章:android6.0之後動態獲取許可權的封裝
列印結果
com.demo.baidumap D/MAP: 中國湖北省武漢市******,30.501075,114.402673
com.demo.baidumap D/MAP: 中國湖北省武漢市******,30.501075,114.402673
com.demo.baidumap D/MAP: 中國湖北省武漢市******,30.501075,114.402673
3.將定位功能引入我們介面中去:
顯示自己的定位並繪製一個點標記:官方參考文件
   case ITEM_LOCATION:
                //當點選我的定位之後會定位到我的位置,並出現一個方向圖片
                mBaiduMap.clear();//每次點選不清除就會疊加
                //定義Maker座標點(獲取經緯度)
                LatLng point = new LatLng(lastLocation.getLatitude(), lastLocation.getLongitude());
                //構建Marker圖示

                BitmapDescriptor bitmap = BitmapDescriptorFactory
                        .fromResource(R.drawable.navi_map_gps_locked);
                //構建MarkerOption,用於在地圖上新增Marker

                OverlayOptions option = new MarkerOptions()
                        .position(point)
                        .icon(bitmap);
                //在地圖上新增Marker,並顯示

                mBaiduMap.addOverlay(option);

                //地圖可以移動到中心點過去

mBaiduMap.animateMapStatus(MapStatusUpdateFactory.newLatLng(point));

                break;
改變地圖手勢的中心點(地圖的中心點)
改變地圖手勢的中心點,即需要改變地圖的中心點,手勢旋轉等操作是以地圖中心點 做旋轉的。
在上面的程式碼最後加上:
mBaiduMap.animateMapStatus(MapStatusUpdateFactory.newLatLng(point));
修改預設的縮放級別,在oncreate中新增
mBaiduMap.setMapStatus(MapStatusUpdateFactory.zoomTo(15f));

這是使用Vysor同手機螢幕在電腦上
旋轉手機可以使定位箭頭隨感測器移動而移動:
參考文件:顯示定位文件
1.寫一個感測器類:SensorInstantce.java
import android.content.Context;
import android.hardware.Sensor;
import android.hardware.SensorEvent;
import android.hardware.SensorEventListener;
import android.hardware.SensorManager;

/**
 * 這是感測器的一個類
 * 傳出x
 * 設定位置指標的走向
 */
public class SensorInstantce implements SensorEventListener {
    private Context mContext;
    SensorManager mSensorManager;

    public SensorInstantce(Context mContext) {
        this.mContext = mContext;
    }

    public void start() {
        //開啟感測器服務
        mSensorManager = (SensorManager) mContext.getSystemService(Context.SENSOR_SERVICE);
        if (mSensorManager != null) {//防止有些手機不支援
            //拿到sensor物件,方向感測器
            Sensor sensor = mSensorManager.getDefaultSensor(Sensor.TYPE_ORIENTATION);
            if (sensor != null) {
                mSensorManager.registerListener((SensorEventListener) this, sensor, SensorManager.SENSOR_DELAY_UI);
            }
        }
    }

    public void stop() {
        //停止服務
        mSensorManager.unregisterListener(this);
    }

    @Override
    public void onSensorChanged(SensorEvent sensorEvent) {
        if (sensorEvent.sensor.getType() == Sensor.TYPE_ORIENTATION) {
            float x = sensorEvent.values[SensorManager.DATA_X];
            if (mListener != null) {
                //把x傳出去
                mListener.onOrientation(x);
            }
        }

    }

    @Override
    public void onAccuracyChanged(Sensor sensor, int i) {

    }

    /***
     * OnOrientationChangedListener 利用這個方法來將實時改變的x傳出去
     */

    private OnOrientationChangedListener mListener;

    public void setOnOrientationChangedListener(OnOrientationChangedListener listener) {
        mListener = listener;
    }

    public static interface OnOrientationChangedListener {
        void onOrientation(float x);
    }
}
2.在BaiduMapAcitivity中
(1)新增成員變數
mIsFirstLocation來實現,第一次如果有定位就直接定位到你當前的定位了
    private SensorInstantce mSensorInstance;//方向感測器物件
    private boolean mIsFirstLocation = true;
(2)oncreate方法中初始化
     mBaiduMap.setMapStatus(MapStatusUpdateFactory.zoomTo(15f));

        //初始化定位
        initLocation();
        //初始化方向感測器
        initSensorInstance();
        // 開啟定點陣圖層
        mBaiduMap.setMyLocationEnabled(true);
這是初始化感測器的方法
 /**
     * 初始化方向感測器,控制定位指標的隨感測器的移動而改變
     * 手機移動到哪,圖示就指哪個方向
     */
    private void initSensorInstance() {
        mSensorInstance = new SensorInstantce(getApplicationContext());
        mSensorInstance.setOnOrientationChangedListener(new SensorInstantce.OnOrientationChangedListener() {
            @Override
            public void onOrientation(float x) {
                //設定定點陣圖標
                if (lastLocation == null) {//如果上次沒有定位,則不需要改變
                    return;
                }
                //實現定位功能
                // 構造定位資料
                MyLocationData locData = new MyLocationData.Builder()
                        .accuracy(lastLocation.getRadius())
                        // 此處設定開發者獲取到的方向資訊,順時針0-360
                        .direction(x).latitude(lastLocation.getLatitude())
                        .longitude(lastLocation.getLongitude()).build();

                // 設定定位資料
                mBaiduMap.setMyLocationData(locData);

                // 設定自定義定點陣圖層的配置(定位模式,是否允許方向資訊,使用者自定義定點陣圖標)
//                BitmapDescriptor mCurrentMarker = BitmapDescriptorFactory
//                        .fromResource(R.drawable.navi_map_gps_locked);
                //不需要自定義圖示
                MyLocationConfiguration config = new MyLocationConfiguration(MyLocationConfiguration.LocationMode.NORMAL,
                        true, null);
                mBaiduMap.setMyLocationConfiguration(config);

                /**
                 * 實現以進入地圖就定位到我們的位置
                 */
                if (mIsFirstLocation) {
                    mIsFirstLocation = false;
                    //拿到位置
                    LatLng point = new LatLng(lastLocation.getLatitude(), lastLocation.getLongitude());
                    mBaiduMap.animateMapStatus(MapStatusUpdateFactory.newLatLng(point));
                }

            }
        });
    }
(3)同樣要在Acitivity的onstart 和onStop中開啟、關閉
 /**
     * 開啟Location和感測器
     */
    @Override
    protected void onStart() {
        mLocationInstance.start();
        mSensorInstance.start();
        super.onStart();
    }

    /**
     * 關閉Location和感測器
     */
    @Override
    protected void onStop() {
        mLocationInstance.stop();
        mSensorInstance.stop();
        super.onStop();
    }
最後如果出現了兩個圖示
在定位的選單的點選事件中,除掉一個圖示
            case ITEM_LOCATION:
            。。。。。
                //在地圖上新增Marker,並顯示
                //將下面那一個圖示去掉

//                mBaiduMap.addOverlay(option);
指標方向隨手機移動方向改變


七、實現新增附件商家的Marker
通過拿到的經緯度查詢座標
com.demo.baidumap D/MAP: 中國湖北省武漢市******,30.501075,114.402673(緯度,經度)
longtitute:經度
Latitude:緯度

第一:給商家資訊做一個分裝類
AddressInfo.java
/**
 * 附件商家資訊的封裝
 */
public class AddressInfo {
    private double latitude;//經度
    private double longtitude;//緯度
    private int imgId;//圖片
    private String name;//名稱
    private String distance;//距離

    public AddressInfo() {
    }

    public AddressInfo(double latitude, double longtitude, int imgId, String name, String distance) {
        this.latitude = latitude;
        this.longtitude = longtitude;
        this.imgId = imgId;
        this.name = name;
        this.distance = distance;
    }

    public double getLatitude() {
        return latitude;
    }

    public void setLatitude(double latitude) {
        this.latitude = latitude;
    }

    public double getLongtitude() {
        return longtitude;
    }

    public void setLongtitude(double longtitude) {
        this.longtitude = longtitude;
    }

    public int getImgId() {
        return imgId;
    }

    public void setImgId(int imgId) {
        this.imgId = imgId;
    }

    public String getName() {
        return name;
    }

    public void setName(String name) {
        this.name = name;
    }

    public String getDistance() {
        return distance;
    }

    public void setDistance(String distance) {
        this.distance = distance;
    }
}
第二:拿到所有商家資訊的集合類
/**
 * 商家資料類
 */
public class AddressInfoLab {

    public static List<AddressInfo> generateDatas() {

        List<AddressInfo> addressInfos = new ArrayList<>();
        // http://api.map.baidu.com/lbsapi/getpoint/index.html
        addressInfos.add(new AddressInfo(30.499861, 114.405871, R.drawable.a1, "關山荷蘭風情園",
                "距離209米"));
        addressInfos.add(new AddressInfo(30.50288, 114.402457, R.drawable.a2, "長江職業學院",
                "距離897米"));
        addressInfos.add(new AddressInfo(30.500655, 114.40005, R.drawable.a3, "天龍公寓",
                "距離249米"));
        addressInfos.add(new AddressInfo(30.501277, 114.403679, R.drawable.a4, "三福",
                "距離679米"));
        return addressInfos;
    }
}
第三:在主介面中新增附件商家的選單按鈕
   case ITEM_SHOWSHOP:
                //遍歷商家,新增marker
                showShops();
                break;
具體的商家顯示的方法:
    /**
     * 顯示商家的方法,並新增marker
     */
    private void showShops() {
        mBaiduMap.clear();//每次點選不清除就會疊加
        //拿到商家資訊
        List<AddressInfo> addressInfoList = AddressInfoLab.generateDatas();
        for (AddressInfo addressInfo : addressInfoList) {
            //定義Maker座標點(獲取經緯度)
            LatLng point = new LatLng(addressInfo.getLatitude(), addressInfo.getLongtitude());
            //構建Marker圖示
            BitmapDescriptor bitmap = BitmapDescriptorFactory
                    .fromResource(R.drawable.maker);
            //構建MarkerOption,用於在地圖上新增Marker

            OverlayOptions option = new MarkerOptions()
                    .position(point)
                    .icon(bitmap);
            //在地圖上新增Marker,並顯示
            mBaiduMap.addOverlay(option);
        }
        //如果沒有地址直接返回
        if (addressInfoList.isEmpty()) {
            return;
        }
        LatLng point = new LatLng(addressInfoList.get(0).getLatitude()
                , addressInfoList.get(0).getLongtitude());

        //讓地圖自動移動到第一個商家的位置
        mBaiduMap.animateMapStatus(MapStatusUpdateFactory.newLatLng(point));
    }

接下來要處理兩個事件
- 1.商家marker的點選事件
- 2.點選之後顯示商家資訊
1.點選事件會彈出一個View
所以建一個佈局 item_address_info.xml 用來顯示點選商家的資訊
<?xml version="1.0" encoding="utf-8"?>
<RelativeLayout xmlns:android="http://schemas.android.com/apk/res/android"
    xmlns:tools="http://schemas.android.com/tools"
    android:layout_width="match_parent"
    android:layout_height="wrap_content"
    android:background="#cc4e5a6b">

    <ImageView
        android:id="@+id/id_marker_img"
        android:layout_width="match_parent"
        android:layout_height="180dp"
        android:layout_margin="12dp"
        android:background="@drawable/bg_img_icon"
        android:scaleType="fitXY"
        android:src="@drawable/a1" />

    <FrameLayout
        android:layout_width="match_parent"
        android:layout_height="wrap_content"
        android:layout_below="@id/id_marker_img"
        android:layout_marginBottom="6dp"
        android:layout_marginEnd="6dp"
        android:layout_marginStart="6dp"
        android:background="#4d5c6c">

        <TextView
            android:id="@+id/id_tx_name"
            android:layout_width="wrap_content"
            android:layout_height="wrap_content"
            android:textSize="14dp"
            tools:text="關山風情園" />

        <TextView
            android:id="@+id/id_tx_distance"
            android:layout_width="wrap_content"
            android:layout_height="wrap_content"
            android:layout_gravity="right"
            android:textSize="14dp"
            tools:text="關山風情園" />
    </FrameLayout>


</RelativeLayout>
2.為了讓主介面不那麼顯得容易,單獨建個類來實現View的展示
AddressView.java 商家資訊顯示的View類
import android.content.Context;
import android.util.AttributeSet;
import android.view.LayoutInflater;
import android.view.View;
import android.widget.ImageView;
import android.widget.RelativeLayout;
import android.widget.TextView;

import com.demo.baidumap.R;
import com.demo.baidumap.bean.AddressInfo;


/**
 * marker詳情佈局
 */

public class AddressView extends RelativeLayout {
    private ImageView mIvIcon;
    private TextView mTvName;
    private TextView mTvDistance;


    public AddressView(Context context, AttributeSet attrs) {
        super(context, attrs);
        setVisibility(View.GONE);
        LayoutInflater
                .from(context)
                .inflate(
                        R.layout.item_address_info,
                        this);
        mIvIcon = findViewById(R.id.id_marker_img);
        mTvName = findViewById(R.id.id_tx_name);
        mTvDistance = findViewById(R.id.id_tx_distance);

    }

    //對外接受商家資訊
    public void setAddressInfo(AddressInfo info) {
        mIvIcon.setImageResource(info.getImgId());
        mTvName.setText(info.getName());
        mTvDistance.setText(info.getDistance());
        setVisibility(View.VISIBLE);
    }
}
3.在主Activity中
1.宣告檢視物件
   //宣告佈局物件
 private AddressView mAddressView;
2.oncreate中初始化檢視 和點選事件
 //底部商家詳情頁
        mAddressView = findViewById(R.id.id_address_view);
   //初始化點選事件
        initEvent();
3.點選事件(點選marker和點選地圖)兩個事件
    public static final String SHOW_INFO = "showInfo";
    private void initEvent() {

        /**
         * 商家marker的點選事件
         */
        mBaiduMap.setOnMarkerClickListener(new BaiduMap.OnMarkerClickListener() {

            @Override
            public boolean onMarkerClick(Marker marker) {
                //點選marker之後拿到marker傳來的額外資訊
                Bundle extraInfo = marker.getExtraInfo();
                AddressInfo addressInfo = (AddressInfo) extraInfo.getSerializable(SHOW_INFO);
                //點選某個marker之後
                mAddressView.setAddressInfo(addressInfo);
                Log.d("TAG", addressInfo.getName());
                //show view
                return false;
            }
        });

        /**
         * 點選地圖的事件(讓商家資訊消失)
         */
        mBaiduMap.setOnMapClickListener(new BaiduMap.OnMapClickListener() {
            @Override
            public void onMapClick(LatLng latLng) {
                mAddressView.setVisibility(View.GONE);
            }

            @Override
            public boolean onMapPoiClick(MapPoi mapPoi) {
                return false;
            }
        });
    }
在顯示商家的方法中將商家的位置放進bundle等待點選事件的觸發(獲取商家額外資訊extraInfo)
  /**
     * 顯示商家的方法,並新增marker
     */
    private void showShops() {
    .......
            //構建Marker圖示
            BitmapDescriptor bitmap = BitmapDescriptorFactory
                    .fromResource(R.drawable.maker);

            /**
             * 拿到額外資訊存到extraInfo裡面
             */
            Bundle bundle = new Bundle();
            bundle.putSerializable(SHOW_INFO, addressInfo);
            //並傳進去
            //構建MarkerOption,用於在地圖上新增Marker
            OverlayOptions option = new MarkerOptions()
                    .position(point)
                    .extraInfo(bundle)//將bundle傳進去
                    .icon(bitmap);
         ........
    }
最後還有在顯示商家的方法中GONE掉檢視
  case ITEM_SHOWSHOP:
                //點選mark gone掉
                mAddressView.setVisibility(View.GONE);
                //遍歷商家,新增marker
                showShops();
                break;
最終效果:

參考:百度地圖開發者文件、和幫助與反饋、還有demo來學習百度地圖的SDK


