
利用POI實現Execl的匯入匯出
#匯入POI依賴架包
<dependency>
	<groupId>org.apache.poi</groupId>
	<artifactId>poi</artifactId>
	<version>3.15</version>
</dependency>
<dependency>
	<groupId>org.apache.poi</groupId>
	<artifactId>poi-ooxml</artifactId>
	<version>3.15</version>
</dependency>
##將資料庫的資料匯出成Excel
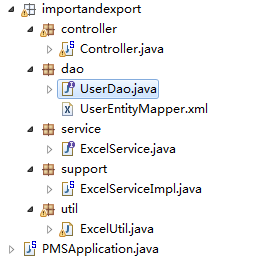
###先看專案結構,採用基於Maven的Spring boot 專案
###MySql資料庫資料:

###下一步就是把資料庫資料匯出成Excel,這裡利用了我的Controller層的exportUserAll方法
####第一步:匯出MySql資料,變成Excel檔案流
Control層程式碼
package com.travelsky.pms.importandexport.controller;

import java.io.BufferedOutputStream;
import java.io.File;
import java.io.FileOutputStream;
import java.io.IOException;
import java.util.ArrayList;
import java.util.List;
import javax.servlet.http.HttpServletRequest;
import javax.servlet.http.HttpServletResponse;
import org.apache.poi.hssf.usermodel.HSSFCell;
import org.apache.poi.hssf.usermodel.HSSFRichTextString;
import org.apache.poi.hssf.usermodel.HSSFRow;
import org.apache.poi.hssf.usermodel.HSSFSheet;
import org.apache.poi.hssf.usermodel.HSSFWorkbook;
import org.springframework.beans.factory.annotation.Autowired;
import org.springframework.web.bind.annotation.GetMapping;
import org.springframework.web.bind.annotation.RequestMapping;
import org.springframework.web.bind.annotation.RequestParam;
import org.springframework.web.bind.annotation.ResponseBody;
import org.springframework.web.multipart.MultipartFile;
import com.travelsky.pms.common.dto.JSONResponse;
import com.travelsky.pms.common.entity.UserEntity;
import com.travelsky.pms.common.util.UUIDUtil;
import com.travelsky.pms.importandexport.service.ExcelService;
import com.travelsky.pms.importandexport.util.ExcelUtil;

@org.springframework.stereotype.Controller
@RequestMapping
public class Controller {
	@Autowired
	ExcelService service;
	/*http://127.0.0.1:88/exportUserAll
	 * Execl匯入
	 */

	@GetMapping("/exportUserAll")
	@ResponseBody
    public void exportUserAll(HttpServletResponse response) throws IOException {

		HSSFWorkbook workbook = new HSSFWorkbook();
        HSSFSheet sheet = workbook.createSheet("資訊表");//建立sheet物件
        List<UserEntity> userList =service.ExportUserInfor();//得到查詢所有結果
        String Name ="USER"+ ".xls";//設定要匯出的檔案的名字


        String[] headers = {"序號","賬號","密碼","姓名", "電話號碼", "git賬號","電子郵箱","成績","學分"};
        //headers表示excel表中第一行的表頭
        HSSFRow row = sheet.createRow(0);//第一行
        //在excel表中新增表頭
        for(int i=0;i<headers.length;i++){
            HSSFCell cell = row.createCell(i);//第幾列
            HSSFRichTextString text = new HSSFRichTextString(headers[i]);
            cell.setCellValue(text);
        }
        int rowNum = 1;
        //在表中存放查詢到的資料放入對應的列
        for (UserEntity us : userList) {
            HSSFRow row1 = sheet.createRow(rowNum);//第幾行
            row1.createCell(0).setCellValue(rowNum);
            row1.createCell(1).setCellValue(us.getAccount());
            row1.createCell(2).setCellValue(us.getPassword());
            row1.createCell(3).setCellValue(us.getName());
            row1.createCell(4).setCellValue(us.getPhone());
            row1.createCell(5).setCellValue(us.getGitlabAccount());
            row1.createCell(6).setCellValue(us.getEmail());
            row1.createCell(7).setCellValue(us.getScore());
            row1.createCell(8).setCellValue(us.getCredit());
            rowNum++;
        }
        response.setContentType("application/octet-stream");
        response.setHeader("Content-disposition", "attachment;filename=" +Name);
        response.flushBuffer();
        workbook.write(response.getOutputStream());

}
	/*http://127.0.0.1:88/ImportUserAll?path=E:/1.xls
	 * Execl匯入
	 */


	    /**
	     * 用於接收前端上傳檔案
	     * @param request
	     * @param file
	     * @throws Exception
	     */

		@RequestMapping("/ImportUserAll")
	    @ResponseBody
	    public JSONResponse importUserAll(@RequestParam("file") MultipartFile file,HttpServletRequest request) throws Exception {
	        if (!file.isEmpty()) {


	            	String path=System.getProperty("user.dir");
	                BufferedOutputStream out = new BufferedOutputStream(
	                        new FileOutputStream(new File(file.getOriginalFilename())));
	                //System.out.println("檔名"+file.getOriginalFilename());
	               //System.out.println("目錄"+path+"\\"+file.getOriginalFilename());

	                out.write(file.getBytes());
	                out.flush();
	                out.close();
	                String filePath=path+"\\"+file.getOriginalFilename();
	                List<UserEntity> result=new ArrayList<>();
	        		List<Object> list=ExcelUtil.Execl2List(filePath);//呼叫工具類
	        		for(int i=0;i<list.size();i++)
	        		{
	        			List<Object> objectList=(List<Object>) list.get(i);
	        			int k=1;
	        			while(k<objectList.size())
	        			{    UserEntity ue=new UserEntity();
	        			     ue.setAccount(objectList.get(k).toString());
	        			     k+=1;
	        			     ue.setPassword(objectList.get(k).toString());
	        			     k+=1;
	        			     ue.setName(objectList.get(k).toString());
	        			     k+=1;
	        			     ue.setPhone(objectList.get(k).toString());
	        			     k+=1;
	        			     ue.setGitlabAccount(objectList.get(k).toString());
	        			     k+=1;
	        			     ue.setEmail(objectList.get(k).toString());
	        			     k+=1;
	        			     ue.setScore(Integer.parseInt(objectList.get(k).toString().substring(0,3)));
	        			     k+=1;
	        			     ue.setCredit(Integer.parseInt(objectList.get(k).toString().substring(0,3)));
	        			     k+=1;
	        			     ue.setId(UUIDUtil.random32());
	        			     ue.setRoleFlag(true);//true代表管理員,flase代表普通使用者
	        			     ue.setDeleteFlag(false);//true代表沒刪
	        				 System.out.println(ue);
	        			     result.add(ue);//這裡就是所有結果存為實體列表
	        			}

	        		}
	        		service.ImportUserInfor(result);//匯入資料庫業務

	        }
			return JSONResponse.ok("匯入成功");
	        }


		}
實體類程式碼
package com.travelsky.pms.common.entity;

import lombok.Data;

@Data
public class UserEntity {
    private String id;

    private String account;

    private String password;

    private String name;

    private String phone;

    private String gitlabAccount;

    private String email;

    private Integer score;

    private Integer credit;

    private Boolean roleFlag;

    private Boolean deleteFlag;


}
具體的程式碼和解釋我都有備註
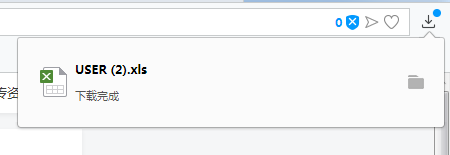
寫到這裡就可以直接輸入網址 http://127.0.0.1:88/exportUserAll,伺服器後端就會自動寫到瀏覽器,變成下載檔案流:
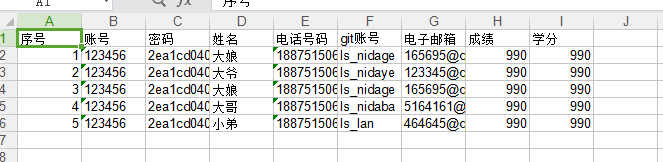
開啟的Excel檔案:
####第二步前端接收
這裡的前端接收並不簡單!
一開始我就難在這裡,因為我發現不知道用什麼來接收後端的檔案流

然後我也百度什麼找資料,突然就發現了一個神器,直接利用標籤的跳躍性範文後端伺服器介面,就不需要前端接受
下載
html網頁新增這個標籤就能像之前那樣自動下載
##匯出講完了,我們接著討論怎麼匯入,匯入相對麻煩一點,首先我們要明確需求是那種導。一般的Excel匯入分為兩種,第一種匯入現有的本地Excel,第二種就把自己想成客服端,我要把Excel匯入伺服器,首先伺服器得有這個檔案吧,然後自動匯入吧,畢竟我們做後端的,所以一般情況都是先上傳然後在下載對吧;
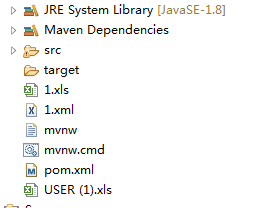
###所以第一步上傳檔案,上傳檔案就是IO流的讀寫,一般來說大專案都是用一個雲端暫存這些檔案,我這裡就不詳細解說了,我就直接利用我自定義的importUserAll把檔案上傳到專案根目錄上,上傳後就會在這裡顯示1.xls檔案
之後就是用IO流讀取1.xml檔案,利用我的ExcelUtil方法轉化成list巢狀list.
package com.travelsky.pms.importandexport.util;


	import java.io.File;
	import java.io.FileInputStream;
	import java.io.IOException;
	import java.io.InputStream;
    import java.util.ArrayList;
    import java.util.List;
    import org.apache.poi.hssf.usermodel.HSSFWorkbook;
	import org.apache.poi.ss.usermodel.Cell;
	import org.apache.poi.ss.usermodel.Row;
	import org.apache.poi.ss.usermodel.Sheet;
	import org.apache.poi.ss.usermodel.Workbook;
	import org.apache.poi.xssf.usermodel.XSSFWorkbook;

import com.travelsky.pms.common.exception.PMSException;

	/**
	 *
	 * Description: Excel操作
	 *
	 */
	public class ExcelUtil {

		private static final String EXCEL_XLS = "xls";
	    private static final String EXCEL_XLSX = "xlsx";

	    /**
	     * 判斷Excel的版本,獲取Workbook
	     * @param in
	     * @param filename
	     * @return
	     * @throws IOException
	     */
	    public static Workbook getWorkbok(InputStream in,File file) throws IOException{
	        Workbook wb = null;
	        if(file.getName().endsWith(EXCEL_XLS)){  //Excel 2003
	            wb = new HSSFWorkbook(in);
	        }else if(file.getName().endsWith(EXCEL_XLSX)){  // Excel 2007/2010
	            wb = new XSSFWorkbook(in);
	        }
	        return wb;
	    }

	    /**
	     * 判斷檔案是否是excel
	     * @return
	     * @throws Exception
	     */
	    public static boolean checkExcelVaild(File file) throws Exception{
	        if(!file.exists()){
	            throw new PMSException("檔案不存在");
	        }
	        if(!(file.isFile() && (file.getName().endsWith(EXCEL_XLS) || file.getName().endsWith(EXCEL_XLSX)))){
	            throw new PMSException("檔案不是Excel");

	        }
			return true;
	    }

	    /**
	     * 讀取Excel測試,相容 Excel 2003/2007/2010
	     * @return
	     * @return
	     * @throws Exception
	      */

 public static List<Object> Execl2List(String path) throws Exception {


	            // 同時支援Excel 2003、2007
	            File excelFile = new File(path); // 建立檔案物件
	            FileInputStream in = new FileInputStream(excelFile); // 檔案流
	            if(checkExcelVaild(excelFile))
	            {
	            Workbook workbook = getWorkbok(in,excelFile);
	            //Workbook workbook = WorkbookFactory.create(is); // 這種方式 Excel2003/2007/2010都是可以處理的

	            int sheetCount = workbook.getNumberOfSheets(); // Sheet的數量
	            List<Object> biglList=new ArrayList<>();
	            for(int k=0;k<sheetCount;k++)
	            {
//	             // 遍歷第一個Sheet
	            Sheet sheet = workbook.getSheetAt(k);   // 遍歷第三個Sheet


	            // 為跳過第一行目錄設定count
	            int count = 0;
	            for (Row row : sheet) {

	            		// 跳過第一和第二行的目錄
	                    if(count < 1 ) {
	                        count++;
	                        continue;
	                    }


	                    //獲取總列數(空格的不計算)
	                    int columnTotalNum = row.getPhysicalNumberOfCells();

	                   // System.out.println("總列數:" + columnTotalNum);

	                   // System.out.println("最大列數:" + row.getLastCellNum());

	                    //for迴圈的,不掃描空格的列
	               List<Object> list=new ArrayList<>();
                   for (Cell cell : row) {
                	   if(!cell.toString().equals(""))
                	     {list.add(cell);
                    	//System.out.println("列"+cell);
                    	}
                    }
                 //  System.out.println(list);//獲取所有list集合
                   biglList.add(list);


	            }
	            return biglList;


	            }  }

			return null;

	    }


	    private static Object getValue(Cell cell) {
	    	Object obj = null;
	    	switch (cell.getCellTypeEnum()) {
		        case BOOLEAN:
		            obj = cell.getBooleanCellValue();
		            break;
		        case ERROR:
		            obj = cell.getErrorCellValue();
		            break;
		        case NUMERIC:
		            obj = cell.getNumericCellValue();
		            break;
		        case STRING:
		            obj = cell.getStringCellValue();
		            break;
		        default:
		            break;
	    	}
	    	return obj;
	    }


}
然後列印成
[
[1.0, 123456, 2ea1cd0405ab06baeb761e863ff199e4, 大爺, 18875150631, ls_nidaye, [email protected], 990.0, 990.0], [2.0, 123456, 2ea1cd0405ab06baeb761e863ff199e4, 大娘, 18875150632, ls_nidage, [email protected], 990.0, 990.0], [3.0, 123456, 2ea1cd0405ab06baeb761e863ff199e4, 大哥, 18875150631, ls_nidaba, [email protected], 990.0, 990.0], [4.0, 123456, 2ea1cd0405ab06baeb761e863ff199e4, 小弟, 18875150631, ls_lan, [email protected], 990.0, 990.0]
]
這種resultlist -----list形式,然後我們要把每一個list迭代出來
UserEntity(id=d92a3d587492a8aacb24b3b289a7e6b6, account=123456, password=2ea1cd0405ab06baeb761e863ff199e4, name=大爺, phone=18875150631, gitlabAccount=ls_nidaye, [email protected], score=990, credit=990, roleFlag=true, deleteFlag=false)
UserEntity(id=0674f01fcb82730a978467d787fa4bcf, account=123456, password=2ea1cd0405ab06baeb761e863ff199e4, name=大娘, phone=18875150632, gitlabAccount=ls_nidage, [email protected], score=990, credit=990, roleFlag=true, deleteFlag=false)
UserEntity(id=f5206718089a77aa45b45559df28200f, account=123456, password=2ea1cd0405ab06baeb761e863ff199e4, name=大哥, phone=18875150631, gitlabAccount=ls_nidaba, [email protected], score=990, credit=990, roleFlag=true, deleteFlag=false)
UserEntity(id=a91d0f2af288660ac534513d9ae98934, account=123456, password=2ea1cd0405ab06baeb761e863ff199e4, name=小弟, phone=18875150631, gitlabAccount=ls_lan, [email protected], score=990, credit=990, roleFlag=true, deleteFlag=false)
緊接著就是新增到資料庫,我這裡利用mapper.xmldie迭代list
insert into sys_user (id, account, password,
name, phone, gitlab_account,
email, score, credit,
role_flag, delete_flag)
values
(#{item.id},
#{item.account},
#{item.password},
#{item.name},
#{item.phone},
#{item.gitlabAccount},
#{item.email},
#{item.score},
#{item.credit},
#{item.roleFlag},
#{item.deleteFlag})
然後就可以看到資料庫資料 !
