基於mysql-proxy配置mysql讀寫分離
阿新 • • 發佈:2018-11-26
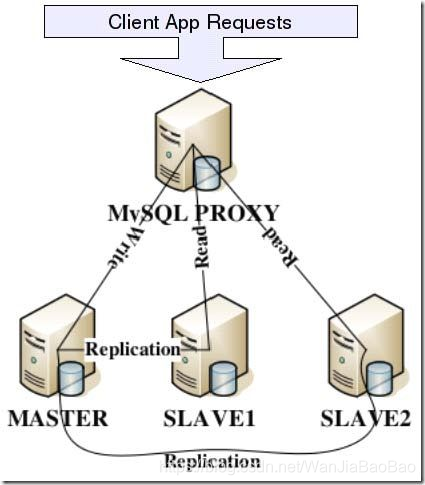
原理圖

環境說明
- 已關閉防火牆、selinux;
- 已二進位制安裝mysql-5.7.22版本;
- 已配置好mysql主從,配置詳情請參照mysql主從配置;
- 所用主機所用IP地址如下:
| IP地址 | 角色 | 安裝 |
|---|---|---|
| 192.168.91.128 | mysql-proxy中介軟體 | mysql-proxy、mariadb |
| 192.168.91.135 | master(write) | mysql-5.7.22 |
| 192.168.91.136 | salve(read) | mysql-5.7.22 |
配置步驟
- 在192.168.91.128主機上,下載mysql-proxy(點選下載),並解壓
[[email protected] ~]# tar -xf mysql-proxy-0.8.4-linux-el6-x86-64bit.tar.gz -C /usr/local/
[[email protected] ~]# ln -s /usr/local/mysql-proxy-0.8.4-linux-el6-x86-64bit/ /usr/local/mysql-proxy
[ - 備份配置檔案,並新增主配置檔案,並將主配置檔案許可權修改為660
[[email protected] ~]# cd /usr/local/mysql-proxy
## 備份讀寫分離配置檔案 ##
[[email protected] mysql-proxy]# cp share/doc/mysql-proxy/rw-splitting.lua{,.bak}
## 備份管理指令碼 ##
[ - 修改讀寫分離配置檔案
[[email protected] mysql-proxy]# vim /usr/local/mysql-proxy/share/doc/mysql-proxy/rw-splitting.lua
......
if not proxy.global.config.rwsplit then
        proxy.global.config.rwsplit = {
                min_idle_connections = 1,
                max_idle_connections = 1,

                is_debug = false
        }
end
......
- 啟動mysql-proxy
[[email protected] mysql-proxy]# /usr/local/mysql-proxy/bin/mysql-proxy --defaults-file=/etc/mysql-proxy/mysql-proxy.conf
[[email protected] mysql-proxy]# ss -ntl
State      Recv-Q Send-Q                    Local Address:Port                      Peer Address:Port
LISTEN     0      128                      192.168.91.128:4040                                 *:*
- 在192.168.91.35主機上(master),建立管理使用者並授權,從伺服器同步相應的操作
mysql> grant all on *.* to 'sepa'@'192.168.91.%' identified by '123456';
Query OK, 0 rows affected, 1 warning (0.01 sec)

mysql> flush privileges;
Query OK, 0 rows affected (0.01 sec)
- 在192.168.91.128主機上使用授權使用者登入資料庫
[[email protected] mysql-proxy]# yum -y install mariadb
[[email protected] mysql-proxy]# mysql -usepa -p123456 -h192.168.91.128 -P4040
Welcome to the MariaDB monitor.  Commands end with ; or \g.

MySQL [(none)]> show  databases;
+--------------------+
| Database           |
+--------------------+
| information_schema |
| mysql              |
| performance_schema |
| sys                |
+--------------------+
4 rows in set (0.01 sec)
- 在192.168.91.136主機上,將從同步功能停止掉;在192.168.91.128主機上建立資料庫並查詢資料庫來驗證讀寫分離是否成功
## 在192.168.91.128主機上執行 ##
MySQL [(none)]> create database test;
Query OK, 1 row affected (0.00 sec)

## 在192.168.91.136主機上執行 ##
mysql> stop slave;
Query OK, 0 rows affected, 1 warning (0.00 sec)

## 在192.168.91.128主機上執行 ##
MySQL [(none)]> create table mysql.haha(id int not null,name char not null);
Query OK, 0 rows affected (0.02 sec)

MySQL [(none)]> show tables from test;
Empty set (0.00 sec)
注:查不到表則說明寫是在192.168.91.135(master)主機上執行的,讀則在192.168.91.136(slave)主機上執行
