
Redis-入門筆記-15min帶你一覽redis
Redis-入門筆記-15min帶你一覽redis
https://www.cnblogs.com/xinysu/p/7366142.html#_label5
閱讀目錄(Content)
少年入門筆記,整理出來一起入坑!入門的視屏來自imooc的:http://www.imooc.com/learn/839
1 NOSQL概述
- 什麼是noSQL
- not only sql
- 非關係型資料庫
- 為什麼需要NoSQL
- web2.0大規模動態網站的興起
- high performance ,高併發讀寫,動態頁面展示與互動,比如微博點贊評論等操作,實時統計線上人數排行榜等
- huge storage,海量資料的高效儲存和訪問,大型網站的使用者登入系統
- high scalability && high availability,高可擴充套件性和高可用性
- 主流NOSQL產品
- redis,mongodb,couchdb
- NoSQL的特點
- 易擴充套件
- 靈活資料模型
- 大資料量,高效能
- 高可用
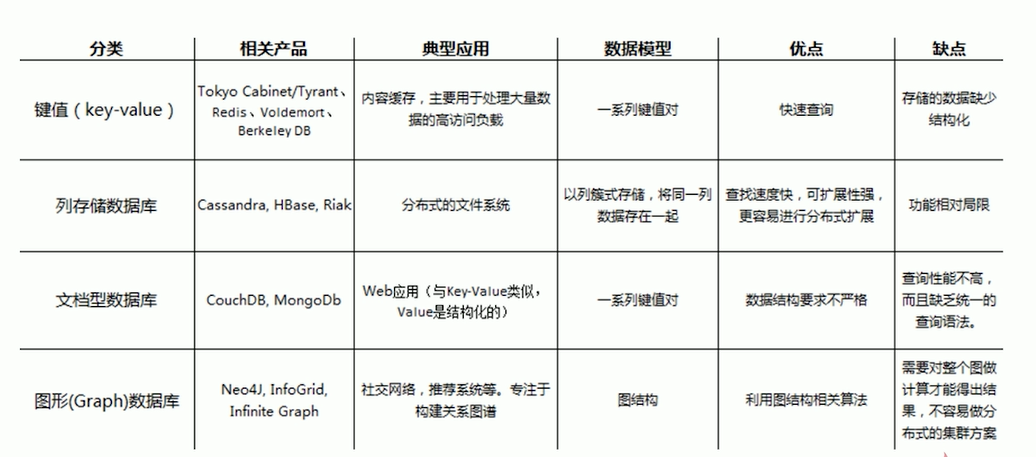
- NoSQL資料庫的四大分類
- 鍵值儲存,redis
- 優勢,快速查詢
- 劣勢,儲存資料缺少結構化
- 列儲存,hbase
- 優勢,快速查詢
- 劣勢,功能侷限
- 文件資料庫,mongodb
- 優勢,資料結構要求不嚴格
- 劣勢,查詢效能並非特別高,缺少統一查詢的語法
- 圖形資料庫,infogate
- 優勢,社交網路,利用圖結構的相關演算法
- 劣勢,需要對整個圖做演算法分析,不利於分散式方案
- 鍵值儲存,redis
2 redis概述
C語言編寫的高效能鍵值對資料,支援的鍵值資料型別:
- 字串型別
- 列表型別
- 有序集合型別
- 雜湊
- 集合型別
Redis的應用場景:
- 快取
- 網站訪問統計
- 任務佇列
- 資料過期處理
- 應用排行榜
- 分散式叢集架構中的session分離
3 redis安裝和使用
3.1 redis安裝
- 依賴環境
- gcc-c++
1 環境準備
#官網下載 redis 3.2.5版本
wget http://download.redis.io/releases/redis-4.0.1.tar.gz

#安裝 C 編譯環境
    yum -y install cpp binutils glibc glibc-kernheaders glibc-common glibc-devel gcc gcc-c++

2 安裝
    解壓安裝包後,進入檔案目錄編譯,編譯結束時,會提示 Hint: It's a good idea to run 'make test'  ,建議在安裝前先測試預安裝下,make test預安裝後,遇到錯誤:You need tcl 8.5 or newer in order to run the Redis test ,缺失安裝包tcl,所以需要先安裝這個 安裝包後再次執行 make test,正常後再進行redis安裝。
    詳細步驟如下:

#解壓二進位制包
tar -zvxf /opt/redis-3.2.5

#進入到檔案目錄
cd redis-3.2.5

#編譯
make

#測試安裝(稍微耗費點時間)
make test

#可能會提醒需要安裝最新版的tcl
#yum install tcl

#指定路徑安裝
make PREFIX=/usr/local/redis install

安裝結束後,進入到安裝路徑中,
[[email protected] bin]# ls -lh /usr/local/redis/bin/
total 22M
-rwxr-xr-x. 1 root root 2.4M Aug 13 18:40 redis-benchmark
-rwxr-xr-x. 1 root root 5.5M Aug 13 18:40 redis-check-aof
-rwxr-xr-x. 1 root root 5.5M Aug 13 18:40 redis-check-rdb
-rwxr-xr-x. 1 root root 2.5M Aug 13 18:40 redis-cli
lrwxrwxrwx. 1 root root 12 Aug 13 18:40 redis-sentinel -> redis-server
-rwxr-xr-x. 1 root root 5.5M Aug 13 18:40 redis-server
這幾個指令用途分別是:
- redis-benchmark
- 效能測試工具
- redis-check-aof
- aof檔案修復工具
- redis-check-rdb
- rdb檔案檢查工具
- redis-cli
- redis客戶端
- redis-server
- redis伺服器啟動命令
- redis-sentinel
3.2 配置檔案修改
 1 #拷貝conf檔案到/etc目錄
 2 cp /opt/redis/redis-4.0.1/redis.conf /etc/redis.conf
 3
 4
 5 #redis.conf 引數說明
 6
 7 ################################## NETWORK #####################################
 8
 9 #繫結的主機地址
10 bind 127.0.0.1
11
12 #保護模式,是否允許 沒有認證配置的主機或介面連線redis,預設是啟動保護模式,則不允許這種情況
13 protected-mode yes
14
15 #指定redis的監聽埠,預設埠是6379,作者在自己的一篇博文中解釋了為什麼選用6379作為預設埠,因為6379在手機按鍵上MERZ對應的號碼,而MERZ取自義大利歌女Alessia Merz的名字,嗯,你開發的,你說了算。
16 port 6379
17
18 # In high requests-per-second environments you need an high backlog in order
19 # to avoid slow clients connections issues. Note that the Linux kernel
20 # will silently truncate it to the value of /proc/sys/net/core/somaxconn so
21 # make sure to raise both the value of somaxconn and tcp_max_syn_backlog
22 # in order to get the desired effect.
23
24 tcp-backlog 511
25
26 #客戶端連結多長時間後關閉連結,單位是秒,指定為0,則表示關閉該功能
27 timeout 0
28
29 # A reasonable value for this option is 300 seconds, which is the new
30 # Redis default starting with Redis 3.2.1.
31 tcp-keepalive 300
32
33 ################################# GENERAL #####################################
34
35 #Redis預設不是以守護程序的方式執行,可以通過該配置項修改,使用yes啟用守護程序
36 daemonize yes
37
38 # If you run Redis from upstart or systemd, Redis can interact with your
39 # supervision tree. Options:
40 #   supervised no      - no supervision interaction
41 #   supervised upstart - signal upstart by putting Redis into SIGSTOP mode
42 #   supervised systemd - signal systemd by writing READY=1 to $NOTIFY_SOCKET
43 #   supervised auto    - detect upstart or systemd method based on
44 #                        UPSTART_JOB or NOTIFY_SOCKET environment variables
45 # Note: these supervision methods only signal "process is ready."
46 #       They do not enable continuous liveness pings back to your supervisor.
47 supervised no
48
3.3 服務啟動與關閉
 1 #服務端啟動
 2 [[email protected] redis-4.0.1]# cd /usr/local/redis/
 3 [[email protected] redis]# ./bin/redis-server /etc/redis.conf
 4 74537:C 13 Aug 18:53:30.774 # oO0OoO0OoO0Oo Redis is starting oO0OoO0OoO0Oo
 5 74537:C 13 Aug 18:53:30.774 # Redis version=4.0.1, bits=64, commit=00000000, modified=0, pid=74537, just started
 6 74537:C 13 Aug 18:53:30.774 # Configuration loaded
 7 [[email protected] redis]# ps axu | grep redis
 8 root      74538  0.6  0.2 145248  2168 ?        Ssl  18:53   0:00 ./bin/redis-server 127.0.0.1:6379
 9 root      74665  0.0  0.0 112648   968 pts/4    S+   18:53   0:00 grep --color=auto redis
10
11 #客戶端啟動
12 redis-cli [-h 127.0.0.1] [-p 6379]
13 127.0.0.1:6379> ping
14 PONG
15
16 #儲存鍵值對
17 127.0.0.1:6379> set name imooc
18 OK
19
20 #獲取name對應的value
21 127.0.0.1:6379> get name
22 "imooc"
23
24 #獲取所有keys
25 127.0.0.1:6379> keys *
26 1) "name"
27
28 #刪除keys
29 127.0.0.1:6379> del name
30 (integer) 1
31 127.0.0.1:6379> get name
32 (nil)
33
34 #關閉服務端
35 redis-cli shutdow
4 redis-py的入門
redis有支援非常多種語言編寫的客戶端,可以從官網檢視 https://redis.io/clients ,redis-py是redis官方網站首選的python客戶端開發包,本人只會點點python,所以從這個入門。
redis-py的github地址:https://github.com/andymccurdy/redis-py
5 redis資料型別
鍵值對種key的注意事項:
- 不要過長
- 最好不要超過1024個位元組
- 不僅消耗記憶體,也影響查詢效率
- 不要過短
- 比如設定為a,沒有實際意義,可能會降低key的可讀性
- 統一命名規範
5.1字串 string
string中的一個key對應一個value,values最長可達512Mb。
string常用命令:
- 賦值
- set key value
- 取值
- get key
- 取值後賦值
- getset key value

- 數值增減
- 自增1
- 如果該key不存在,則建立該key,並賦值為0,0自增後為1,等同於增加 【key,1】鍵值對
- 如果該key存在,則value自增加1
- incr key
- 自減1
- 如果該key不存在,則建立該key,並賦值為0,0自減後為-1,等同於增加 【key,-1】鍵值對
- 如果該key存在,則value自減1
- decr key
- 自增指定值
- 如果該key不存在,則建立該key,並賦值為0,0自增numbers,等同於增加 【key,numbers】鍵值對
- 如果該key存在,則value自增numbers
- incrby key numbers
- 自減指定值
- 如果該key不存在,則建立該key,並賦值為0,0自減numbers,等同於增加 【key,-numbers】鍵值對
- 如果該key存在,則value自減numbers
- decrby key numbers

- 自增1
- 刪除
- del key
- 擴充套件
- value追加string內容
- append key string

5.2 雜湊 hash
hash可以儲存多個鍵值對之間的對映,它就像是一個迷你型的redis。
- 賦值
- hset key field value
- hmset key field value [field value ... ]

- 取值
- hget key field
- hmget key field [field ...]
- hgetall key

- 增加數字
- hincrby key field number

- 刪除
- hdel key field
- del key

- 自學命令
- hexists key field
- hlen key
- hkeys key
- hvals key

5.3 字串列表 list
lish的順序是按照插入的順序,可以在頭部跟尾部插入資料,如果是在list的兩頭進行操作,那麼效率是很高的,但是如果在list中,則會耗費一定時間。
list的型別:
- arraylist使用陣列方式
- 根據索引查詢速度是非常快的
- 但是新增跟刪除操作涉及到位移操作,則會比較慢
- linkedlist使用雙向連結方式
- 每個元素都記錄了前後元素的指標,刪除跟新增只需要修改前後指標,資料操作較快
list常用的命令:
- 兩端新增
- lpush key value [value ...]
- rpush key value [value ...]
- 檢視列表
- lrange key start stop

- 指定位置push
- lset key index value
- 列表中第幾個位置插入value,注意位置從0開始
- lset key index value
- 指定value插入值
- linsert key before|after pivot value
- 在列表中,從左到右,第一個等於pivot這個值的前面或者後面,插入valuse

- 兩端彈出
- lpop key
- 刪除列表最左邊的value
- rpop key
- 刪除列表最右邊的value
- rpoplpush source distination
- 從source列表右邊刪除一個value,並把這個value儲存進入distination列表中
- 適用於訊息釋出過程中的備份操作

- lpop key
- 獲取列表元素個數
- llen key
- 獲取列表的長度
- llen key
- 擴充套件命令
- lpushx key value
- 如果列表存在,則從左端插入push valuse進入列表中,否則返回0
- rpushx key value
- 如果列表存在,則從右端插入push valuse進入列表中,否則返回0
- lrem key count value
- count>0,從列表的左端開始刪除 值等於 value,一共刪除count個
- count<0,從列表的右端開始刪除 值等於 value,一共刪除count個
- count=0,刪除 整個列表中所有 值等於 value

- lpushx key value
5.4 字串集合 set
和list型別不同的是,set集合中不允許出現重複的元素,set最大可以包含的元素是 4294967295 。注意,set中是沒有順序的。
用於維護使用者物件的唯一性,以及處理資料物件之間的關聯關係,可以進行並集交集差集運算。比如購買A產品的使用者ID,放在一個set中,購買另外一個B產品的使用者ID,放在另外一個set中,這樣就很方便計算同時購買兩個產品的使用者等。
list常用指令:
- 新增刪除元素
- sadd key member [member ...]
- srem key member [member ...]
- del key
- 獲取集合中的元素
- smembers key

- 差集運算
- sdiff key1 [key ...]
- 求集合key1與其他集合的差集
- sdiffstore destination key1 [key ...]
- 求集合key1與其他集合的差集,並把結果儲存在destination集合中
- sdiff key1 [key ...]
- 交集運算
- sinter key [key...]
- 求多個集合的交集
- sinterstore destination key [key...]
- 求多個集合的交集,並把結果儲存在destination集合中
- sinter key [key...]
- 並集運算
- sunion key [key...]
- 求多個集合的並集
- sunionstore destination key [key...]
- 求多個集合的並集,並把結果儲存在destination集合中

- sunion key [key...]
- 擴充套件命令
- sismember key member
- 檢視member在key中是否存在
- srandmember key [count]
- 集合key中隨機放回 count 個元素
- scard key
- 檢視集合個數

- sismember key member
5.5 有序字串集合 sorted set
sorted set跟set是比較類似的,集合中不允許出現重複的元素,那麼有啥區別呢?sorted set有順序,從小到大排序,更新操作非常快,訪問資料也非常高效。
應用場景:遊戲排名、微博熱點
常用命令:
- 獲得元素
- zscore key member
- 獲取有序集合中的某個元素的score值
- zrange key start stop [withscores]
- zrangebyscore key mim max [withscores] [limit offset count]
- zscore key member
- 新增元素
- zadd key score member [score member ...]

- 刪除元素
- zrem key member [member...]
- zremrangebyscore key min max

- 擴充套件查詢
- zincrby key increment member
- zscore key member
- zcount key min max

6 keys的通用操作
- keys *
- 檢視所有keys

- del key [key...]
- 刪除多個key
- exists key
- 判斷某個key是否存在,存在返回1,不存在返回0
- rename key newkey
- 重新命名某個key
- expire key seconds
- 設定某個key的生命期,過了這個時間就是過期資料
- ttl key
- 檢視該key的生命還剩下多少秒

- type key
- 檢視key的型別

7 redis的特性
7.1 多資料庫
redis最多支援16個數據,下標0-15表示第幾個資料庫。預設是在0號資料。切換資料庫可以通過select dbnumber 來切換,也可以通過move 來移動key從當前資料到指定的資料庫。

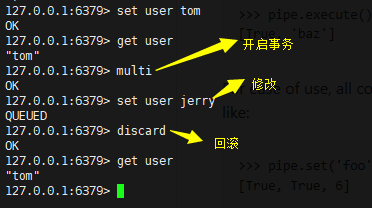
7.2 事務
事務的指令:multi、exec、discard。redis中,如果某個命令執行失敗,後面的命令還會繼續執行。multi,開啟事務,這個指令後的指令預設為在同一個事務內,exec等同於提交,discard等同於回滾。
8 redis的持久化
redis的高效能是因為資料都在記憶體中,如果資料庫重啟,則所有資料都會丟失,那麼如何進行資料持久化呢?
- RDB持久化
- 預設支援,在指定的時間內,把記憶體的資料寫入磁碟
- AOF持久化
- 以日誌的形式記錄每一個操作,啟動的時候,重新執行所有log
- 無持久化
- 不進行持久化,則認為redis的作用為快取,無需持久化資料
- RDB與AOF同時使用
8.1 RDB持久化
- 優勢
- redis資料庫僅包含一個檔案,對於檔案備份是非常方便的,如果系統出現災難時,較容易恢復
- 災難恢復時,備份檔案較為容易單獨轉移到其他儲存介質
- 資料量很大的時候,啟動速度快
- 劣勢
- 不能夠保證資料無丟失,資料丟失時間 = 當前時間-最近備份時間
- 子程序完成持久化工作,如果資料集很大的時候,可能會造成短時間內redis所在伺服器停止對外服務
- 配置
- RDB預設配置檔案中就有,可以檢視redis.conf檔案中關於save的設定

- save 900 1 :900秒內至少有1個數據變化,則進行持久化
- RDB預設配置檔案中就有,可以檢視redis.conf檔案中關於save的設定
-
-
-
- save 300 10 :300秒內至少有10個數據發生變化,則進行持久化
- save 60 10000 : 60秒內至少有1w個數據發生變化,則進行持久化

- dbfilename 則是命名當前持久檔案的名字
- dir,則是定義當前持久化檔案的存放路徑
-
-

8.2 AOF持久化
- 優勢
- 更高的資料安全性
- 每秒同步,最高丟失1s資料
- 每運算元同步,每次發生資料的變化都會立即記錄到磁碟中,效能最低
- append追加檔案備份
- 備份過程中出現問題,不會破壞之前的日誌備份
- 如果寫入了一半資料,然後出現系奔潰的問題,在redis下一次啟動之前,可以通過redis_check_aof工具解決資料一致性問題
- 如果日誌備份過大
- redis會自動啟動日誌重寫機制,append過程中,會把備份資料寫入到老的備份檔案中,並且會用一個新檔案,記錄此期間的修改資料語句
- AOF包含一個格式清晰的資料修改操作語句的日誌檔案
- 更高的資料安全性
- 劣勢
- 相同數量的資料集檔案,比RDB的要打
- AOF效率低於RDB
- 需要人員配置,非預設配置
- 配置
- 在redis.conf檔案中,配置一下內容
- appendonly yes:啟動appendonly,開啟AOF備份
- appendfilename "appendonly.aof" :AOF備份的檔名
- appendfsync always :每個修改操作同步備份一次
- appendfsync everysec:1s同步備份一次
- appendfsync no :不同步
- 測試配置
- 簡單測試案例
- redis中配置AOF,選擇每操作一次就備份的機制,增刪改資料後,執行flushall,然後通過備份檔案來恢復資料到flushall之前
- 步驟
- 啟動AOF,選擇每操作一次就備份
- appendonly yes
- appendfsync always
- 重啟redis
- /usr/local/redis/bin/redis-cli shutdown
- /usr/local/redis/bin/redis-server /etc/redis.conf
- 造資料
- 執行flushall
- 處理備份檔案
- vim /usr/local/redis/appendonly.aof
- 刪除flushall的操作記錄
-

- 重啟資料庫
- /usr/local/redis/bin/redis-cli shutdown
- /usr/local/redis/bin/redis-server /etc/redis.conf
- 檢查資料
- 啟動AOF,選擇每操作一次就備份
- 簡單測試案例
- 在redis.conf檔案中,配置一下內容


如果轉載,請註明博文來源: www.cnblogs.com/xinysu/ ,版權歸 部落格園 蘇家小蘿蔔 所有。望各位支援!