Spring之Bean學習
簡述:Spring框架主要是涉及到IOC(控制反轉)和AOP(切面程式設計)兩大重點
IOC和DI(依賴注入)其實就是等同的意思,就是建立物件和維護物件,放在一個容器裡,直接依賴注入即可使用
AOP的存在目的是為了解耦即高內聚,低耦合
Bean的取值範圍
Singleton:一個Spring容器中只有一個Bean的例項,此為Spring的預設配置,全容器共享一個例項
Prototype:每次呼叫新建一個Bean的例項
Request:Web專案中,給每一個http request新建一個Bean例項
Session
GlobalSession:這個只在portal應用中有用,給每一個global http session新建一個Bean例項
Bean的初始化和銷燬
1、java配置方式:使用@Bean的initMethod和destroyMethod(相當於xml配置的init-method和destory- method)
2、註解方式:利用JSR-250的@PostConstruct
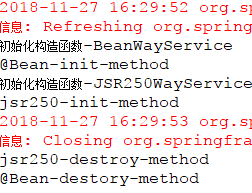
initMethod和destoryMethod指定BeanWayService類的init和destory方法在構造之後、Bean銷燬之前執行
程式碼及執行結果如下:
import org.springframework.context.annotation.Bean;
import org.springframework.context.annotation.ComponentScan;
import org.springframework.context.annotation.Configuration;
@Configuration // 聲明當前是配置類
@ComponentScan("com.pkb.prepost") // 自動掃描該包下的所有service、component、repository、controller
public class PrePostConfig
{
// 宣告bean例項
@Bean(initMethod = "init", destroyMethod = "destory")
BeanWayService beanWayService()
{
return new BeanWayService();
}
@Bean
JSR250WayService jsr250WayService()
{
return new JSR250WayService();
}
}
public class BeanWayService
{
public void init()
{
System.out.println("@Bean-init-method");
}
public BeanWayService()
{
super();
System.out.println("初始化建構函式-BeanWayService");
}
public void destory()
{
System.out.println("@Bean-destory-method");
}
}
import javax.annotation.PostConstruct;
import javax.annotation.PreDestroy;
public class JSR250WayService
{
@PostConstruct // 在建構函式執行之後執行
public void init()
{
System.out.println("jsr250-init-method");
}
public JSR250WayService()
{
super();
System.out.println("初始化建構函式-JSR250WayService");
}
@PreDestroy // 在Bean銷燬之前執行
public void destroy()
{
System.out.println("jsr250-destroy-method");
}
}
import org.springframework.context.annotation.AnnotationConfigApplicationContext;
public class Main
{
public static void main(String[] args)
{
AnnotationConfigApplicationContext context = new AnnotationConfigApplicationContext(
PrePostConfig.class);
BeanWayService service = context.getBean(BeanWayService.class);
JSR250WayService service1 = context.getBean(JSR250WayService.class);
context.close();
}
}

spring事件為Bean與Bean之間的訊息通訊提供了支援
1、自定義事件、繼承ApplicationEvent
2、定義事件監聽器,實現ApplicationListener
3、使用容器釋出事件
程式碼及執行結果如下:
import org.springframework.context.ApplicationEvent;
public class DemoEvent extends ApplicationEvent
{
private String msg;
public DemoEvent(Object source, String msg)
{
super(source);
this.msg = msg;
}
public String getMsg()
{
return msg;
}
public void setMsg(String msg)
{
this.msg = msg;
}
}
import org.springframework.context.ApplicationListener;
import org.springframework.stereotype.Component;
// 實現ApplicationListener介面並制定監聽的事件型別
@Component
public class DemoListenter implements ApplicationListener<DemoEvent>
{
// 使用onApplicationEvent方法對訊息進行接受處理
public void onApplicationEvent(DemoEvent event)
{
String msg = event.getMsg();
System.out.println("我(bean-demoListener)接收到了bean-demoPublisher釋出的訊息:" + msg);
}
}
import org.springframework.beans.factory.annotation.Autowired;
import org.springframework.context.ApplicationContext;
import org.springframework.stereotype.Component;
@Component
public class DemoPublisher
{
@Autowired
ApplicationContext applicationContext;// 注入applicationContext用來發布事件
// 使用publish方法來發布
public void publish(String msg)
{
applicationContext.publishEvent(new DemoEvent(this, msg));
}
}
import org.springframework.context.annotation.ComponentScan;
import org.springframework.context.annotation.Configuration;
@Configuration
@ComponentScan("com.pkb.event")
public class EventConfig
{}
import org.springframework.context.annotation.AnnotationConfigApplicationContext;
public class Main
{
public static void main(String[] args)
{
AnnotationConfigApplicationContext context = new AnnotationConfigApplicationContext(
EventConfig.class);
DemoPublisher demoPublisher = context.getBean(DemoPublisher.class);
demoPublisher.publish("hello application event");
context.close();
}
}

Spring Aware的目的是為了讓Bean獲得Spring容器的服務,因為ApplicationContext介面集成了
MessageSource介面、ApplicationEventPublisher介面和ResourceLoader介面,所以Bean集成了
ApplicationConextAware可以獲得Spring容器的所有服務
程式碼及執行結果如下:
import org.springframework.context.annotation.ComponentScan;
import org.springframework.context.annotation.Configuration;
@Configuration
@ComponentScan("com.pkb.aware")
public class AwareConfig
{}
import org.apache.commons.io.IOUtils;
import org.springframework.beans.factory.BeanNameAware;
import org.springframework.context.ResourceLoaderAware;
import org.springframework.core.io.Resource;
import org.springframework.core.io.ResourceLoader;
import org.springframework.stereotype.Service;
// 實現BeanNameAware, ResourceLoaderAware介面,獲得Bean名稱和資源載入的所有服務
@Service
public class AwareService implements BeanNameAware, ResourceLoaderAware
{
private String beanName;
private ResourceLoader loader;
// 需重寫setResourceLoader方法
public void setResourceLoader(ResourceLoader resourceLoader)
{
this.loader = resourceLoader;
}
// 需重寫setBeanName方法
public void setBeanName(String beanName)
{
this.beanName = beanName;
}
public void outputResult()
{
System.out.println("Bean的名稱為: " + beanName);
Resource resource = loader.getResource("classpath:com/pkb/aware/test.txt");
try
{
System.out.println(
"ResourceLoader載入檔案的內容為: " + IOUtils.toString(resource.getInputStream()));
}
catch (Exception e)
{
e.printStackTrace();
}
}
public ResourceLoader getLoader()
{
return loader;
}
public void setLoader(ResourceLoader loader)
{
this.loader = loader;
}
public String getBeanName()
{
return beanName;
}
}
import org.springframework.context.annotation.AnnotationConfigApplicationContext;
public class Main
{
public static void main(String[] args)
{
AnnotationConfigApplicationContext context = new AnnotationConfigApplicationContext(
AwareConfig.class);
AwareService awareService = context.getBean(AwareService.class);
awareService.outputResult();
context.close();
}
}
//在com.pkb.aware包下建立test.txt檔案並任意寫入內容

spring EL表達方式
1、注入普通字元
2、注入作業系統屬性
3、注入表示式運算結果
4、注入其他Bean的屬性
5、注入檔案內容
6、注入網址內容
7、注入屬性檔案
程式碼及結果如下:
import org.springframework.beans.factory.annotation.Value;
import org.springframework.stereotype.Service;
@Service
public class DemoService
{
@Value("其他類的屬性") // 注入普通字串
private String another;
public String getAnother()
{
return another;
}
public void setAnother(String another)
{
this.another = another;
}
}
import org.apache.commons.io.IOUtils;
import org.springframework.beans.factory.annotation.Autowired;
import org.springframework.beans.factory.annotation.Value;
import org.springframework.context.annotation.Bean;
import org.springframework.context.annotation.ComponentScan;
import org.springframework.context.annotation.Configuration;
import org.springframework.context.annotation.PropertySource;
import org.springframework.context.support.PropertySourcesPlaceholderConfigurer;
import org.springframework.core.env.Environment;
import org.springframework.core.io.Resource;
@Configuration
@ComponentScan("com.pkb.el")
@PropertySource("classpath:com/pkb/el/test.properties")
public class ElConfig
{
@Value("I Love You!") // 注入普通字元
private String normal;
@Value("#{systemProperties['os.name']}") // 注入作業系統
private String osName;
// 注入表示式結果
@Value("#{T(java.lang.Math).random()*100.0}")
private double randomNumber;
// 注入其他Bean屬性
@Value("#{demoService.another}")
private String fromAnother;
// 注入檔案資源
@Value("classpath:com/pkb/el/test.txt")
private Resource testFile;
// 注入網址資源
@Value("http://www.baidu.com")
private Resource testUrl;
// 注入配置檔案
@Value("${book.name}")
private String bookName;
@Autowired
private Environment environment;
@Bean
public static PropertySourcesPlaceholderConfigurer configurer()
{
return new PropertySourcesPlaceholderConfigurer();
}
public void outputResource()
{
try
{
System.out.println(normal);
System.out.println(osName);
System.out.println(randomNumber);
System.out.println(fromAnother);
System.out.println(IOUtils.toString(testFile.getInputStream()));
System.out.println(IOUtils.toString(testUrl.getInputStream()));
System.out.println(bookName);
System.out.println(environment.getProperty("book.author"));
}
catch (Exception e)
{
e.printStackTrace();
}
}
}
import org.springframework.context.annotation.AnnotationConfigApplicationContext;
public class Main
{
public static void main(String[] args)
{
AnnotationConfigApplicationContext context = new AnnotationConfigApplicationContext(
ElConfig.class);
ElConfig service = context.getBean(ElConfig.class);
service.outputResource();
context.close();
}
}
//在com.pkb.el包下建立test.properties (book.author = zhangsan
//book.name = spring boot)和 test.txt (內容任意)

Spring支援AspectJ的註解切面程式設計
1、使用@Aspect宣告是一個切面
2、使用@After、@Before、@Around定義建言(advice),可直接將攔截規則(切點)作為引數
3、其中@After、@Before、@Around引數的攔截規則為切點(PointCut),為了使切點複用,
可使用@PointCut專門定義攔截規則,然後在@After、@Before、@Around引數中呼叫
4、其中符合條件的每一個被攔截處為連線點(JoinPoint)
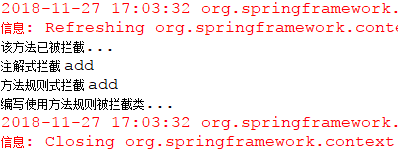
程式碼及執行結果如下:
//註解本身沒有功能,和xml一樣都是一種元資料即解釋資料的資料
import java.lang.annotation.Documented;
import java.lang.annotation.ElementType;
import java.lang.annotation.Retention;
import java.lang.annotation.RetentionPolicy;
import java.lang.annotation.Target;
@Target(ElementType.METHOD)
@Retention(RetentionPolicy.RUNTIME)
@Documented
public @interface Action {
String name();
}
import org.springframework.context.annotation.ComponentScan;
import org.springframework.context.annotation.Configuration;
import org.springframework.context.annotation.EnableAspectJAutoProxy;
@Configuration // 聲明當前類為配置類
@ComponentScan("com.pkb.aop")
@EnableAspectJAutoProxy // 開啟spring對AspectJ代理的支援
public class AopConfig
{
}
import org.springframework.stereotype.Service;
@Service
public class DemoAnnotationService
{
@Action(name = "add")
public void add()
{
System.out.println("該方法已被攔截...");
}
}
import org.springframework.stereotype.Service;
@Service
public class DemoMethodService
{
public void add()
{
System.out.println("編寫使用方法規則被攔截類...");
}
}
import java.lang.reflect.Method;
import org.aspectj.lang.JoinPoint;
import org.aspectj.lang.annotation.After;
import org.aspectj.lang.annotation.Aspect;
import org.aspectj.lang.annotation.Before;
import org.aspectj.lang.annotation.Pointcut;
import org.aspectj.lang.reflect.MethodSignature;
import org.springframework.stereotype.Component;
@Aspect // 宣告一個切面
@Component // 讓此切面成為spring容器管理的bean
public class LogAspect
{
// 宣告切點
@Pointcut("@annotation(com.pkb.aop.Action)")
public void annotationPointCut()
{
System.out.println("pointcut方法被呼叫...");
}
@After("execution(* com.pkb.aop.DemoAnnotationService.*(..))")
public void after(JoinPoint joinPoint)
{
MethodSignature signature = (MethodSignature)joinPoint.getSignature();
Method method = signature.getMethod();
Action action = method.getAnnotation(Action.class);
System.out.println("註解式攔截 " + action.name());
}
@Before("execution(* com.pkb.aop.DemoMethodService.*(..))")
public void before(JoinPoint joinPoint)
{
MethodSignature signature = (MethodSignature)joinPoint.getSignature();
Method method = signature.getMethod();
System.out.println("方法規則式攔截 " + method.getName());
}
}
import org.springframework.context.annotation.AnnotationConfigApplicationContext;
public class Main
{
public static void main(String[] args)
{
AnnotationConfigApplicationContext context = new AnnotationConfigApplicationContext(
AopConfig.class);
DemoAnnotationService service = context.getBean(DemoAnnotationService.class);
DemoMethodService service1 = context.getBean(DemoMethodService.class);
service.add();
service1.add();
context.close();
}
}

