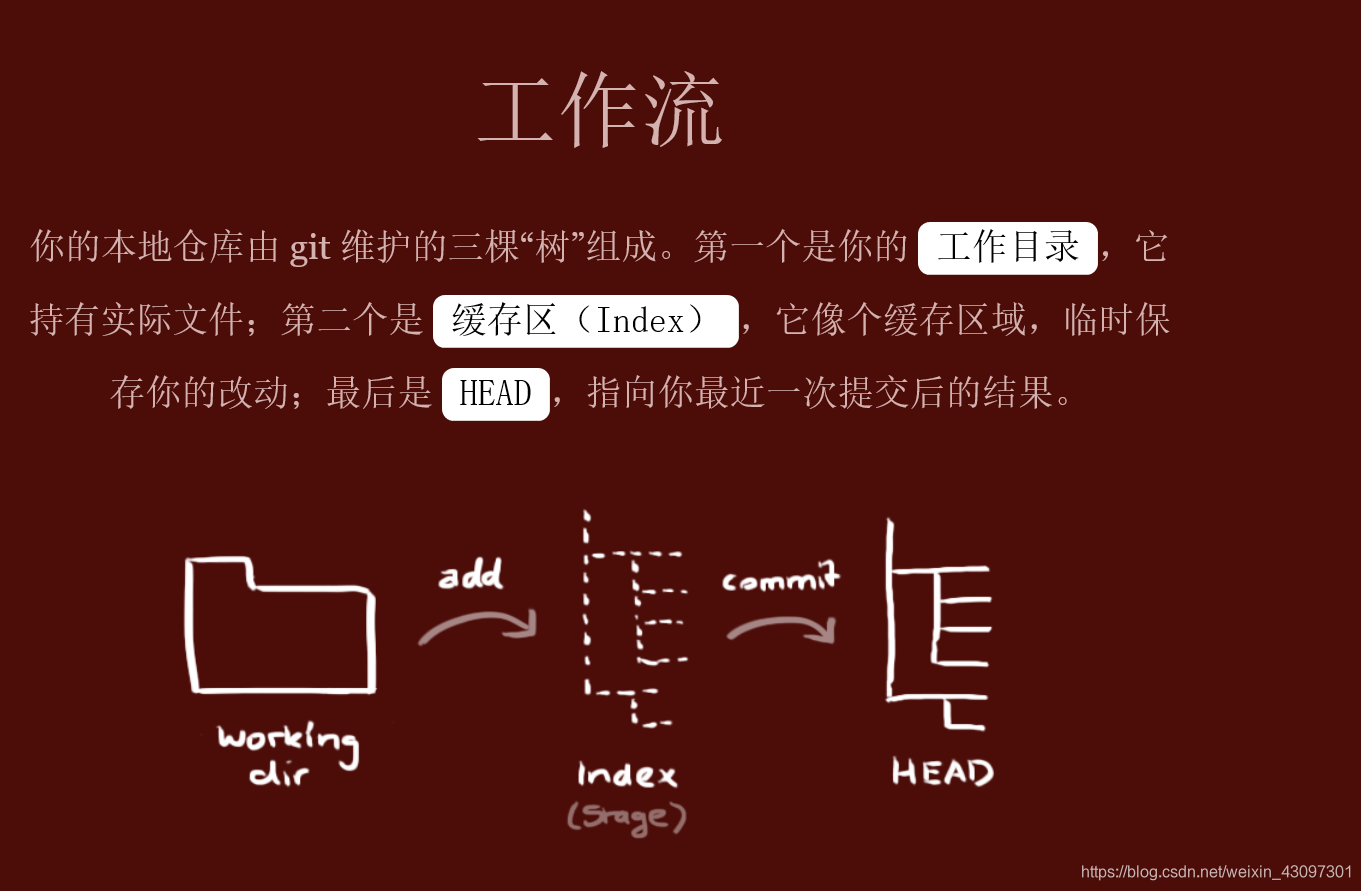
#git工作流程
常用程式碼總覽
也可直接進行官網git指南檢視 連結如下:
https://git-scm.com/book/zh/v2?tdsourcetag=s_pcqq_aiomsg
中文版:https://git-scm.com/book/zh/v2
git init #建立新的 Git 倉庫
git status #命令用於檢視專案的當前狀態。
git add test #新增test文件進入快取區
git status #命令來新增檔案.
git commit -m "註釋" #將快取區內容新增到倉庫中
git status
history # 檢視日誌
git log # 檢視 提交的歷史 , 之前git commit -m "註釋" 
1.設定 git 幫我們管理
用 git init 在目錄中建立新的 Git 倉庫。 你可以在任何時候、
任何目錄中這麼做,完全是本地化的working dir。
#進入需要管理的檔案後輸入
[email protected]ubuntu:~/git$ git init
#然後 ls -a 檢視檔案,
[email protected]ubuntu:~/git$ ls -a
.  ..  .git    #隱藏檔案
2.檔案編寫
使用 git add 命令將想要快照的內容寫入快取區index,
而執行 git commit 將快取區內容新增到倉庫中head。
               #用vim編寫一個檔案
[email protected]ubuntu:~/git$ vim test                         #test檔名任意
             #然後用 git add test  新增到快取區
[email protected]ubuntu:~/git$ git add test
			#git status進入快取區檢視

[email protected]ubuntu:~/git$ git status
#(輸出):
On branch master
Changes to be committed:
  (use "git reset HEAD <file>..." to unstage)

	new file:   test1
如果git沒有賬號,會出現下面這樣的情況
git commit -m 之後如果git沒有賬號,會出現下面這樣的情況,
*** Please tell me who you are.              #請告訴我你是誰。

Run												#執行

  git config --global user.email "[email protected]"
 								# git config——全域性使用者。你的郵件“[email protected]”  設定你的email
  git config --global user.name "Your Name"
							  #  git config——全域性使用者。  設定你的使用者名稱
to set your account's default identity.   #設定帳戶的預設標識。
Omit --global to set the identity only in this repository.
										#省略——全域性設定,僅在此儲存庫中設定標識。


按照提示進行編輯就行了
u:~/git$  git config --global user.email '[email protected]'    #隨便設定
u:~/git$  git config --global user.name 'test'		  #隨便設定

然後再 git commit -m "標記的內容。。版本號"
3.檢視 提交的歷史
#git log
檢視 提交的歷史 , 之前git commit -m “註釋” 的 註釋 內容這裡就能很快的幫我們早找提交的版本,
方便進行版本替換,恢復版本等
[email protected]ubuntu:~/git$ git log
(系統輸出:)
commit dc0e56113ea18565a7ba049cd9e5d1f329daabc8 (HEAD -> master)	#版本id 更新 恢復 對比都用得到
Author: test <[email protected]>
Date:   Thu Nov 15 18:29:48 2018 -0800

    第二次

commit 4b84a617552fec83a8690957a52e1c218d633fff
Author: test <[email protected]>										# 使用者名稱 和 email  之前設定的
Date:   Thu Nov 15 18:23:33 2018 -0800						#  時間

    第一次
[email protected]ubuntu:~/git$
4.檢視快取區index 的改動,
執行 git diff 來檢視執行 git status 的結果的詳細資訊。
git diff 命令顯示已寫入快取與已修改但尚未寫入快取的改動的區別。git diff 有兩個主要的應用場景。
尚未快取的改動:git diff 即工作區working dir 的 改動,比如刪除檔案,建立檔案
檢視已快取的改動: git diff cached
#引數 cached 為git log查詢歷史的 commit dc0e56113ea18565a7ba049cd9e5d1f329daabc8 (HEAD -> master)
#裡面的 dc0e56113ea18565a7ba049cd9e5d1f329daabc8地址,進行檢視制定版本 的新增更改的內容。
檢視已快取的與未快取的所有改動:git diff HEAD
顯示摘要而非整個 diff:git diff --stat
[email protected]ubuntu:~/git$ git diff 4b84a617552fec83a8690957a52e1c218d633fff
											 #上面根據版本id進行檢視
(系統輸出:)
diff --git a/test b/test
index 9b3b33b..c716e84 100644
--- a/test
+++ b/test
@@ -1,2 +1,30 @@
 print("hello world")							#這次更新版本的內容有那些
 print("asdasdasadsdad"")
+sdddddddddddddddddddd
+asddddddddd
+asdddddddddddddddd
+asdasdasd
+
+aaaaaaaa
diff --git a/test.py b/test.py
deleted file mode 100644
index 3cf5162..0000000

5.建立分支
git checckout -b (分支的名字)
[email protected]ubuntu:~/git$ git checkout -b dev  #新建一個名為dev的分支
(系統輸出:)
D	test.py
Switched to a new branch 'dev'       #已經切換到分支 dev
[email protected]ubuntu:~/git$
6.分支合併
[email protected]ubuntu:~/git$ git checkout dev    #切換到分支 dev
 (系統輸出:)
M	test
D	test.py
Switched to branch 'dev'
[email protected]ubuntu:~/git$ ls					#檢視列表
test  test1
[email protected]ubuntu:~/git$ vim test				#vim 編輯 test文字

#(編輯內容,下文隨意編輯的)
print("hello world")
print("asdasdasadsdad"")
zzzzzzzzzzzzzzzzzzzzzzz
xxxxxxxxxxxxxxxxxxxxxxx
cccccccccccccccccccccc
vvvvvvvvvvvvvvvvvvvvvv

[email protected]ubuntu:~/git$ git status			#檢視工作區
(系統輸出:)
On branch dev
Changes not staged for commit:
  (use "git add <file>..." to update what will be committed)
  (use "git checkout -- <file>..." to discard changes in working directory)

	modified:   test

[email protected]ubuntu:~/git$ git commit -am "測試1"     #git commit -m "註釋"   將快取區內容新增到倉庫中
(系統輸出:)									#git add test	新增到快取區
[dev f090128] 測試1							#git commit -am "測試1"  為前面兩個連用
 1 file changed, 1 insertion(+), 1 deletion(-)

[email protected]ubuntu:~/git$ git checkout master			#切換分支為master
Switched to branch 'master'
[email protected]ubuntu:~/git$ ls						#檢視列表
test  test1
[email protected]ubuntu:~/git$ less test				#檢視文字test   也可以用 vim
#(文字內容)
print("hello world")
print("asdasdasadsdad"")
zzzzzzzzzzzzzzzzzzzzzzz
xxxxxxxxxxxxxxxxxxxxxxx
cccccccccccccccccccccc						#和dev分支中的少一排vvvvvvvv

[email protected]ubuntu:~/git$ git merge dev			#將dev分支和master分支進行合併
Updating a9af502..f090128
Fast-forward
 test | 2 +-
 1 file changed, 1 insertion(+), 1 deletion(-)
[email protected]ubuntu:~/git$ less test				#檢視master分支中的test
#(文字內容)
print("hello world")
print("asdasdasadsdad"")
zzzzzzzzzzzzzzzzzzzzzzz
xxxxxxxxxxxxxxxxxxxxxxx
cccccccccccccccccccccc
vvvvvvvvvvvvvvvvvvvvvv
上面的文dev 更改版本後,master沒進行更改,然後在合併,
還有一種為兩個分支都修改了,最後合併出現版本衝突。
[email protected]ubuntu:~/git$ git merge dev			#合併
(系統輸出:)
Auto-merging test
CONFLICT (content): Merge conflict in test
Automatic merge failed; fix conflicts and then commit the result.
	#自動合併testCONFLICT(內容):testAutomatic Merge中的Merge conflict失敗:修復衝突,然後提交結果。

[email protected]ubuntu:~/git$ git status
(系統輸出:)
On branch master
You have unmerged paths.
  (fix conflicts and run "git commit")
  (use "git merge --abort" to abort the merge)

Unmerged paths:
  (use "git add <file>..." to mark resolution)

	both modified:   test

[email protected]ubuntu:~/git$ vim test
print("hello world")
print("asdasdasadsdad"")
zzzzzzzzzzzzzzzzzzzzzzz
xxxxxxxxxxxxxxxxxxxxxxx
cccccccccccccccccccccc
vvvvvvvvvvvvvvvvvvvvvv
<<<<<<< HEAD
nnnnnnnnnnnnnnnnnnnn			#master 分支修改的
=======
bbbbbbbbbbbbbbbbbbbbb		  #dev 分支下修改的

>>>>>>> dev
#這裡進行修改,修改後,git commit -am "解決"  就行了
7.推送到遠端倉庫
1.新建專案,這裡用的是碼雲Gitee

這裡建議 不要 打鉤 使用Readme檔案初始化這個專案。如果兩次推送的版本不連續會出現錯誤,
比如在公司推得3版本,回到家在推5版本

複製地址 https:// 你建立的專案地址
然後,我們在本地庫上使用命令git remote add把它和碼雲的遠端庫關聯:
git remote add origin [email protected]com:liaoxuefeng/learngit.git
之後,就可以正常地用git push和git pull推送了!
如果在使用命令git remote add時報錯:
git remote add origin [email protected]com:liaoxuefeng/learngit.git
fatal: remote origin already exists.
這說明本地庫已經關聯了一個名叫origin的遠端庫,此時,可以先用git remote -v檢視遠端庫資訊:
git remote -v
origin    [email protected]com:michaelliao/learngit.git (fetch)
origin    [email protected]com:michaelliao/learngit.git (push)
可以看到,本地庫已經關聯了origin的遠端庫,並且,該遠端庫指向GitHub。
我們可以刪除已有的GitHub遠端庫:
git remote rm origin
再關聯碼雲的遠端庫(注意路徑中需要填寫正確的使用者名稱):
git remote add origin [email protected]com:liaoxuefeng/learngit.git
此時,我們再檢視遠端庫資訊:
git remote -v
origin    [email protected]com:liaoxuefeng/learngit.git (fetch)
origin    [email protected]com:liaoxuefeng/learngit.git (push)
現在可以看到,origin已經被關聯到碼雲的遠端庫了。通過git push命令就可以把本地庫推送到Gitee上。
有的小夥伴又要問了,一個本地庫能不能既關聯GitHub,又關聯碼雲呢?
答案是肯定的,因為git本身是分散式版本控制系統,可以同步到另外一個遠端庫,當然也可以同步到另外兩個遠端庫。
使用多個遠端庫時,我們要注意,git給遠端庫起的預設名稱是origin,如果有多個遠端庫,我們需要用不同的名稱來標識不同的遠端庫。
仍然以learngit本地庫為例,我們先刪除已關聯的名為origin的遠端庫:
git remote rm origin
然後,先關聯GitHub的遠端庫:
git remote add github [email protected]com:michaelliao/learngit.git
注意,遠端庫的名稱叫github,不叫origin了。
接著,再關聯碼雲的遠端庫:
git remote add gitee [email protected]:liaoxuefeng/learngit.git
同樣注意,遠端庫的名稱叫gitee,不叫origin。
現在,我們用git remote -v檢視遠端庫資訊,可以看到兩個遠端庫:
git remote -v
gitee    [email protected]com:liaoxuefeng/learngit.git (fetch)
gitee    [email protected]com:liaoxuefeng/learngit.git (push)
github    [email protected]com:michaelliao/learngit.git (fetch)
github    [email protected]com:michaelliao/learngit.git (push)
如果要推送到GitHub,使用命令:
git push github master
如果要推送到碼雲,使用命令:
git push gitee master
這樣一來,我們的本地庫就可以同時與多個遠端庫互相同步:
┌─────────┐ ┌─────────┐
│ GitHub │ │ Gitee │
└─────────┘ └─────────┘
▲ ▲
└─────┬─────┘
│
┌─────────────┐
│ Local Repo │
└─────────────┘
參考地址:https://www.liaoxuefeng.com/wiki/0013739516305929606dd18361248578c67b8067c8c017b000/00150154460073692d151e784de4d718c67ce836f72c7c4000
注意
一般我們總會有些檔案無需納入 Git 的管理,也不希望它們總出現在未跟蹤檔案列表。通常都是些自動生成的檔案,比如日誌檔案,或者編譯過程中建立的臨時檔案等。我們可以建立一個名為 .gitignore 的檔案,列出要忽略的檔案模式。來看一個實際的例子:
$ cat .gitignore
    *.[oa]
    *~
第一行告訴 Git 忽略所有以 .o 或 .a 結尾的檔案。一般這類物件檔案和存檔檔案都是編譯過程中出現的,我們用不著跟蹤它們的版本。第二行告訴 Git 忽略所有以波浪符(~)結尾的檔案,許多文字編輯軟體(比如 Emacs)都用這樣的檔名儲存副本。此外,你可能還需要忽略 log,tmp 或者 pid 目錄,以及自動生成的文件等等。要養成一開始就設定好 .gitignore 檔案的習慣,以免將來誤提交這類無用的檔案。
檔案 .gitignore 的格式規範如下:
•所有空行或者以註釋符號 # 開頭的行都會被 Git 忽略。
•可以使用標準的 glob 模式匹配。
•匹配模式最後跟反斜槓(/)說明要忽略的是目錄。
•要忽略指定模式以外的檔案或目錄,可以在模式前加上驚歎號(!)取反。
所謂的 glob 模式是指 shell 所使用的簡化了的正則表示式。星號(*)匹配零個或多個任意字元;[abc] 匹配任何一個列在方括號中的字元(這個例子要麼匹配一個 a,要麼匹配一個 b,要麼匹配一個 c);問號(?)只匹配一個任意字元;如果在方括號中使用短劃線分隔兩個字元,表示所有在這兩個字元範圍內的都可以匹配(比如 [0-9] 表示匹配所有 0 到 9 的數字)。
我們再看一個 .gitignore 檔案的例子:
#此為註釋 – 將被 Git 忽略
    # 忽略所有 .a 結尾的檔案
    *.a
    # 但 lib.a 除外
    !lib.a
    # 僅僅忽略專案根目錄下的 TODO 檔案,不包括 subdir/TODO
    /TODO
    # 忽略 build/ 目錄下的所有檔案
    build/
    # 會忽略 doc/notes.txt 但不包括 doc/server/arch.txt
    doc/*.txt
    *.pyc
    #忽略pycharm中的pyc快取檔案
