
Netty應用例項學習
Netty 是一個 Java NIO 客戶端伺服器框架,使用它可以快速簡單地開發網路應用程式,比如伺服器和客戶端的協議。Netty 大大簡化了網路程式的開發過程比如 TCP 和 UDP 的 socket 服務的開發。
本文旨在通過例項學習Netty的一些用法。
【1】Netty 實現聊天功能
①SimpleChatServerHandler 服務端處理器
handler 是由 Netty 生成用來處理 I/O 事件的,SimpleChatServerHandler例項如下:
package com.nett.chat.handler;

import io.netty.channel.Channel;
import io.netty.channel.ChannelHandlerContext;
import io.netty.channel.SimpleChannelInboundHandler;
import io.netty.channel.group.ChannelGroup;
import io.netty.channel.group.DefaultChannelGroup;
import io.netty.util.concurrent.GlobalEventExecutor;

/**
 * Created by Janus on 2018/11/20.
 */
public class SimpleChatServerHandler extends SimpleChannelInboundHandler<String> { // (1)

    public static ChannelGroup channels = new DefaultChannelGroup(GlobalEventExecutor.INSTANCE);

    @Override
    public void handlerAdded(ChannelHandlerContext ctx) throws Exception { // (2)
        Channel incoming = ctx.channel();
        for (Channel channel : channels) {
            channel.writeAndFlush("[SERVER] - " + incoming.remoteAddress() + " 加入\n");
        }
        channels.add(ctx.channel());
    }
    @Override
    public void handlerRemoved(ChannelHandlerContext ctx) throws Exception { // (3)
        Channel incoming = ctx.channel();
        for (Channel channel : channels) {
            channel.writeAndFlush("[SERVER] - " + incoming.remoteAddress() + " 離開\n");
        }
        channels.remove(ctx.channel());
    }
    @Override
    protected void channelRead0(ChannelHandlerContext ctx, String s) throws Exception { // (4)
        Channel incoming = ctx.channel();
        for (Channel channel : channels) {
            if (channel != incoming){
                channel.writeAndFlush("[" + incoming.remoteAddress() + "]" + s + "\n");
            } else {
                channel.writeAndFlush("[you]" + s + "\n");
            }
        }
    }
    @Override
    public void channelActive(ChannelHandlerContext ctx) throws Exception { // (5)
        Channel incoming = ctx.channel();
        System.out.println("SimpleChatClient:"+incoming.remoteAddress()+"線上");
    }
    @Override
    public void channelInactive(ChannelHandlerContext ctx) throws Exception { // (6)
        Channel incoming = ctx.channel();
        System.out.println("SimpleChatClient:"+incoming.remoteAddress()+"掉線");
    }
    @Override
    public void exceptionCaught(ChannelHandlerContext ctx, Throwable cause) { // (7)
        Channel incoming = ctx.channel();
        System.out.println("SimpleChatClient:"+incoming.remoteAddress()+"異常");
        // 當出現異常就關閉連線
        cause.printStackTrace();
        ctx.close();
    }
}
① SimpleChatServerHandler 繼承自SimpleChannelInboundHandler,這個類實現了ChannelInboundHandler介面,ChannelInboundHandler 提供了許多事件處理的介面方法,然後你可以覆蓋這些方法。現在僅僅只需要繼承 SimpleChannelInboundHandler 類而不是你自己去實現介面方法。
SimpleChannelInboundHandler繼承示意圖如下(ctrl+shift+alt+u IDEA下檢視):
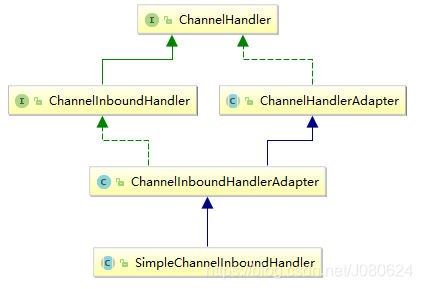
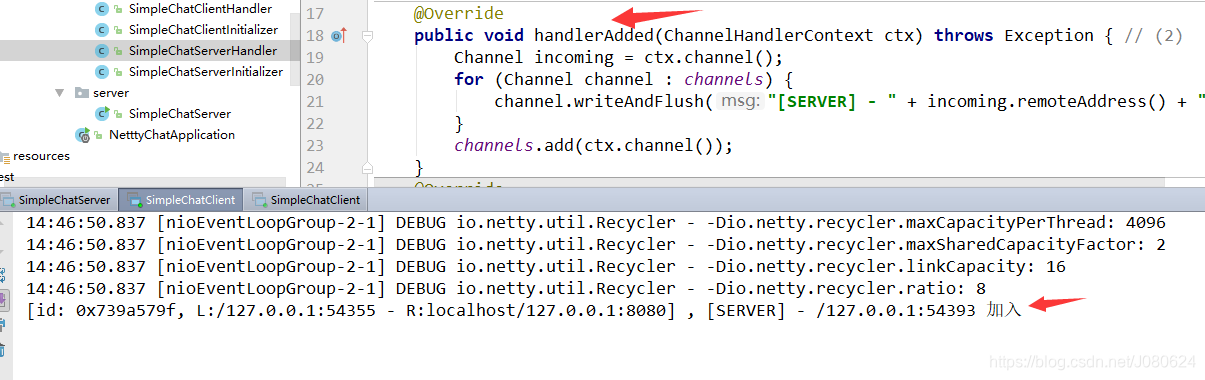
② 覆蓋了 handlerAdded() 事件處理方法。每當從服務端收到新的客戶端連線時,客戶端的 Channel 存入ChannelGroup列表中,並通知列表中的其他客戶端 Channel。
③ 覆蓋了 handlerRemoved() 事件處理方法。每當從服務端收到客戶端斷開時,客戶端的 Channel 移除 ChannelGroup 列表中,並通知列表中的其他客戶端 Channel。
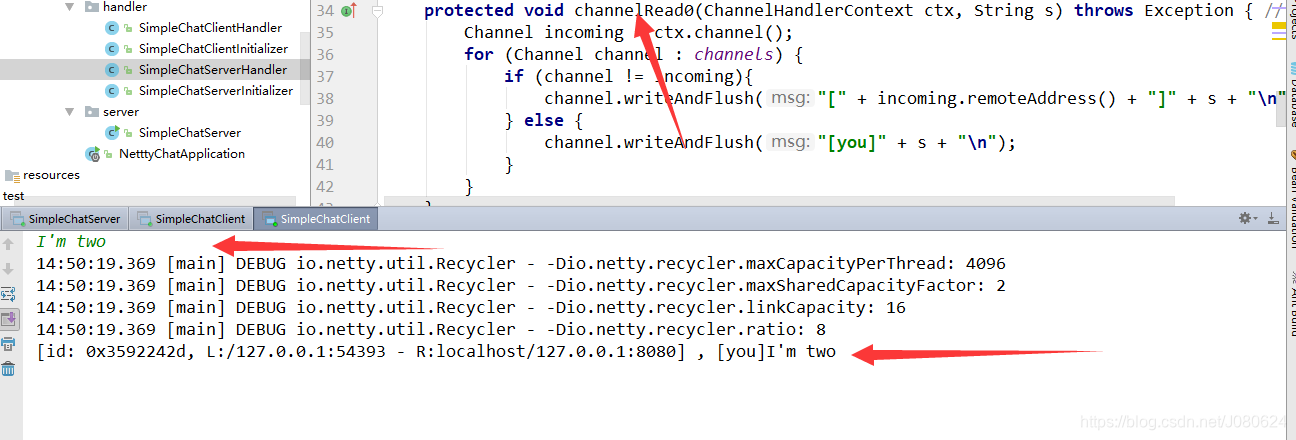
④ 覆蓋了 channelRead0() 事件處理方法。每當從服務端讀到客戶端寫入資訊時,將資訊轉發給其他客戶端的 Channel。其中如果你使用的是 Netty 5.x 版本時,需要把 channelRead0() 重新命名為messageReceived()。
⑤ 覆蓋了 channelActive() 事件處理方法。服務端監聽到客戶端活動。
⑥ 覆蓋了 channelInactive() 事件處理方法。服務端監聽到客戶端不活動。
⑦ exceptionCaught() 事件處理方法是當出現 Throwable 物件才會被呼叫,即當 Netty 由於 IO 錯誤或者處理器在處理事件時丟擲的異常時。在大部分情況下,捕獲的異常應該被記錄下來並且把關聯的 channel 給關閉掉。然而這個方法的處理方式會在遇到不同異常的情況下有不同的實現,比如你可能想在關閉連線之前傳送一個錯誤碼的響應訊息。
② SimpleChatServerInitializer
SimpleChatServerInitializer 用來增加多個的處理類到 ChannelPipeline 上,包括編碼、解碼、SimpleChatServerHandler 等。
例項如下:
public class SimpleChatServerInitializer extends
ChannelInitializer<SocketChannel> {
	@Override
	public void initChannel(SocketChannel ch) throws Exception {
		ChannelPipeline pipeline = ch.pipeline();
		pipeline.addLast("framer", new DelimiterBasedFrameDecoder(8192, Delimiters.lineDelimiter()));
		pipeline.addLast("decoder", new StringDecoder());
		pipeline.addLast("encoder", new StringEncoder());
		pipeline.addLast("handler", new SimpleChatServerHandler());
		System.out.println("SimpleChatClient:"+ch.remoteAddress() +"連線上");
	}
}
③SimpleChatServer
編寫一個 main() 方法來啟動服務端。
SimpleChatServer例項如下:
import com.nett.chat.handler.SimpleChatServerInitializer;
import io.netty.bootstrap.ServerBootstrap;
import io.netty.channel.ChannelFuture;
import io.netty.channel.ChannelOption;
import io.netty.channel.EventLoopGroup;
import io.netty.channel.nio.NioEventLoopGroup;
import io.netty.channel.socket.nio.NioServerSocketChannel;

/**
 * Created by Janus on 2018/11/20.
 */
public class SimpleChatServer {
    private int port;

    public SimpleChatServer(int port) {
        this.port = port;
    }

    public void run() throws Exception {
        EventLoopGroup bossGroup = new NioEventLoopGroup(); // (1)
        EventLoopGroup workerGroup = new NioEventLoopGroup();
        try {
            ServerBootstrap b = new ServerBootstrap(); // (2)
            b.group(bossGroup, workerGroup)
                    .channel(NioServerSocketChannel.class) // (3)
                    .childHandler(new SimpleChatServerInitializer()) //(4)
                    .option(ChannelOption.SO_BACKLOG, 128) // (5)
                    .childOption(ChannelOption.SO_KEEPALIVE, true); // (6)
            System.out.println("SimpleChatServer 啟動了");
            // 繫結埠,開始接收進來的連線
            ChannelFuture f = b.bind(port).sync(); // (7)
            // 等待伺服器 socket 關閉 。
            // 在這個例子中,這不會發生,但你可以優雅地關閉你的伺服器。
            f.channel().closeFuture().sync();
        } finally {
            workerGroup.shutdownGracefully();
            bossGroup.shutdownGracefully();
            System.out.println("SimpleChatServer 關閉了");
        }
    }

    public static void main(String[] args) throws Exception {
        int port;
        if (args.length > 0) {
            port = Integer.parseInt(args[0]);
        } else {
            port = 8080;
        }
        new SimpleChatServer(port).run();
    }
}
至於1234567標註對應的講解,參考博文Netty基礎入門講解,此處不再贅述。
④ SimpleChatClientHandler客戶端處理器
客戶端的處理類比較簡單,只需要將讀到的資訊打印出來即可。
public class SimpleChatClientHandler extends SimpleChannelInboundHandler<String> {
    @Override
    protected void channelRead0(ChannelHandlerContext ctx, String s) throws Exception {
        Channel channel = ctx.channel();
        System.out.println(channel+" , "+s);
    }
}
⑤ SimpleChatClientInitializer
與服務端類似,不再贅述。
例項如下:
import io.netty.channel.ChannelInitializer;
import io.netty.channel.ChannelPipeline;
import io.netty.channel.socket.SocketChannel;
import io.netty.handler.codec.DelimiterBasedFrameDecoder;
import io.netty.handler.codec.Delimiters;
import io.netty.handler.codec.string.StringDecoder;
import io.netty.handler.codec.string.StringEncoder;

/**
 * Created by Janus on 2018/11/20.
 */
public class SimpleChatClientInitializer extends ChannelInitializer<SocketChannel> {
    @Override
    public void initChannel(SocketChannel ch) throws Exception {
        ChannelPipeline pipeline = ch.pipeline();
        pipeline.addLast("framer", new DelimiterBasedFrameDecoder(8192, Delimiters.lineDelimiter()));
        pipeline.addLast("decoder", new StringDecoder());
        pipeline.addLast("encoder", new StringEncoder());
        pipeline.addLast("handler", new SimpleChatClientHandler());
    }
}
⑥ SimpleChatClient
編寫一個 main() 方法來啟動客戶端。
例項如下:
import com.nett.chat.handler.SimpleChatClientInitializer;
import io.netty.bootstrap.Bootstrap;
import io.netty.channel.Channel;
import io.netty.channel.EventLoopGroup;
import io.netty.channel.nio.NioEventLoopGroup;
import io.netty.channel.socket.nio.NioSocketChannel;

import java.io.BufferedReader;
import java.io.InputStreamReader;

/**
 * Created by Janus on 2018/11/20.
 */
public class SimpleChatClient {

    public static void main(String[] args) throws Exception{
        new SimpleChatClient("localhost", 8080).run();
    }
    private final String host;
    private final int port;
    public SimpleChatClient(String host, int port){
        this.host = host;
        this.port = port;
    }
    public void run() throws Exception {
        EventLoopGroup group = new NioEventLoopGroup();
        try {
            Bootstrap bootstrap = new Bootstrap()
                    .group(group)
                    .channel(NioSocketChannel.class)
                    .handler(new SimpleChatClientInitializer());
            //這裡使用connect instead of bind
            Channel channel = bootstrap.connect(host, port).sync().channel();
            //從控制檯讀取資料
            BufferedReader in = new BufferedReader(new InputStreamReader(System.in));
            //迴圈將讀取的資料傳送
            while (true) {
                channel.writeAndFlush(in.readLine() + "\r\n");
            }
        } catch (Exception e) {
            e.printStackTrace();
        } finally {
            group.shutdownGracefully();
        }
    }
}
⑦ 執行效果
先執行 SimpleChatServer,再可以執行多個 SimpleChatClient,控制檯輸入文字繼續測試。
-
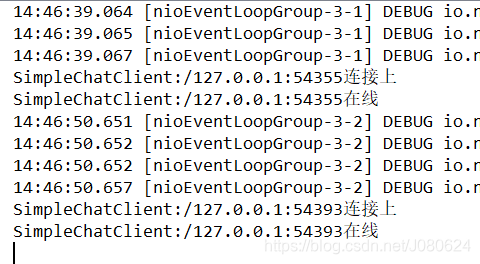
分別啟動兩個client,服務端顯示如下:
-
當第二個客戶端加入時,第一個客戶端收到服務端發來訊息如下:
-
當第二個客戶端輸入字串時,第二個客戶端接收到伺服器發來的訊息如下:
-
當第二個客戶端輸入字串時,第一個客戶端接收到伺服器的訊息如下:

-
當第二個客戶端關閉時,第一個客戶端收到訊息如下:
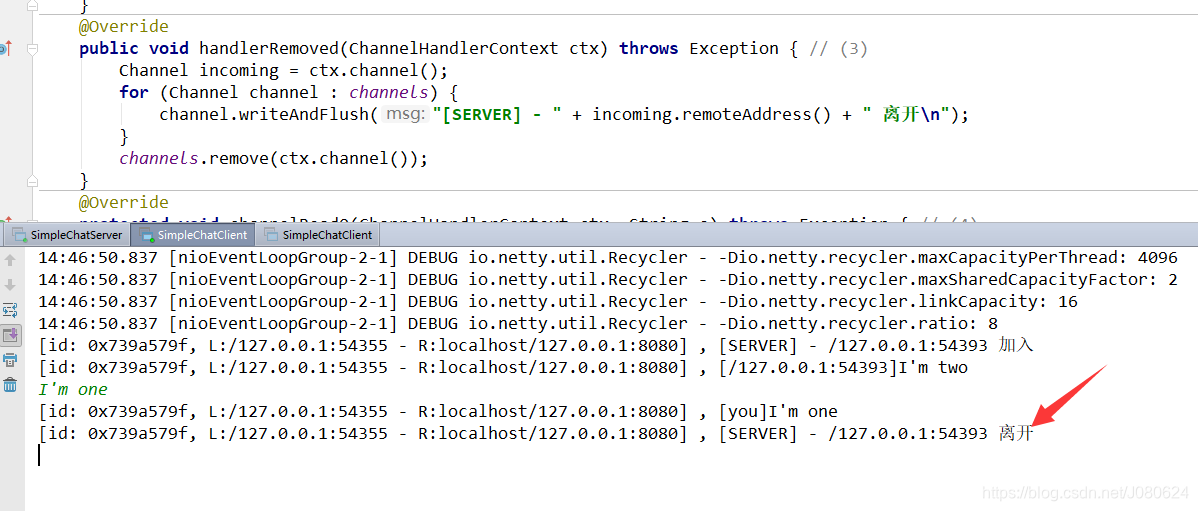
-
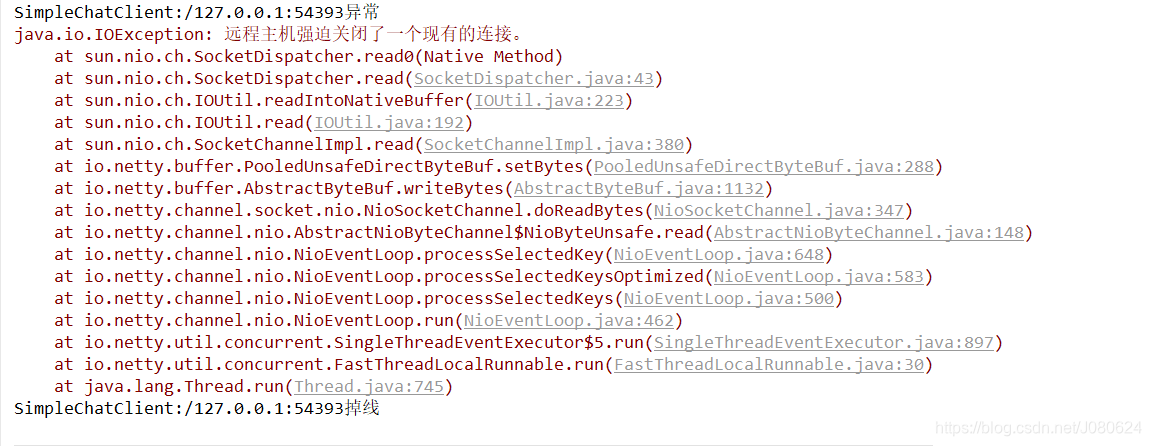
當第二個客戶端關閉時,伺服器端列印如下:
【2】Netty 實現 WebSocket 聊天功能
上面我們用Netty快速實現了一個 Java 聊天程式。現在,我們
要做下修改,加入 WebSocket 的支援,使它可以在瀏覽器裡進行文字聊天。
① WebSocket
WebSocket 通過“Upgrade handshake(升級握手)”從標準的 HTTP 或HTTPS 協議轉為 WebSocket。因此,使用 WebSocket 的應用程式將始終以 HTTP/S 開始,然後進行升級。在什麼時候發生這種情況取決於具體的應用。它可以是在啟動時,或當一個特定的 URL 被請求時。
在我們的應用中,當 URL 請求以“/ws”結束時,我們才升級協議為WebSocket。否則,伺服器將使用基本的HTTP/S。一旦升級連線將使用WebSocket 傳輸所有資料。
整個伺服器邏輯如下:
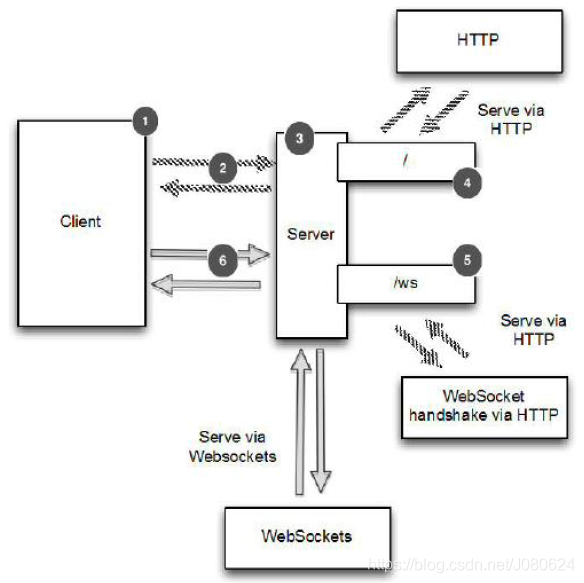
1.客戶端/使用者連線到伺服器並加入聊天
2.HTTP 請求頁面或 WebSocket 升級握手
3.伺服器處理所有客戶端/使用者
4.響應 URI “/”的請求,轉到預設 html 頁面
5.如果訪問的是 URI“/ws” ,處理 WebSocket 升級握手
6.升級握手完成後 ,通過 WebSocket 傳送聊天訊息
② HttpRequestHandler
例項如下:
import io.netty.channel.*;
import io.netty.handler.codec.http.*;
import io.netty.handler.ssl.SslHandler;
import io.netty.handler.stream.ChunkedNioFile;

import java.io.File;
import java.io.RandomAccessFile;
import java.net.URISyntaxException;
import java.net.URL;

/**
 * Created by Janus on 2018/11/20.
 */
public class HttpRequestHandler extends SimpleChannelInboundHandler<FullHttpRequest> { //1
    private final String wsUri;
    private static final File INDEX;

    static {
        URL location = HttpRequestHandler.class.getProtectionDomain().getCodeSource().getLocation();
        try {
            String path = location.toURI() + "WebsocketChatClient.html";
            path = !path.contains("file:") ? path : path.substring(5);
            INDEX = new File(path);
        } catch (URISyntaxException e) {
            throw new IllegalStateException("Unable to locate WebsocketChatClient.html", e);
        }
    }

    public HttpRequestHandler(String wsUri) {
        this.wsUri = wsUri;
    }

    @Override
    public void channelRead0(ChannelHandlerContext ctx, FullHttpRequest request) throws Exception {
        if (wsUri.equalsIgnoreCase(request.getUri())) {
            ctx.fireChannelRead(request.retain()); //2
        } else {
            if (HttpHeaders.is100ContinueExpected(request)) {
                send100Continue(ctx); //3
            }
            RandomAccessFile file = new RandomAccessFile(INDEX, "r");//4
            HttpResponse response = new DefaultHttpResponse(request.getProtocolVersion(), HttpResponseStatus.OK);
            response.headers().set(HttpHeaders.Names.CONTENT_TYPE, "text/html; charset=UTF-8");
            boolean keepAlive = HttpHeaders.isKeepAlive(request);
            if (keepAlive) { //5
                response.headers().set(HttpHeaders.Names.CONTENT_LENGTH, file.length());
                response.headers().set(HttpHeaders.Names.CONNECTION, HttpHeaders.Values.KEEP_ALIVE);
            }
            ctx.write(response); //6
            if (ctx.pipeline().get(SslHandler.class) == null) { //7
                ctx.write(new DefaultFileRegion(file.getChannel(), 0, file.length()));
            } else {
                ctx.write(new ChunkedNioFile(file.getChannel()));
            }
            ChannelFuture future = ctx.writeAndFlush(LastHttpContent.EMPTY_LAST_CONTENT); //8
            if (!keepAlive) {
                future.addListener(ChannelFutureListener.CLOSE); //9
            }
            file.close();
        }
    }

    private static void send100Continue(ChannelHandlerContext ctx) {
        FullHttpResponse response = new DefaultFullHttpResponse(HttpVersion.HTTP_1_1, HttpResponseStatus.CONTINUE);
        ctx.writeAndFlush(response);
    }

    @Override
    public void exceptionCaught(ChannelHandlerContext ctx, Throwable cause)
            throws Exception {
        Channel incoming = ctx.channel();
        System.out.println("Client:" + incoming.remoteAddress() + "異常");
        // 當出現異常就關閉連線
        cause.printStackTrace();
        ctx.close();
    }
}
標註說明如下:
-
1.擴充套件 SimpleChannelInboundHandler 用於處理 FullHttpRequest資訊
-
2.如果請求是 WebSocket 升級,遞增引用計數器(保留)並且將它傳遞給在 ChannelPipeline 中的下個 ChannelInboundHandler
-
3.處理符合 HTTP 1.1的 “100 Continue” 請求
-
4.讀取預設的 WebsocketChatClient.html 頁面
-
5.判斷 keepalive 是否在請求頭裡面
-
6.給客戶端響應
-
7.寫 index.html 到客戶端,判斷 SslHandler 是否在 ChannelPipeline 來決定是使用 DefaultFileRegion 還是ChunkedNioFile
-
8.寫並重新整理 LastHttpContent 到客戶端,標記響應完成
-
9.如果 keepalive 為false,當寫完成時,關閉 Channel
HttpRequestHandler 做了下面幾件事,
- 如果該 HTTP 請求被髮送到URI “/ws”,呼叫 FullHttpRequest 上的 retain(),並通過呼叫 fireChannelRead(msg) 轉發到下一個 ChannelInboundHandler。retain() 是必要的,因為 channelRead() 完成後,它會呼叫 FullHttpRequest 上的 release() 來釋放其資源。
- 如果客戶端傳送的 HTTP 1.1 頭是“Expect: 100-continue” ,將傳送“100 Continue”的響應。
- 在響應頭被設定後,寫一個 HttpResponse 返回給客戶端。注意,這是不是 FullHttpResponse,唯一的反應的第一部分。此外,我們不使用writeAndFlush() 在這裡—這個是在最後完成。
- 如果沒有加密也不壓縮,要達到最大的效率可以是通過儲存 index.html 的內容在一個 DefaultFileRegion實現—這將利用零拷貝來執行傳輸。出於這個原因,我們檢查,看看是否有一個 SslHandler 在 ChannelPipeline 中來判斷是否使用 ChunkedNioFile。
- 寫 LastHttpContent 來標記響應的結束,並終止它
- 如果不要求 keepalive ,新增 ChannelFutureListener 到 ChannelFuture 物件的最後寫入,並關閉連線。注意,這裡我們呼叫 writeAndFlush() 來重新整理所有以前寫的資訊。
③ 處理 WebSocket frame
WebSockets 在“幀”裡面來發送資料,其中每一個都代表了一個訊息的一部分。一個完整的訊息利用了多個幀。
WebSocket “Request for Comments” (RFC) 定義了六中不同的 frame。 Netty 給他們每個都提供了一個 POJO 實現 ,而我們的程式只需要使用下面4個幀型別:
- CloseWebSocketFrame
- PingWebSocketFrame
- PongWebSocketFrame
- TextWebSocketFrame
另外兩種為BinaryWebSocketFrame和ContinuationWebSocketFrame。
在這裡我們只需要顯示處理 TextWebSocketFrame,其他的會由 WebSocketServerProtocolHandler 自動處理。
下面程式碼展示了 ChannelInboundHandler 處理 TextWebSocketFrame,同時也將跟蹤在 ChannelGroup中所有活動的 WebSocket 連線。
TextWebSocketFrameHandler例項如下:
import io.netty.channel.Channel;
import io.netty.channel.ChannelHandlerContext;
import io.netty.channel.SimpleChannelInboundHandler;
import io.netty.channel.group.ChannelGroup;
import io.netty.channel.group.DefaultChannelGroup;
import io.netty.handler.codec.http.websocketx.TextWebSocketFrame;
import io.netty.util.concurrent.GlobalEventExecutor;

/**
 * Created by Janus on 2018/11/20.
 */
public class TextWebSocketFrameHandler extends
        SimpleChannelInboundHandler<TextWebSocketFrame> {

    public static ChannelGroup channels = new DefaultChannelGroup(GlobalEventExecutor.INSTANCE);

    @Override
    protected void channelRead0(ChannelHandlerContext ctx,
                                TextWebSocketFrame msg) throws Exception { // (1)
        Channel incoming = ctx.channel();
        for (Channel channel : channels) {
            if (channel != incoming) {
                channel.writeAndFlush(new TextWebSocketFrame("[" + incoming.remoteAddress() + "]" + msg.text()));
            } else {
                channel.writeAndFlush(new TextWebSocketFrame("[you]" + msg.text()));
            }
        }
    }

    @Override
    public void handlerAdded(ChannelHandlerContext ctx) throws Exception { // (2)
        Channel incoming = ctx.channel();
        for (Channel channel : channels) {
            channel.writeAndFlush(new TextWebSocketFrame("[SERVER] - " + incoming.remoteAddress() + " 加入"));
        }
        channels.add(ctx.channel());
        System.out.println("Client:" + incoming.remoteAddress() + "加入");
    }

    @Override
    public void handlerRemoved(ChannelHandlerContext ctx) throws Exception { // (3)
        Channel incoming = ctx.channel();
        for (Channel channel : channels) {
            channel.writeAndFlush(new TextWebSocketFrame("[SERVER] - " + incoming.remoteAddress() + " 離開"));
        }
        System.out.println("Client:" + incoming.remoteAddress() + "離開");
        channels.remove(ctx.channel());
    }

    @Override
    public void channelActive(ChannelHandlerContext ctx) throws Exception { // (5)
        Channel incoming = ctx.channel();
        System.out.println("Client:" + incoming.remoteAddress() + "線上");
    }

    @Override
    public void channelInactive(ChannelHandlerContext ctx) throws Exception { // (6)
        Channel incoming = ctx.channel();
        System.out.println("Client:" + incoming.remoteAddress() + "掉線");
    }

    @Override
    public void exceptionCaught(ChannelHandlerContext ctx, Throwable cause)
            throws Exception {
        Channel incoming = ctx.channel();
        System.out.println("Client:" + incoming.remoteAddress() + "異常");
        // 當出現異常就關閉連線
        cause.printStackTrace();
        ctx.close();
    }
}
數字標註說明參考第【1】部分,這裡同樣不再贅述。
TextWebSocketFrameHandler 僅作了幾件事:
- 當WebSocket 與新客戶端已成功握手完成,通過寫入資訊到 ChannelGroup 中的 Channel 來通知所有連線的客戶端,然後新增新 Channel 到 ChannelGroup
- 如果接收到 TextWebSocketFrame,呼叫 retain() ,並將其寫、重新整理到 ChannelGroup,使所有連線的WebSocket Channel 都能接收到它。和以前一樣,retain() 是必需的,因為當 channelRead0()返回時,TextWebSocketFrame 的引用計數將遞減。由於所有操作都是非同步的,writeAndFlush() 可能會在以後完成,我們不希望它來訪問無效的引用。
④ WebsocketChatServerInitializer
由於 Netty 處理了其餘大部分功能,唯一剩下的我們現在要做的是初始化 ChannelPipeline 給每一個建立的新的Channel 。做到這一點,我們需要一個ChannelInitializer。
public class WebsocketChatServerInitializer extends
        ChannelInitializer<SocketChannel> {
    //1擴充套件 ChannelInitializer
    @Override
    public void initChannel(SocketChannel ch) throws Exception {
        //2新增 ChannelHandler 到 ChannelPipeline
        ChannelPipeline pipeline = ch.pipeline();
        pipeline.addLast(new HttpServerCodec());
        pipeline.addLast(new HttpObjectAggregator(64*1024));
        pipeline.addLast(new ChunkedWriteHandler());
        pipeline.addLast(new HttpRequestHandler("/ws"));
        pipeline.addLast(new WebSocketServerProtocolHandler("/ws"));
        pipeline.addLast(new TextWebSocketFrameHandler());
    }
}
initChannel() 方法設定 ChannelPipeline 中所有新註冊的 Channel,安裝所有需要的ChannelHandler。
⑤ WebsocketChatServer
編寫一個 main() 方法來啟動服務端。
例項如下:
import com.netty.chat.handler.WebsocketChatServerInitializer;
import io.netty.bootstrap.ServerBootstrap;
import io.netty.channel.ChannelFuture;
import io.netty.channel.ChannelOption;
import io.netty.channel.EventLoopGroup;
import io.netty.channel.nio.NioEventLoopGroup;
import io.netty.channel.socket.nio.NioServerSocketChannel;

/**
 * Created by Janus on 2018/11/20.
 */
public class WebsocketChatServer {
    private int port;
    public WebsocketChatServer(int port) {
        this.port = port;
    }
    public void run() throws Exception {
        EventLoopGroup bossGroup = new NioEventLoopGroup(); // (1)
        EventLoopGroup workerGroup = new NioEventLoopGroup();
        try {
            ServerBootstrap b = new ServerBootstrap(); // (2)
            b.group(bossGroup, workerGroup)
                    .channel(NioServerSocketChannel.class) // (3)
                    .childHandler(new WebsocketChatServerInitializer()) //(4)
                    .option(ChannelOption.SO_BACKLOG, 128) // (5)
                    .childOption(ChannelOption.SO_KEEPALIVE, true); // (6)
            System.out.println("WebsocketChatServer 啟動了");
            // 繫結埠,開始接收進來的連線
            ChannelFuture f = b.bind(port).sync(); // (7)
            // 等待伺服器 socket 關閉 。
            // 在這個例子中,這不會發生,但你可以優雅地關閉你的伺服器。
            f.channel().closeFuture().sync();
        } finally {
            workerGroup.shutdownGracefully();
            bossGroup.shutdownGracefully();
            System.out.println("WebsocketChatServer 關閉了");
        }
    }
    public static void main(String[] args) throws Exception {
        int port;
        if (args.length > 0) {
            port = Integer.parseInt(args[0]);
        } else {
            port = 8080;
        }
        new WebsocketChatServer(port).run();
    }
}
至於1234567標註對應的講解,參考博文Netty基礎入門講解,此處不再贅述。
⑥ WebsocketChatClient.html
在程式的 resources/templates 目錄下,我們建立一個 WebsocketChatClient.html 頁面來作為客戶端。
例項如下:
<!DOCTYPE html>
<html>
<head>
    <meta charset="UTF-8">
    <title>WebSocket Chat</title>
</head>
<body>
<script type="text/javascript">
    var socket;
    if (!window.WebSocket) {
        window.WebSocket = window.MozWebSocket;
    }
    if (window.WebSocket) {
        socket = new WebSocket("ws://localhost:8080/ws");
        socket.onmessage = function(event) {
            var ta = document.getElementById('responseText');
            ta.value = ta.value + '\n' + event.data
        };
        socket.onopen = function(event) {
            var ta = document.getElementById('responseText');
            ta.value = "連線開啟!";
        };
        socket.onclose = function(event) {
            var ta = document.getElementById('responseText');
            ta.value = ta.value + "連線被關閉";
        };
    } else {
        alert("你的瀏覽器不支援 WebSocket!");
    }
    function send(message) {
        if (!window.WebSocket) {
            return;
        }
        if (socket.readyState == WebSocket.OPEN) {
            socket.send(message);
        } else {
            alert("連線沒有開啟.");
        }
    }
</script>
    <form onsubmit="return false;">
        <h3>WebSocket 聊天室:</h3>
        <textarea id="responseText" style="width: 500px; height: 300px;"></textarea>
        <br>
        <input type="text" name="message" style="width: 300px" value="Welcome !">
        <input type="button" value="傳送訊息" onclick="send(this.form.message.value)">
        <input type="button" onclick="javascript:document.getElementById('responseText').value=''" value="清空聊天記錄">
    </form>
    <br>
    <br>
</body>
</html>
⑦ 執行效果
先執行 WebsocketChatServer,再開啟多個瀏覽器頁面實現多個 客戶端訪問 http://localhost:8080

專案原始碼地址:https://github.com/JanusJ/Netty