自定義SurfaceView實現抽獎轉盤實戰篇
看到一個抽獎的效果,最近正要寫個自定義的View就用這個練一下好了
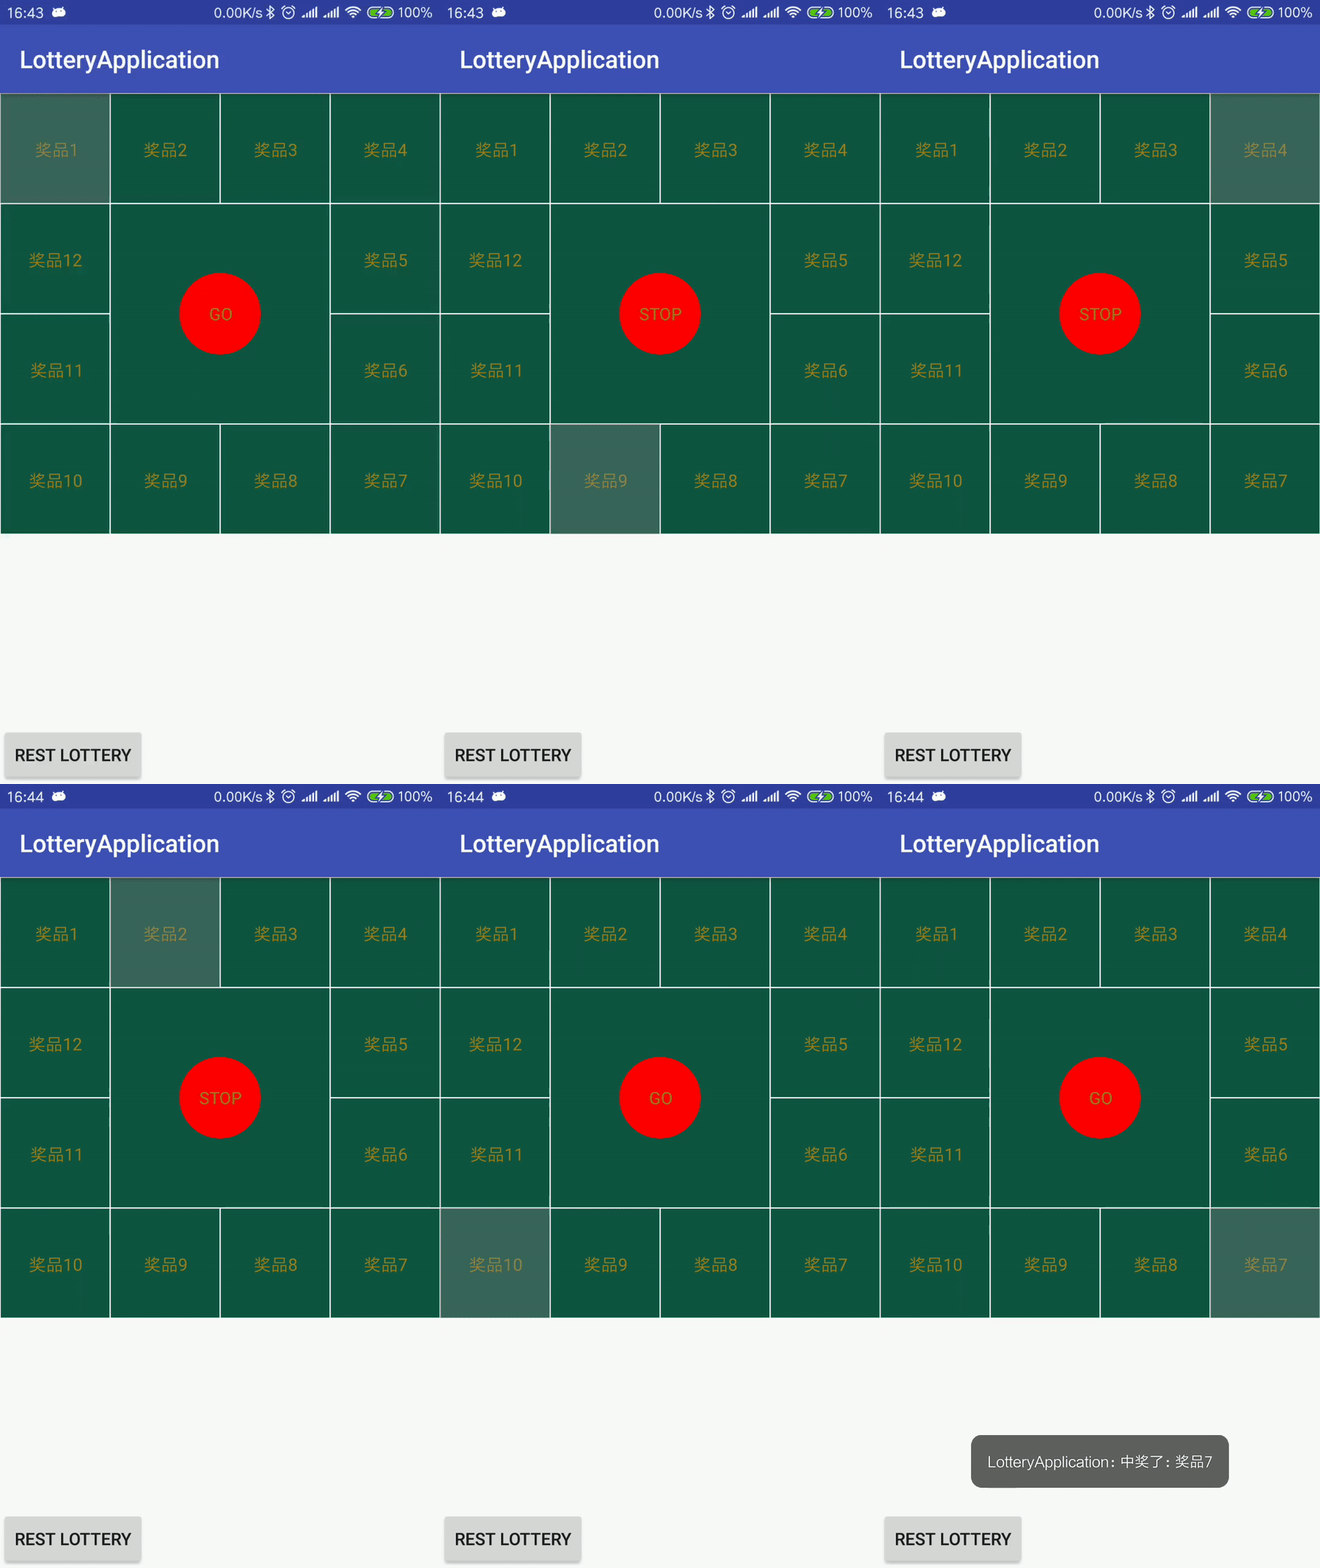
不多說先上圖,因為我這主要是實現了思路,所以UI做的不是很好看,後續我會補上,看是否能滿足你的需求:

思路解析
1.首先需要看仔細看一下,抽獎是什麼流程,拆分業務流程。
2.分析好業務流程後,開始做程式碼分析,如何實現分成幾個步驟。
3.具體的實現步驟,要儘可能完整這樣你寫的時候就會很流暢。
具體實現
自定義view流程大約是幾步:
-
需要繪製的靜態佈局都有那些要明確出來,
-
抽獎這個首先要有一個背景;
-
然後是一堆小的中獎矩形區域(區域上是文字或獎品圖片等);
-
然後是有一個浮層類似的矩形模組(需要滾動在各中獎矩形上);
-
然後是一個啟動抽獎的按鈕(其實這個按鈕應該是唯一的操作了);
-
-
上面這些東西都繪製完成後,就需要是讓這個抽獎機,滾動起來了,然後產生一箇中獎產品。我猜想中獎產品應該是一個固定的,就是在你還沒開始抽之前,就已經確定了一個範圍,因為一個抽獎活動各個獎項都是固定的。抽走一個就會少一個,相應的獎品的中獎機率就會越小。這個地方我還沒有實現,目前只是隨機出來一個獎品。
有了如上的分析步驟,我們寫起來就不會那麼複雜了,因為你已經確定要做的事情了,按步驟寫就好了
由於我們的view在抽獎的時候會一直進行繪製,所以這裡我選擇使用SurfaceView來實現,如直播中的點贊一般也是用SurfaceView來實現。
下面開始正式進入編碼
-
SurfaceView常規使用,由於支援在子執行緒中繪製,所以初始程式碼如下:
@Override public void surfaceCreated(SurfaceHolder holder) { LogUtil.d("surfaceCreated--呼叫surfaceCreated"); isDrawing = true; drawThread = new Thread(this); drawThread.start(); } @Override publicvoid surfaceChanged(SurfaceHolder holder, int format, int width, int height) { LogUtil.d("surfaceChanged--呼叫surfaceChanged"); } @Override public void surfaceDestroyed(SurfaceHolder holder) { LogUtil.d("surfaceDestroyed--呼叫surfaceDestroyed"); currentCount = 0; if (mRunningAnimator != null) { mRunningAnimator.cancel(); mRunningAnimator.removeAllListeners(); } isDrawing = false; mRectList.clear(); drawThread = null; } @Override public void run() { while (isDrawing) { try { //降低繪製的頻率 Thread.sleep(10); mCanvas = mHolder.lockCanvas(); draw(); } catch (Exception e) { e.printStackTrace(); } finally { LogUtil.d("run_finally--unlockCanvasAndPost:"); mHolder.unlockCanvasAndPost(mCanvas); } } } -
這個draw方法是正式開始繪製的地方,主要有以下幾部分,在繪製之前先計算出各個矩形的位置。
/** * 繪製開始 */ private void draw() { //計算出抽獎塊的位置 calculate(); //繪製抽獎的背景 drawBackground(mCanvas); //繪製開始按鈕 drawLotteryButton(mCanvas); //繪製遮罩 drawShade(mCanvas); } -
計算位置的程式碼是我自己摸索的寫的,感覺應該不是很好(尷尬),主要的思路就是因為我計劃繪製的是一個四個邊的正方形,所以我把獎品數目分成了四份。然後就是按照順時針的順序挨個計算每個矩形的位置了。
因為要繪製正方形,所以如果SurfaceView不是正方形的話,就要不能填充完全了,按照較小的邊進行計算。
/** * 計算需要多少個獎品塊,獎品平均分配到4個邊上 */ private void calculate() { if (mCanvas.getWidth() < mCanvas.getHeight()) { everyWidth = mCanvas.getWidth() / (rowCount + 1); } else { everyWidth = mCanvas.getHeight() / (rowCount + 1); } realityWidth = everyWidth * (rowCount + 1); int left = -everyWidth; int top = 0; int right = 0; int bottom = everyWidth; for (int i = 0; i < rowCount; i++) { left += everyWidth; right += everyWidth; Rect rect = new Rect(left, top, right, bottom); mRectList.add(rect); } // LogUtil.d("calculate1--mRectList長度:" + mRectList.size()); left = rowCount * everyWidth; top = -everyWidth; right = (rowCount + 1) * everyWidth; bottom = 0; for (int i = 0; i < rowCount; i++) { top += everyWidth; bottom += everyWidth; Rect rect = new Rect(left, top, right, bottom); mRectList.add(rect); // LogUtil.d("calculate2--top:" + rect.top + "bottom:" + rect.bottom); } // LogUtil.d("calculate2--mRectList長度:" + mRectList.size()); left = (rowCount + 1) * everyWidth; top = rowCount * everyWidth; right = (rowCount + 2) * everyWidth; bottom = (rowCount + 1) * everyWidth; for (int i = 0; i < rowCount; i++) { left -= everyWidth; right -= everyWidth; Rect rect = new Rect(left, top, right, bottom); mRectList.add(rect); // LogUtil.d("calculate3--left:" + rect.left + "right:" + rect.right); } // LogUtil.d("calculate3--mRectList長度:" + mRectList.size()); left = 0; top = (rowCount + 1) * everyWidth; right = everyWidth; bottom = (rowCount + 2) * everyWidth; for (int i = 0; i < rowCount; i++) { top -= everyWidth; bottom -= everyWidth; Rect rect = new Rect(left, top, right, bottom); mRectList.add(rect); // LogUtil.d("calculate4--top:" + rect.top + "bottom:" + rect.bottom); } // LogUtil.d("calculate4--mRectList長度:" + mRectList.size()); } -
計算完成後會得到一個小的矩形列表,裡面儲存的是Rect用來記錄每個矩形的位置。下面開始繪製矩形,先繪製整個背景矩形,再繪製小的矩形,然後在把文字繪製到小矩形上,這裡計算文字的位置比較麻煩,很不容易對齊。
canvas.drawRect(new Rect(0, 0, mCanvas.getWidth(), canvas.getHeight()), mPaint); for (int i = 0; i < mRectList.size(); i++) { // LogUtil.d("開始繪製第:" + i); Rect rectF1 = mRectList.get(i); canvas.drawRect(rectF1, mPaint); canvas.drawRect(rectF1, mBorderPaint); //計算文字的位置 if (i < awardCount) { Point point = calculateTextLocation(rectF1, awardList.get(i)); mCanvas.drawText(awardList.get(i), point.x, point.y, mTextPaint); } else { Point point = calculateTextLocation(rectF1, awardList.get(i - awardCount)); mCanvas.drawText(awardList.get(i - awardCount), point.x, point.y, mTextPaint); } } -
現在基本上整體繪製了主要部分,現在把中心的開獎按鈕繪製一下。這個地方也是需要處理文字對齊。後期會繼續完善。
private void drawLotteryButton(Canvas canvas) { mButtonRegion = new Region(realityWidth / 2 - radius / 2, realityWidth / 2 - radius / 2, realityWidth / 2 + radius / 2, realityWidth / 2 + radius / 2); canvas.drawCircle(realityWidth / 2, realityWidth / 2, radius, mButtonPaint); if (lotteryState == IS_LOTTERYING) { Point point = calculateTextLocation(mButtonRegion.getBounds(), "STOP"); canvas.drawText("STOP", point.x, point.y, mTextPaint); } else { Point point = calculateTextLocation(mButtonRegion.getBounds(), "GO"); canvas.drawText("GO", point.x, point.y, mTextPaint); } } -
然後在把中獎矩形上繪製一個陰影就基本完成了所有的繪製。
 private void drawShade(Canvas mCanvas) {
        LogUtil.d("開始繪製陰影圖" + currentCount);
        if (mRectList.size() > currentCount) {
            mCanvas.drawRect(mRectList.get(currentCount), mShadePaint);
        }
        if (mRectList.size() == rowCount * 4) {
            isDrawing = false;
        }
    }
以上的步驟完成後,基本上一個不會動的抽獎自定義控制元件已經出來了。
下面思考如何讓這個動起來?
思路:
我想小的中獎矩形的位置都有了,就按照已有的位置,在上面在繪製一層不就好了麼?
有了想法了,就可以開始去實踐一下,看是否可行。
嘗試一
通過一個不停增加變化的數字,來繪製陰影,因為我想只繪製陰影部分不影響已經繪製好的其他部分,嘗試後發現SurfaceView會一直閃爍。
嘗試二
如果只繪製陰影不行的話,我就只能把整個畫布都繪製一次,然後每次繪製陰影的位置不同,這種方式倒是實現了大概的抽獎效果,但是感覺比較消耗記憶體,因為你要繪製一整張畫布。(目前我還沒找到其他的方法)
陰影也能動起來了,就差一個點選事件了,這個是通過實現touch事件來處理,因為我們知道按鈕的座標範圍,我們只要判斷點選的位置在這個座標範圍內就響應事件即可。
具體實現如下,這裡面有一個邏輯是通過狀態來控制按鈕是開始搖獎,還是結束搖獎。:
 @Override
    public boolean onTouchEvent(MotionEvent event) {

        int x = (int) event.getX();
        int y = (int) event.getY();
        switch (event.getAction()) {
            case MotionEvent.ACTION_DOWN:
                if (mButtonRegion.contains(x, y)) {
                    LogUtil.d("onTouchEvent-X:" + x + "Y:" + y);
                }
                break;
            case MotionEvent.ACTION_UP:
                if (mButtonRegion.contains(x, y)) {
                    LogUtil.d("onTouchEvent-X:" + x + "Y:" + y);
                    if (isEnable) {
                        if (lotteryState == IS_DEFAULT) {
                            startLottery();
                        } else if(lotteryState == IS_LOTTERYING) {
                            stopLottery();
                        }
                    }
                }
                break;
            default:
                break;
        }
        return true;

    }
開獎的動畫我也貼出來吧,屬性動畫的知識,通過改變currentCount來確定陰影的繪製位置。
/**
     * 讓陰影滾動起來
     *
     * @param
     */
    private void startLottery() {
        lotteryState = IS_LOTTERYING;
        drawLotteryButton(mCanvas);
        if (currentCount > mRectList.size()) {
            return;
        }
        if (mRunningAnimator != null) {
            currentCount = 0;
            mRunningAnimator.cancel();
        }
//        int timeResult = testRandom3() * 1000;
        //由於屬性動畫中,當達到最終值會立刻跳到下一次迴圈,所以需要補1
        mRunningAnimator = ObjectAnimator.ofInt(this, "currentCount", 0, 1);
        mRunningAnimator.setRepeatMode(ValueAnimator.RESTART);
        mRunningAnimator.setRepeatCount(ValueAnimator.INFINITE);
        mRunningAnimator.setDuration(3000);
        mRunningAnimator.setInterpolator(new LinearInterpolator());
        mRunningAnimator.start();

    }
上面基本完成了這個還不太完整的抽獎自定義View了,但是還有許多小的細節沒有實現完全。
todo的內容
1.開獎動畫加入;
2.指定開獎的獎品,不能說使用隨機開獎。
今天添加了開獎動畫和指定到某一個獎品
思路分析:
我們要實現上面的需求,首先要處理兩個問題:
1.我們點選stop的時候,currentCount需要回到初始位置,因為我門計劃播放開獎動畫是從0開始變化,如果不把currentCount重置為初始位置,會出現跳躍。
2.指定獎品結果,需要我們播放最後一圈動畫的時候加上這個結果數值,讓選中的獎品剛好走到指定位置。
解決方案:
輪盤現在還旋轉,先取消第一個播放動畫。然後我們播放一個臨時動畫,把移動到初始值(選中模組移動到初始位置)。然後在正式播放我們的開獎動畫。一個逐漸變慢的動畫,最後停在指定位置。
程式碼比較簡單,這裡我就不再貼出,有需要的可以去看一下git。
This ALL
再次附上鍊接
