
往linux核心函式掛鉤子
概述
本文講解替換一個已經在記憶體中的函式,使得執行流流入我們自己的邏輯,然後再呼叫原始的函式。比如有個函式叫做funcion,而你希望統計一下呼叫function的次數,最直接的方法就是如果有誰呼叫function的時候,調到下面這個函式就好了。
void new_function()
{
count++;
return function();
}
鉤子存在的意義
當核心程式已經在執行過程中,如果需要對某個核心函式做出小的改動,原始方法是修改核心原始碼或驅動程式,重新編譯在載入二進位制檔案,這樣的工作量相對比較大。只有當動態載入驅動程式時修改才比較方便。為什麼不對應用程式hook呢?因為這樣意義不大,改一下原始碼重啟服務會好很多,核心重新編譯、重啟裝置代價非常大。
鉤子原理
在x86架構與linux系統平臺,每個函式編譯後地址的前5個位元組都是callq function+0x5(及是預設指向下一條指令,注意圖中的地址是一個相對地址概念,實際地址跟你執行的程序有關),圖 1是文章後面用到的HerokHook.ko經過反編譯得到的,從圖 1中可以清晰看到跳轉到函式的第一條指令是callq,指向下一條指令,緊接著是堆疊。

圖 2是本次實驗的流程圖,orig_ptr指向linux核心需要hook的函式,當核心呼叫orig_ptr指向函式時候,首先會執行第一條指令,在我們的函式中修改callq orig_ptr +0x5 為jmp Hook_ptr-5,在我們的函式中執行一系列操作後,在通過return ptr_tmp呼叫中間輔助函式,將ptr_tmp函式的前5位元組xxx修改成jmp orig_ptr+0x5,這裡必須跳過orig_ptr的前5位元組,因為這5個位元組函式已經被我們修改,不然就進入死迴圈。

中間輔助函式存在的意義,如果在hook_ptr中直接返回呼叫orig_ptr函式,那麼沒有繞過前5個位元組就會進入死迴圈。在hook_ptr函式末尾不能新增jmp跳轉指令,因為你不知道那些位元組是保留,以及堆疊平衡情況。所以需要新增中間輔助函式。
核心鉤子介面
讀者可能認為現在已經具備註冊鉤子的條件,其實不是這樣的,在早期Linux核心版本中,如果具備上述流程就可以通過memcpy和jmp buffer(buffer存放指令)掛鉤子,由於一些不符合常規的做法已經影響正常的業務邏輯,所以Linux核心做了如下限制:
- 可執行程式碼段不可寫:這個措施便封堵住了你想通過簡單memcpy的方式替換函式指令的方案。
- 記憶體buffer不可執行:這個措施便封堵住了你想把執行流jmp到你的一個儲存指令的buffer的方案。
- stack不可執行:避免緩衝區溢位、棧溢位。
查閱Linux核心資料,發現Linux核心已經提供了text_poke_smp和kallsyms_lookup_name函式介面。
鉤子必然可掛載原理
大家都知道,x86平臺採用的是馮諾依曼體系結構,馮諾依曼結構採用統一儲存,即指令與資料採用相同匯流排傳輸,那麼在作業系統層我們必然可以隨意解釋記憶體空間的含義。不管是通過核心介面還是自定義介面(申請許可權,重新對映當前連續page頁)都可以更改記憶體空間含義,所以很多不正常操作計算機的原理都是基於如此。早期的單機遊戲可以搜尋記憶體資料變化來確定狀態值,進而重新對映當前page許可權進行重新賦值操作。
程式碼編寫
待hook驅動程式
hello.c是原驅動程式,程式碼中編寫最簡單的hello驅動程式,Makefile,驅動程式。
test.c
#include <linux/module.h>
#include <linux/kernel.h>
#include <linux/fs.h>
#include <linux/init.h>
#include <linux/device.h>
#include <linux/miscdevice.h>
#include <linux/delay.h>
#include <asm/irq.h>
#include <asm/io.h>
#include <asm/uaccess.h>
#include <mach/regs-gpio.h>
#include <mach/hardware.h>
#include <linux/device.h>
#include <linux/gpio.h>
#define DEVICE_NAME "hello"
static struct class *hello_class;
static int hello_open(struct tty_struct * tty, struct file * filp)
{
printk("open is successd!\n");
return 0;
}
static int hello_read(struct file * file,char __user * userbuf,size_t bytes,loff_t * off)
{
unsigned char buf[4];
buf[0]=0x11;
buf[1]=0x33;
buf[2]=0x44;
buf[3]=0x55;
copy_to_user(userbuf,buf,sizeof(buf));
return(sizeof(buf));
}
static struct file_operations hello_fops = {
.owner = THIS_MODULE,
.read = hello_read,
.open =hello_open,
};
static int major;
static int hello_init(void)
{
major= register_chrdev(0, DEVICE_NAME, &hello_fops);
hello_class = class_create(THIS_MODULE, DEVICE_NAME);
device_create(hello_class, NULL, MKDEV(major, 0), NULL, "hello");
printk(KERN_ALERT "init is scussed!\n");
return 0;
}
static void hello_exit(void)
{
unregister_chrdev(major, DEVICE_NAME);
device_destroy(hello_class,MKDEV(major, 0));
class_destroy(hello_class);
printk(KERN_ALERT "Goodbye, cruel world\n");
}
module_init(hello_init);
module_exit(hello_exit);
MODULE_LICENSE("Dual BSD/GPL");
MODULE_AUTHOR("Herok");
MODULE_DESCRIPTION("A simple hello world module");
MODULE_ALIAS("A simplest module");
待hook驅動程式的測試程式
test.c
#include <sys/types.h>
#include <sys/stat.h>
#include <fcntl.h>
#include <stdio.h>
#include <poll.h>
int main(int argc,char **argv)
{
int fd;
unsigned char buf[4];
fd = open("/dev/hello", O_RDWR);
if(fd<0){
printf("open is error!\n");
return -1;
}
read(fd,&buf,4);
printf("%x\n",buf[0]);
printf("%x\n",buf[1]);
printf("%x\n",buf[2]);
printf("%x\n",buf[3]);
close(fd);
}
hook驅動程式
HerokHook.c
#include <linux/kallsyms.h>
#include <linux/cpu.h>
#include <linux/kprobes.h>
#include <linux/module.h>
#include <linux/kernel.h>
#include <linux/fs.h>
#include <linux/init.h>
#include <linux/device.h>
#include <linux/miscdevice.h>
#include <linux/delay.h>
#include <asm/io.h>
#include <asm/uaccess.h>
#include <linux/device.h>
#define OPTSIZE 5
char saved_op[OPTSIZE]={0};
char jump_op[OPTSIZE]={0};
int (*ptr_tmp_hello_read)(struct file * file,char __user * userbuf,size_t bytes,loff_t * off);
int (*ptr_orig_hello_read)(struct file * file,char __user * userbuf,size_t bytes,loff_t * off);
int stub_hello_conntrack_in(struct file * file,char __user * userbuf,size_t bytes,loff_t * off)
{
printk("hook stub conntrack\n");
return 0;
}
int hook_hello_read(struct file * file,char __user * userbuf,size_t bytes,loff_t * off)
{
printk(KERN_EMERG "hook conntrack herok\n");
return ptr_tmp_hello_read(file,userbuf, bytes,off);
}
static void *(*ptr_poke_smp)(void *addr, const void *opcode, size_t len);
static __init int replace_function__init(void)
{
s32 hook_offset, orig_offset;
// 這個poke函式完成的就是重對映,寫text段
ptr_poke_smp = kallsyms_lookup_name("text_poke_smp");
if (!ptr_poke_smp) {
printk(KERN_INFO "err");
return -1;
}
//找到需要hook的函式
ptr_orig_hello_read = kallsyms_lookup_name("hello_read");
printk(KERN_EMERG "ptr_orig_hello_read=%#x\n",ptr_orig_hello_read);
if (!ptr_orig_hello_read) {
printk("err");
return -1;
}
jump_op[0] = 0xe9; //jmp指令
// 計算目標hook函式到當前位置的相對偏移
hook_offset = (s32)((long)hook_hello_read - (long)ptr_orig_hello_read - OPTSIZE);
// 後面4個位元組為一個相對偏移
(*(s32*)(&jump_op[1])) = hook_offset;
saved_op[0] = 0xe9;
// 計算目標原始函式將要執行的位置到當前位置的偏移
orig_offset = (s32)((long)ptr_orig_hello_read + OPTSIZE - ((long)stub_hello_conntrack_in + OPTSIZE));
(*(s32*)(&saved_op[1])) = orig_offset;
get_online_cpus();
// 替換操作!
ptr_poke_smp(stub_hello_conntrack_in, saved_op, OPTSIZE);
ptr_tmp_hello_read = stub_hello_conntrack_in;
printk(KERN_EMERG "ptr_tmp_hello_read=%#x\n",ptr_tmp_hello_read);
barrier();
ptr_poke_smp(ptr_orig_hello_read, jump_op, OPTSIZE);
put_online_cpus();
return 0;
}
static __exit void replace_function_exit(void)
{
get_online_cpus();
ptr_poke_smp(ptr_orig_hello_read, saved_op, OPTSIZE);
ptr_poke_smp(stub_hello_conntrack_in, jump_op, OPTSIZE);
barrier();
put_online_cpus();
}
module_init(replace_function__init);
module_exit(replace_function_exit);
MODULE_DESCRIPTION("hook test");
MODULE_LICENSE("GPL");
MODULE_VERSION("1.1");
Makefile程式
程式碼如圖 3。
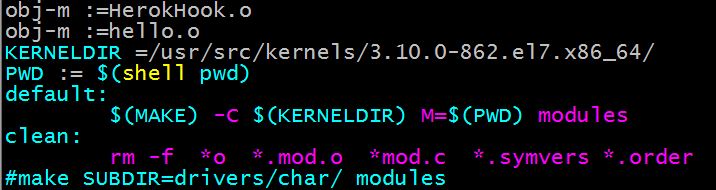
圖 3
測試
編譯生成hello.ko和HerokHook.ko,依次載入這兩個驅動程式,並且編譯並執行測試程式,從程式執行結果發現,程式將先呼叫我們的hook函式,然後在呼叫原函式。圖 4可以看到函式的地址空間,也可以通過cat /proc/modules得到所以核心的地址空間範圍。

圖 4
結語
至於在Linux應用程式中如何編譯與載入驅動程式讀者可以自行百度,這個相對簡單。在centos平臺需要安裝linux-headrs庫,kernel-headers.x86_64和kernel.x86_64兩個庫,安裝完成後再/usr/src/kernels目錄下會出現核心檔案,在Makefile中指定該路徑就可以正常編譯。
hook怎麼在核心中玩完全由讀者決定,最好的是與tcp這個程式碼分支比較多的糟糕程式碼一起玩,這樣玩花樣比較多,後期帶領大家領略linux中TCP世界。
Never lock up your dreaming box, and the greatest peril to the soul is that one is likely to get precisely what he is seeking.