
React自己寫的一個地圖小元件
React自己寫的一個地圖小元件
由於今天比較閒,就玩了玩react,然後就封裝了一個地圖的元件,當然功能比較簡單,因為就是隨手寫的小東西,但是由於引用了百度API和bee-mobile,所以用起來可能要薛微麻煩一點點,但是我保證,只是一點點而已。
由於之前發了一次,說字數太少從主頁移出了,作為一個鐵頭娃,那我肯定得重寫啊。前一次發的不夠細緻,這次就薛微細一點好吧,
由於,由於,魷魚,說的我都餓了。不說了進入正題好吧,
首先說說主體思想,思想比較簡單,去拿過來百度地圖的API和bee-mobile,然後將兩者結合到一起,形成新的元件
怎麼在React中引入百度地圖的API在這篇文章就贅述了,前面的隨筆中我寫過,需要的同學去看一下就好,也很簡單
主要使用了bee-mobile的Notification,Button,Icon(想要了解bee-mobile,請移步https://bee-mobiles.github.io/#/docs/introduce)
1.Notification主要是來實現點選後的彈出功能,
2.Button是按鈕,
3.Icon是圖示
多說無益,直接上效果圖好吧

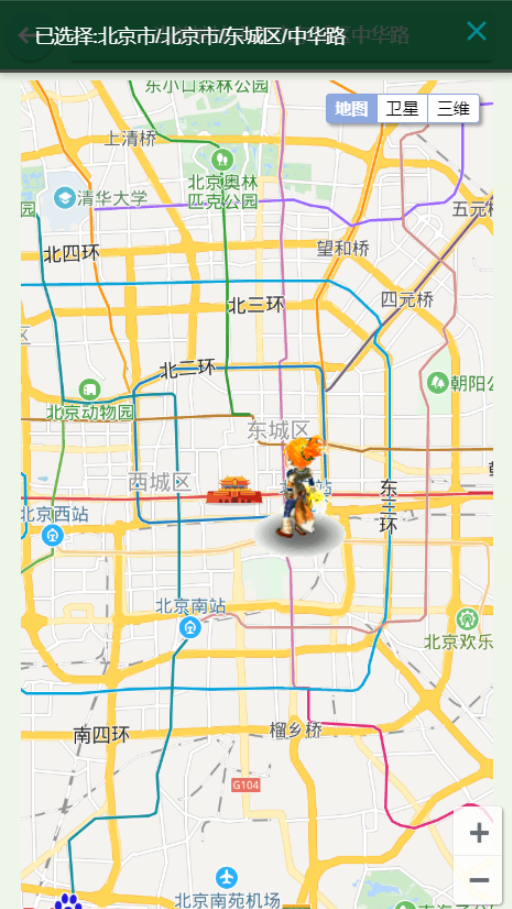
實現的效果:1.地圖的縮放
2.地圖型別的轉換
3.點選後頂端地址變為點選的地址
4.點選後會對點選的地址進行標註
5.切換地圖型別會有水波效果
6.定位是小狐狸效果(這個是百度API預設的一個定點陣圖標,我沒改,因為我感覺這個狐狸挺可愛的,我也沒給元件提供改小狐狸的引數,別問我為什麼,就是頭鐵)
使用步驟:
1.基礎三步走
a.引入百度地圖API,百度地圖API的引入在此不多贅述,我前面的文章中已經介紹(請見React中使用百度地圖API這篇文章)
b.bee-Mobile引入 yarn add bee-mobile
c.styled-components 引入 yarn add styled-components
2.我直接把元件的原始碼放上來,需要的直接拉下去隨便找地方放下,在需要使用的元件裡直接引用即可,注意:使用前請閱讀最下方的使用說明
原始碼我加了一小部分註釋,很容易就能看懂
元件原始碼:
import  React,{Component} from 'react';
import styled from "styled-components"
import BMap  from 'BMap';
import {Notification,Button,Icon} from 'bee-mobile';


const NewaddressButton = styled(Button)`
        width:${props=>props.width||"100%"};
        height:${props=>props.height||"200px"};
        background-color:${props=>props.sideBgColor||"white"};
        overflow:hidden;
`

const Address = styled.div`
        width:100%;
        height:${props=>props.height||"200px" } !important;
        .BMap_stdMpCtrl{
            position:fixed !important;
            right:0;
            top:.5rem;
        }
`

const Pudian = styled.div`
        width:100%;
        height:50px;
`
const Addresstop = styled.div`
        position:fixed;
        z-index:999;
        height:.5rem;
        width:100%;
        background-color:rgb(53, 218, 132);
        padding-top:.05rem;
        padding-left:.05rem;
        display:flex;
        color:white;
        line-height:.4rem;
        .address_goback{
                button{
                        background-color:rgb(43, 208, 130)
                }

        }
        .addressInfo{
                padding-left:.1rem;
                flex:1;
          button{
                  width:95%;
                  background-color:rgb(43, 208, 130)
         }
        }
`


 class AddressComponent extends Component{
    render() {
        return(
            <div>
                <Addresstop>
                    <div className="address_goback">
                    <Button theme="success" shape="circle" onClick={this.props.topButtonEvent.bind(this)}>
                        <Icon icon="keyboard_backspace"/>
                    </Button>
                    </div>

                    <div className="addressInfo"><Button theme="success"><span>當前地址:</span><span>{this.props.topAddress}</span></Button></div>
                </Addresstop>
                <Pudian></Pudian>
                <NewaddressButton {...this.props}>
                <Address className="address" id="address" {...this.props}>
                </Address>
            </NewaddressButton>
            </div>


        )
    }
    componentDidMount(){
        var map = new BMap.Map("address"); // 建立Map例項
        //城市優先
        if(this.props.MapCity){
            map.centerAndZoom(this.props.MapCity||"北京",this.props.level||11);
        }else{
             map.centerAndZoom(new BMap.Point(this.props.longitude||116.404,this.props.latitude||39.915), this.props.level||11); // 初始化地圖,設定中心點座標和地圖級別
        }
        this.props.MapTypeControl&&map.addControl(new BMap.MapTypeControl()); //新增地圖型別控制元件

        this.props.enableScrollWheelZoom&&map.enableScrollWheelZoom();

        if(this.props.zoomControl){
        var top_left_navigation = new BMap.NavigationControl();  //左上角,新增預設縮放平移控制元件
            //新增控制元件和比例尺
        map.addControl(top_left_navigation);
        }

        var _this = this
        var geoc = new BMap.Geocoder();
        //獲取到點選的API
        map.addEventListener("click",function(e){
            var pt = e.point;
            geoc.getLocation(pt, function(rs){
                var addComp = rs.addressComponents;
                console.log(pt)
                _this.props.getAddress(addComp,pt)
                //新增提示資訊
                //在當前地圖上設定標註
                    //建立小狐狸
                    map.clearOverlays();

                    var myIcon = new BMap.Icon("http://lbsyun.baidu.com/jsdemo/img/fox.gif", new BMap.Size(170,157));
                    var marker2 = new BMap.Marker(pt,{icon:myIcon});  // 建立標註
                    map.addOverlay(marker2);              // 將標註新增到地圖中

                Notification.info({
                    title: '',
                    message: `已選擇:${addComp.province&&addComp.province}${addComp.city&&"/"+addComp.city}${addComp.district&&"/"+addComp.district}${addComp.street&&"/"+addComp.street}`,
                },
                )
            });
        })}

}
export default AddressComponent
元件使用指南:
1.引入元件
2.元件使用引數說明
<AddressComponent
          //頂部城市
         topAddress = {this.props.address}
          //頂部返回按鈕的事件
         topButtonEvent = {this.topButtonEvent.bind(this)}
          //元件的高度
         height="500px"
         //側邊的背景顏色
         sideBgColor="lightBlue"
         //顯示地圖的級別
               level="11"
              //設定中心城市,城市優先於經緯度
              MapCity="上海"
              longitude ="116.404"
              latitude="39.915"
               // 地圖型別控制元件
              MapTypeControl={true}
              //是否可以滑鼠滾輪滑動
              enableScrollWheelZoom={true}
              //縮放控制元件
              zoomControl={true}
              getAddress = {(address,LongitudeAndLatitude)=>{
                  //在此可以獲取到地址
                 //   alert(address.province + ", " + address.city + ", " + address.district + ", " + address.street + ", " + address.streetNumber);
                 // 可以在此處獲取地址進行操作
           //LongitudeAndLatitude為經緯度

                 console.log(LongitudeAndLatitude)
                }}
              >
             </AddressComponent>
到這裡已經可以愉快的使用了,按照步驟走應該是可以正常執行的,假設有問題可以評論我,特別注意一下,該元件只是隨手寫著玩的,並不完善,可以當Demo來使用參考
寫的很不嚴謹,單純是為了實現功能而寫的程式碼,許多判斷的地方都沒有寫的非常嚴謹,請各位大佬不要太較真,瞅瞅就好,如果有問題請指出,我出一瓶紅牛買你的指點好吧,啥,一瓶紅牛不夠?那一場正規保健可以不,正規的啊,別想歪了,我不是那種人,畢竟快到年底了,安全為重。哈哈哈。
最後推薦一手今天剛加上的大佬,部落格名叫做:沉默王二 ,文筆非常好的大腿,我已經驗證過了,人也很有意思,可以說是很棒了
程式碼成就萬世基基沙鎮海 夢想永在凌雲意意氣風發