
Mysql + canal + zookeeper環境搭建
Mysql + canal + zookeeper環境搭建
一、mysql叢集搭建
1. mysql基本環境
作業系統: Linux version 2.6.32-431.el6.x86_64
資料庫:MySQL Community Server 5.7.20
主節點IP:10.60.81.157
主節點IP:10.60.81.158
從節點IP:10.60.81.159
2. 安裝mysql
2.1.官網下載MySQL
mysql-5.7.20-1.el6.x86_64.rpm-bundle.tar
2.2. 三個節點都安裝:
2.2.1.三個節點檢視是否安裝mysql
rpm -qa | grep mysql
rpm -e --nodeps mysql-libs-5.1.66-2.el6_3.x86_64 (有則刪除)
2.2.2. 三個節點都安裝mysql
tar –xvf mysql-5.7.20-1.el6.x86_64.rpm-bundle.tar
rpm -ivh mysql-community-common-5.7.20-1.el6.x86_64.rpm
rpm -ivh mysql-community-libs-5.7.20-1.el6.x86_64.rpm
rpm -ivh mysql-community-client-5.7.20-1.el6.x86_64.rpm
rpm -ivh mysql-community-server-5.7.20-1.el6.x86_64.rpm
2.3.設定密碼
2.3.1. 編輯配置檔案my.cnf
[mysqld]
server-id=157 #####這裡不同
log-bin=mysql-bin ####開啟二進位制日誌
log-slave-updates
binlog-format=ROW
sql_mode=STRICT_TRANS_TABLES,NO_ZERO_IN_DATE,NO_ZERO_DATE,ERROR_FOR_DIVISION_BY_ZERO,NO_AUTO_CREATE_USER,NO_ENGINE_SUBSTITUTION
skip-external-locking
key_buffer_size = 384M
max_allowed_packet = 1M
table_open_cache = 512
sort_buffer_size = 2M
read_buffer_size = 2M
read_rnd_buffer_size = 8M
myisam_sort_buffer_size = 64M
thread_cache_size = 8
query_cache_size = 32M
datadir=/var/lib/mysql
socket=/var/lib/mysql/mysql.sock
#skip-grant-tables=1
# Disabling symbolic-links is recommended to prevent assorted security risks
symbolic-links=0
log-error=/var/log/mysqld.log
pid-file=/var/run/mysqld/mysqld.pid
2.3.2. 啟動mysql
service mysqld start
2.3.3. 獲取MySQL的臨時密碼
如果安裝的是RPM包,則預設是/var/log/mysqld.log
2.3.4. 登陸並修改密碼
使用預設的密碼登陸:
mysql -uroot -p
alter user 'root'@'localhost' identified by '[email protected]';
flush privileges;
3. 建立同步資料使用者及授權使用者
3.1.授權其他機器登陸
GRANT ALL PRIVILEGES ON *.* TO 'root'@'%' IDENTIFIED BY '[email protected]' WITH GRANT OPTION;
flush privileges;
3.2. 建立同步使用者
grant replication slave on *.* to 'mytest'@'10.60.81.%' identified by '[email protected]';
4. mysql主主配置
4.1. 配置兩臺主機及啟動
檢視兩臺主機(10.60.81.157、10.60.81.158)配置檔案(my.cnf)除了server-id不一樣,其他幾乎一模一樣。配置檔案寫好後,我們把兩臺伺服器上的mysql伺服器啟動起來
4.2. 登入10.60.81.157的mysql中檢視master狀態
mysql> show master status;
+------------------+----------+--------------+------------------+-------------------+
| File | Position | Binlog_Do_DB | Binlog_Ignore_DB | Executed_Gtid_Set |
+------------------+----------+--------------+------------------+-------------------+
| mysql-bin.000002 | 1290 | | | |
+------------------+----------+--------------+------------------+-------------------+
1 row in set (0.00 sec)
4.3. 登入10.60.81.158的msyql中,把10.60.81.157配置成自己的主
Change master to master_host='10.60.81.157',master_port=3306,master_user='mytest',master_password='[email protected]',master_log_file='mysql-bin.000002',master_log_pos=1290;
同上,檢視10.60.81.158,然後登入10.60.81.157,把10.60.81.158,配置成自己的主,然後分別在兩臺機器的mysql中,啟動slave
4.4. 啟動10.60.81.158狀態
mysql> show slave status \G;
*************************** 1. row ***************************
Slave_IO_State: Waiting for master to send event
Master_Host: 10.60.81.158
Master_User: mytest
Master_Port: 3306
Connect_Retry: 60
Master_Log_File: mysql-bin.000003
Read_Master_Log_Pos: 1290
Relay_Log_File: sz280317-relay-bin.000009
Relay_Log_Pos: 367
Relay_Master_Log_File: mysql-bin.000002
Slave_IO_Running: Yes
Slave_SQL_Running: Yes
Replicate_Do_DB:
Replicate_Ignore_DB:
Replicate_Do_Table:
Replicate_Ignore_Table:
Replicate_Wild_Do_Table:
Replicate_Wild_Ignore_Table:
Last_Errno: 0
Last_Error:
Skip_Counter: 0
Exec_Master_Log_Pos: 1290
Relay_Log_Space: 743
Until_Condition: None
Until_Log_File:
Until_Log_Pos: 0
Master_SSL_Allowed: No
Master_SSL_CA_File:
Master_SSL_CA_Path:
Master_SSL_Cert:
Master_SSL_Cipher:
Master_SSL_Key:
Seconds_Behind_Master: 0
Master_SSL_Verify_Server_Cert: No
Last_IO_Errno: 0
Last_IO_Error:
Last_SQL_Errno: 0
Last_SQL_Error:
Replicate_Ignore_Server_Ids:
Master_Server_Id: 158
Master_UUID: b805346c-54e0-11e8-baa8-005056a42d94
Master_Info_File: /var/lib/mysql/master.info
SQL_Delay: 0
SQL_Remaining_Delay: NULL
Slave_SQL_Running_State: Slave has read all relay log; waiting for more updates
Master_Retry_Count: 86400
Master_Bind:
Last_IO_Error_Timestamp:
Last_SQL_Error_Timestamp:
Master_SSL_Crl:
Master_SSL_Crlpath:
Retrieved_Gtid_Set:
Executed_Gtid_Set:
Auto_Position: 0
Replicate_Rewrite_DB:
Channel_Name:
Master_TLS_Version:
1 row in set (0.00 sec)
ERROR:
No query specified
可以看到 Slave_IO_Running: Yes
Slave_SQL_Running: Yes
然後在看10.60.81.158的狀態:
mysql> show slave status \G;
*************************** 1. row ***************************
Slave_IO_State: Waiting for master to send event
Master_Host: 10.60.81.157
Master_User: mytest
Master_Port: 3306
Connect_Retry: 60
Master_Log_File: mysql-bin.000005
Read_Master_Log_Pos: 717
Relay_Log_File: sz280318-relay-bin.000010
Relay_Log_Pos: 6027
Relay_Master_Log_File: mysql-bin.000002
Slave_IO_Running: Yes
Slave_SQL_Running: Yes
Replicate_Do_DB:
Replicate_Ignore_DB:
Replicate_Do_Table:
Replicate_Ignore_Table:
Replicate_Wild_Do_Table:
Replicate_Wild_Ignore_Table:
Last_Errno: 0
Last_Error:
Skip_Counter: 0
Exec_Master_Log_Pos: 717
Relay_Log_Space: 7402
Until_Condition: None
Until_Log_File:
Until_Log_Pos: 0
Master_SSL_Allowed: No
Master_SSL_CA_File:
Master_SSL_CA_Path:
Master_SSL_Cert:
Master_SSL_Cipher:
Master_SSL_Key:
Seconds_Behind_Master: 0
Master_SSL_Verify_Server_Cert: No
Last_IO_Errno: 0
Last_IO_Error:
Last_SQL_Errno: 0
Last_SQL_Error:
Replicate_Ignore_Server_Ids:
Master_Server_Id: 157
Master_UUID: 1412180f-54c9-11e8-9e3e-005056a436f6
Master_Info_File: /var/lib/mysql/master.info
SQL_Delay: 0
SQL_Remaining_Delay: NULL
Slave_SQL_Running_State: Slave has read all relay log; waiting for more updates
Master_Retry_Count: 86400
Master_Bind:
Last_IO_Error_Timestamp:
Last_SQL_Error_Timestamp:
Master_SSL_Crl:
Master_SSL_Crlpath:
Retrieved_Gtid_Set:
Executed_Gtid_Set:
Auto_Position: 0
Replicate_Rewrite_DB:
Channel_Name:
Master_TLS_Version:
1 row in set (0.00 sec)
ERROR:
No query specified
5.mysql主從配置
檢視兩臺機器(10.60.81.157、10.60.81.159),把10.60.81.157作主,10.60.81.159作從,與主主配置唯一不同是,不要在主機配置從機為自己的主即可。
二、zookeeper叢集搭建
1. zookeeper基本環境
作業系統: Linux version 2.6.32-431.el6.x86_64
Zookeeper: zookeeper-3.4.12.tar.gz
三臺機器:10.60.81.160、10.60.81.161、10.60.81.162
2. zookeeper 安裝與配置
2.1.官網下載zookeeper
zookeeper-3.4.12.tar.gz
2.2. 上傳到遠端節點
scp zookeeper.tar.gz [email protected]
scp zookeeper.tar.gz [email protected]
scp zookeeper.tar.gz [email protected]
2.3. 登入遠端節點(其他兩個節點的擦作大同小異)
2.4. 解壓包,配置,在cnof 目錄新建zoo.cfg
sz280320:[email protected]/hgx/zookeeper-3.4.12/conf>cat zoo.cfg
tickTime=2000
initLimit=5
syncLimit=2
dataDir=/hgx/servers/zookeeper/data
dataLogDir=/hgx/servers/zookeeper/logs
clientPort=4180
server.60=10.60.81.160:2888:3888
server.61=10.60.81.161:2888:3888
server.62=10.60.81.162:2888:3888
在目錄上述dataDir的目錄中建立myid, 將上述的三個數,server.X(我這裡的X是60,61,62),中的X值寫入myid檔案,三臺節點的myid這是不一樣的。
3、zookeeper 啟動與執行
3.1. 三個節點都要啟動
zookeeper/bin/zkServer.sh start
3.2、zookeeper狀態檢查
sz280320:[email protected]/hgx/zookeeper-3.4.12/bin>./zkCli.sh -server 10.60.81.160:4180
Connecting to 10.60.81.160:4180
2018-05-21 11:26:37,346 [myid:] - INFO [main:[email protected]] - Client environment:zookeeper.version=3.4.12-e5259e437540f349646870ea94dc2658c4e44b3b, built on 03/27/2018 03:55 GMT
2018-05-21 11:26:37,355 [myid:] - INFO [main:[email protected]] - Client environment:host.name=sz280320
2018-05-21 11:26:37,355 [myid:] - INFO [main:[email protected]] - Client environment:java.version=1.8.0_151
2018-05-21 11:26:37,361 [myid:] - INFO [main:[email protected]] - Client environment:java.vendor=Oracle Corporation
2018-05-21 11:26:37,361 [myid:] - INFO [main:[email protected]] - Client environment:java.home=/usr/java/jdk1.8.0_151/jre
2018-05-21 11:26:37,362 [myid:] - INFO [main:[email protected]] - Client environment:java.class.path=/hgx/zookeeper-3.4.12/bin/../build/classes:/hgx/zookeeper-3.4.12/bin/../build/lib/*.jar:/hgx/zookeeper-3.4.12/bin/../lib/slf4j-log4j12-1.7.25.jar:/hgx/zookeeper-3.4.12/bin/../lib/slf4j-api-1.7.25.jar:/hgx/zookeeper-3.4.12/bin/../lib/netty-3.10.6.Final.jar:/hgx/zookeeper-3.4.12/bin/../lib/log4j-1.2.17.jar:/hgx/zookeeper-3.4.12/bin/../lib/jline-0.9.94.jar:/hgx/zookeeper-3.4.12/bin/../lib/audience-annotations-0.5.0.jar:/hgx/zookeeper-3.4.12/bin/../zookeeper-3.4.12.jar:/hgx/zookeeper-3.4.12/bin/../src/java/lib/*.jar:/hgx/zookeeper-3.4.12/bin/../conf:
2018-05-21 11:26:37,362 [myid:] - INFO [main:[email protected]] - Client environment:java.library.path=/usr/java/packages/lib/amd64:/usr/lib64:/lib64:/lib:/usr/lib
2018-05-21 11:26:37,362 [myid:] - INFO [main:[email protected]] - Client environment:java.io.tmpdir=/tmp
2018-05-21 11:26:37,362 [myid:] - INFO [main:[email protected]] - Client environment:java.compiler=<NA>
2018-05-21 11:26:37,363 [myid:] - INFO [main:[email protected]] - Client environment:os.name=Linux
2018-05-21 11:26:37,363 [myid:] - INFO [main:[email protected]] - Client environment:os.arch=amd64
2018-05-21 11:26:37,363 [myid:] - INFO [main:[email protected]] - Client environment:os.version=2.6.32-431.el6.x86_64
2018-05-21 11:26:37,364 [myid:] - INFO [main:[email protected]] - Client environment:user.name=cloudera-scm
2018-05-21 11:26:37,364 [myid:] - INFO [main:[email protected]] - Client environment:user.home=/home/cloudera-scm
2018-05-21 11:26:37,364 [myid:] - INFO [main:[email protected]] - Client environment:user.dir=/hgx/zookeeper-3.4.12/bin
2018-05-21 11:26:37,368 [myid:] - INFO [main:[email protected]] - Initiating client connection, connectString=10.60.81.160:4180 sessionTimeout=30000 [email protected]
Welcome to ZooKeeper!
2018-05-21 11:26:37,430 [myid:] - INFO [main-SendThread(10.60.81.160:4180):[email protected]] - Opening socket connection to server 10.60.81.160/10.60.81.160:4180. Will not attempt to authenticate using SASL (unknown error)
JLine support is enabled
2018-05-21 11:26:37,622 [myid:] - INFO [main-SendThread(10.60.81.160:4180):[email protected]] - Socket connection established to 10.60.81.160/10.60.81.160:4180, initiating session
2018-05-21 11:26:37,653 [myid:] - INFO [main-SendThread(10.60.81.160:4180):[email protected]] - Session establishment complete on server 10.60.81.160/10.60.81.160:4180, sessionid = 0x3c039e8bf59a0003, negotiated timeout = 30000
WATCHER::
WatchedEvent state:SyncConnected type:None path:null
三、搭建HA模式的canal
1. canal基本環境
作業系統: Linux version 2.6.32-431.el6.x86_64
canal server: canal.deployer-1.0.25.tar.gz
二臺機器:10.60.81.159、10.60.81.158
2.Canal安裝
2.1. 官網下載Canal
canal.deployer-1.0.25.tar.gz
2.2. 新建canal使用者,並賦予許可權
CREATE USER canal IDENTIFIED BY 'canal';
GRANT SELECT, REPLICATION SLAVE, REPLICATION CLIENT ON *.* TO 'canal'@'%';
FLUSH PRIVILEGES;
(在10.60.81.157機器中進入mysql建立canal使用者,並賦予許可權)
2.3. 上傳包到兩個遠端節點
scp canal.deployer-1.0.25.tar.gz [email protected]:/hgx/
scp canal.deployer-1.0.25.tar.gz [email protected]:/hgx/
2.4.二個節點安裝canal
tar –zxvf canal.deployer-1.0.25.tar.gz
mv canal.deployer-1.0.25 canal
3. canal配置檔案
3.1. canal.properties
#################################################
######### common argument #############
#################################################
canal.id= 1
canal.ip=
canal.port= 11111
canal.zkServers=10.60.81.160:4180,10.60.81.161:4180,10.60.81.162:4180
# flush data to zk
canal.zookeeper.flush.period = 1000
# flush meta cursor/parse position to file
canal.file.data.dir = ${canal.conf.dir}
canal.file.flush.period = 1000
## memory store RingBuffer size, should be Math.pow(2,n)
canal.instance.memory.buffer.size = 16384
## memory store RingBuffer used memory unit size , default 1kb
canal.instance.memory.buffer.memunit = 1024
## meory store gets mode used MEMSIZE or ITEMSIZE
canal.instance.memory.batch.mode = MEMSIZE
## detecing config
canal.instance.detecting.enable = false
#canal.instance.detecting.sql = insert into retl.xdual values(1,now()) on duplicate key update x=now()
canal.instance.detecting.sql = select 1
canal.instance.detecting.interval.time = 3
canal.instance.detecting.retry.threshold = 3
canal.instance.detecting.heartbeatHaEnable = false
# support maximum transaction size, more than the size of the transaction will be cut into multiple transactions delivery
canal.instance.transaction.size = 1024
# mysql fallback connected to new master should fallback times
canal.instance.fallbackIntervalInSeconds = 60
# network config
canal.instance.network.receiveBufferSize = 16384
canal.instance.network.sendBufferSize = 16384
canal.instance.network.soTimeout = 30
# binlog filter config
#canal.instance.filter.druid.ddl = true
canal.instance.filter.query.dcl = false
canal.instance.filter.query.dml = false
canal.instance.filter.query.ddl = false
canal.instance.filter.table.error = false
canal.instance.filter.rows = false
# binlog format/image check
canal.instance.binlog.format = ROW,STATEMENT,MIXED
canal.instance.binlog.image = FULL,MINIMAL,NOBLOB
# binlog ddl isolation
canal.instance.get.ddl.isolation = false
#################################################
######### destinations #############
#################################################
canal.destinations= kafka
# conf root dir
canal.conf.dir = ../conf
# auto scan instance dir add/remove and start/stop instance
canal.auto.scan = true
canal.auto.scan.interval = 5
#canal.instance.tsdb.spring.xml=classpath:spring/tsdb/h2-tsdb.xml
#canal.instance.tsdb.spring.xml=classpath:spring/tsdb/mysql-tsdb.xml
canal.instance.global.mode = spring
canal.instance.global.lazy = false
#canal.instance.global.manager.address = 127.0.0.1:1099
#canal.instance.global.spring.xml = classpath:spring/local-instance.xml
#canal.instance.global.spring.xml = classpath:spring/memory-instance.xml
#canal.instance.global.spring.xml = classpath:spring/file-instance.xml
canal.instance.global.spring.xml = classpath:spring/default-instance.xml
3.2. instance.properties
#################################################
## mysql serverId
canal.instance.mysql.slaveId=1234 ##另外一臺機器改成1235,保證slaveId不重複即可
# position info
canal.instance.master.address=10.60.81.157:3306
canal.instance.master.journal.name=
canal.instance.master.position=
canal.instance.master.timestamp=
# table meta tsdb info
canal.instance.tsdb.enable=true
canal.instance.tsdb.dir=${canal.file.data.dir:../conf}/${canal.instance.destination:}
canal.instance.tsdb.url=jdbc:h2:${canal.instance.tsdb.dir}/h2;CACHE_SIZE=1000;MODE=MYSQL;
#canal.instance.tsdb.url=jdbc:mysql://127.0.0.1:3306/canal_tsdb
canal.instance.tsdb.dbUsername=canal
canal.instance.tsdb.dbPassword=canal
#canal.instance.standby.address =
#canal.instance.standby.journal.name =
#canal.instance.standby.position =
#canal.instance.standby.timestamp =
# username/password
canal.instance.dbUsername=canal
canal.instance.dbPassword=canal
canal.instance.defaultDatabaseName=
canal.instance.connectionCharset=UTF-8
# table regex
canal.instance.filter.regex=.*\\..*
# table black regex
canal.instance.filter.black.regex=
#################################################
***上述兩個配置檔案,黃色標記部分為修改部分在兩個伺服器上一樣***
4. 啟動canal服務
兩臺機器分別執行:canal/bin/zkServer.sh
5. 檢視是否啟動成功
5.1. 在10.60.81.159檢視日誌

5.2. 在10.60.81.158檢視日誌
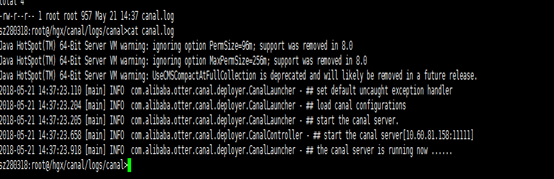
***上述兩伺服器日誌檔案(canal.log)出現如圖所示,說明canal的HA搭建成功