樣例GeoQuiz應用開發 第2章
先介紹一下MVC,Model View Controller,是軟體架構中最常見的一種框架。
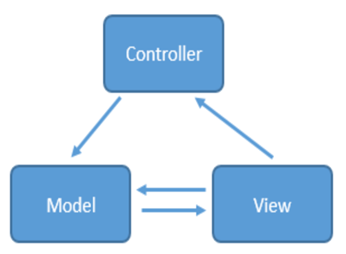
簡單來說就是通過 controller 的控制去操作 model 層的資料,並且返回給 view 層展示,具體見下圖

當用戶出發事件的時候,view 層會發送指令到 controller 層,接著 controller 去通知model層更新資料,model層更新完資料以後直接顯示在view層上,這就是MVC的工作原理。
1)模型(Model)
Model是一個應用系統的核心部分,代表了該系統實際要實現的所有功能處理。比如:在視訊播放器中,模型代表一個視訊資料庫及播放視訊的程式函式程式碼;在拍照應用中,模型代表一個照片資料庫,及看圖片時的程式函式程式碼。在一個電話應用中,Model代表一個電話號碼簿,以及撥打電話和傳送簡訊的程式函式程式碼。Model在values目錄下通過xml檔案格式生成,也可以通過硬編碼的方式直接Java程式碼生成。
2)檢視(View)
View是軟體應用傳送給使用者的一個反饋結果。它代表軟體應用中的圖形展示、聲音播放、觸覺反饋等職責。檢視的根節點是應用程式的自身視窗。比如,視訊播放器中可能包含當前播放的畫面,這個畫面就是一個檢視。另一個檢視元件可能是該視訊的文字標題。再一個就是一些播放按鍵,View在layout目錄下通過xml檔案格式生成,用findViewById()獲取;也可以通過硬編碼的方式直接Java程式碼生成。
3)控制器(Controller)
Controller在軟體應用負責對外部事件的響應,包括:鍵盤敲擊、螢幕觸控、電話呼入等。Controller實現了一個事件佇列,每一個外部事件均在事件佇列中被唯一標識。框架依次將事件從佇列中移出並派發出去。
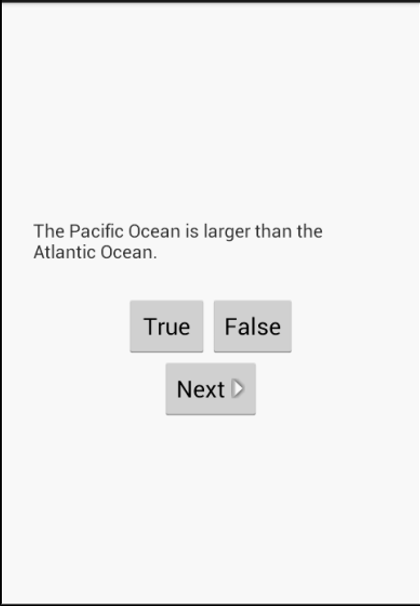
任務要求實現GeoQuiz 能從多個題目之間切換。(所有的程式碼都會更新)

程式碼更新:
activity_main.xml程式碼:
<LinearLayout xmlns:android="http://schemas.android.com/apk/res/android"
android:layout_width="match_parent"
android:layout_height="match_parent"
android:gravity="center"
android:orientation
MainActivity.java程式碼 :
package com.example.a83856.myapplication1;

import android.support.v7.app.AppCompatActivity;
import android.os.Bundle;
import android.view.View;
import android.widget.Button;
import android.widget.ImageButton;
import android.widget.TextView;
import android.widget.Toast;

public class MainActivity extends AppCompatActivity {

    private Button mTrueButton;
    private Button mFalseButton;
    private Button mNextButton;
    private TextView mQuestionTextView;

    private Question[] mQuestionBank=new Question[]{
            new Question(R.string.question_ocean,true),
            new Question(R.string.question_mideast,false),
            new Question(R.string.question_africa,false),
            new Question(R.string.question_americas,true),
            new Question(R.string.question_asia,true),
    };

    private int mCurrentIndex=0;

    private void updateQuestion(){
        int question=mQuestionBank[mCurrentIndex].getTextResId();
        mQuestionTextView.setText(question);
    }

    private void checkAnswer(boolean uesrPressesTrue){
        boolean answerIsTrue=mQuestionBank[mCurrentIndex].isAnswerTrue();
        int messageResId=0;
        if(uesrPressesTrue==answerIsTrue)
            messageResId=R.string.correct_toast;
        else
            messageResId=R.string.incorrect_toast;
        Toast.makeText(this,messageResId,Toast.LENGTH_SHORT).show();
    }

    @Override
    protected void onCreate(Bundle savedInstanceState) {
        super.onCreate(savedInstanceState);
        setContentView(R.layout.activity_main);

        mQuestionTextView=(TextView)findViewById(R.id.question_text_view);
        updateQuestion();
        mTrueButton=(Button)findViewById(R.id.true_button);
        mTrueButton.setOnClickListener(new View.OnClickListener() {
            @Override
            public void onClick(View v) {
                checkAnswer(true);
            }
        });

        mFalseButton=(Button)findViewById(R.id.false_button);
        mFalseButton.setOnClickListener(new View.OnClickListener() {
            @Override
            public void onClick(View v) {
                checkAnswer(false);
            }
        });

        mNextButton=(Button)findViewById(R.id.next_button);
        mNextButton.setOnClickListener(new View.OnClickListener() {
            @Override
            public void onClick(View v) {
                mCurrentIndex=(mCurrentIndex+1)%mQuestionBank.length;
                updateQuestion();
            }
        });

        updateQuestion();
    }
}
strings.xml程式碼:
<resources>
    <string name="app_name">My Application1</string>
    <string name="question_text">Constantinople is the largest city in Turkey</string>
    <string name="true_button">TRUE</string>
    <string name="false_button">FALSE</string>
    <string name="correct_toast">Correct!</string>
    <string name="incorrect_toast">Incorrect!</string>

    <string name="next_button">NEXT</string>
    <string name="question_ocean">The Pacific Ocean is larger than the Atlantic Qcean.</string>
    <string name="question_mideast">The Suez Canal connects the Red Sea and the Indian Ocean.</string>
    <string name="question_africa">The source of the Nile River is in Egypt.</string>
    <string name="question_americas">The Amazon River is the longest river in the Americas.</string>
    <string name="question_asia">Lake Baikal is the world\'s oldest and deepest freshwater lake.</string>
</resources>
1. Question類中封裝了什麼東西?為什麼能這麼用?
Question類中封裝了兩部分資料:問題文字和問題答案。
但是注意mTextResId是int型別而不是String 型別,是因為該變數儲存的是地理知識問題的字串資源的ID而資源ID總是int型別同時為這兩個變數設定獲取方法和設定方法。
同時根據我們上面說到的MVC模式,可以知道,模型物件不關心使用者介面,它存在的目的就是儲存和管理應用資料。這裡面的Question類其實就很類似,它只儲存對應的地理知識的題面和答案,其他的和它並沒有什麼關係,所以只需要再控制檢視層,逐條顯示對應的題面就可以了。
挑戰題:
1. 使用者點選應用的Textview文字區域,也可以跳轉到下一題。
mQuestionTextView=(TextView)findViewById(R.id.question_text_view);
        updateQuestion();
被替換為,設定監聽器即可。(TextView也是View的一個子類,和Button一樣都可以設定監聽器)

mQuestionTextView=(TextView)findViewById(R.id.question_text_view);//給TextView設計監聽器,達到點選也會進行題面變化
        mQuestionTextView.setOnClickListener(new View.OnClickListener() {
            @Override
            public void onClick(View v) {
                mCurrentIndex=(mCurrentIndex+1)%mQuestionBank.length;
                updateQuestion();
            }
        });
2. 新增後退按鈕。
string.xml增加:
<string name="pre_button">PRE</string>
actiity_main.xml中:
<Button
        android:id="@+id/next_button"
        android:layout_width="wrap_content"
        android:layout_height="wrap_content"
        android:text="@string/next_button"/>

這塊要增加對應的模組,變化為:

<LinearLayout
        android:layout_width="wrap_content"
        android:layout_height="wrap_content"
        android:orientation="horizontal">

        <Button
            android:id="@+id/pre_button"
            android:layout_width="wrap_content"
            android:layout_height="wrap_content"
            android:text="@string/pre_button"
            android:drawableLeft="@drawable/arrow_left"
            android:drawablePadding="4dp"/>

        <Button
            android:id="@+id/next_button"
            android:layout_width="wrap_content"
            android:layout_height="wrap_content"
            android:text="@string/next_button"
            android:drawableRight="@drawable/arrow_right"
            android:drawablePadding="4dp"/>
    </LinearLayout>
對應的MainActivity.java中增加:
mPreButton=(Button)findViewById(R.id.pre_button);
        mPreButton.setOnClickListener(new View.OnClickListener() {
            @Override
            public void onClick(View v) {
                if(mCurrentIndex== 0){
                    int question = mQuestionBank[mQuestionBank.length -1].getTextResId();
                    mQuestionTextView.setText(question);
                    mCurrentIndex=4;
                } else{
                    mCurrentIndex=(mCurrentIndex -1);
                    updateQuestion();
                }
            }
        });

注意0的時候要特判一下,不然會執行錯誤。
3. 從按鈕到圖示按鈕:
完成這個需要使用ImageButton元件,對應的程式碼改變。
activity_main.xml中:
<LinearLayout
        android:layout_width="wrap_content"
        android:layout_height="wrap_content"
        android:orientation="horizontal">
        <ImageButton
            android:id="@+id/pre_button"
            android:layout_width="wrap_content"
            android:layout_height="wrap_content"
            android:src="@drawable/arrow_left"/>
        <ImageButton
            android:id="@+id/next_button"
            android:layout_width="wrap_content"
            android:layout_height="wrap_content"
            android:src="@drawable/arrow_right"/>
    </LinearLayout>
Activity_main.java中:
mPreButton=(Button)findViewById(R.id.pre_button);
mNextButton=(Button)findViewById(R.id.next_button);

替換為,其他的沒有什麼變化。
mPreButton=(ImageButton)findViewById(R.id.pre_button);
mNextButton=(ImageButton)findViewById(R.id.next_button);
