angular專案仿照案例程式碼新增一個模組
今天準備仿照angular官網案例中的模組,然後自己增加一個模組。
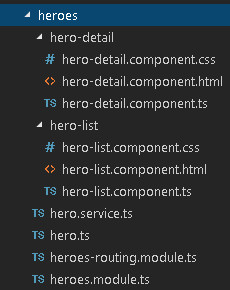
參照物件是專案中的heros模組,右下圖是VSCode中的目錄結構:


從程式碼結構看,官方例項中一個基本模組包含如下內容:
1. XX-detail 2. XX-list 3. XX.service 4. XX 5. XX-rounting.module 6. XX.module
按先後順序排序之後如下:
1. XX (實體類)
2. XX.service (提供本模組中具體的一些功能和方法)
3. XX-detail和XX-list (記錄詳情和記錄列表)
各自又分為component.ts + component.html ,以及component.css
component.ts負責資料獲取以及頁面跳轉的定義,component.html負責資料的展示,總得來說是一對一的配對關係。
4. XX-rounting.module (定義本模組中的幾個路由)
5. XX.module (整合本模組的路由與所有功能元件)
************************************************************************************************************
說完了一個模組的組成部分,準備增加自定義的使用者資訊模組(user),下面記錄新增自定義模組的步驟:
1. 複製“heros”資料夾,並重命名為user(按它的標準應該是users,不過出於個人喜好,我還是用了單數user)。
2. 對於上面介紹的每個部分,檔名中heros替換為user, 檔案裡面的內容也進行替換:
替換內容:

HERO -> USER
Hero -> User
hero -> user
heroes -> users //注意複數的寫法問題
尤其要注意的是 user-rounting.module中,因為我這邊模組名用了user而不是users,踩了一個小時的坑之後,路由中的寫法如下(如果是按照示例用複數起名為users的話就沒有這個問題):
const userRoutes: Routes = [
  { path: 'users', redirectTo: '/superusers' },
  { path: 'user/:id', redirectTo: '/superuser/:id' },
  { path: 'superusers',  component: UserListComponent, data: {  }},
  { path: 'superuser/:id', component: UserDetailComponent, data: {  }}
];
3. app.module.ts中把user模組的名稱加進去。
4. app.component.html中把user模組的連結放進去,按照 user-rounting.module,注意路徑的寫法。
4. mock-users.ts中的模擬資料改一下。
執行,成功:


