spring cloud (一、服務註冊demo_eureka)
首先我的部落格記理論知識很少,大家對spring boot、spring cloud 、分散式 、微服務什麼的一點概念都沒有的還請先去百度看看理論,知道了是做什麼用的,然後再寫下demo ,這樣學起來才沒有那麼迷糊!
我一般寫下的demo都是我踩了很多坑,或者說很多人在其他地方寫下的demo搬過來根本執行不起來,然後我經過處理和查詢,整理了一下!
方便我以後再回來查詢,也方便有些小夥伴入門的demo!
我就簡略的介紹一個這個demo;就是spring cloud 中的一個註冊伺服器 、註冊管理中心 會自動監控!
這個demo是我從官網上面找下來的,然後註釋了一些用不上的程式碼和配置!
我這裡採用的idea編輯器!
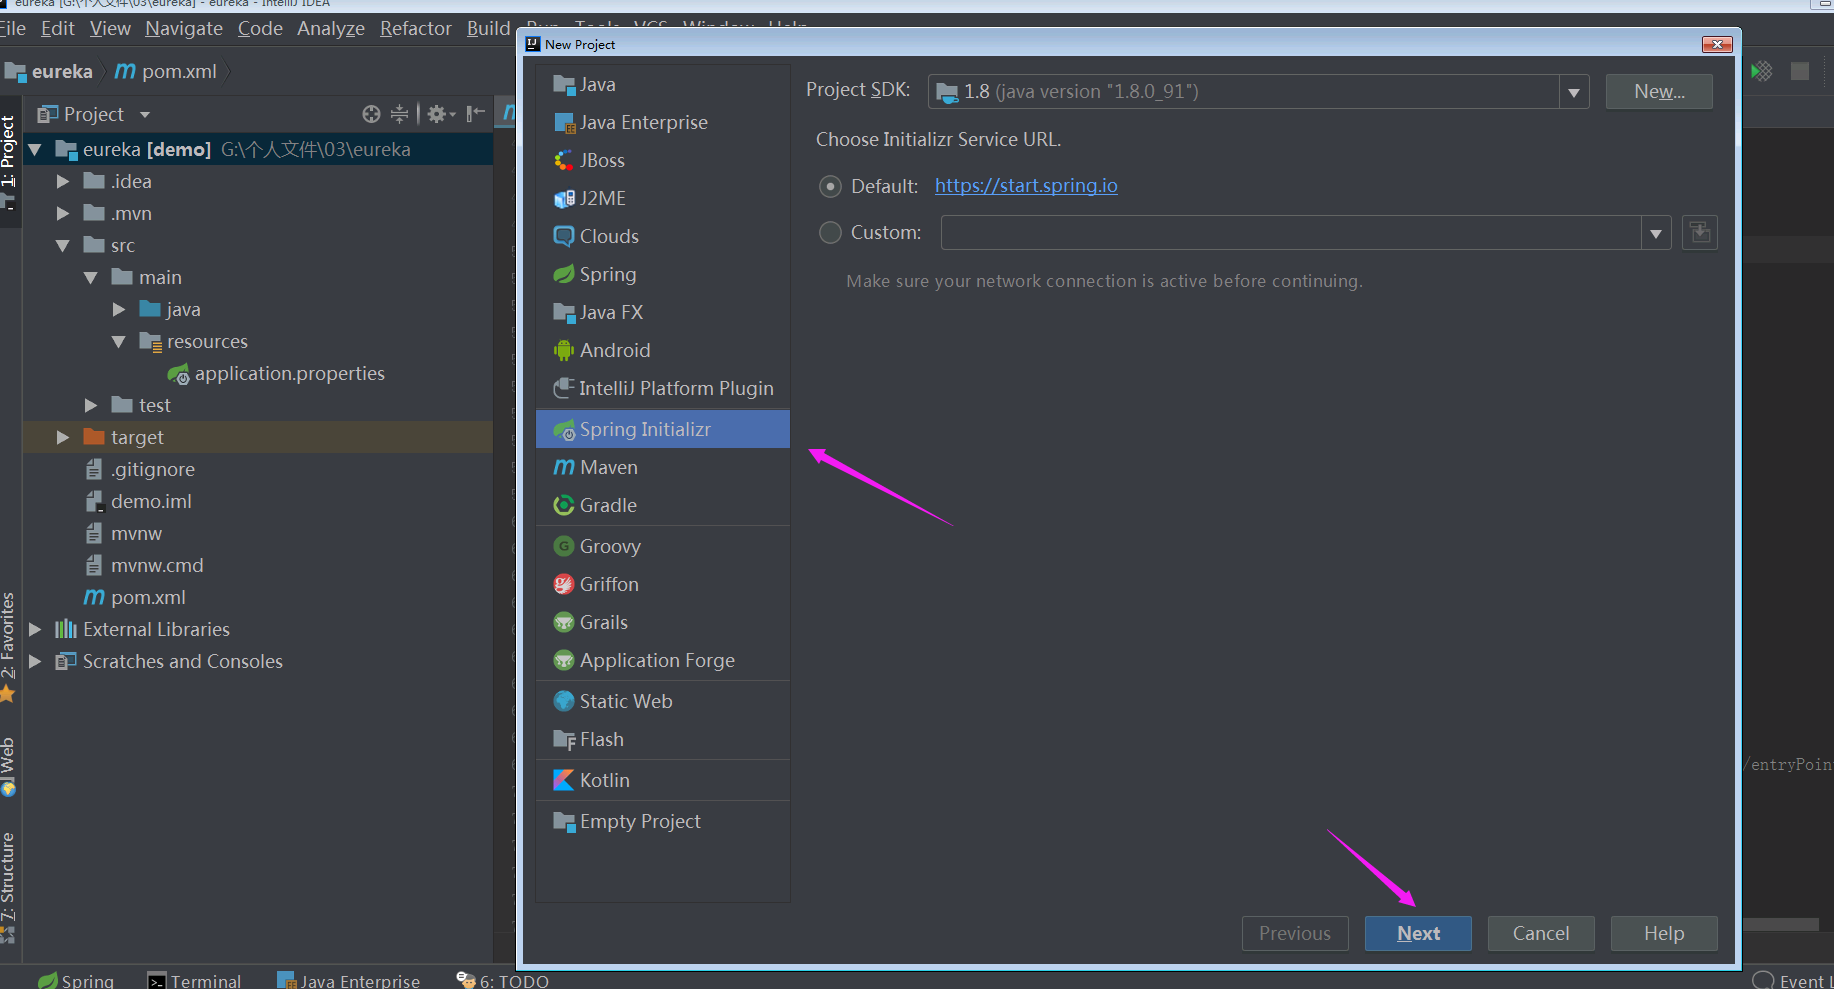
第一步:我們建立一個spring boot專案
如下圖:一直next.......最後Finish

第二步:修改maven的pom檔案,檔案已經給你們整理好了,如下:
<?xml version="1.0" encoding="UTF-8"?> <project xmlns="http://maven.apache.org/POM/4.0.0" xmlns:xsi="http://www.w3.org/2001/XMLSchema-instance" xsi:schemaLocation="http://maven.apache.org/POM/4.0.0 http://maven.apache.org/xsd/maven-4.0.0.xsd"> <modelVersion>4.0.0</modelVersion><!--描述這個POM檔案是遵從哪個版本的專案描述符。--> <groupId>com.example</groupId> <artifactId>demo</artifactId> <version>0.0.1-SNAPSHOT</version> <packaging>jar</packaging> <name>demo</name> <description>demo project forSpring Boot</description> <parent><!--父級依賴,繼承--> <groupId>org.springframework.boot</groupId> <artifactId>spring-boot-starter-parent</artifactId> <version>2.0.2.RELEASE</version> <relativePath/> <!-- lookup parent from repository --> </parent> <dependencies><!--引入依賴--> <dependency> <groupId>org.springframework.cloud</groupId> <artifactId>spring-cloud-starter-netflix-eureka-server</artifactId> </dependency> <dependency> <groupId>org.springframework.cloud</groupId> <artifactId>spring-cloud-starter-config</artifactId> </dependency> <dependency> <groupId>org.springframework.boot</groupId> <artifactId>spring-boot-starter-test</artifactId> <scope>test</scope> </dependency> </dependencies> <!--宣告依賴,如果dependencies中沒有宣告版本就會來這裡面找--> <dependencyManagement> <dependencies> <dependency> <groupId>org.springframework.cloud</groupId> <artifactId>spring-cloud-dependencies</artifactId> <version>Finchley.BUILD-SNAPSHOT</version> <type>pom</type> <scope>import</scope> </dependency> </dependencies> </dependencyManagement> <properties><!--定義的標籤屬性可以在其他地方讀取--> <project.build.sourceEncoding>UTF-8</project.build.sourceEncoding> <start-class>com.example.demo.DemoApplication</start-class> <java.version>1.8</java.version> <!-- <docker.image.prefix>springcloud</docker.image.prefix>--> </properties> <build> <plugins> <!-- <plugin> <groupId>com.spotify</groupId> <artifactId>docker-maven-plugin</artifactId> <version>0.2.3</version> <configuration> <baseImage>openjdk:8-jre-alpine</baseImage> <imageName>${docker.image.prefix}/${project.artifactId}</imageName> <exposes>8761</exposes> <entryPoint>["java", "-Djava.security.egd=file:/dev/./urandom", "-jar", "/${project.build.finalName}.jar"]</entryPoint> <resources> <resource> <targetPath>/</targetPath> <directory>${project.build.directory}</directory> <include>${project.build.finalName}.jar</include> </resource> </resources> </configuration> </plugin>--> <!-- <plugin> <groupId>org.springframework.boot</groupId> <artifactId>spring-boot-maven-plugin</artifactId> <!– defined in spring-cloud-starter-parent pom (as documentation hint), but needs to be repeated here –> <configuration> <requiresUnpack> <dependency> <groupId>com.netflix.eureka</groupId> <artifactId>eureka-core</artifactId> </dependency> <dependency> <groupId>com.netflix.eureka</groupId> <artifactId>eureka-client</artifactId> </dependency> </requiresUnpack> </configuration> </plugin>--> <!-- <plugin> <groupId>pl.project13.maven</groupId> <artifactId>git-commit-id-plugin</artifactId> <configuration> <failOnNoGitDirectory>false</failOnNoGitDirectory> </configuration> </plugin> <plugin> <!–skip deploy (this is just a test module) –> <artifactId>maven-deploy-plugin</artifactId> <configuration> <skip>true</skip> </configuration> </plugin>--> </plugins> </build> <!-- <!–相當於配置遠端倉庫–> <repositories> <repository> <id>spring-snapshots</id> <name>Spring Snapshots</name> <url>https://repo.spring.io/libs-snapshot</url> <!–是否自動更新–> <snapshots> <enabled>true</enabled> </snapshots> </repository> <repository> <id>spring-milestones</id> <name>Spring Milestones</name> <url>https://repo.spring.io/libs-milestone</url> <snapshots> <enabled>false</enabled> </snapshots> </repository> <repository> <id>spring-releases</id> <name>Spring Releases</name> <url>https://repo.spring.io/libs-release</url> <snapshots> <enabled>false</enabled> </snapshots> </repository> </repositories> <!–外掛倉庫–> <pluginRepositories> <pluginRepository> <id>spring-snapshots</id> <name>Spring Snapshots</name> <url>https://repo.spring.io/libs-snapshot-local</url> <snapshots> <enabled>true</enabled> </snapshots> </pluginRepository> <pluginRepository> <id>spring-milestones</id> <name>Spring Milestones</name> <url>https://repo.spring.io/libs-milestone-local</url> <snapshots> <enabled>false</enabled> </snapshots> </pluginRepository> </pluginRepositories>--> </project>
以上的pom檔案你複製進去了會發現很多註釋掉了。先別管
第三步:修改 application.properties,檔案內容如下:
server.port=3333

eureka.instance.hostname=localhost
#不要向註冊中心註冊自己
eureka.client.register-with-eureka=false
#禁止檢索服務
eureka.client.fetch-registry=false
eureka.client.service-url.defaultZone=http://${eureka.instance.hostname}:${server.port}/eureka
第四步:在啟動類上加上這個註解@EnableEurekaServer
package com.example.demo;

import org.springframework.boot.SpringApplication;
import org.springframework.boot.autoconfigure.SpringBootApplication;
import org.springframework.cloud.netflix.eureka.server.EnableEurekaServer;

@EnableEurekaServer
@SpringBootApplication
public class DemoApplication {

    public static void main(String[] args) {
        SpringApplication.run(DemoApplication.class, args);
    }
}
到了這一步所有的配置和程式碼已經寫完了!
注意:如果你的專案現在啟動不起來,那就把pom檔案的註釋全部放開,會自動從配置的倉庫裡面下載jar包
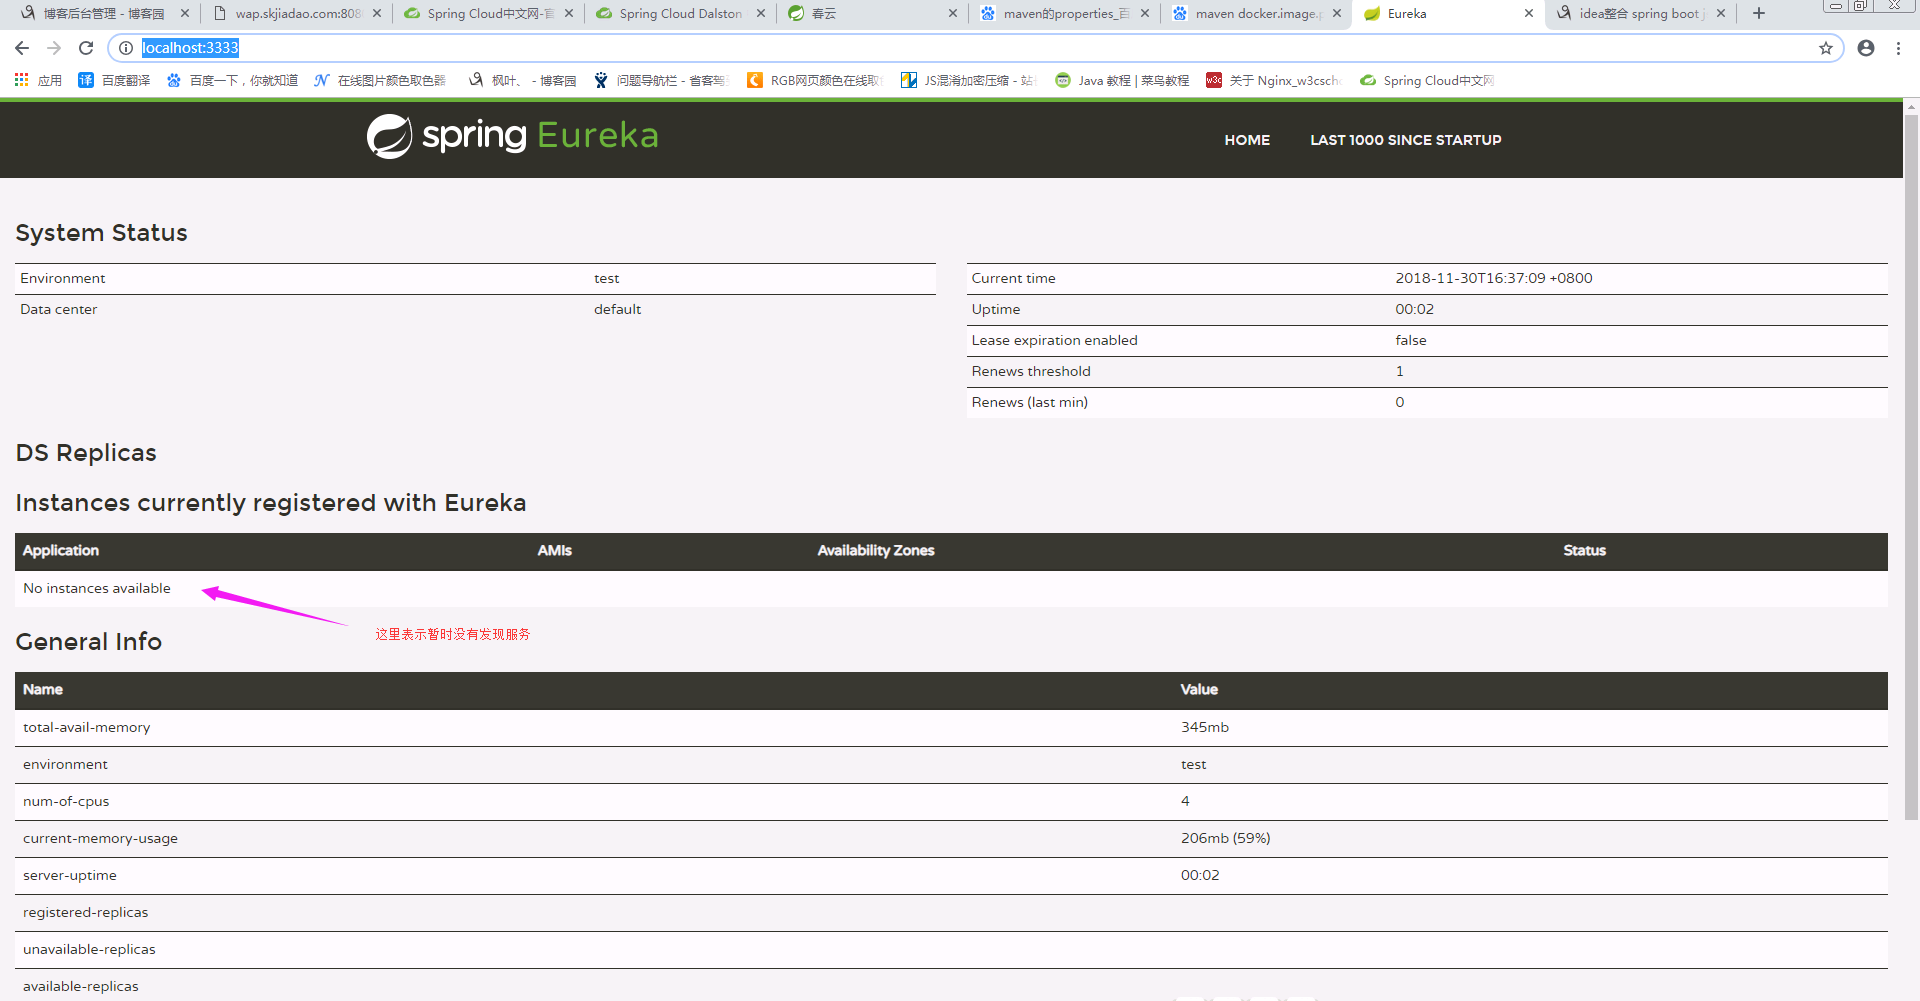
一切正常後,我們通過main方法啟動,通過上面的配置,我們開啟瀏覽器訪問 http://localhost:3333
會出現如下介面

