
Scrapy爬取伯樂線上採用兩種入庫方法
scrapy基本命令
1.建立scrapy專案
scrapy startproject mybole
2.進入專案列表並在專案目錄下建立爬蟲檔案,此處必須加上你要爬取的連結否則會報錯
cd mybole
scrapy genspider jobbole jobbole.com
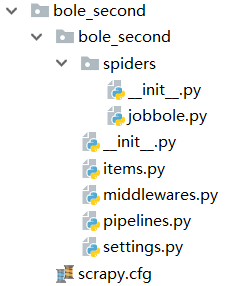
3.在你建立的scrapy列表中找到spiders就是你建立的爬蟲資料夾jobbole.py
4.初始化的爬蟲程式碼scrapy已幫你建立

5.現在開始進行爬取網頁文章內容的提取採用xpath方法進行爬取,爬去的xpath程式碼可在Chrome應用商城下載xpathhelper,也可以在命令列模式下輸入如下程式碼就可以進入shell介面
scrapy shell “此處填寫具體網址”
6.完整的jobbole.py程式碼如下:
# -*- coding: utf-8 -*-
import scrapy
import  re
from mybole.items import  MyboleItem
from scrapy.http import  Request#回掉函式
from  urllib import  parse#域名拼接
class MyjobboleSpider(scrapy.Spider):
    name = 'myjobbole'
    allowed_domains = ['blog.jobbole.com']
    start_urls = ['http://blog.jobbole.com/all-posts/']

    def parse(self, response):
        # archive > div:nth-child(1) > div.post-thumb > a
        post_nodes=response.css("#archive .floated-thumb .post-thumb a")
        #post_urls=response.css('//div[@id="archive"]/div[@class="post floated-thumb"]/div[@class="post-thumb"]/a/@href').extract()

        for post_node in post_nodes:
            image_url=post_node.css("img::attr(src)").extract_first('')
            post_url=post_node.css("::attr(href)").extract_first('')
            #meta是個字典,意思是每次執行程式碼吧圖片url提取
            yield  Request(url=parse.urljoin(response.url,post_url),meta={"front_image_url":image_url},  callback=self.parse_detial)#執行url對具體文章提取內容迴圈多次
        #在response.css(".next.page-numbers::attr(href)")中兩個class之間加了空格代表父子,不加空格代表是同一個class
        next_urls=response.css(".next.page-numbers::attr(href)").extract_first('')
        if next_urls:
            #scrapy  根據函式名呼叫函式進行每頁的爬取回到這個def parse(self, response):
            yield  Request(url=parse.urljoin(response.url,next_urls),callback=self.parse)#執行url對具體文章提取內容迴圈多次
細節性知識點:
#strip()去掉提取內容中的回車換行符即“\r\n”,replace(".","")替換.為空
create_date=response.xpath("//p[@class=‘entry-meta-hide-on-mobile’]/text()").extract()[0].strip().replace("·", “”)
tag_list = [tag for tag in tag_list if not tag.strip().endswith(‘評論’)]#過濾掉“評論”
tags = ‘,’.join(tag_list)
join(): 連線字串陣列。將字串、元組、列表中的元素以指定的字元(分隔符)連線生成一個新的字串
語法: ‘sep’.join(seq)
引數說明
sep:分隔符。可以為空
seq:要連線的元素序列、字串、元組、字典
上面的語法即:以sep作為分隔符,將seq所有的元素合併成一個新的字串
返回值:返回一個以分隔符sep連線各個元素後生成的字串
7.items.py程式碼如下:
import scrapy


class MyboleItem(scrapy.Item):
    # define the fields for your item here like:
    # name = scrapy.Field()
    title=scrapy.Field()
    create_date = scrapy.Field()
    url = scrapy.Field()
    url_object_id = scrapy.Field()  # 文章 URL 的 MD5 值
    front_image_url = scrapy.Field()
    front_image_path = scrapy.Field()
    praisenums = scrapy.Field()
    favnums = scrapy.Field()
    commentnums = scrapy.Field()
    content= scrapy.Field()
    tags= scrapy.Field()
items.py相當於python基礎知識中的字典,但是在爬去資訊的時候對資料操作比較多於是便有了item方便進行資料的操作。
8.piplines.py管道檔案程式碼:
看不懂的程式碼請看註釋
import  json
import pymysql
#from  twisted.enterprise import adbapi
from twisted.enterprise import  adbapi
from scrapy.pipelines.images import ImagesPipeline

class MybolePipeline(object):
    def process_item(self, item, spider):
        return item
 #此處利用scrapy自帶scrapy.pipelines.images爬取圖片並將圖片路徑 儲存
class MyboleImagePipeline(ImagesPipeline):
    def item_completed(self, results, item, info):
        for ok, v in results:
            image_file_path = v['path']
            item['front_image_path'] = image_file_path
        return item


#json檔案儲存
class JsonWithEncodingPipeline(object):
    def __init__(self):
        self.file = open('article.json', 'a', encoding='utf-8')
    #此處開啟檔案的方式“a”與“w”一樣但是必須要新增encoding='utf-8'將爬取的xpath程式碼轉換問utf-8型別

    def process_item(self, item, spider):
    #先將item物件轉化為字典物件才能進行json檔案儲存, ensure_ascii=False代表不用ascii儲存也就是		         #用中文就好了
        self.file.write(json.dumps(dict(item), ensure_ascii=False) + ',\n')
        return item

    def close_spider(self):
        self.file.close()


 #一般資料庫儲存
 #此處程式碼最容易報錯請確保資料庫表 中開頭麼有空格其他注意細節
class MySQLPipeline(object):
    def __init__(self):
        self.conn = pymysql.connect(host="127.0.0.1",user="root",password="root",db="Articles", charset='utf8')
        self.cursor = self.conn.cursor()

    def process_item(self, item, spider):
        insert_sql = '''
                    insert into jobbole_article(title,create_date,url,url_object_id,front_img_url,
                                                front_img_path,praise_nums,comment_nums,fav_nums,tags,content)
                    values(%s,%s,%s,%s,%s,%s,%s,%s,%s,%s,%s)
                '''
        self.cursor.execute(insert_sql, (
            item['title'], item['create_date'], item['url'], item['url_object_id'],
            item['front_img_url'], item['front_img_path'], item['praise_nums'],
            item['comment_nums'], item['fav_nums'], item['tags'], item['content']
        ))
        self.conn.commit()


    def close_spider(self,spider): #TypeError: close_spider() takes 1 positional argument but 2 were given


        self.cursor.close()
        self.conn.close()


#非同步存入資料庫目的就是爬蟲速度太快資料存入資料庫程式碼,此處非同步儲存加快速度分佈存入,防止數
#據太多資料庫堵著
class MysqlTwistedPipline(object):
    #builtins.TypeError: __init__() missing 1 required positional argument: 'db_pool'
    #出現如上錯誤在from_settinngs 前新增@classmethod
    def __init__(self,dbpool):
        self.dbpool=dbpool
    #從settings獲得 資料庫配置資訊
    @classmethod
    #@classmethod優先順序高於__init__使dbpool輸出便於初始化
    def from_settings(cls,settings):
        # 用一個db_params接收連線資料庫的引數
        dbparms=dict(host=settings["MYSQL_HOST"],db=settings["MYSQL_DBNAME"],
                     user=settings["MYSQL_USER"],password=settings["MYSQL_PASSWORD"],
                     charset="utf8",
                    #設定遊標型別
                     cursorclass=pymysql.cursors.DictCursor,
                     use_unicode=True,
                     )
        # 建立連線池
        dbpool=adbapi.ConnectionPool('pymysql',**dbparms)
        # 返回一個pipeline物件
        return cls(dbpool)


    def process_item(self,item,spider):
        #把要執行的sql語句放入連線池
        # 使用Twisted將mysql插入變成非同步執行
        # runInteraction可以將傳入的函式變成非同步的
        query=self.dbpool.runInteraction(self.insert_into,item)
        query.addErrback(self.handle_error,item,spider)
        # 如果sql執行傳送錯誤,自動回撥addErrBack()函式
        return item
    def insert_into(self,cursor,item):
        # 會從dbpool取出cursor
        # 執行具體的插入
        insert_sql = '''
                            insert into jobbole_article(title,create_date,url,url_object_id,front_img_url,
                                                        front_img_path,praise_nums,comment_nums,fav_nums,tags,content)
                            values(%s,%s,%s,%s,%s,%s,%s,%s,%s,%s,%s)
                        '''
        cursor.execute(insert_sql, (
            item['title'], item['create_date'], item['url'], item['url_object_id'],
            item['front_img_url'], item['front_img_path'], item['praise_nums'],
            item['comment_nums'], item['fav_nums'], item['tags'], item['content']
        ))
        # 拿傳進的cursor進行執行,並且自動完成commit操作

    def handle_error(self, failure, item, spider):
        # 處理非同步插入的異常
        print(failure)
9.setting檔案是對整個爬蟲執行哪塊不執行哪塊的整體控制:
(1)簡單來說就是不遵守robots.txt規定,不寫著這句話代表你什麼都獲取不了
Obey robots.txt rules
ROBOTSTXT_OBEY = False
(2)管道檔案控制器,數字越小 代表執行優先順序越大,簡單來說就是誰小先執行誰
ITEM_PIPELINES = {
   #'mybole.pipelines.MybolePipeline': 300,
#'scrapy.pipelines.images.ImagesPipeline':1,

#"mybole.pipelines.JsonWithEncodingPipeline":300,
    #'mybole.pipelines.MyboleImagePipeline':200,
'scrapy.pipelines.images.ImagesPipeline':1
}

import  os
project_dir=os.path.dirname(os.path.abspath(__file__))#獲得當前目錄的名稱向前取獲得目錄名
IMAGE_URLS_FIELD='front_image_url'#獲取url
#請睜開眼你沒有加S導致程式錯誤
# IMAGES_URLS_FIELD = 'front_image_url'
IMAGE_STORE=os.path.join(project_dir,'images')#設定圖片路徑
(3)獲取圖片利用的是自帶的圖片管道進行爬取,需要與管道相聯合
(4)在setting 中新增資料庫資訊你怎樣建立資料庫內容隨你改變
MYSQL_HOST='localhost'
MYSQL_DBNAME="Articles"
MYSQL_USER="root"
MYSQL_PASSWORD="root"
10.setting.py整體起作用程式碼在這如需修改請自行修改:
#當我們的item被傳輸到pipeline我們可以將其進行儲存到資料庫等工作
ITEM_PIPELINES = {

   #'bole.pipelines.BolePipeline': 300,
   #'bole.pipelines.JsonWithEncodingPipeline': 2,
  # 'bole.pipelines.JsonWithEncodingPipeline': 200,
  #  "bole.pipelines.MysqlTwistedPipline":200,
  #  "bole.pipelines.BoleImagePipeline":100,
   'scrapy.pipelines.images.ImagesPipeline':1
}
MYSQL_HOST='localhost'
MYSQL_DBNAME="Articles"
MYSQL_USER="root"
MYSQL_PASSWORD="root"
import os
# 獲取專案目錄
project_dir = os.path.dirname(os.path.abspath(__file__))
# 指定需要下載的圖片欄位,這個欄位必須是可迭代物件,這裡 front_img_url 就是圖片欄位名
IMAGES_URLS_FIELD = 'front_img_url'
# 指定圖片儲存路徑,這裡將專案目錄與 images 目錄進行拼接,作為圖片儲存路徑
IMAGES_STORE = os.path.join(project_dir, 'images')
MYSQL_HOST='localhost'
MYSQL_DBNAME="Articles"
MYSQL_USER="root"
MYSQL_PASSWORD="root"