例項入手Vue-Route給引用元件傳值以及實現元件重用
阿新 • • 發佈:2018-12-01
場景


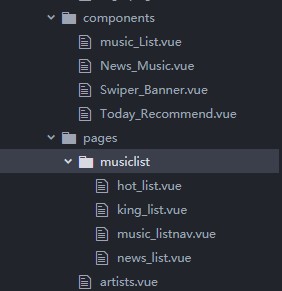
音樂榜單下有個導航頁面元件music_list.vue,它能導航到hot_list.vue熱歌榜頁面元件,king_list.vue King榜頁面元件,news_list.vue新歌榜頁面元件,這三個頁面元件佈局一致,但是請求的資料不同,所以這三個頁面都引入了公共元件music_List.vue,並且各自將請求的url作為引數傳遞給公共元件。


實現
music_listnav.vue
<template lang="html">
  <div class="music-nav">
    <div class="log url hd">
        <h2>音樂榜單</h2>
        <div>更多</div>
    </div>
    <ul>
      <li>
        <router-link to="/home/hot">熱歌榜</router-link>
        <span class="gap-line"> </span>
      </li>
      <li>
        <router-link to="/home/news">新歌榜</router-link>
        <span class="gap-line"> </span>
      </li>
      <li>
        <router-link to="/home/king">King榜</router-link>
        <span class="gap-line"> </span>
      </li>
    </ul>
  </div>
</template>

<script>
export default {
}
</script>

<style scoped>

.music-nav{
    background-color: #fff;
    margin-top: 10px;
    padding: 10px 17px;
}

.hd {
    margin: 14px 0 18px 0;
    display: -webkit-box;
    display: -webkit-flex;
    display: flex;
}

.hd h2 {
    -webkit-box-flex: 1;
    -webkit-flex: 1;
    flex: 1;
    margin: 0;
    padding: 0;
    font-size: 20px;
}

.hd {
    margin-bottom: 0;
}

ul{
    display: flex;
}

ul li{
  padding: 18px 0 12px 0;
  font-size: 16px;
  flex: 1;
  text-align: center;
  color: #999;
  position: relative;
  z-index: 2;
}

ul li a{
  display: block;
}

ul li a.active{
  color: #299DE7 !important;
}
.gap-line {
    position: absolute;
    right: 0;
    top: 20px;
    height: 18px;
    width: 1px;
    border-left: 1px solid #eee;
}

</style>
hot_list.vue 、king_list.vue、news_list.vue
這三個元件頁面程式碼一致,不同的是傳遞給公共元件music_List.vue的url引數不同,進而請求的資料不同。
<template lang="html">
  <div class="">
    <MusicList :url="url" />
  </div>
</template>

<script>

import MusicList from "../../components/Music_List"

export default {
  data(){
    return{
      url:"要請求的url"
    }
  },
  components:{
    MusicList
  }
}
</script>

<style lang="css">
</style>
公共元件music_List.vue
<template lang="html"> <div class="board panels"> <div class="panel hotsongs on"> <ul class="list"> <li class="song url" v-for="(item,index) in currentData" :key="index"> <div class="poster"> <img :src="item.pic_big" :alt="item.title"> </div> <div class="info"> <div class="name"> {{ item.title }} </div> <div class="author">{{ item.artist_name }}</div> </div> </li> </ul> <div class="more-songs url"> 檢視該榜單> </div> </div> </div> </template> <script> export default { data(){ return{ currentData:[] } }, props:{ url:{ type:String, default:"" } }, mounted(){ const httpUrl = this.HOST+this.url; this.$axios.get(httpUrl) .then(res => { this.currentData = res.data.song_list }) .catch(error => { console.log(error); }) } } </script> <style scoped> .board{ margin-bottom: 10px; } .panel { border-top: 1px solid #eee; position: relative; top: -1px; display: block; background: #fff; } .list{ padding: 20px; padding-top: 0; } .panel .list li { height: 60px; border-bottom: 1px solid #eee; padding-left: 0; display: flex; padding-top: 10px; } .panel .list li .poster { position: relative; width: 45px; margin-right: 8px; } .panel .list li .poster img { border: 1px solid #eee; } .info{ flex: 1; overflow: hidden; text-overflow: ellipsis; white-space: nowrap; } .info .name { overflow: hidden; text-overflow: ellipsis; white-space: nowrap; font-size: 16px; color: #333; } .info .author { overflow: hidden; text-overflow: ellipsis; white-space: nowrap; font-size: 12px; color: #999; margin-top: 2px; } .more-songs { color: #999; margin-top: 9px; font-size: 12px; text-align: center; height: 32px; line-height: 32px; } </style>
配置路由
開啟router下的index.js
{
      path: '/',
      name: 'Index',
      redirect:"/home",
      component: Index,
      children:[
        {
          path: 'home',
          component: Home,
          redirect:"/home/hot",
          children:[
            {
              path:"hot",
              component:HotList
            },
            {
              path:"king",
              component:KingList
            },
            {
              path:"news",
              component:NewsList
            }
          ]
        },
home頁面本身就是index的子路由,而熱歌榜、新歌榜、KIng榜都是home的子路由。
講解
1.在home.vue頁面有引入了music_listnav.vue導航元件,在導航元件中通過router-link以及index.js中的配置實現路由跳轉到三個榜單元件。
2.在三大榜單元件中,引入了 公共元件
通過 <MusicList :url= "url"/>給引用的元件 傳遞一個引數url,而這個引數在
給引數賦值。
export default {
  data(){
    return{
      url:"要賦值的引數"

    }
3.公共元件接受引數
在公共元件中通過:
  props:{
    url:{
      type:String,
      default:""
    }
來接受傳遞的引數。
然後將接受的引數作為請求資料的url來請求不同的資料
  mounted(){
    const httpUrl = this.HOST+this.url;
    this.$axios.get(httpUrl)
      .then(res => {
        this.currentData = res.data.song_list
      })
      .catch(error => {
        console.log(error);
      })
  }
最終效果


