
李曉菁201771010114《面向物件程式設計(java)》第十四周學習總結
一:理論知識部分
1.Swing和MVC設計模式
(1)設計模式(Design pattern)是設計者一種流行的 思考設計問題的方法,是一套被反覆使用,多數人 知曉的,經過分類編目的,程式碼設計經驗的總結。
(2)模型-檢視-控制器設計模式(Model –ViewController )是Java EE平臺下建立 Web 應用程式 的重要設計模式。
(3)MVC設計模式 – Model(模型):是程式中用於處理程式資料邏 輯的部分,通常模型負責在資料庫中存取資料。
– View(檢視):是程式中處理資料顯示的部分, 通常檢視依據模型存取的資料建立。
– Controller(控制器):是程式中處理使用者互動 的部分。通常控制器負責從檢視讀取資料,控制 使用者輸入,並向模型傳送資料。
(4)Java元件有內容、外觀、行為三個主要元素
2.佈局管理器
1)佈局管理器是一組類。 – 實現 java.awt.LayoutManager 介面 – 決定容器中元件的位置和大小
Java.awt包中定義了5種佈局管理類,每一種布 局管理類對應一種佈局策略。
每個容器都有與之相關的預設佈局管理器。
2)5種佈局管理器:
(1)FlowLayout: 流佈局(Applet和Panel的預設 佈局管理器) (2)BorderLayout:邊框佈局( Window、Frame和 Dialog的預設佈局管理器) (3)GridLayout: 網格佈局 (4)GridBagLayout: 網格組佈局 (5)CardLayout :卡片佈局
3.文字輸入:(1)域 (2)文字區(3)標籤與標籤元件(4)密碼域(5)滾動窗格
4.選擇元件:複選框 單選按鈕 邊框 組合框 滑動條
複選框:複選框構造器 1.bold = new JCheckBox("Bold"); 複選框自動地帶有表示標籤
單選按鈕:JRadioButton(String label,Icon icon); 建立一個帶標籤和圖示的單選按鈕
邊框:如果在一個視窗中 有多組複選框或單選按 鈕,就需要視覺化的形 式指明哪些按鈕屬於同 一組。Swing提供了一 組很有用的邊框
組合框:
如果有多個選擇項,使用單選按鈕佔據的螢幕空 間太大時,就可以選擇組合框。
faceCombo = new JComboBox(); faceCombo.setEditable(true);
滑動條:滑動條可以讓使用者從一組離散值中進行選擇 ,並且它還允許進行連續值得選擇
5.選單:選單建立 選單項中的圖示 複選框和單選按鈕選單項 彈出選單 快捷鍵和加速器 啟用和禁用選單項 工具欄 工具提示
6.對話方塊:選項對話方塊 建立對話方塊 資料選擇 檔案對話方塊 顏色選擇器
(1)對話方塊是一種大小不能變化、不能有選單的容器視窗; 對話方塊不能作為一個應用程式的主框架,而必須包含在其 他的容器中。
(2)選項對話方塊:JOptionPane提供的對話方塊是模式對話方塊。當模 式對話方塊顯示時,它不允許使用者輸入到程式的 其他的視窗。使用JOptionPane,可以建立和自 定義問題、資訊、警告和錯誤等幾種型別的對 話框。
(3)資料交換:輸入對話方塊含有供使用者輸入文字的文字框、一個確認和取 消按鈕,是有模式對話方塊。當輸入對話方塊可見時,要求使用者 輸入一個字串。
(4)檔案對話方塊:專門用於對檔案(或目錄)進行瀏覽和選擇的對 話框,常用的構造方法: – JFileChooser():根據使用者的預設目錄建立檔案對話方塊 – JFileChooser(File currentDirectory):根據File型引數 currentDirectory指定的目錄建立檔案對話方塊
(5)顏色對話方塊: javax.swing包中的JColorChooser類的靜態方 法: public static Color showDialog(Component component, String title, Color initialColor)建立一個顏色對話方塊
實驗十四 Swing圖形介面元件
實驗時間 20178-11-29
1、實驗目的與要求
(1) 掌握GUI佈局管理器用法;
(2) 掌握各類Java Swing元件用途及常用API;
2、實驗內容和步驟
實驗1: 匯入第12章示例程式,測試程式並進行組內討論。
測試程式1
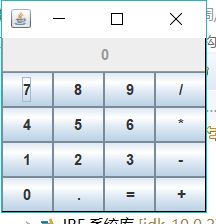
l 在elipse IDE中執行教材479頁程式12-1,結合執行結果理解程式;
l 掌握各種佈局管理器的用法;
l 理解GUI介面中事件處理技術的用途。
l 在佈局管理應用程式碼處添加註釋;


package calculator;

import java.awt.*;
import java.awt.event.*;
import javax.swing.*;

/**
 * A panel with calculator buttons and a result display.
 */
public class CalculatorPanel extends JPanel
{
   private JButton display;
   private JPanel panel;
   private double result;
   private String lastCommand;
   private boolean start;

   public CalculatorPanel()
   {
      setLayout(new BorderLayout());

      result = 0;
      lastCommand = "=";
      start = true;

      // add the display

      display = new JButton("0");
      display.setEnabled(false);
      add(display, BorderLayout.NORTH);

      ActionListener insert = new InsertAction();
      ActionListener command = new CommandAction();

      // add the buttons in a 4 x 4 grid

      panel = new JPanel();
      panel.setLayout(new GridLayout(4, 4));

      addButton("7", insert);
      addButton("8", insert);
      addButton("9", insert);
      addButton("/", command);

      addButton("4", insert);
      addButton("5", insert);
      addButton("6", insert);
      addButton("*", command);

      addButton("1", insert);
      addButton("2", insert);
      addButton("3", insert);
      addButton("-", command);

      addButton("0", insert);
      addButton(".", insert);
      addButton("=", command);
      addButton("+", command);

      add(panel, BorderLayout.CENTER);
   }

   /**
    * Adds a button to the center panel.
    * @param label the button label
    * @param listener the button listener
    */
   private void addButton(String label, ActionListener listener)
   {
      JButton button = new JButton(label);
      button.addActionListener(listener);
      panel.add(button);
   }

   /**
    * This action inserts the button action string to the end of the display text.
    */
   private class InsertAction implements ActionListener
   {
      public void actionPerformed(ActionEvent event)
      {
         String input = event.getActionCommand();
         if (start)
         {
            display.setText("");
            start = false;
         }
         display.setText(display.getText() + input);
      }
   }

   /**
    * This action executes the command that the button action string denotes.
    */
   private class CommandAction implements ActionListener
   {
      public void actionPerformed(ActionEvent event)
      {
         String command = event.getActionCommand();

         if (start)
         {
            if (command.equals("-"))
            {
               display.setText(command);
               start = false;
            }
            else lastCommand = command;
         }
         else
         {
            calculate(Double.parseDouble(display.getText()));
            lastCommand = command;
            start = true;
         }
      }
   }

   /**
    * Carries out the pending calculation.
    * @param x the value to be accumulated with the prior result.
    */
   public void calculate(double x)
   {
      if (lastCommand.equals("+")) result += x;
      else if (lastCommand.equals("-")) result -= x;
      else if (lastCommand.equals("*")) result *= x;
      else if (lastCommand.equals("/")) result /= x;
      else if (lastCommand.equals("=")) result = x;
      display.setText("" + result);
   }
}
View Code
package calculator;

import javax.swing.*;

/**
 * A frame with a calculator panel.
 */
public class CalculatorFrame extends JFrame
{
   public CalculatorFrame()
   {
      add(new CalculatorPanel());
      pack();
   }
}
View Code
package calculator;

import java.awt.*;
import javax.swing.*;

/**
 * @version 1.34 2015-06-12
 * @author Cay Horstmann
 */
public class Calculator
{
   public static void main(String[] args)
   {
      EventQueue.invokeLater(() -> {
         CalculatorFrame frame = new CalculatorFrame();
         frame.setTitle("Calculator");
         frame.setDefaultCloseOperation(JFrame.EXIT_ON_CLOSE);
         frame.setVisible(true);
      });
   }
}
View Code
測試程式2
l 在elipse IDE中除錯執行教材486頁程式12-2,結合執行結果理解程式;
l 掌握各種文字元件的用法;
l 記錄示例程式碼閱讀理解中存在的問題與疑惑。
package text;

import java.awt.*;
import javax.swing.*;

/**
 * @version 1.41 2015-06-12
 * @author Cay Horstmann
 */
public class TextComponentTest
{
   public static void main(String[] args)
   {
      EventQueue.invokeLater(() -> {
         JFrame frame = new TextComponentFrame();
         frame.setTitle("TextComponentTest");
         frame.setDefaultCloseOperation(JFrame.EXIT_ON_CLOSE);
         frame.setVisible(true);
      });
   }
}
View Code
package text;

import java.awt.BorderLayout;
import java.awt.GridLayout;

import javax.swing.JButton;
import javax.swing.JFrame;
import javax.swing.JLabel;
import javax.swing.JPanel;
import javax.swing.JPasswordField;
import javax.swing.JScrollPane;
import javax.swing.JTextArea;
import javax.swing.JTextField;
import javax.swing.SwingConstants;

/**
 * A frame with sample text components.
 */
public class TextComponentFrame extends JFrame
{
   public static final int TEXTAREA_ROWS = 8;
   public static final int TEXTAREA_COLUMNS = 20;

   public TextComponentFrame()
   {
      JTextField textField = new JTextField();
      JPasswordField passwordField = new JPasswordField();

      JPanel northPanel = new JPanel();
      northPanel.setLayout(new GridLayout(2, 2));
      northPanel.add(new JLabel("User name: ", SwingConstants.RIGHT));
      northPanel.add(textField);
      northPanel.add(new JLabel("Password: ", SwingConstants.RIGHT));
      northPanel.add(passwordField);

      add(northPanel, BorderLayout.NORTH);

      JTextArea textArea = new JTextArea(TEXTAREA_ROWS, TEXTAREA_COLUMNS);
      JScrollPane scrollPane = new JScrollPane(textArea);

      add(scrollPane, BorderLayout.CENTER);

      // add button to append text into the text area

      JPanel southPanel = new JPanel();

      JButton insertButton = new JButton("Insert");
      southPanel.add(insertButton);
      insertButton.addActionListener(event ->
         textArea.append("User name: " + textField.getText() + " Password: "
            + new String(passwordField.getPassword()) + "\n"));

      add(southPanel, BorderLayout.SOUTH);
      pack();
   }
}
View Code

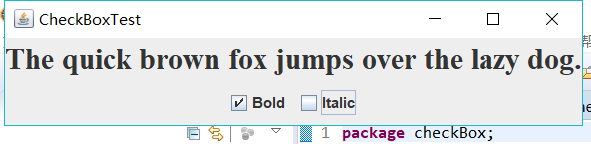
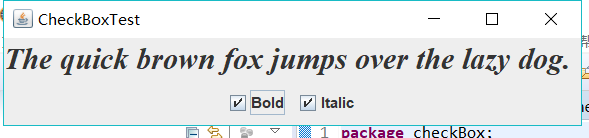
測試程式3
l 在elipse IDE中除錯執行教材489頁程式12-3,結合執行結果理解程式;
l 掌握複選框元件的用法;
l 記錄示例程式碼閱讀理解中存在的問題與疑惑。
package checkBox;

import java.awt.*;
import javax.swing.*;

/**
 * @version 1.34 2015-06-12
 * @author Cay Horstmann
 */
public class CheckBoxTest
{
   public static void main(String[] args)
   {
      EventQueue.invokeLater(() -> {
         JFrame frame = new CheckBoxFrame();
         frame.setTitle("CheckBoxTest");
         frame.setDefaultCloseOperation(JFrame.EXIT_ON_CLOSE);
         frame.setVisible(true);
      });
   }
}
View Code
package checkBox;

import java.awt.*;
import java.awt.event.*;
import javax.swing.*;

/**
 * A frame with a sample text label and check boxes for selecting font
 * attributes.
 */
public class CheckBoxFrame extends JFrame
{
   private JLabel label;
   private JCheckBox bold;
   private JCheckBox italic;
   private static final int FONTSIZE = 24;

   public CheckBoxFrame()
   {
      // add the sample text label

      label = new JLabel("The quick brown fox jumps over the lazy dog.");
      label.setFont(new Font("Serif", Font.BOLD, FONTSIZE));
      add(label, BorderLayout.CENTER);

      // this listener sets the font attribute of
      // the label to the check box state

      ActionListener listener = event -> {
         int mode = 0;
         if (bold.isSelected()) mode += Font.BOLD;
         if (italic.isSelected()) mode += Font.ITALIC;
         label.setFont(new Font("Serif", mode, FONTSIZE));
      };

      // add the check boxes

      JPanel buttonPanel = new JPanel();

      bold = new JCheckBox("Bold");
      bold.addActionListener(listener);
      bold.setSelected(true);
      buttonPanel.add(bold);

      italic = new JCheckBox("Italic");
      italic.addActionListener(listener);
      buttonPanel.add(italic);

      add(buttonPanel, BorderLayout.SOUTH);
      pack();
   }
}
測試程式4
l 在elipse IDE中除錯執行教材491頁程式12-4,執行結果理解程式;
l 掌握單選按鈕元件的用法;
l 記錄示例程式碼閱讀理解中存在的問題與疑惑。
package radioButton;

import java.awt.*;
import javax.swing.*;

/**
 * @version 1.34 2015-06-12
 * @author Cay Horstmann
 */
public class RadioButtonTest
{
   public static void main(String[] args)
   {
      EventQueue.invokeLater(() -> {
         JFrame frame = new RadioButtonFrame();
         frame.setTitle("RadioButtonTest");
         frame.setDefaultCloseOperation(JFrame.EXIT_ON_CLOSE);
         frame.setVisible(true);
      });
   }
}
View Code
package radioButton;

import java.awt.*;
import java.awt.event.*;
import javax.swing.*;

/**
 * A frame with a sample text label and radio buttons for selecting font sizes.
 */
public class RadioButtonFrame extends JFrame
{
   private JPanel buttonPanel;
   private ButtonGroup group;
   private JLabel label;
   private static final int DEFAULT_SIZE = 36;

   public RadioButtonFrame()
   {
      // add the sample text label

      label = new JLabel("The quick brown fox jumps over the lazy dog.");
      label.setFont(new Font("Serif", Font.PLAIN, DEFAULT_SIZE));
      add(label, BorderLayout.CENTER);

      // add the radio buttons

      buttonPanel = new JPanel();
      group = new ButtonGroup();

      addRadioButton("Small", 8);
      addRadioButton("Medium", 12);
      addRadioButton("Large", 18);
      addRadioButton("Extra large", 36);

      add(buttonPanel, BorderLayout.SOUTH);
      pack();
   }

   /**
    * Adds a radio button that sets the font size of the sample text.
    * @param name the string to appear on the button
    * @param size the font size that this button sets
    */
   public void addRadioButton(String name, int size)
   {
      boolean selected = size == DEFAULT_SIZE;
      JRadioButton button = new JRadioButton(name, selected);
      group.add(button);
      buttonPanel.add(button);

      // this listener sets the label font size

      ActionListener listener = event -> label.setFont(new Font("Serif", Font.PLAIN, size));

      button.addActionListener(listener);
   }
}
View Code


測試程式5
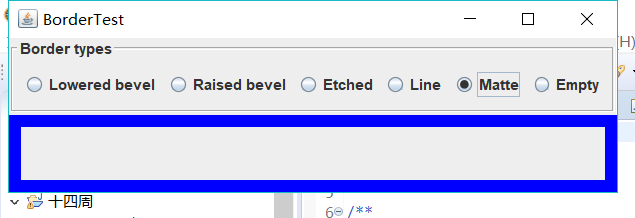
l 在elipse IDE中除錯執行教材494頁程式12-5,結合執行結果理解程式;
l 掌握邊框的用法;
l 記錄示例程式碼閱讀理解中存在的問題與疑惑。
package border;

import java.awt.*;
import javax.swing.*;

/**
 * @version 1.34 2015-06-13
 * @author Cay Horstmann
 */
public class BorderTest
{
   public static void main(String[] args)
   {
      EventQueue.invokeLater(() -> {
         JFrame frame = new BorderFrame();
         frame.setTitle("BorderTest");
         frame.setDefaultCloseOperation(JFrame.EXIT_ON_CLOSE);
         frame.setVisible(true);
      });
   }
}
View Code
package border;

import java.awt.*;
import javax.swing.*;
import javax.swing.border.*;

/**
 * A frame with radio buttons to pick a border style.
 */
public class BorderFrame extends JFrame
{
   private JPanel demoPanel;
   private JPanel buttonPanel;
   private ButtonGroup group;

   public BorderFrame()
   {
      demoPanel = new JPanel();
      buttonPanel = new JPanel();
      group = new ButtonGroup();

      addRadioButton("Lowered bevel", BorderFactory.createLoweredBevelBorder());
      addRadioButton("Raised bevel", BorderFactory.createRaisedBevelBorder());
      addRadioButton("Etched", BorderFactory.createEtchedBorder());
      addRadioButton("Line", BorderFactory.createLineBorder(Color.BLUE));
      addRadioButton("Matte", BorderFactory.createMatteBorder(10, 10, 10, 10, Color.BLUE));
      addRadioButton("Empty", BorderFactory.createEmptyBorder());

      Border etched = BorderFactory.createEtchedBorder();
      Border titled = BorderFactory.createTitledBorder(etched, "Border types");
      buttonPanel.setBorder(titled);

      setLayout(new GridLayout(2, 1));
      add(buttonPanel);
      add(demoPanel);
      pack();
   }

   public void addRadioButton(String buttonName, Border b)
   {
      JRadioButton button = new JRadioButton(buttonName);
      button.addActionListener(event -> demoPanel.setBorder(b));
      group.add(button);
      buttonPanel.add(button);
   }
}
View Code

測試程式6
l 在elipse IDE中除錯執行教材498頁程式12-6,結合執行結果理解程式;
l 掌握組合框元件的用法;
l 記錄示例程式碼閱讀理解中存在的問題與疑惑。
package comboBox;

import java.awt.*;
import javax.swing.*;

/**
 * @version 1.35 2015-06-12
 * @author Cay Horstmann
 */
public class ComboBoxTest
{
   public static void main(String[] args)
   {
      EventQueue.invokeLater(() -> {
         JFrame frame = new ComboBoxFrame();
         frame.setTitle("ComboBoxTest");
         frame.setDefaultCloseOperation(JFrame.EXIT_ON_CLOSE);
         frame.setVisible(true);
      });
   }
}
View Code
package comboBox;

import java.awt.BorderLayout;
import java.awt.Font;

import javax.swing.JComboBox;
import javax.swing.JFrame;
import javax.swing.JLabel;
import javax.swing.JPanel;

/**
 * A frame with a sample text label and a combo box for selecting font faces.
 */
public class ComboBoxFrame extends JFrame
{
   private JComboBox<String> faceCombo;
   private JLabel label;
   private static final int DEFAULT_SIZE = 24;

   public ComboBoxFrame()
   {
      // add the sample text label

      label = new JLabel("The quick brown fox jumps over the lazy dog.");
      label.setFont(new Font("Serif", Font.PLAIN, DEFAULT_SIZE));
      add(label, BorderLayout.CENTER);

      // make a combo box and add face names

      faceCombo = new JComboBox<>();
      faceCombo.addItem("Serif");
      faceCombo.addItem("SansSerif");
      faceCombo.addItem("Monospaced");
      faceCombo.addItem("Dialog");
      faceCombo.addItem("DialogInput");

      // the combo box listener changes the label font to the selected face name

      faceCombo.addActionListener(event ->
         label.setFont(
            new Font(faceCombo.getItemAt(faceCombo.getSelectedIndex()),
               Font.PLAIN, DEFAULT_SIZE)));

      // add combo box to a panel at the frame's southern border

      JPanel comboPanel = new JPanel();
      comboPanel.add(faceCombo);
      add(comboPanel, BorderLayout.SOUTH);
      pack();
   }
}
View Code
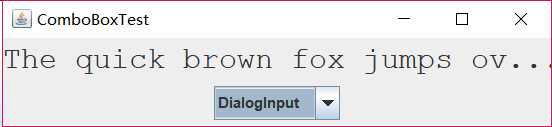

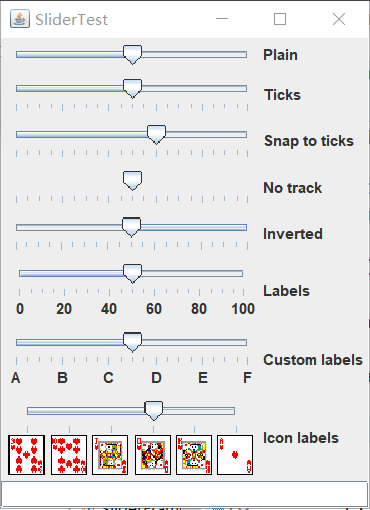
測試程式7
l 在elipse IDE中除錯執行教材501頁程式12-7,結合執行結果理解程式;
l 掌握滑動條元件的用法;
l 記錄示例程式碼閱讀理解中存在的問題與疑惑。
package slider;

import java.awt.*;
import javax.swing.*;

/**
 * @version 1.15 2015-06-12
 * @author Cay Horstmann
 */
public class SliderTest
{
   public static void main(String[] args)
   {
      EventQueue.invokeLater(() -> {
         SliderFrame frame = new SliderFrame();
         frame.setTitle("SliderTest");
         frame.setDefaultCloseOperation(JFrame.EXIT_ON_CLOSE);
         frame.setVisible(true);
      });
   }
}
View Code
package slider;

import java.awt.*;
import java.util.*;
import javax.swing.*;
import javax.swing.event.*;

/**
 * A frame with many sliders and a text field to show slider values.
 */
public class SliderFrame extends JFrame
{
   private JPanel sliderPanel;
   private JTextField textField;
   private ChangeListener listener;

   public SliderFrame()
   {
      sliderPanel = new JPanel();
      sliderPanel.setLayout(new GridBagLayout());

      // common listener for all sliders
      listener = event -> {
         // update text field when the slider value changes
         JSlider source = (JSlider) event.getSource();
         textField.setText("" + source.getValue());
      };

      // add a plain slider

      JSlider slider = new JSlider();
      addSlider(slider, "Plain");

      // add a slider with major and minor ticks

      slider = new JSlider();
      slider.setPaintTicks(true);
      slider.setMajorTickSpacing(20);
      slider.setMinorTickSpacing(5);
      addSlider(slider, "Ticks");

      // add a slider that snaps to ticks

      slider = new JSlider();
      slider.setPaintTicks(true);
      slider.setSnapToTicks(true);
      slider.setMajorTickSpacing(20);
      slider.setMinorTickSpacing(5);
      addSlider(slider, "Snap to ticks");

      // add a slider with no track

      slider = new JSlider();
      slider.setPaintTicks(true);
      slider.setMajorTickSpacing(20);
      slider.setMinorTickSpacing(5);
      slider.setPaintTrack(false);
      addSlider(slider, "No track");

      // add an inverted slider

      slider = new JSlider();
      slider.setPaintTicks(true);
      slider.setMajorTickSpacing(20);
      slider.setMinorTickSpacing(5);
      slider.setInverted(true);
      addSlider(slider, "Inverted");

      // add a slider with numeric labels

      slider = new JSlider();
      slider.setPaintTicks(true);
      slider.setPaintLabels(true);
      slider.setMajorTickSpacing(20);
      slider.setMinorTickSpacing(5);
      addSlider(slider, "Labels");

      // add a slider with alphabetic labels

      slider = new JSlider();
      slider.setPaintLabels(true);
      slider.setPaintTicks(true);
      slider.setMajorTickSpacing(20);
      slider.setMinorTickSpacing(5);

      Dictionary<Integer, Component> labelTable = new Hashtable<>();
      labelTable.put(0, new JLabel("A"));
      labelTable.put(20, new JLabel("B"));
      labelTable.put(40, new JLabel("C"));
      labelTable.put(60, new JLabel("D"));
      labelTable.put(80, new JLabel("E"));
      labelTable.put(100, new JLabel("F"));

      slider.setLabelTable(labelTable);
      addSlider(slider, "Custom labels");

      // add a slider with icon labels

      slider = new JSlider();
      slider.setPaintTicks(true);
      slider.setPaintLabels(true);
      slider.setSnapToTicks(true);
      slider.setMajorTickSpacing(20);
      slider.setMinorTickSpacing(20);

      labelTable = new Hashtable<Integer, Component>();

      // add card images

      labelTable.put(0, new JLabel(new ImageIcon("nine.gif")));
      labelTable.put(20, new JLabel(new ImageIcon("ten.gif")));
      labelTable.put(40, new JLabel(new ImageIcon("jack.gif")));
      labelTable.put(60, new JLabel(new ImageIcon("queen.gif")));
      labelTable.put(80, new JLabel(new ImageIcon("king.gif")));
      labelTable.put(100, new JLabel(new ImageIcon("ace.gif")));

      slider.setLabelTable(labelTable);
      addSlider(slider, "Icon labels");

      // add the text field that displays the slider value

      textField = new JTextField();
      add(sliderPanel, BorderLayout.CENTER);
      add(textField, BorderLayout.SOUTH);
      pack();
   }

   /**
    * Adds a slider to the slider panel and hooks up the listener
    * @param s the slider
    * @param description the slider description
    */
   public void addSlider(JSlider s, String description)
   {
      s.addChangeListener(listener);
      JPanel panel = new JPanel();
      panel.add(s);
      panel.add(new JLabel(description));
      panel.setAlignmentX(Component.LEFT_ALIGNMENT);
      GridBagConstraints gbc = new GridBagConstraints();
      gbc.gridy = sliderPanel.getComponentCount();
      gbc.anchor = GridBagConstraints.WEST;
      sliderPanel.add(panel, gbc);
   }
}
View Code
測試程式8
l 在elipse IDE中除錯執行教材512頁程式12-8,結合執行結果理解程式;
l 掌握選單的建立、選單事件監聽器、複選框和單選按鈕選單項、彈出選單以及快捷鍵和加速器的用法。
l 記錄示例程式碼閱讀理解中存在的問題與疑惑。
package menu;

import java.awt.*;
import javax.swing.*;

/**
 * @version 1.24 2012-06-12
 * @author Cay Horstmann
 */
public class MenuTest
{
   public static void main(String[] args)
   {
      EventQueue.invokeLater(() -> {
         JFrame frame = new MenuFrame();
         frame.setTitle("MenuTest");
         frame.setDefaultCloseOperation(JFrame.EXIT_ON_CLOSE);
         frame.setVisible(true);
      });
   }
}
View Code

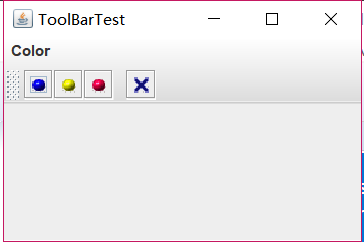
測試程式9
l 在elipse IDE中除錯執行教材517頁程式12-9,結合執行結果理解程式;
l 掌握工具欄和工具提示的用法;
l 記錄示例程式碼閱讀理解中存在的問題與疑惑。
package toolBar;

import java.awt.*;
import javax.swing.*;

/**
 * @version 1.14 2015-06-12
 * @author Cay Horstmann
 */
public class ToolBarTest
{
   public static void main(String[] args)
   {
      EventQueue.invokeLater(() -> {
         ToolBarFrame frame = new ToolBarFrame();
         frame.setTitle("ToolBarTest");
         frame.setDefaultCloseOperation(JFrame.EXIT_ON_CLOSE);
         frame.setVisible(true);
      });
   }
}
View Code
package toolBar;

import java.awt.*;
import java.awt.event.*;
import javax.swing.*;

/**
 * A frame with a toolbar and menu for color changes.
 */
public class ToolBarFrame extends JFrame
{
   private static final int DEFAULT_WIDTH = 300;
   private static final int DEFAULT_HEIGHT = 200;
   private JPanel panel;

   public ToolBarFrame()
   {
      setSize(DEFAULT_WIDTH, DEFAULT_HEIGHT);

      // add a panel for color change

      panel = new JPanel();
      add(panel, BorderLayout.CENTER);

      // set up actions

      Action blueAction = new ColorAction("Blue", new ImageIcon("blue-ball.gif"), Color.BLUE);
      Action yellowAction = new ColorAction("Yellow", new ImageIcon("yellow-ball.gif"),
            Color.YELLOW);
      Action redAction = new ColorAction("Red", new ImageIcon("red-ball.gif"), Color.RED);

      Action exitAction = new AbstractAction("Exit", new ImageIcon("exit.gif"))
         {
            public void actionPerformed(ActionEvent event)
            {
               System.exit(0);
            }
         };
      exitAction.putValue(Action.SHORT_DESCRIPTION, "Exit");

      // populate toolbar

      JToolBar bar = new JToolBar();
      bar.add(blueAction);
      bar.add(yellowAction);
      bar.add(redAction);
      bar.addSeparator();
      bar.add(exitAction);
      add(bar, BorderLayout.NORTH);

      // populate menu

      JMenu menu = new JMenu("Color");
      menu.add(yellowAction);
      menu.add(blueAction);
      menu.add(redAction);
      menu.add(exitAction);
      JMenuBar menuBar = new JMenuBar();
      menuBar.add(menu);
      setJMenuBar(menuBar);
   }

   /**
    * The color action sets the background of the frame to a given color.
    */
   class ColorAction extends AbstractAction
   {
      public ColorAction(String name, Icon icon, Color c)
      {
         putValue(Action.NAME, name);
         putValue(Action.SMALL_ICON, icon);
         putValue(Action.SHORT_DESCRIPTION, name + " background");
         putValue("Color", c);
      }

      public void actionPerformed(ActionEvent event)
      {
         Color c = (Color) getValue("Color");
         panel.setBackground(c);
      }
   }
}
View Code
測試程式10
l 在elipse IDE中除錯執行教材524頁程式12-10、12-11,結合執行結果理解程式,瞭解GridbagLayout的用法。
l 在elipse IDE中除錯執行教材533頁程式12-12,結合程式執行結果理解程式,瞭解GroupLayout的用法。
l 記錄示例程式碼閱讀理解中存在的問題與疑惑。
package gridbag;

import java.awt.EventQueue;

import javax.swing.JFrame;

/**
 * @version 1.35 2015-06-12
 * @author Cay Horstmann
 */
public class GridBagLayoutTest
{
   public static void main(String[] args)
   {
      EventQueue.invokeLater(() ->           {
               JFrame frame = new FontFrame();
               frame.setTitle("GridBagLayoutTest");
               frame.setDefaultCloseOperation(JFrame.EXIT_ON_CLOSE);
               frame.setVisible(true);
         });
   }
}
View Code
package gridbag;

import java.awt.*;

/**
 * This class simplifies the use of the GridBagConstraints class.
 * @version 1.01 2004-05-06
 * @author Cay Horstmann
 */
public class GBC extends GridBagConstraints
{
   /**
    * Constructs a GBC with a given gridx and gridy position and all other grid
    * bag constraint values set to the default.
    * @param gridx the gridx position
    * @param gridy the gridy position
    */
   public GBC(int gridx, int gridy)//自定義類GBC,定義網格的位置值x,y
   {
      this.gridx = gridx;
      this.gridy = gridy;
   }

   /**
    * Constructs a GBC with given gridx, gridy, gridwidth, gridheight and all
    * other grid bag constraint values set to the default.
    * @param gridx the gridx position
    * @param gridy the gridy position
    * @param gridwidth the cell span in x-direction
    * @param gridheight the cell span in y-direction
    */

   //構造一個給定gridx、gridy、gridwidth、gridheight的GBC
   public GBC(int gridx, int gridy, int gridwidth, int gridheight)
   {
      this.gridx = gridx;
      this.gridy = gridy;
      this.gridwidth = gridwidth;
      this.gridheight = gridheight;
   }

   /**
    * Sets the anchor.
    * @param anchor the anchor value
    * @return this object for further modification
    */
   public GBC setAnchor(int anchor)//當元件小於其顯示區域時使用此欄位。它可以確定在顯示區域中放置元件的位置。
   {
      this.anchor = anchor;
      return this;
   }

   /**
    * Sets the fill direction.
    * @param fill the fill direction
    * @return this object for further modification
    */

   /*設定填充方向,當元件的顯示區域大於它所請求的顯示區域的大小時使用此欄位。
      它可以確定是否調整元件大小,以及在需要的時候如何進行調整。
      預設值為none,不調整元件大小
      */
   public GBC setFill(int fill)
   {
      this.fill = fill;
      return this;
   }

   /**
    * Sets the cell weights.
    * @param weightx the cell weight in x-direction
    * @param weighty the cell weight in y-direction
    * @return this object for further modification
    */

   //設定分佈額外的空間。
   public GBC setWeight(double weightx, double weighty)
   {
      this.weightx = weightx;
      this.weighty = weighty;
      return this;
   }

   /**
    * Sets the insets of this cell.
    * @param distance the spacing to use in all directions
    * @return this object for further modification
    */

   //指定元件的外部填充,即元件與其顯示區域邊緣之間間距的最小量。
   public GBC setInsets(int distance)
   {
      this.insets = new Insets(distance, distance, distance, distance);//距離的間距使用在所有的方向
      return this;
   }

   /**
    * Sets the insets of this cell.
    * @param top the spacing to use on top
    * @param left the spacing to use to the left
    * @param bottom the spacing to use on the bottom
    * @param right the spacing to use to the right
    * @return this object for further modification
    */

   //設定單元格的insets。
   public GBC setInsets(int top, int left, int bottom, int right)
   {
      this.insets = new Insets(top, left, bottom, right);
      return this;
   }

   /**
    * Sets the internal padding
    * @param ipadx the internal padding in x-direction
    * @param ipady the internal padding in y-direction
    * @return this object for further modification
    */

   //設定內部填充
   public GBC setIpad(int ipadx, int ipady)
   {
      this.ipadx = ipadx;//x方向的內填充
      this.ipady = ipady;//y方向的內填充
      return this;
   }
}
View Code
相關推薦
201771010128王玉蘭《面向物件程式設計(Java)第十四周學習總結》
第一部分:理論知識總結: (1)Swing 設計模式(Design pattern)是設計者一種流行的 思考設計問題的方法,是一套被反覆使用,多數人 知曉的,經過分類編目的,程式碼設計經驗的總結。 使用設計模式是為了可重用程式碼、讓程式碼更容易被 他人理解、保證程式碼可靠性。 每一個模式描
201771010102 常惠琢 2018面向物件程式設計(Java)第14周學習總結
1 package gridbag; 2 3 import java.awt.*; 4 5 /** 6 * This class simplifies the use of the GridBagConstraints class. 7 * @version 1.01
201771010102 常惠琢 2018面向物件程式設計(JAVA)第18周學習總結
實驗十八 總複習 實驗時間 2018-12-30 1、實驗目的與要求 (1) 綜合掌握java基本程式結構; (2) 綜合掌握java面向物件程式設計特點; (3) 綜合掌握java GUI 程式設計結構;
2018面向物件程式設計(Java)第11周學習指導及要求
2018面向物件程式設計(Java)第11周學習指導及要求 (2018.11.8-2018.11.11) 學習目標 (1) 掌握Vetor、Stack、Hashtable三個類的用途及常用API; (2) 瞭解java集合框架體系組成; (3) 掌握ArrayList、LinkLis
2018面向物件程式設計(Java)第12周學習指導及要求
2018面向物件程式設計(Java)第12周學習指導及要求 (2018.11.15-2018.11.18) 學習目標 (1) 掌握Java GUI中框架建立及屬性設定中常用類的API; (2) 掌握Java GUI中2D圖形繪製常用類的API; (3) 瞭解Java GUI中2D圖形
2018面向物件程式設計(Java)第14周學習指導及要求
2018面向物件程式設計(Java)第14周學習指導及要求(2018.11.29-2018.12.2) 學習目標 (1) 掌握GUI佈局管理器用法; (2) 掌握各類Java Swing元件用途及常用API; 學習資源 1.教材第12章 2.第12章教學課件 3. corejav
2018面向物件程式設計(Java)第16周學習指導及要求
2018面向物件程式設計(Java)第16周學習指導及要求(2018.12.13-2018.12.16) 學習目標 (1) 掌握執行緒概念; (2) 掌握執行緒建立的兩種技術; (3) 理解和掌握執行緒的優先順序屬性及排程方法; (4) 掌握Java GUI 程式設計技術。 學習資
201771010113 李婷華 《面向物件程式設計(Java)》第八週總結
一.理論知識部分 1.Java為了克服單繼承的缺點,Java使用了介面,一個類可以實現一個或多個介面。 2.在Java程式設計語言中,介面不是類,而是對類的一組需求描述,由常量和一組抽象方法組成。介面中不包括變數和具體實現的方法。 3.只要類實現了介面,則該類要遵從介面描述的統一格式進行定義,並且可以在
201771010113 李婷華 《面向物件程式設計(Java)》第十一週總結
一.理論知識部分 第九章 集合 1.資料結構介紹: 線性結構:線性表,棧,佇列,串,陣列,檔案。非線性結構:樹,圖。 散列表:又稱為雜湊表。 散列表演算法的基本思想是:以結點的關鍵字為自變數,通過一定的函式關係(雜湊函式)計算出對應的函式值,以這個值作為該結點儲存在散列表中的地址。當散列
201771010113 李婷華《面向物件程式設計(Java)》第十二週總結
一.理論知識部分 1.Java的抽象口工具箱( Abstract WindowToolkit, AWT)包含在java.awt包中,它提供了許多用來設計GUI的元件類和容器類。 2.AWT庫處理使用者介面元素的方法:把圖形元素的建立和行為委託給本地GUI工具箱進行處理。 3.Swing使用者
201771010113 李婷華 《面向物件程式設計(java)》第十五週總結
一.理論知識部分 JAR檔案 Java程式的打包:程式編譯完成後,程式設計師將.class檔案壓縮打包為.jar檔案後,GUI介面程式就可以直接雙擊圖示執行。 .jar檔案(Java歸檔)既可以包含類檔案,也可以包含諸如影象和聲音這些其它型別的檔案。 JAR檔案是壓縮的,它使用ZIP壓縮格式。 ja
201771010113 李婷華 《面向物件程式設計(Java)》第十六週總結
一.理論知識部分 1.程式是一段靜態的程式碼,它應用程式執行藍 是一段靜態的程式碼,它應用程式執行藍 是一段靜態的程式碼,它應用程式執行藍本。 2.程序是程式的一次動態執行,它對應了從程式碼載入、執行至執行完畢的一個完整過程。 3.多執行緒是程序執行過中產生的多條線索。 4.執行緒是比程序執行更小的單
201771010113 李婷華 《面向物件程式設計(Java)》第十七週總結
一.理論知識部分 Java 的執行緒排程採用優先順序策略:優先順序高的先執行,優先順序低的後執行;多執行緒系統會自動為每個執行緒分配一個優先順序,預設時,繼承其父類的優先順序; 任務緊急的執行緒,其優先順序較高; 同優先順序的執行緒按“先進先出”的佇列原則。 呼叫setPriority(int
201771010120 蘇浪浪 面向物件程式設計(Java)第10周
1、實驗目的與要求 (1) 理解泛型概念; (2) 掌握泛型類的定義與使用; (3) 掌握泛型方法的宣告與使用; (4) 掌握泛型介面的定義與實現; (5)瞭解泛型程式設計,理解其用途。 2、實驗內容和步驟 實驗1: 匯入第8章示例程式,測試程式並進行程式碼註釋。 測試程式1:
201771010141 周強 面向物件程式設計(Java)第12周作業
實驗十二 圖形程式設計 實驗時間 2018-11-14 1、實驗目的與要求 (1) 掌握Java GUI中框架建立及屬性設定中常用類的API; (2) 掌握Java GUI中2D圖形繪製常用類的API; (3) 瞭解J
蘇浪浪 201771010120 面向物件程式設計(Java)第13周
/實驗十三 圖形介面事件處理技術 1、實驗目的與要求 (1) 掌握事件處理的基本原理,理解其用途; (2) 掌握AWT事件模型的工作機制; (3) 掌握事件處理的基本程式設計模型; (4) 瞭解GUI介面元件觀感設定方法; (5) 掌握WindowAdapter類、AbstractAc
李曉菁201771010114《面向物件程式設計(Java)》第十週學習總結
一:理論部分 1.泛型:也稱引數化型別(parameterized type),就是在定義類、介面和方法時,通過型別引數指示將要處理的物件型別。(如ArrayList類)。 2.泛型程式設計(Generic programming):編寫程式碼可以被很多不同型別的物件所重用。 3.Pair類引入了一個型
李曉菁201771010114《面向物件程式設計(Java)》第十一週學習總結
集合 一:.資料結構介紹 1.一般將資料結構分為兩大類:線性資料結構和非線性資料結構。 (1)線性資料結構:線性表、棧、佇列、串、陣列和檔案。 (2)非線性資料結構:樹和圖。 2.線性表: 3.連結串列:(1)單向連結串列 (2)迴圈連結串列 (3)雙向迴圈連結串列 4.棧:棧(Stack)
李曉菁201771010114《面向物件程式設計(java)》第十二週學習總結
一:理論部分 1.(1) 使用者介面(User Interface)使用者與計算機系統(各種程式)互動的介面 (2)圖形使用者介面(Graphical User Interface)以圖形方式呈現的使用者介面 2.AWT:Java 的抽象視窗工具箱( Abstract WindowToolkit, AW
李曉菁201771010114《面向物件程式設計(java)》第十三週學習總結
理論知識:事件處理 1.事件源:能夠產生事件的物件都可以成為事件源,如文字框,按鈕等。一個事件源是一個能夠註冊監聽器並向監聽器傳送事件物件的物件。 2.事件監聽器:事件監聽器物件接收事件源傳送的通告(事件物件),並對發生的事件作出響應。一個監聽器物件就是一個實現了專門監聽器介面的類例項,該類必須實現介面中