
回頭探索JDBC及PreparedStatement防SQL注入原理
概述
JDBC在我們學習J2EE的時候已經接觸到了,但是僅是照搬步驟書寫,其中的PreparedStatement防sql注入原理也是一知半解,然後就想回頭查資料及敲測試程式碼探索一下。再有就是我們在專案中有一些配置項是有時候要變動的,比如資料庫的資料來源,為了在修改配置時不改動編譯的程式碼,我們把要變動的屬性提取到一個配置檔案中,比如properties,因為properties裡面都是鍵值對的形式,所以非常便於閱讀和維護。
一、首先說說讀取properties檔案,這個相對路徑和絕對路徑的問題:
package com.test.properties;import java.io.File; import java.io.IOException; public class TestProperties { private static final String dataSourcePath = "resources/dataSource.properties"; private static final String absoluteDataSourcePath = "D:\\Workspace\\Blogs\\TEST_Preparedstatement\\resources\\dataSource.properties";public static void main(String[] args) { try { // 1.getPath() 方法跟建立 File 物件時傳入的路徑引數有關,返回構造時傳入的路徑 // 2.getAbsolutePath() 方法返回檔案的絕對路徑,如果構造的時候是全路徑就直接返回全路徑, // 如果構造時是相對路徑,就返回當前目錄的路徑 + 構造 File 物件時的路徑 // 3.getCanonicalPath() 方法返回絕對路徑,會把 ..\ 、.\ 這樣的符號解析掉// 1.相對路徑讀取檔案 //user.dir為當前使用者目錄(即專案路徑),java.io 包中的類總是根據當前使用者目錄來解析相對路徑名, //當File物件入參不是以"/"開始的時候,則判斷為相對路徑方式構造,使用當前使用者目錄+相對路徑的方式構造檔案物件 System.out.println("當前使用者目錄:" + System.getProperty("user.dir")); File file = new File(dataSourcePath); System.out.println("入參路徑:" + file.getPath());//入參路徑 System.out.println("絕對路徑:" + file.getAbsolutePath());//絕對路徑 System.out.println("絕對路徑:" + file.getCanonicalPath());//絕對路徑 // 2.絕對路徑讀取檔案 //絕對路徑名:是完整的路徑名,從根目錄定位檔案位置,不需要參照其他檔案路徑, //windows中從某個分割槽磁碟如"c://"開始定位,linux表示從根目錄"/"開始定位。 File file2 = new File(absoluteDataSourcePath); System.out.println(""); System.out.println("入參路徑2:" + file2.getPath());//入參路徑 System.out.println("絕對路徑2:" + file2.getAbsolutePath());//絕對路徑 System.out.println("絕對路徑2:" + file2.getCanonicalPath());//絕對路徑 } catch (IOException e) { // TODO Auto-generated catch block e.printStackTrace(); } } }
下面截圖是控制檯輸出的結果:對應的解釋我都寫在程式碼的註釋裡了。

二、java讀取Properties檔案三種方式
搞清楚了絕對路徑和相對路徑,我們就可以藉助java.util包中的Properties來讀取專案中的配置檔案了,下面是常用的三種方法:
1.其中第一種方法在上面的相對路徑讀取檔案中也講了,這裡使用相對路徑,java.io解析時會自動加上專案路徑,也就是說等於是絕對路徑,這裡也可以使用絕對路徑,但專案不推薦這樣做是因為指定死了碟符,專案移動別的系統平臺時就要改動。
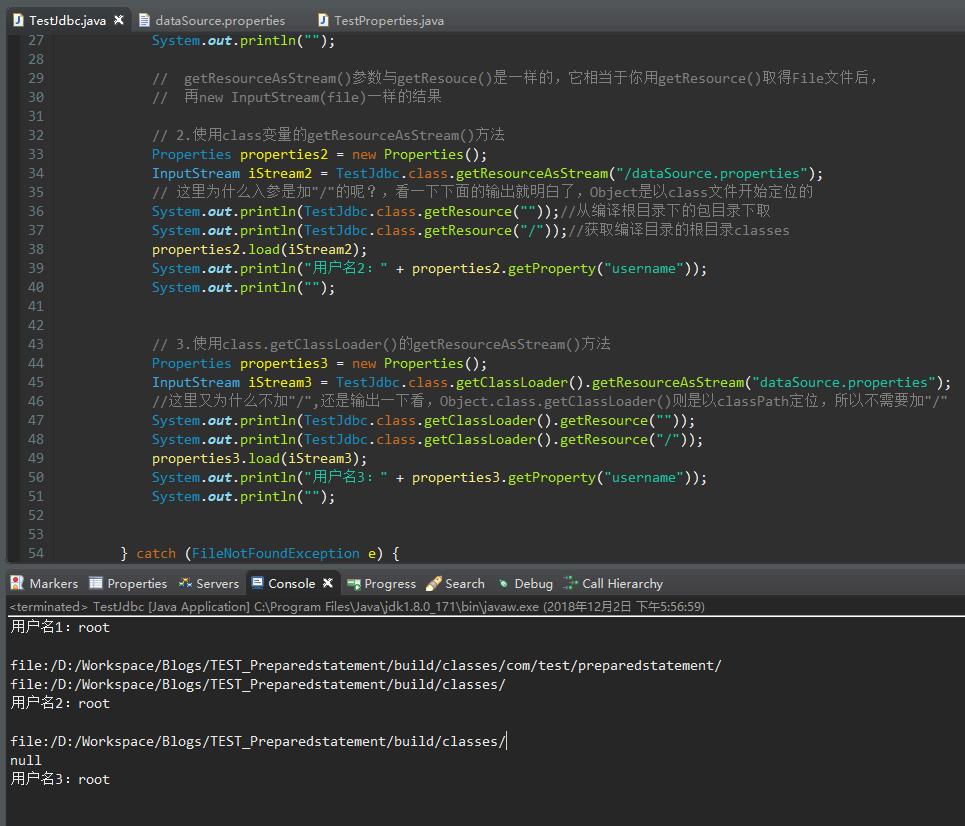
2.第2、3種方法大同小異,就是要注意下class時使用加”/”是classes根目錄下,所以要加”/”,而getClassLoader時直接是獲得的classPath,所以不需要加根目錄”/”
package com.test.preparedstatement;

import java.io.BufferedInputStream;
import java.io.File;
import java.io.FileInputStream;
import java.io.FileNotFoundException;
import java.io.IOException;
import java.io.InputStream;
import java.util.Properties;

public class TestJdbc {

    private static final String dataSourcePath = "resources/dataSource.properties";

    public static void getPathByJavaUtilProperties() {
        try {
            // 1.使用java.util.Properties類的load(InputStream in)方法載入properties檔案
            InputStream iStream = new BufferedInputStream(new FileInputStream(new File(dataSourcePath)));
            Properties properties = new Properties();
            properties.load(iStream);
            System.out.println("使用者名稱1:" + properties.getProperty("username"));
            System.out.println("");

            //  getResourceAsStream()引數與getResouce()是一樣的,它相當於你用getResource()取得File檔案後,
            //  再new InputStream(file)一樣的結果

            // 2.使用class變數的getResourceAsStream()方法
            Properties properties2 = new Properties();
            InputStream iStream2 = TestJdbc.class.getResourceAsStream("/dataSource.properties");
            // 這裡為什麼入參是加"/"的呢?,看一下下面的輸出就明白了,Object是以class檔案開始定位的
            System.out.println(TestJdbc.class.getResource(""));//從編譯根目錄下的包目錄下取
            System.out.println(TestJdbc.class.getResource("/"));//獲取編譯目錄的根目錄classes
            properties2.load(iStream2);
            System.out.println("使用者名稱2:" + properties2.getProperty("username"));
            System.out.println("");


            // 3.使用class.getClassLoader()的getResourceAsStream()方法
            Properties properties3 = new Properties();
            InputStream iStream3 = TestJdbc.class.getClassLoader().getResourceAsStream("dataSource.properties");
            //這裡又為什麼不加"/",還是輸出一下看,Object.class.getClassLoader()則是以classPath定位,所以不需要加"/"
            System.out.println(TestJdbc.class.getClassLoader().getResource(""));
            System.out.println(TestJdbc.class.getClassLoader().getResource("/"));
            properties3.load(iStream3);
            System.out.println("使用者名稱3:" + properties3.getProperty("username"));
            System.out.println("");


        } catch (FileNotFoundException e) {
            e.printStackTrace();
        } catch (IOException e) {
            e.printStackTrace();
        }

    }


    public static void main(String[] args) {
        TestJdbc.getPathByJavaUtilProperties();
//        TestJdbc.getDataBaseData();
    }
}
下面是輸出結果,這裡要注意TestJdbc.class.getClassLoader().getResource("/")是null
三.測試statement和preparedStatement效率
載入好配置檔案後,我來測試一下jdbc連線mysql資料庫時,批量插入資料使用statement和preparedStatement效率,不多比比,程式碼來說話:
package com.test.preparedstatement;

import java.io.BufferedInputStream;
import java.io.File;
import java.io.FileInputStream;
import java.io.FileNotFoundException;
import java.io.IOException;
import java.io.InputStream;
import java.sql.Connection;
import java.sql.DriverManager;
import java.sql.PreparedStatement;
import java.sql.SQLException;
import java.sql.Statement;
import java.util.Properties;

public class TestJdbc {

    private static final String dataSourcePath = "resources/dataSource.properties";

    public static void getDataBaseData() {

        try {
            InputStream iStream = new BufferedInputStream(new FileInputStream(new File(dataSourcePath)));
            Properties properties = new Properties();
            properties.load(iStream);
            String username = properties.getProperty("username");
            String password = properties.getProperty("password");
            String driver = properties.getProperty("driver");
            String url = properties.getProperty("url");

            // 1.statement方式
            long start = System.currentTimeMillis();
            //載入驅動
            Class.forName(driver);
            //建立連線
            Connection connection = DriverManager.getConnection(url, username, password);
            //建立statement
            Statement statement = connection.createStatement();
            for (int i = 0; i < 50; i++) {
                statement.execute("insert into test values("+i+",'a"+i+"')");
            }
            statement.close();
            connection.close();
            System.out.println("statment花費時間:"+String.valueOf(System.currentTimeMillis()-start));


            // 2.preparedStatement方式
            long start2 = System.currentTimeMillis();
            //載入驅動
            Class.forName(driver);
            //建立連線
            Connection connection2 = DriverManager.getConnection(url, username, password);
            //建立preparedStatement
            PreparedStatement preparedStatement = connection2.prepareStatement("insert into test values(?,?)");
            for (int j = 50; j < 100; j++) {
                preparedStatement.setInt(1, j);
                preparedStatement.setString(2, "b"+j);
                preparedStatement.execute();
            }

            preparedStatement.close();
            connection2.close();
            System.out.println("preparedStatement花費時間:"+String.valueOf(System.currentTimeMillis()-start2));

        } catch (FileNotFoundException e) {
            e.printStackTrace();
        } catch (IOException e) {
            e.printStackTrace();
        } catch (ClassNotFoundException e) {
            e.printStackTrace();
        } catch (SQLException e) {
            e.printStackTrace();
        }
    }

    public static void main(String[] args) {
        TestJdbc.getDataBaseData();
    }
}
資料庫資料插入了100條資料,執行成功:

然後看看控制檯執行時間比較:
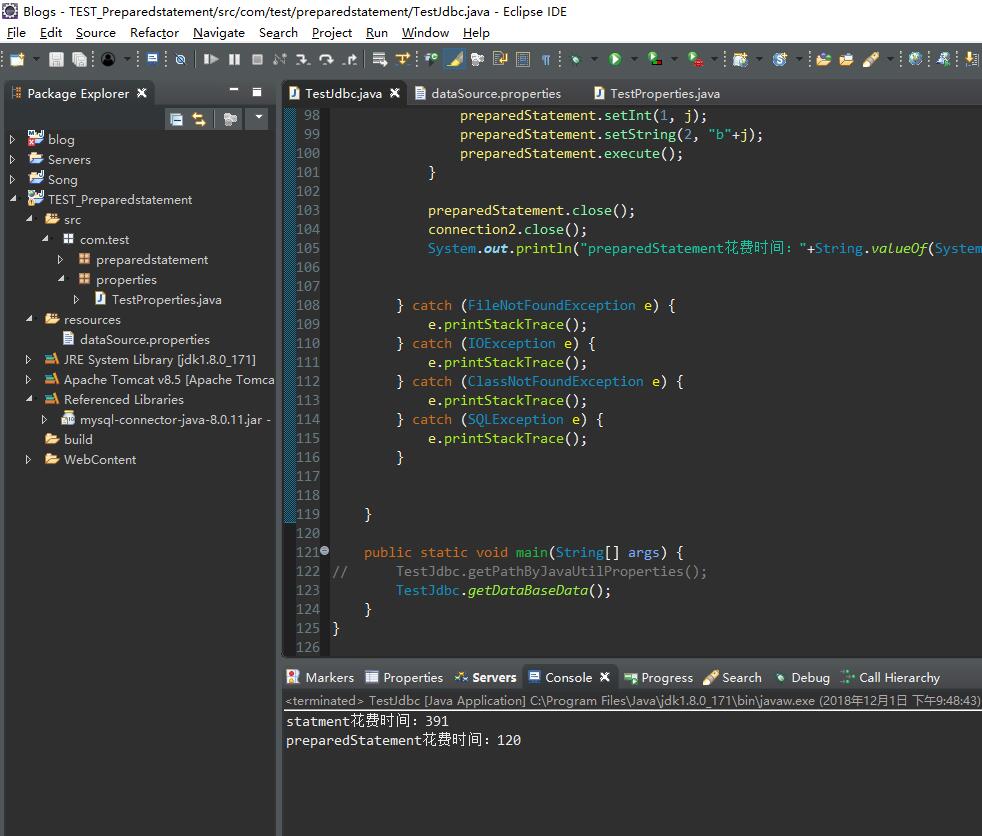
可以看到statement執行時間是preparedstatement執行時間的3倍,在批量處理上,preparedstatement效率更高。
總結:
prepared是準備的意思,也就是mysql的預編譯在起作用。
1.使用statement時,每次執行sql,statement都會直接把sql扔給資料庫執行,而且每次執行都要經過編譯sql,執行sql,獲得結果的過程,50次操作,50次編譯。
2.preparedstatement不同的是在建立preparedstatement物件時就把sql語句結構輸入進去了,並把這個sql預編譯成函式並儲存起來,然後載入引數,執行sql,返回結果。當批量處理時,後面49個處理都是使用這個函式,因為sql結構沒變,所以不用二次編譯,直接賦值,執行。
3.PreparedStatement繼承自Statement,可以說對statement做了優化
4.下面這句是網上說的,具體我沒測過:JDBC驅動程式5.0.5以後版本 預設預編譯都是關閉的。jdbc:mysql://localhost:3306/mybatis?&useServerPrepStmts=true&cachePrepStmts=tru在MySQL中,既要開啟預編譯也要開啟快取。因為如果只是開啟預編譯的話效率還沒有不開啟預編譯效率高。
5.因為preparedstatement使用?作佔位符,所以就算惡意的sql進入到後臺,在preparedStatement.execute();之前已經對sql做了預編譯,就是說sql的執行函式已經確定,所以不會再破壞sql的結構。所以可以防止sql注入。