你需要知道的Android View的建立
View的建立與繪製一向是很多人望而止步的問題。然而我們在平常的應用開發中是最經常運用到的setContentView(),我們都會用在Activity的onCreate()的時候呼叫setContentView()來載入編輯好的XML佈局。但是實際上建立與繪製一個View,內部的實現方式的確比我們表面所編寫的程式碼複雜得多,導致大家沒能深入去了解View的建立與繪製。接下來我們一步步來了解View的建立與繪製。
在研究setContentView()方法前,我們首先先看一下這圖:
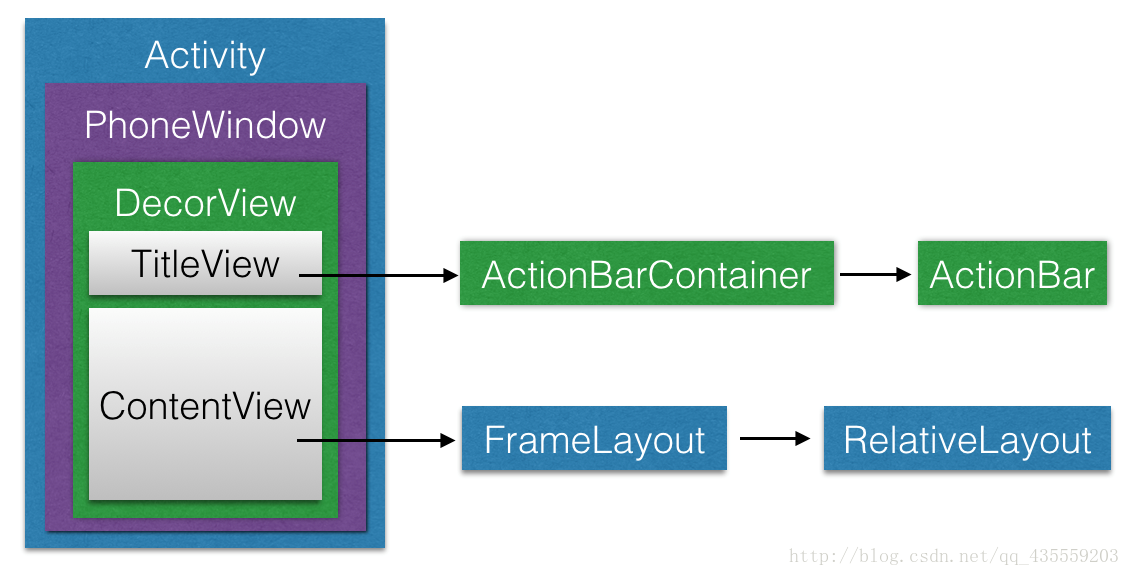
上圖中,DecorView是個應用視窗的最頂層View。(Decor的英文全稱是Decoration,即“修飾”的意思)。DecorView只有一個子元素是垂直LinearLayout。在LinearLayout下有兩個子佈局,第一個是ViewStub,ViewStub就是ActionBar,它會根據theme判斷有沒使用ActionBar來決定是否引入ActionBar佈局。第二個是FrameLayout,這就是我們應用真實使用的父佈局。
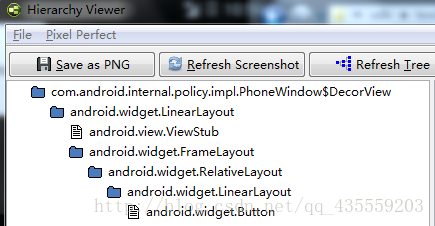
大家可以通過sdk工具Hierarchy Viewer來檢視驗證一下ViewTree的情況。
Window類 位於/frameworks/base/core/java/Android/view/Window.java
Window,中文解析“視窗”。它是一個巨集觀的概念。該類是一個抽象類,提供了繪製視窗的通用API,我們可以理解為它是一個載體。
接著我們看一下PhoneWindow,它是Android中Window的具體實現類。
PhoneWindow位於/frameworks/policies/base/phone/com/android/internal/policy/impl/PhoneWindow.java
PhoneWindow繼承於Window類,我們可以通過實現具體抽象方法去繪製視窗,該類還包含DecorView內部類。我們平時呼叫的setContentView()方法設定Activity的使用者介面時,實際上是對PhoneWindow的ViewTree的設定。
我們通過一個比喻來理解他們之間的關係。Window類相當於一幅畫(抽象概念,什麼畫我們未知) ,PhoneWindow為一副齊白石先生的山水畫(具體概念,我們知道了是誰的、什麼性質的畫),DecorView則為該山水畫的具體內容(有山、有水、有樹,各種介面)。DecorView呈現在PhoneWindow上。好了,有了這部分的認識之後,我們就開始從原始碼的角度去認識View的建立。
當我們自定義Activity繼承Android.app.Activity時候,呼叫的setContentView()如下:
    public void setContentView(@LayoutRes int layoutResID) {
        getWindow().setContentView(layoutResID);
        initWindowDecorActionBar();
    }
getWindow()方法返回一個PhoneWindow物件,那就是說呼叫的是PhoneWindow的setContentView()方法。原始碼如下:
@Override
public void setContentView(int layoutResID) {
    // Note: FEATURE_CONTENT_TRANSITIONS may be set in the process of installing the window
    // decor, when theme attributes and the like are crystalized. Do not check the feature
    // before this happens.
    if (mContentParent == null) {
        // mContentParent即為上面提到的ContentView的父容器,若為空則呼叫installDecor()生成
        installDecor();
    } else if (!hasFeature(FEATURE_CONTENT_TRANSITIONS)) {
        // mContentParent不為null,則移除decorView的所有子View
        mContentParent.removeAllViews();
    }

    if (hasFeature(FEATURE_CONTENT_TRANSITIONS)) {
        final Scene newScene = Scene.getSceneForLayout(mContentParent, layoutResID,
                getContext());
        transitionTo(newScene);
    } else {
        // 一般情況會來到這裡,呼叫mLayoutInflater.inflate()方法來填充佈局
        // 填充佈局也就是把我們設定的ContentView加入到mContentParent中
        mLayoutInflater.inflate(layoutResID, mContentParent); // 2
    }
    final Callback cb = getCallback();
    if (cb != null && !isDestroyed()) {
        // 呼叫onContentChanged()回撥方法通知Activity視窗內容發生了改變
        cb.onContentChanged();
    }
}
首先判斷了mContentParent是否為null,如果為空則執行installDecor()方法,那麼這個mContentParent又是什麼呢?我們看一下它的註釋。
// This is the view in which the window contents are placed. It is either
// mDecor itself, or a child of mDecor where the contents go.
private ViewGroup mContentParent;
它是一個ViewGroup型別,結合2處程式碼,可以得知,這個mContentParent是我們設定的佈局的父佈局。
梳理下:Activity通過PhoneWindow的setContentView方法來設定佈局,而設定佈局之前,會先判斷是否存在mContentParent,而我們設定的佈局檔案則是mContentParent的子元素。
接著我們看一下installDecor(),我們看一下PhoneWindow#installDecor:
private void installDecor() {
    if (mDecor == null) {
        mDecor = generateDecor(); // 1
        mDecor.setDescendantFocusability(ViewGroup.FOCUS_AFTER_DESCENDANTS);
        mDecor.setIsRootNamespace(true);
        if (!mInvalidatePanelMenuPosted && mInvalidatePanelMenuFeatures != 0) {
            mDecor.postOnAnimation(mInvalidatePanelMenuRunnable);
        }
    }
    if (mContentParent == null) {
        mContentParent = generateLayout(mDecor); // 2
        ...
        }
    }
}首先,會執行1處程式碼,呼叫PhoneWindow#generateDecor方法:
protected DecorView generateDecor() {
    return new DecorView(getContext(), -1);
}可以看出,這裡例項化了DecorView,而DecorView則是PhoneWindow類的一個內部類,繼承於FrameLayout,由此可知它也是一個ViewGroup。DecorView上面我們已經對它進行過一次解析了,大家可以返回去回顧下。接下來我們看2處PhoneWindow#generateLayout方法的程式碼:
protected ViewGroup generateLayout(DecorView decor) {
        // Apply data from current theme.
        // 從主題檔案中獲取樣式資訊
        // 載入TitleBar方法一
        TypedArray a = getWindowStyle();

        ...

        if (a.getBoolean(R.styleable.Window_windowNoTitle, false)) {
            requestFeature(FEATURE_NO_TITLE);
        } else if (a.getBoolean(R.styleable.Window_windowActionBar, false)) {
            // Don't allow an action bar if there is no title.
            requestFeature(FEATURE_ACTION_BAR);
        }

        if(...){
            ...
        }

        // Inflate the window decor.
        // 載入窗口布局
        int layoutResource;
        // 載入TitleBar方法二
        int features = getLocalFeatures();
        // System.out.println("Features: 0x" + Integer.toHexString(features));
        if ((features & (1 << FEATURE_SWIPE_TO_DISMISS)) != 0) {
            layoutResource = R.layout.screen_swipe_dismiss;
        } else if(...){
            ...
        }

        View in = mLayoutInflater.inflate(layoutResource, null);    //載入layoutResource
        decor.addView(in, new ViewGroup.LayoutParams(MATCH_PARENT, MATCH_PARENT)); //往DecorView中新增子View,即mContentParent
        mContentRoot = (ViewGroup) in;

        ViewGroup contentParent = (ViewGroup)findViewById(ID_ANDROID_CONTENT); // 這裡獲取的就是mContentParent
        if (contentParent == null) {
            throw new RuntimeException("Window couldn't find content container view");
        }

        if ((features & (1 << FEATURE_INDETERMINATE_PROGRESS)) != 0) {
            ProgressBar progress = getCircularProgressBar(false);
            if (progress != null) {
                progress.setIndeterminate(true);
            }
        }

        if ((features & (1 << FEATURE_SWIPE_TO_DISMISS)) != 0) {
            registerSwipeCallbacks();
        }

        // Remaining setup -- of background and title -- that only applies
        // to top-level windows.
        ...

        return contentParent;
    }
由以上程式碼可以看出,該方法還是做了相當多的工作的,首先根據設定的主題樣式來設定DecorView的風格,比如說有沒有titlebar之類的,就是解析我們為Activity設定theme的地方,至於Theme的設定:
1.我們可以在AndroidManifest裡面進行設定,為我們的Activity配置相應屬性,即android:theme=”“,PhoneWindow物件呼叫getWindowStyle()方法獲取值。
2.也可以在setContentView()前呼叫requestFeature,指定requestFeature()指定視窗修飾符,PhoneWindow物件呼叫getLocalFeature()方法獲取值;
對Theme操作完,我們才對layoutResource賦值的,因此我相信有不少人都曾經遇到一個錯誤——“requestFeature() must be called before adding content”。
接著通過對features和mIsFloating的判斷,設定視窗的風格修飾為layoutResource進行賦值。得到了layoutResource以後,通過LayoutInflater.inflate()方法生成View物件。並加入到decor中。這就是為DecorView新增子View,而這裡的子View則是上面提到的mContentParent。如果上面設定了FEATURE_NO_ACTIONBAR,那麼DecorView就只有mContentParent一個子View,這也解釋了mContentParent物件註釋:mContentParent是DecorView本身或者是DecorView的一個子元素。
小結:DecorView是頂級View,內部有titlebar和contentParent兩個子元素,而內部根據theme設定TitleBar,和選擇系統中的佈局檔案,將佈局檔案通過inflate轉化為view,加入到mDecor中;這些佈局檔案中都包含一個id為content的FrameLayout,將其引用返回給mContentParent。
瞭解完PhoneWindow#installDecor後我們接著PhoneWindow#setContentView(),看到那部分2處程式碼:mLayoutInflater.inflate(layoutResID, mContentParent);相信LayoutInflater大家跟setContentView()一樣常用。因為在一些動態載入View和BaseAdapter介面卡的程式碼編寫中我們都會用到。我們來看一下它的程式碼:
    public View inflate(XmlPullParser parser, @Nullable ViewGroup root) {
        return inflate(parser, root, root != null);
    }

    public View inflate(@LayoutRes int resource, @Nullable ViewGroup root, boolean attachToRoot) {
        final Resources res = getContext().getResources();
        if (DEBUG) {
            Log.d(TAG, "INFLATING from resource: \"" + res.getResourceName(resource) + "\" ("
                    + Integer.toHexString(resource) + ")");
        }

        final XmlResourceParser parser = res.getLayout(resource);
        try {
            return inflate(parser, root, attachToRoot);
        } finally {
            parser.close();
        }
    }
LayoutInflater.inflate()將上面建立的decorView作為root的引數。上面的程式碼比較簡單,重點是return那行的inflate(),我們看一下里面的實現過程:
    public View inflate(XmlPullParser parser, @Nullable ViewGroup root, boolean attachToRoot) {
        synchronized (mConstructorArgs) {
            Trace.traceBegin(Trace.TRACE_TAG_VIEW, "inflate");

            final Context inflaterContext = mContext;
            final AttributeSet attrs = Xml.asAttributeSet(parser);
            Context lastContext = (Context) mConstructorArgs[0];
            mConstructorArgs[0] = inflaterContext;
            View result = root;

            try {
                // Look for the root node.
                int type;
                // 一直讀取xml檔案,直到遇到開始標記
                while ((type = parser.next()) != XmlPullParser.START_TAG &&
                        type != XmlPullParser.END_DOCUMENT) {
                    // Empty
                }

                if (type != XmlPullParser.START_TAG) {
                    throw new InflateException(parser.getPositionDescription()
                            + ": No start tag found!");
                }

                final String name = parser.getName();

                if (DEBUG) {
                    System.out.println("**************************");
                    System.out.println("Creating root view: "
                            + name);
                    System.out.println("**************************");
                }
                // 單獨處理<merge>標籤
                if (TAG_MERGE.equals(name)) {
                    if (root == null || !attachToRoot) {
                        throw new InflateException("<merge /> can be used only with a valid "
                                + "ViewGroup root and attachToRoot=true");
                    }
                    // 遞迴地填充佈局
                    rInflate(parser, root, inflaterContext, attrs, false);
                } else {
                    // Temp is the root view that was found in the xml
                    // 能在XML發現根View
                    final View temp = createViewFromTag(root, name, inflaterContext, attrs);

                    ViewGroup.LayoutParams params = null;

                    if (root != null) {
                        if (DEBUG) {
                            System.out.println("Creating params from root: " +
                                    root);
                        }
                        // Create layout params that match root, if supplied
                        // 獲取父容器的佈局引數(LayoutParams)
                        params = root.generateLayoutParams(attrs);
                        if (!attachToRoot) {
                            // Set the layout params for temp if we are not
                            // attaching. (If we are, we use addView, below)
                            // 若attachToRoot引數為false,則我們只會將父容器的佈局引數設定給根View
                            temp.setLayoutParams(params);
                        }
                    }

                    if (DEBUG) {
                        System.out.println("-----> start inflating children");
                    }

                    // Inflate all children under temp against its context.
                    // 遞迴載入根View的所有子View
                    rInflateChildren(parser, temp, attrs, true);

                    if (DEBUG) {
                        System.out.println("-----> done inflating children");
                    }

                    // We are supposed to attach all the views we found (int temp)
                    // to root. Do that now.
                    // 若父容器不為空且attachToRoot為true,則將父容器作為根View的父View包裹上來
                    if (root != null && attachToRoot) {
                        root.addView(temp, params);
                    }

                    // Decide whether to return the root that was passed in or the
                    // top view found in xml.
                    // 若root為空或是attachToRoot為false,則以根View作為返回值
                    if (root == null || !attachToRoot) {
                        result = temp;
                    }
                }

            } catch (XmlPullParserException e) {
                InflateException ex = new InflateException(e.getMessage());
                ex.initCause(e);
                throw ex;
            } catch (Exception e) {
                InflateException ex = new InflateException(
                        parser.getPositionDescription()
                                + ": " + e.getMessage());
                ex.initCause(e);
                throw ex;
            } finally {
                // Don't retain static reference on context.
                mConstructorArgs[0] = lastContext;
                mConstructorArgs[1] = null;
            }

            Trace.traceEnd(Trace.TRACE_TAG_VIEW);

            return result;
        }
    }
在上面的原始碼中,LayoutInflater其實就是使用Android提供的pull解析方式來解析佈局檔案的。首先對於佈局檔案中的標籤進行單獨處理,呼叫rInflate()方法來填充佈局。非標籤情況下會呼叫一個createViewFromTag()方法。從方法名的命名方式我們可以猜到這是通過xml節點來建立View物件的。
無論是標籤還是非標籤,它們實際都是通過xml節點來建立View物件,並新增到父佈局中。
到這來setContentView()的整體執行流程我們就分析完了,至此我們已經完成了Activity的ContentView的建立與設定工作。但是我們的View還是不可見的,因為我們只是做了建立和設定載入而已。接下來就到View的繪製流程步驟。但是在測量、佈局、繪製工作前還有一個步驟,那就是把DecorView新增至Window中。
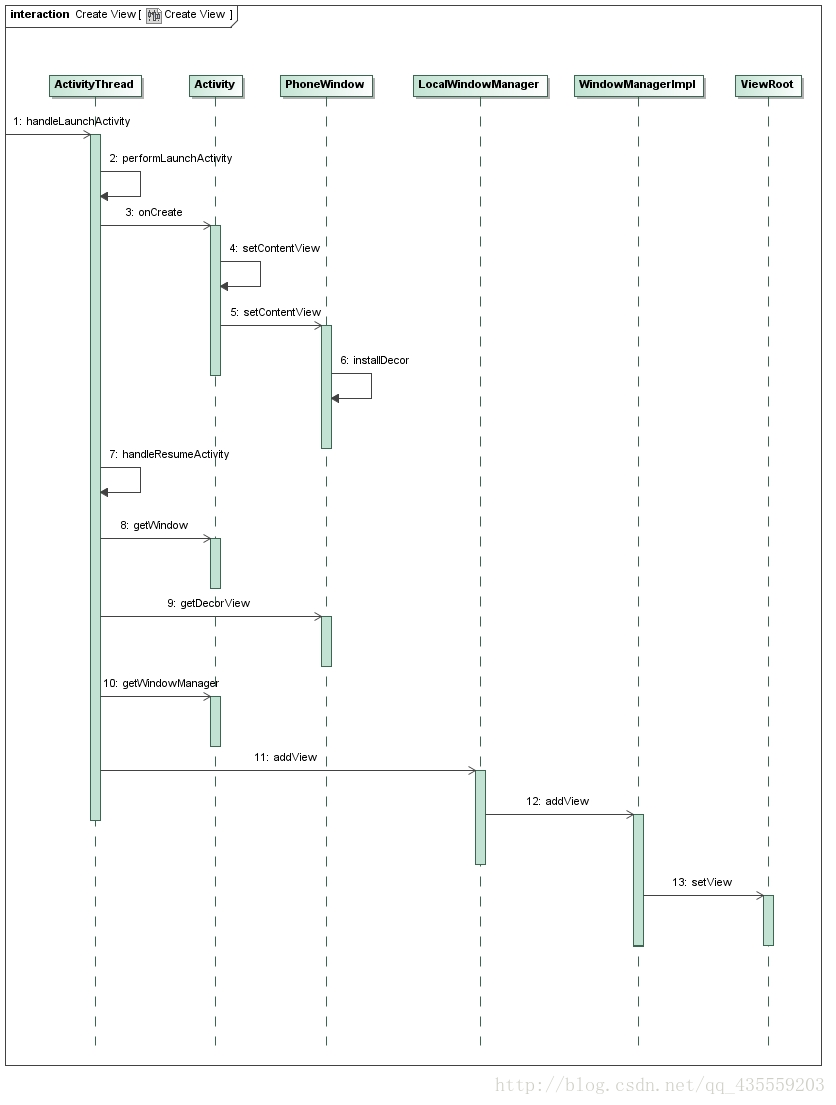
每一個Activity元件都有一個關聯的Window物件,用來描述一個應用程式視窗。每一個應用程式視窗內部又包含有一個View物件,用來描述應用程式視窗的檢視。上文分析了建立DecorView的過程,現在則要把DecorView新增到Window物件中。而要了解這個過程,我們首先要簡單先了解一下Activity的建立過程:
首先,在ActivityThread#handleLaunchActivity中啟動Activity,在這裡面會呼叫到Activity#onCreate方法,從而完成上面所述的DecorView建立動作,當onCreate()方法執行完畢,在handleLaunchActivity方法會繼續呼叫到ActivityThread#handleResumeActivity方法,我們看看這個方法的原始碼:
final void handleResumeActivity(IBinder token, boolean clearHide, boolean isForward) {
    //...
    ActivityClientRecord r = performResumeActivity(token, clearHide); // 這裡會呼叫到onResume()方法

    if (r != null) {
        final Activity a = r.activity;

        //...
        if (r.window == null && !a.mFinished && willBeVisible) {
            r.window = r.activity.getWindow(); // 獲得window物件
            View decor = r.window.getDecorView(); // 獲得DecorView物件
            decor.setVisibility(View.INVISIBLE);
            ViewManager wm = a.getWindowManager(); // 獲得windowManager物件
            WindowManager.LayoutParams l = r.window.getAttributes();
            a.mDecor = decor;
            l.type = WindowManager.LayoutParams.TYPE_BASE_APPLICATION;
            l.softInputMode |= forwardBit;
            if (a.mVisibleFromClient) {
                a.mWindowAdded = true;
                wm.addView(decor, l); // 呼叫addView方法
            }
            //...
        }
    }
}在該方法內部,獲取該activity所關聯的window物件,DecorView物件,以及windowManager物件,而WindowManager是抽象類,它的實現類是WindowManagerImpl,所以後面呼叫的是WindowManagerImpl#addView方法,我們看看原始碼:
public final class WindowManagerImpl implements WindowManager {
    private final WindowManagerGlobal mGlobal = WindowManagerGlobal.getInstance();
    ...
    @Override
    public void addView(View view, ViewGroup.LayoutParams params) {
        mGlobal.addView(view, params, mDisplay, mParentWindow);
    }
}接著呼叫了mGlobal的成員函式,而mGlobal則是WindowManagerGlobal的一個例項,那麼我們接著看WindowManagerGlobal#addView方法:
public void addView(View view, ViewGroup.LayoutParams params,
            Display display, Window parentWindow) {
        ...

        ViewRootImpl root;
        View panelParentView = null;

        synchronized (mLock) {
            ...

            root = new ViewRootImpl(view.getContext(), display); // 1

            view.setLayoutParams(wparams);

            mViews.add(view);
            mRoots.add(root);
            mParams.add(wparams);
        }

        // do this last because it fires off messages to start doing things
        try {
            root.setView(view, wparams, panelParentView); // 2
        } catch (RuntimeException e) {
            // BadTokenException or InvalidDisplayException, clean up.
            synchronized (mLock) {
                final int index = findViewLocked(view, false);
                if (index >= 0) {
                    removeViewLocked(index, true);
                }
            }
            throw e;
        }
    }
先看1程式碼處,例項化了ViewRootImpl類,接著,在2處程式碼,呼叫ViewRootImpl#setView方法,並把DecorView作為引數傳遞進去,在這個方法內部,會通過跨程序的方式向WMS(WindowManagerService)發起一個呼叫,從而將DecorView最終新增到Window上。這個過程中ViewRootImpl、DecorView和WMS會彼此關聯,至於詳細過程這裡不展開來說了。
最後通過WMS呼叫ViewRootImpl#performTraverals方法開始View的測量、佈局、繪製流程,這將在下篇繼續分析View的繪製測量。下面一張圖總結我們View的建立的整套流程,大家可以通過下圖來對上面的知識分析進行再次理解。