通過SAL實現定時計劃
From:https://developer.atlassian.com/server/framework/atlassian-sdk/scheduling-events-via-sal-tutorial
概述
本嚮導將向你演示如何在你的外掛中定時排程一個Java任務在後臺執行。為此,我們將使用SAL(Shared Access Layer)提供的跨產品元件 PluginScheduler 。
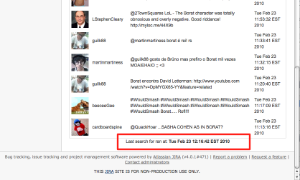
後臺任務排程在任務成本較高的場景或者需要定時執行的維護工作中會很有用處。在本嚮導中,我們在後臺定時執行一個任務,每5秒從Twitter中搜索一次並將最後一次的搜尋結果儲存在記憶體中(在本教程中我們假設Twitter搜尋是一個代價很高的任務)。
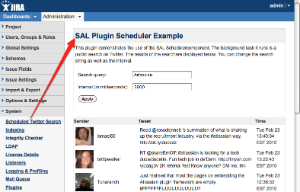
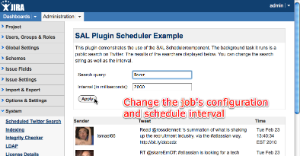
為了是嚮導更有趣,不可見的後臺搜尋任務伴隨著一個JIRA管理頁面,該頁面呈現最新的搜尋結果,並向用戶提供更改搜尋查詢和間隔時間的能力。它還實現了取消和重新安排事件的必要途徑。
為了實現上述這些,外掛包含如下模組:
- Java classes encapsulating the plugin logic (a webwork 1 action and the SAL scheduled event) Java類,封裝所有的邏輯實現(一個web 1動作處理和SAL呼叫事件)
- A velocity template for the admin page that renders the Twitter search results 管理員介面的velocity模版,用於顯示Twitter搜尋結果。
- A web item to add a link to the administration context menu web模組,提供跳轉到管理員選單的連結。
- An internationalisation resource bundle 國際化資源包
所有模組打包到一個JAR檔案中,在接下來的示例中會對每個模組做深入的介紹。
外掛程式碼
我們鼓勵你完成本教程的學習。如果你想要跳過或者檢查你的學習成果,你可以從Atlassian Bitbucket上找到外掛的原始碼。Bitbucket伺服器是一個開源Git倉,包含了本教程程式碼。要克隆這個倉,執行如下命令:
$ git clone https://[email protected]/atlassian_tutorial/jira-scheduled-events.git
此外,你可以在下載頁面下載原始碼。下載頁面:bitbucket.org/atlassian_tutorial/jira-scheduled-events
所需知識點
為了完成本教程,你應該已經理解了Java開發的基礎知識:classes, interfaces, methods, 如何使用編譯器等等。你還應該理解:
- 如何使用 Atlassian Plugin SDK 建立一個外掛工程
- 如何在IDE中開啟你的外掛工程
- 如何編譯你的工程以及通過maven打包JAR檔案。
本教程會教你:
- 如何在外掛中使用 SAL (Shared Access Library)
- 如何利用外掛框架的生命週期系統
- 如何使用帶velocity模版的webwork
- 如何建立和使用國際化資源包
- 如何新增一個web模組
Step 1. 建立外掛工程
使用適合的 atlas-create-application-plugin 命令建立你的外掛。如:atlas-create-jira-plugin or atlas-create-confluence-plugin.
在本教程中,我們會使用Atlassian Plugin SDK,所以請確保你已經安裝並能與描述一致的執行。要檢查你是否已經準備好了環境,嘗試執行atlas-version名, 你將看到如下輸出:
$ atlas-version

ATLAS Version:    3.0.4
ATLAS Home:       /Users/administrator/usr/atlassian-plugin-sdk-3.0.4
ATLAS Scripts:    /Users/administrator/usr/atlassian-plugin-sdk-3.0.4/bin
ATLAS Maven Home: /Users/administrator/usr/atlassian-plugin-sdk-3.0.4/apache-maven
--------
Executing: /Users/administrator/usr/atlassian-plugin-sdk-3.0.4/apache-maven/bin/mvn --version
Apache Maven 2.1.0 (r755702; 2009-03-19 06:10:27+1100)
Java version: 1.6.0_15
Java home: /System/Library/Frameworks/JavaVM.framework/Versions/1.6.0/Home
Default locale: en_US, platform encoding: MacRoman
OS name: "mac os x" version: "10.6" arch: "x86_64" Family: "mac"
$
然後通過atlas-create-jira-plugin建立一個新的JIRA外掛,並根據提示給外掛的groupId和artifactId填入合適的值。
下面是一個例子:
$ atlas-create-jira-plugin
Executing: /Users/administrator/usr/atlassian-plugin-sdk-3.0.4/apache-maven/bin/mvn com.atlassian.maven.plugins:maven-jira-plugin:3.0.4:create
[INFO] Scanning for projects...
[INFO] ------------------------------------------------------------------------
[INFO] Building Maven Default Project
[INFO]    task-segment: [com.atlassian.maven.plugins:maven-jira-plugin:3.0.4:create] (aggregator-style)
[INFO] ------------------------------------------------------------------------
[INFO] [jira:create]
[INFO] Setting property: classpath.resource.loader.class => 'org.codehaus.plexus.velocity.ContextClassLoaderResourceLoader'.
[INFO] Setting property: velocimacro.messages.on => 'false'.
[INFO] Setting property: resource.loader => 'classpath'.
[INFO] Setting property: resource.manager.logwhenfound => 'false'.
[INFO] [archetype:generate]
[INFO] Generating project in Interactive mode
[INFO] Archetype repository missing. Using the one from [com.atlassian.maven.archetypes:jira-plugin-archetype:5 -> https://maven.atlassian.com/public] found in catalog internal
Define value for groupId: : com.atlassian.example
Define value for artifactId: : scheduling
Define value for version:  1.0-SNAPSHOT: :
Define value for package:  com.atlassian.example: : com.atlassian.example.scheduling
Confirm properties configuration:
groupId: com.atlassian.example
artifactId: scheduling
version: 1.0-SNAPSHOT
package: com.atlassian.example.scheduling
 Y: :
[INFO] ----------------------------------------------------------------------------
[INFO] Using following parameters for creating OldArchetype: jira-plugin-archetype:3.0.4
[INFO] ----------------------------------------------------------------------------
[INFO] Parameter: groupId, Value: com.atlassian.example
[INFO] Parameter: packageName, Value: com.atlassian.example.scheduling
[INFO] Parameter: package, Value: com.atlassian.example.scheduling
[INFO] Parameter: artifactId, Value: scheduling
[INFO] Parameter: basedir, Value: /private/tmp
[INFO] Parameter: version, Value: 1.0-SNAPSHOT
[INFO] ********************* End of debug info from resources from generated POM ***********************
[INFO] OldArchetype created in dir: /private/tmp/scheduling
[INFO] ------------------------------------------------------------------------
[INFO] BUILD SUCCESSFUL
[INFO] ------------------------------------------------------------------------
[INFO] Total time: 1 minute 1 second
[INFO] Finished at: Mon Feb 22 18:13:41 EST 2010
[INFO] Final Memory: 42M/252M
[INFO] ------------------------------------------------------------------------
$
Step 2. 新增所需的Maven依賴
在本教程中,我們會使用SAL和開源的Twitter Java庫twitter4j. 把他們都加到pom.xml檔案中:
<dependencies>
    ...
    <dependency>
        <groupId>net.homeip.yusuke</groupId>
        <artifactId>twitter4j</artifactId>
        <version>2.0.10</version>
    </dependency>
    <dependency>
        <groupId>com.atlassian.sal</groupId>
        <artifactId>sal-api</artifactId>
        <version>2.0.0</version>
        <scope>provided</scope>
    </dependency>
    ...
</dependencies>
Step 3. 在外掛描述檔案中匯入SAL模組
為了外掛礦建可以注入 SAL PluginScheduler, 我們需要在atlassian-plugin.xml明確的引入該模組,所以新增如下節點:
<component-import key="pluginScheduler">
    <description>SAL Scheduler</description>
    <interface>com.atlassian.sal.api.scheduling.PluginScheduler</interface>
</component-import>
Step 4. 編寫後臺任務
現在編寫一個模組來獲取已經注入的SAL PluginScheduler,然後在啟動的時候註冊這個週期性的後臺任務。
首先,實現任務本身,它必須是一個公開類並實現了介面 com.atlassian.sal.api.scheduling.PluginJob:
package com.atlassian.example.scheduling;

import com.atlassian.sal.api.scheduling.PluginJob;
import org.apache.log4j.Logger;
import twitter4j.Query;
import twitter4j.Twitter;
import twitter4j.TwitterException;

import java.util.Date;
import java.util.Map;

public class TwitterQueryTask implements PluginJob {

    private final Logger logger = Logger.getLogger(TwitterQueryTask.class);

    /**
     * Executes this job.
     *
     * @param jobDataMap any data the job needs to execute. Changes to this data will be remembered between executions.
     */
    public void execute(Map<String, Object> jobDataMap) {

        final TwitterMonitorImpl monitor = (TwitterMonitorImpl)jobDataMap.get(TwitterMonitorImpl.KEY);
        assert monitor != null;
        try {
            final Twitter twitter = new Twitter();
            monitor.setTweets(twitter.search(new Query(monitor.getQuery())).getTweets());
            monitor.setLastRun(new Date());
        } catch (TwitterException te) {
            logger.error("Error talking to Twitter: " + te.getMessage(), te);
        }
    }
}
注意排程器在執行時傳遞給execute()方法的map,它為我們提供了一種與任務溝通的途徑。
排程器工作的方法是,註冊任務時,我們將任務的類名傳遞給調取器而不是一個例項,排程器來完成類的例項化。這導致的一個後果就是,它必須包含一個預設的公開的構建方法,我們如果想要進行執行時配置,需要使用jobDataMap。
當通過jobDataMap將資料傳給任務是,使用唯一的字串鍵來標識。在我們的實現裡,我們儲存了一個指向TwitterMonitorImpl外掛的索引,這個索引負責我們的任務排程以及接收Twitter的搜尋結果。
我們使用TwitterMonitorImpl.KEY來儲存這個索引。我們將在下一部分中宣告我們的模組。
最後,看看如何使用twitter4j類庫,它允許我們僅用兩行程式碼就可以公開的,匿名的查詢。
Step 5. 編寫排程任務的模組
這是我們在atlassian-plugin.xml中註冊為外掛的類。它會在啟動時由框架例項化並複製註冊我們的任務。它也會儲存Twitter的搜尋結果,並且可以通過我們稍後新增的web動作進行訪問。
package com.atlassian.example.scheduling;

import com.atlassian.sal.api.lifecycle.LifecycleAware;
import com.atlassian.sal.api.scheduling.PluginScheduler;
import org.apache.log4j.Logger;
import twitter4j.Tweet;

import java.util.Date;
import java.util.HashMap;
import java.util.List;

public class TwitterMonitorImpl implements TwitterMonitor, LifecycleAware {

    /* package */ static final String KEY = TwitterMonitorImpl.class.getName() + ":instance";
    private static final String JOB_NAME = TwitterMonitorImpl.class.getName() + ":job";

    private final Logger logger = Logger.getLogger(TwitterMonitorImpl.class);
    private final PluginScheduler pluginScheduler;  // provided by SAL

    private String query = "Atlassian"; // default Twitter search
    private long interval = 5000L;      // default job interval (5 sec)
    private List<Tweet> tweets;         // results of the last search
    private Date lastRun = null;        // time when the last search returned

    public TwitterMonitorImpl(PluginScheduler pluginScheduler) {
        this.pluginScheduler = pluginScheduler;
    }

    // declared by LifecycleAware
    public void onStart() {
        reschedule(query, interval);
    }

    public void reschedule(String query, long interval) {
        this.query = query;
        this.interval = interval;

        pluginScheduler.scheduleJob(
                JOB_NAME,                   // unique name of the job
                TwitterQueryTask.class,     // class of the job
                new HashMap<String,Object>() {{
                    put(KEY, TwitterMonitorImpl.this);
                }},                         // data that needs to be passed to the job
                new Date(),                 // the time the job is to start
                interval);                  // interval between repeats, in milliseconds
        logger.info(String.format("Twitter search task scheduled to run every %dms", interval));
    }

    public String getQuery() {
        return query;
    }

    /* package */ void setTweets(List<Tweet> tweets) {
        this.tweets = tweets;
    }

    /* package */ void setLastRun(Date lastRun) {
        this.lastRun = lastRun;
    }
}
注意我們是如何實現 SAL’s com.atlassian.sal.api.lifecycle.LifecycleAware 介面的,以及如何使用它的 onStart() 方法來註冊這個任務。
關鍵是我們不能接受再我們模組構造方法中註冊(登出)任務任務,因為當我們構建器被呼叫時,排程器(和SAL本身)可能還沒有完全初始化。因為,通過實現 com.atlassian.sal.api.lifecycle.LifecycleAware 介面並在 onStart()註冊任務。
與所有外掛一樣,我們建立一個介面用於與其他外掛共享我們的模組:
package com.atlassian.example.scheduling;

public interface TwitterMonitor {

    public void reschedule(String query, long interval);
}
Step 6. 將模組新增到atlassian-plugin.xml
...
    <component key="schedulerComponent" class="com.atlassian.example.scheduling.TwitterMonitorImpl"
             system="true" public="true">
        <description>The plugin component that schedules the Twitter search.</description>
        <interface>com.atlassian.sal.api.lifecycle.LifecycleAware</interface>
        <interface>com.atlassian.example.scheduling.TwitterMonitor</interface>
    </component>
...
注意這個顯示宣告com.atlassian.sal.api.lifecycle.LifecycleAware介面,以及如何把模組宣告成公開的,只有這樣SAL的生命週期管理器才可以訪問到。
Step 7. 啟動Have a Beer and Put Your Feet Up!
在本節中,你應該可以排程任務工作,完成Twitter搜尋。
啟動JIRA,連結偵錯程式,並在你的模組構造器,它的 reschedule() 方法和你任務的 execute() 中設定斷點,然後檢視它的執行。
外掛SDK方便快速簡單的部署和除錯。要是你的外掛在debug模式下執行,只需執行:
$ atlas-debug
或者使用Maven執行:
$ mvn jira:debug
如果你對這個中間產物已經滿意,繼續向前排程你的任務。如果你想要做更多,再次稍作停留,然後檢視剩下的內容學習如何新增一個Web Item,一個webwork動作,velocity模版以及國際化支援,使之有一些互動,更有趣。
在這之前,我們沒有使用任何特定產品的特性或API,因此可以執行在任何Atlassian產品上,不限定於JIRA。
Step 8. 擴充套件模組介面
為了在管理介面顯示Twitter結果,我們需要在TwitterMonitor介面中新增一些方法。
這是有必要的,因為我們已經將 TwitterMonitorImpl 模組注入到我們的webwork action中,並且這個介面中額外的方法將允許這個action與模組進行交流,接受最後一次的查詢結果,以及間隔時間。
package com.atlassian.example.scheduling;

import twitter4j.Tweet;

import java.util.Date;
import java.util.List;

public interface TwitterMonitor {

    public String getQuery();
    public long getInterval();
    public List<Tweet> getTweets();
    public Date getLastRun();
    public void reschedule(String query, long interval);
}
並在TwitterMonitorImpl實現它們:
...
public class TwitterMonitorImpl implements TwitterMonitor, LifecycleAware {

...
    public long getInterval() {
        return interval;
    }

    public Date getLastRun() {
        return lastRun;
    }

    public List<Tweet> getTweets() {
        return tweets;
    }
...
Step 9. 新增一個webwork 站點
在接下來的教程中,我們僅限於在JIRA中,新增一個管理員頁面來Twitter搜尋結果。我們也將允許使用者修改搜尋規則以及搜尋頻率。
首先,實現webwork站點:
package com.atlassian.example.scheduling;

import com.atlassian.jira.web.action.JiraWebActionSupport;
import twitter4j.Tweet;

import java.util.Date;
import java.util.List;

public class SchedulerAction extends JiraWebActionSupport {

    private final TwitterMonitor twitterMonitor;
    private String query;
    private long interval;

    public SchedulerAction(TwitterMonitor twitterMonitor) {
        this.twitterMonitor = twitterMonitor;
        this.query = twitterMonitor.getQuery();
        this.interval = twitterMonitor.getInterval();
    }

    @Override
    protected String doExecute() throws Exception {
        return SUCCESS;
    }

    public String doReschedule() {
        twitterMonitor.reschedule(query, interval);
        return getRedirect("TwitterScheduler!default.jspa");
    }

    public List<Tweet> getTweets() {
        return twitterMonitor.getTweets();
    }

    public String getQuery() {
        return query;
    }

    public void setQuery(String query) {
        this.query = query;
    }

    public long getInterval() {
        return interval;
    }

    public void setInterval(long interval) {
        this.interval = interval;
    }

    public Date getLastRun() {
        return twitterMonitor.getLastRun();
    }
}
我們有兩個進入這個站點的方法:doExecute() 方法沒有任何效果,僅僅提供訪問當前搜尋結果的入口。doReschedule() 方法用來修改頻率或搜尋條件,它會取消後臺任務並重新執行。
注意當重新排程站點後,我們不會呈現介面,但是我們會將瀏覽器重定向到只讀站點 doExecute() 以避免在瀏覽器中顯示重新排程的URL,因為這會導致使用者通過重新整理按鈕重新整理瀏覽器時,我們的任務不斷的被重新排程。
Step 10. 在atlassian-plugin.xml註冊WebWork站點
我們將在atlassian-plugin中註冊webwork操作。並新增一個Web專案,以向JIRA管理部分的上下文選單新增連結,該選單將連結到我們的新頁面:
...
    <resource type="i18n" name="i18n" location="com.atlassian.example.scheduling.TwitterSchedulerBundle"/>

    <web-item key="schedulerActionLink" section="system.admin/system"
            i18n-name-key="com.atlassian.example.scheduling.adminLink"
            name="Scheduled Twitter Search" weight="1">
        <label key="com.atlassian.example.scheduling.adminLink"/>
        <link linkId="schedulerActionLink">/secure/admin/TwitterScheduler.jspa</link>
    </web-item>

    <webwork1 key="schedulerAction" name="SAL Scheduler Example">
        <actions>
            <action name="com.atlassian.example.scheduling.SchedulerAction"
                    alias="TwitterScheduler">
                <view name="success">/templates/scheduler.vm</view>
                <view name="input">/templates/scheduler.vm</view>
            </action>
        </actions>
    </webwork1>
...
注意我們還添加了支援國際化的118n資源包,所以我們可以根據使用者的設定引用不同語種的字串。
通常使用i18n是一個好的習慣,甚至你只提供一種語言包。當然,如果你覺得這個操作很麻煩,可以忽略包宣告,只需要硬編碼文字即可。
- 檢視我們使用的語言包 contents of the language bundle
Step 11. 新增Velocity模版
最後,我們為頁面新增src/main/resources/templates/scheduler.vm 模版。下面的程式碼片段只關注有趣的部分,省略了大部分佈局。全部的模板見The full template is on Bitbucket.
...
    <form method="post" action="TwitterScheduler!reschedule.jspa">
        <p>
            <table>
                <tr>
                    <td>$i18n.getText("com.atlassian.example.scheduling.queryCell")</td>
                    <td><input type="text" name="query" value="$query"></td>
                </tr>
                <tr>
                    <td>$i18n.getText("com.atlassian.example.scheduling.intervalCell")</td>
                    <td><input type="text" name="interval" value="$interval"></td>
                </tr>
                <tr>
                    <td colspan="2"><input type="submit" value="$i18n.getText("com.atlassian.example.scheduling.applyButton")"></td>
                </tr>
            </table>
        </p>
    </form>
...
    <table class="jiraform maxWidth">
        <thead class="jiraformheader">
            <tr>
                <th colspan="2">$i18n.getText("com.atlassian.example.scheduling.result.header.from")</th>
                <th>$i18n.getText("com.atlassian.example.scheduling.result.header.tweet")</th>
                <th>$i18n.getText("com.atlassian.example.scheduling.result.header.date")</th>
            </tr>
        </thead>
        <tbody id="tweets">
            #foreach ( $tweet in $tweets )
            <tr>
                <td><img src="$tweet.profileImageUrl" width="48" height="48"></td>
                <td>$tweet.fromUser</td>
                <td>$tweet.text</td>
                <td>$tweet.createdAt</td>
            </tr>
            #end
        </tbody>
    </table>
    <div style="text-align: center;">$i18n.getText("com.atlassian.example.scheduling.lastRun") <b>$lastRun</b></div>
...
Step 12. 啟動JIRA
這就是我們教程的全部內容,現在我們啟動JIRA,驗證結果:
$ mvn jira:run
Screenshots