[設計模式] - No.9 Prototype模式
Prototype 模式
在Java中,如果我們一般使用new XXClass()的方式獲取一個例項。而Prototype提供了這樣一種方式,既不通過new的方式獲取例項,同時和工廠方法獲取例項的方法不同。該模式使用類對應的物件來產生新的例項。
在介紹Prototype模式之前,我們要首先介紹Java中的clone()和Cloneable。我們知道,在java中,所有的類都繼承於一個叫Object的類。而該類中一個重要的方法就是clone()。他可以通過複製例項的方式獲取一個新的例項,而不需要知道該類的具體實現。
如果我們希望對一個類的例項進行克隆,那麼我們被克隆的類必須實現Cloneable
clone()時會丟擲CloneNotSupportedException異常。Cloneable介面中並沒有宣告任何方法,只是用來標記這個類可以被複制,這類介面被稱為標記介面。
我們結合一段程式碼來看clone()函式的作用。假設我們有個類實現了Cloneable:
public class Stuent implements Cloneable {
private String name;
private Date birth;
public Stuent(String name,Date date) {
this.name = 在Student中有兩個成員變數,一個是String型別的姓名,一個是Date型別的生日。
由於clone()函式訪問許可權是protected的,所以這裡我在Student中過載了該函式,修改訪問修飾符為public,直接呼叫父類的clone()
我們在主函式中這樣呼叫Student:
public class Main {
            Date date = new Date();
        date.setYear(1995);
        date.setMonth(7);
        date.setDate(3);
        Stuent s1 = new Stuent("xiaoming",date);
        Stuent s2 = (Stuent) s1.clone();
        System.out.println(s1.toString());
        System.out.println(s2.toString());
        System.out.println(s1.getName()==s2.getName()?"s1.name == s2.name":"s1.name != s2.name");
        System.out.println(s1.getBirth()==s2.getBirth()?"s1.birth == s2.birth":"s1.birth != s2.birth");

        System.out.println("\n-------After change-------\n");
        s2.setName("xiaohong");
        date.setYear(1996);
        date.setMonth(5);
        date.setDate(12);
        System.out.println(s1.toString());
        System.out.println(s2.toString());
        System.out.println(s1.getName()==s2.getName()?"s1.name == s2.name":"s1.name != s2.name");
        System.out.println(s1.getBirth()==s2.getBirth()?"s1.birth == s2.birth":"s1.birth != s2.birth");
}
我們首先建立一個s1,其變數name值為"xiaoming",並且birth物件指向date。然後呼叫該函式的clone()函式來克隆一個新的例項。列印兩個例項。接下來我們修改date中的值,並在此列印兩個例項。(上面程式碼中Date類的月份從0開始,所以7對應八月,5對應六月)
輸出如下所示:
name: xiaoming,birth: Sat Aug 03 10:21:41 CST 3895
name: xiaoming,birth: Sat Aug 03 10:21:41 CST 3895
s1.name == s2.name
s1.birth == s2.birth-------After change-------
name: xiaoming,birth: Fri Jun 12 10:21:41 CST 3896
name: xiaohong,birth: Fri Jun 12 10:21:41 CST 3896
s1.name != s2.name
s1.birth == s2.birth
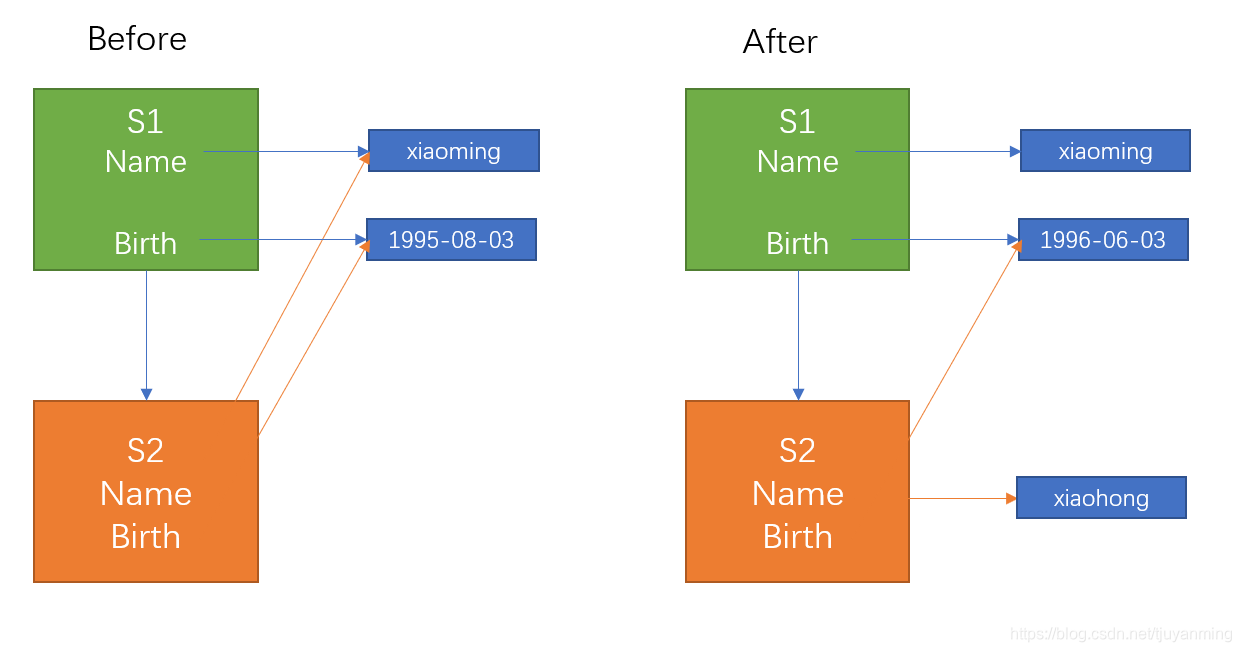
可以看出,在我們修改了date之後,s1和s2對應的date變數均發生了改變。也就是說兩個例項內部的成員變數birth指向同一段記憶體空間。這也就是我們說的,淺拷貝。
淺拷貝:當我們複製一個物件A時,返回一個新的物件引用B。同時A和B具有相同的成員變數,而對於A中含有的引用,B也僅僅複製該引用,而沒有複製該引用所指向的記憶體空間儲存的值。我們用一張圖來表示上述的過程。

回到Prototype模式,一個簡單的Prototype 模式如下所示:
首先,我們有一個Product介面,該介面繼承了Cloneable介面,所有克隆的類實現了該介面。
public interface Product extends Cloneable {
    public abstract void show(String s);
    public abstract Product createClone();
}
然後,我們有一個Manager類,該類維護了一個Map儲存我們想要克隆的例項
public class Manager {
    private HashMap showcase = new HashMap();
    public void register(String name, Product proto) {
        showcase.put(name, proto);
    }
    public Product create(String protoname) {
        Product p = (Product)showcase.get(protoname);
        return p.createClone();
    }
}
最後,實現了兩個具體類MessageBox和UnderlinePen,其實現了具體的列印方法和克隆方法。
public class MessageBox implements Product {
    private char decochar;
    public MessageBox(char decochar) {
        this.decochar = decochar;
    }

    @Override
    public void show(String s) {
        int length = s.getBytes().length;
        for (int i = 0; i < length + 4; i++) {
            System.out.print(decochar);
        }
        System.out.println("");
        System.out.println(decochar + " "  + s + " " + decochar);
        for (int i = 0; i < length + 4; i++) {
            System.out.print(decochar);
        }
        System.out.println("");
    }

    @Override
    public Product createClone() {
        Product p = null;
        try {
            //淺拷貝
            p = (Product)clone();
        } catch (CloneNotSupportedException e) {
            e.printStackTrace();
        }
        return p;
    }
}
public class UnderlinePen implements Product {
    private char ulchar;
    public UnderlinePen(char ulchar) {
        this.ulchar = ulchar;

    }

    @Override
    public void show(String s) {
        int length = s.getBytes().length;
        System.out.println("\""  + s + "\"");
        System.out.print(" ");
        for (int i = 0; i < length; i++) {
            System.out.print(ulchar);
        }
        System.out.println("");
    }

    @Override
    public Product createClone() {
        Product p = null;
        try {
            p = (Product)clone();
        } catch (CloneNotSupportedException e) {
            e.printStackTrace();
        }
        return p;
    }
}
在Main函式中呼叫過程如下:
public class Main {

    public static void main(String args []){

        Manager manager = new Manager();
        UnderlinePen upen = new UnderlinePen('~');
        MessageBox mbox = new MessageBox('*');
        MessageBox sbox = new MessageBox('/');
        manager.register("strong date",upen);
        manager.register("star date",mbox);
        manager.register("slash date",sbox);

        Product p1 = manager.create("strong date");
        Product p2 = manager.create("star date");
        Product p3 = manager.create("slash date");
        p1.show("Hello, world.");
        p2.show("Hello, world.");
        p3.show("Hello, world.");

    }
}
"Hello, world."
 ~~~~~~~~~~~~~
*****************
* Hello, world. *
*****************
/////////////////
/ Hello, world. /
/////////////////

Process finished with exit code 0
由於在前面我們解釋clone()和Cloneable以及淺拷貝,所以這段程式碼看起來比較簡單,這裡就不在介紹了。
一個一般的prototype模式的UML類圖如下:

簡單來說就是兩個部分:
- 一個是繼承了
Cloneable介面的prototype介面,該介面向外部呼叫提供了被克隆物件的clone方法,同時在內部宣告一些其他的函式,例如列印函式之類的。 - 另外一個就是具體的類,該類實現了
prototype介面,實現了具體的createclone函式以及具體的一些函式。
那麼prototype模式具體有什麼樣的用處呢?在《圖解設計模式》這本書中,提到了以下三點:
-
物件種類繁多,無法將他們整合到一個類中
-
難以根據類生成例項
-
想解耦框架與生成的例項
