BUGKU-逆向(reverse)-writeup
目錄
- 入門逆向
- Easy_vb
- Easy_Re
- 遊戲過關
- Timer(阿里CTF)
- 逆向入門
- love
- LoopAndLoop(阿里CTF)
- easy-100(LCTF)
- SafeBox(NJCTF)
- Mountain climbing
前言:在bugku上把能寫的逆向都寫了,由於大佬們的writeup太深奧或者說太簡潔了讓我(小白)看得雲裡霧裡。所以我寫了這個詳細點的writeup(理解錯的地方望指出),儘量讓大家都看得懂。最近比較忙先寫到了這裡,未完待續
入門逆向
下載後ida開啟,雙擊_mail函式裡就有flag
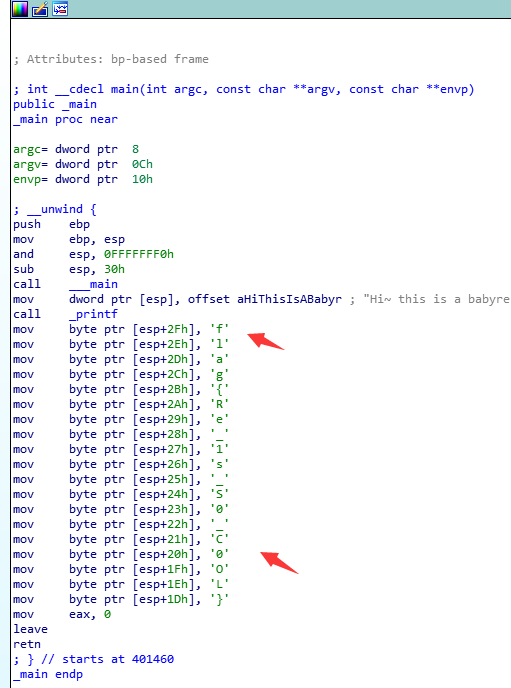
Easy_vb
下載後ida開啟,往下翻裡就有flag
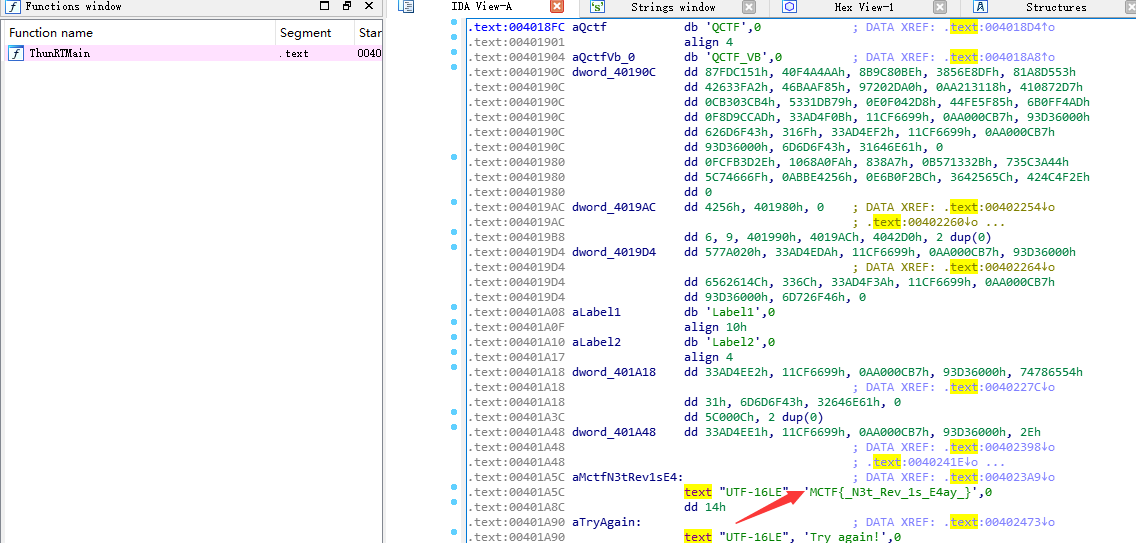
提交flag出錯,將MCTF改成flag即可。
Easy_Re
下載後ida開啟,雙擊_mail函式 ,F5翻譯為偽C程式碼
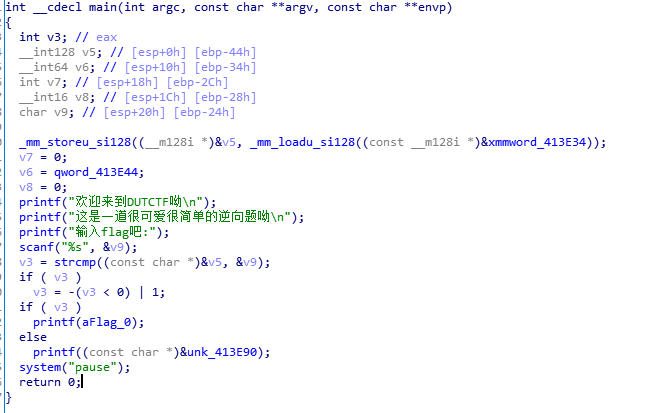
strcmp()對面輸入的值是否等於xmmword_413E34位置的值,雙擊跟過去,發現了flag
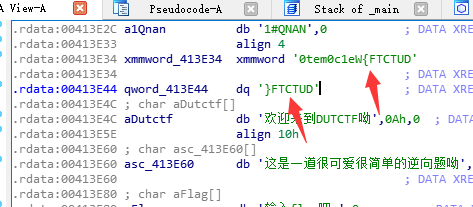
小端儲存的問題,看起來反了而已。

遊戲過關
下載後ida開啟,看到函式比較多,分享一種快速找關鍵函式的方法。
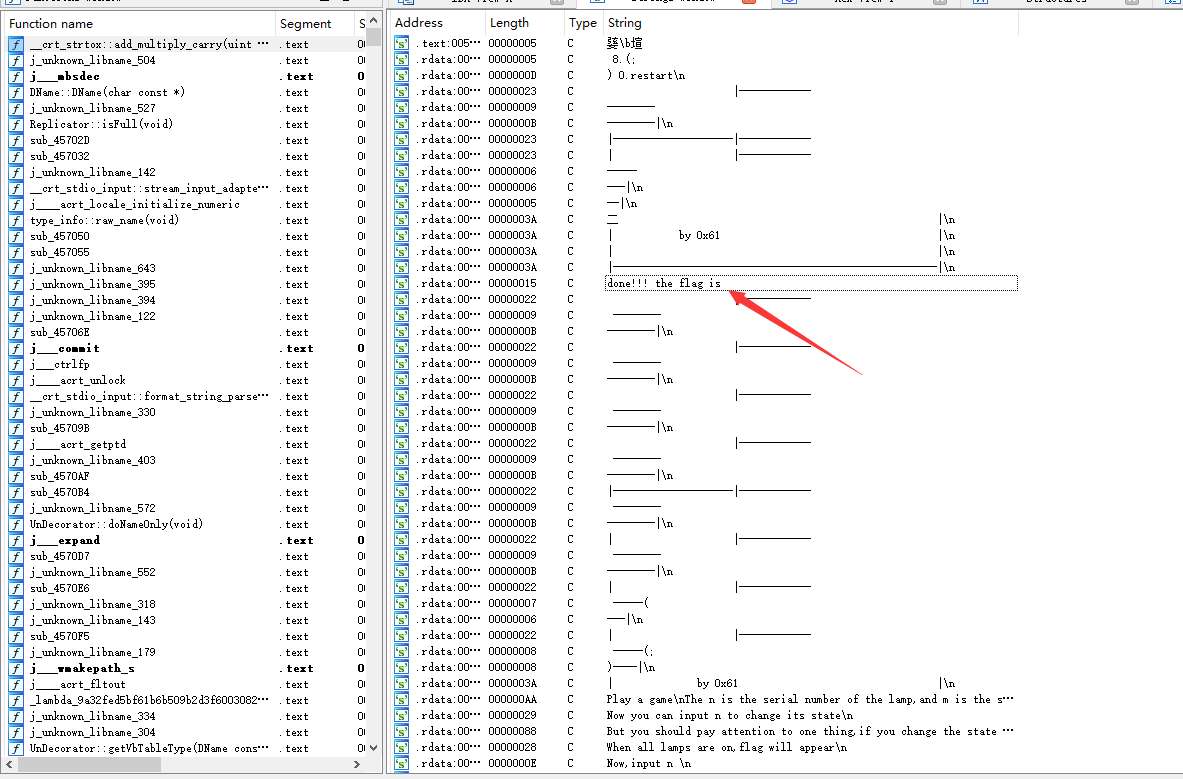
首先就是看執行遍程式,瞭解下程式流程以及關鍵字串。然後開啟ida
1.Shift+F12檢視下字串。
2.然後雙擊過去。
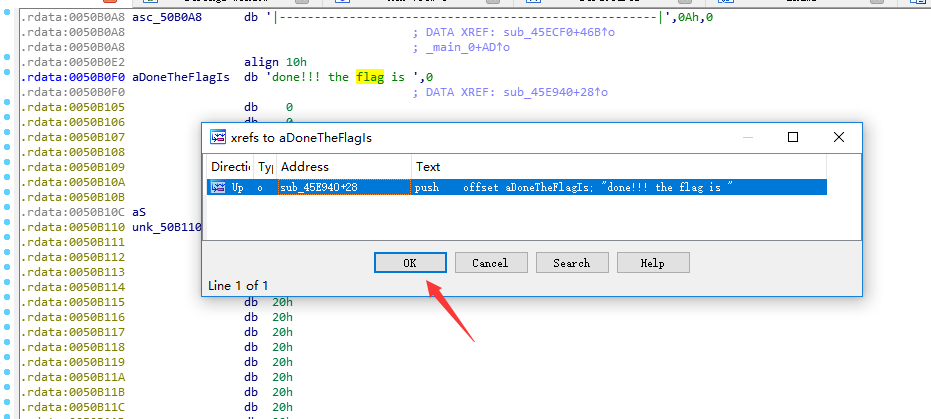
3.再按Cirt+X交叉引用顯示呼叫位置
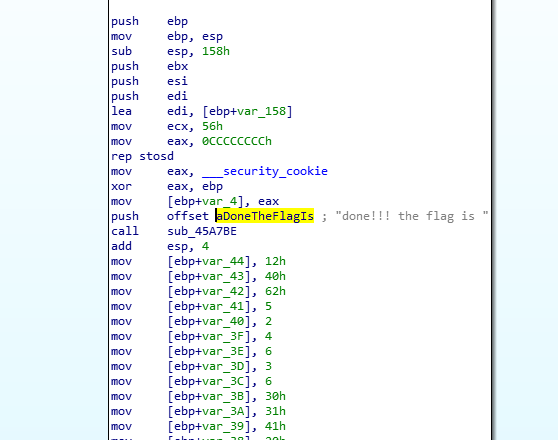
然後F5看下虛擬碼
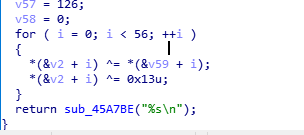
打印出done!!! the flag is 然後有兩個陣列按位異或再和0x13異或生成flag
#!usr/bin/env python
#!coding=utf-8

__author__ = 'zhengjim'

array1 = [18,64,98,5,2,4,6,3,6,48,49,65,32,12,48,65,31,78,62,32,49,32,1,57,96,3,21,9,4,62,3,5,4,1,2,3,44,65,78,32,16,97,54,16,44,52,32,64,89,45,32,65,15,34,18,16,0]
array2 = [123,32,18,98,119,108,65,41,124,80,125,38,124,111,74,49,83,108,94,108,84,6,96,83,44,121,104,110,32,95,117,101,99,123,127,119,96,48,107,71,92,29,81,107,90,85,64,12,43,76,86,13,114,1,117,126,0]

flag = ''
for i in range(len(array1)):
    flag+= chr(array1[i] ^ array2[i] ^ 0x13 )
print flag
Timer(阿里CTF)
下載檔案發現是apk ,先安裝執行下發現有一個倒計時,只是時間為200000秒。猜測是讓時間走完獲取flag。

用jadx-gui反編譯,雙擊看MainActivity檢視
package net.bluelotus.tomorrow.easyandroid;

import android.os.Bundle;
import android.os.Handler;
import android.support.v7.app.AppCompatActivity;
import android.view.Menu;
import android.view.MenuItem;
import android.widget.TextView;

public class MainActivity extends AppCompatActivity {
    int beg = (((int) (System.currentTimeMillis() / 1000)) + 200000);
    int k = 0;
    int now;
    long t = 0;

    public native String stringFromJNI2(int i);

    public static boolean is2(int n) {
        if (n <= 3) {
            if (n > 1) {
                return true;
            }
            return false;
        } else if (n % 2 == 0 || n % 3 == 0) {
            return false;
        } else {
            int i = 5;
            while (i * i <= n) {
                if (n % i == 0 || n % (i + 2) == 0) {
                    return false;
                }
                i += 6;
            }
            return true;
        }
    }

    protected void onCreate(Bundle savedInstanceState) {
        super.onCreate(savedInstanceState);
        setContentView((int) R.layout.activity_main);
        final TextView tv1 = (TextView) findViewById(R.id.textView2);
        final TextView tv2 = (TextView) findViewById(R.id.textView3);
        final Handler handler = new Handler();
        handler.postDelayed(new Runnable() {
            public void run() {
                MainActivity.this.t = System.currentTimeMillis();
                MainActivity.this.now = (int) (MainActivity.this.t / 1000);
                MainActivity.this.t = 1500 - (MainActivity.this.t % 1000);
                tv2.setText("AliCTF");
                if (MainActivity.this.beg - MainActivity.this.now <= 0) {
                    tv1.setText("The flag is:");
                    tv2.setText("alictf{" + MainActivity.this.stringFromJNI2(MainActivity.this.k) + "}");
                }
                MainActivity mainActivity;
                if (MainActivity.is2(MainActivity.this.beg - MainActivity.this.now)) {
                    mainActivity = MainActivity.this;
                    mainActivity.k += 100;
                } else {
                    mainActivity = MainActivity.this;
                    mainActivity.k--;
                }
                tv1.setText("Time Remaining(s):" + (MainActivity.this.beg - MainActivity.this.now));
                handler.postDelayed(this, MainActivity.this.t);
            }
        }, 0);
    }

    public boolean onCreateOptionsMenu(Menu menu) {
        getMenuInflater().inflate(R.menu.menu_main, menu);
        return true;
    }

    public boolean onOptionsItemSelected(MenuItem item) {
        if (item.getItemId() == R.id.action_settings) {
            return true;
        }
        return super.onOptionsItemSelected(item);
    }

    static {
        System.loadLibrary("lhm");
    }
}首先初始化了beg為當前時間加上200000。(System.currentTimeMillis() / 1000)是獲得系統的時間,單位為毫秒,轉換為秒。
看onCreate方法,找到關鍵處
if (MainActivity.this.beg - MainActivity.this.now <= 0) {
                    tv1.setText("The flag is:");
                    tv2.setText("alictf{" + MainActivity.this.stringFromJNI2(MainActivity.this.k) + "}");
}所以MainActivity.this.beg - MainActivity.this.now <= 0 就是過了得時間。如果過了200000秒則出現flag。flag是使用native層來列印。
思路:能不能直接跳過200000秒直接出現flag呢?
有一個關鍵變數k,往下看,看看k有沒有什麼運算。
 if (MainActivity.is2(MainActivity.this.beg - MainActivity.this.now)) {
                    mainActivity = MainActivity.this;
                    mainActivity.k += 100;
                } else {
                    mainActivity = MainActivity.this;
                    mainActivity.k--;
                }
將差值用is2函式判斷,如果true,就k+100 ,如果false,就k-1。那就要看下is2函式
public static boolean is2(int n) {
        if (n <= 3) {
            if (n > 1) {
                return true;
            }
            return false;
        } else if (n % 2 == 0 || n % 3 == 0) {
            return false;
        } else {
            int i = 5;
            while (i * i <= n) {
                if (n % i == 0 || n % (i + 2) == 0) {
                    return false;
                }
                i += 6;
            }
            return true;
        }
}直接照著寫一個即可,然後可以算出關鍵變數k
解密指令碼
#!usr/bin/env python
#!coding=utf-8

__author__ = 'zhengjim'

def is2(n):
    if(n <= 3):
        if(n > 1):
            return True
        return False
    elif(n % 2 == 0 or n % 3 == 0):
        return False
    else:
        i = 5
        while(i * i <= n):
            if (n % i == 0 or n % (i + 2) == 0):
                return False
            i += 6
    return True

k=0

for i in xrange(200000,0,-1):
    k = k + 100 if is2(i) else k - 1
print k算出k = 1616384
然後就可以繞過200000秒將k帶入傳入進去獲取flag。
實現的話,用Androidkiller開啟專案,因為跳轉後輸出了The flag is,所以搜尋該字串,雙擊跟過去。

往上看第113行的if-gtz v0, :cond_0。 if-ltz是如果大於0跳轉 ,那改成如果小於0跳轉就跳過了200000秒等待了。對應的語句為if-ltz v0, :cond_0。
然後要找到賦值k的位置,看第129行-149行,因為k的值是在alictf{和}之間傳入的。
看到了139行的的iget v3, v3, Lnet/bluelotus/tomorrow/easyandroid/MainActivity;->k:I,知道v3是k的值。
於是在下面賦值const v3,1616384
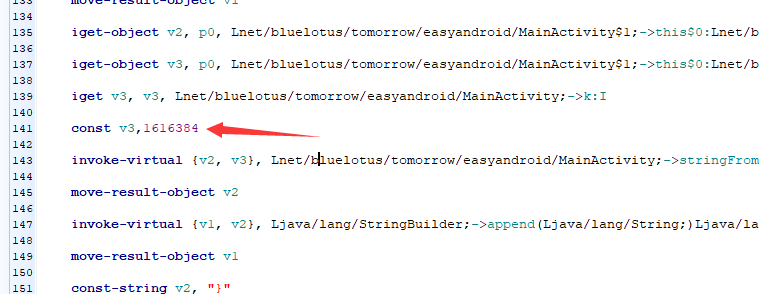
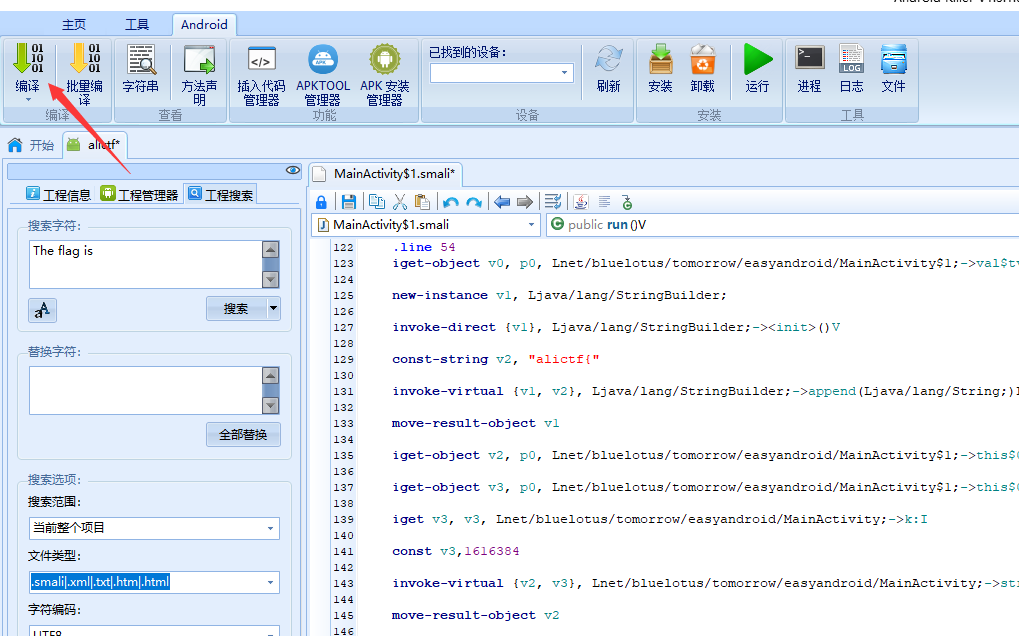
然後儲存,編譯,安裝執行就出現flag。
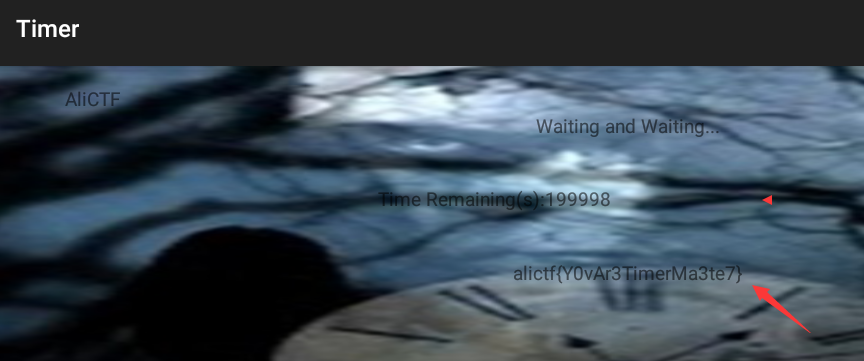
flag
逆向入門
下載後發現不是pe檔案,右鍵txt開啟,看到data:image/png;base64,iVBORXXXXXX...開頭的,為影象檔案。
開頭新增<img scr=",結尾新增"> ,html開啟。有二維碼掃描既可。

love
下載來用peid看是C++的,先執行下。

要輸入flag。用ida開啟
按之前說的方法,快速定位到關鍵函式
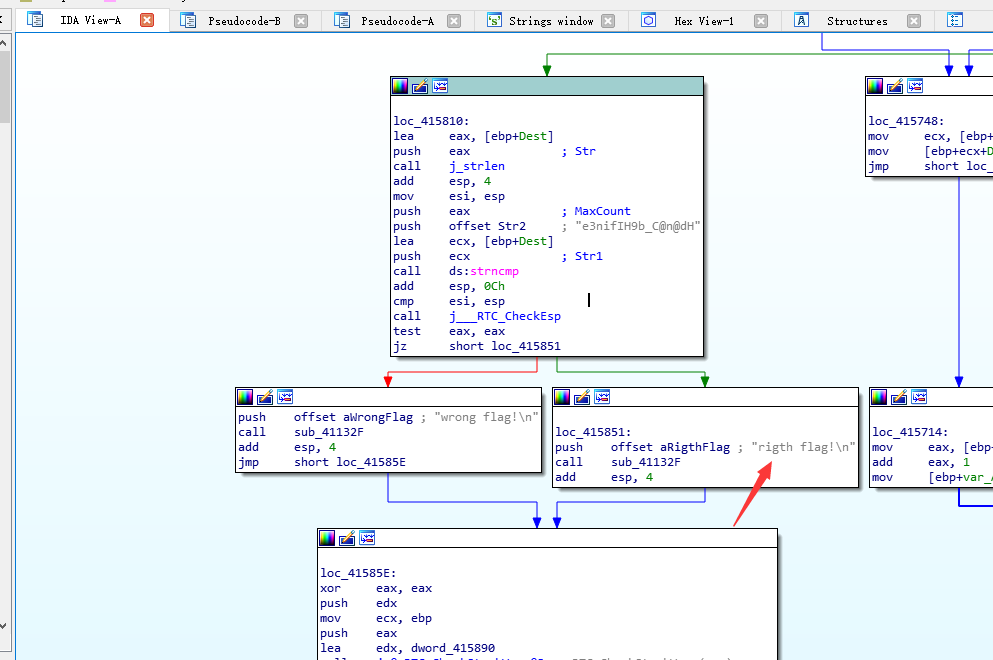
打F5檢視虛擬碼
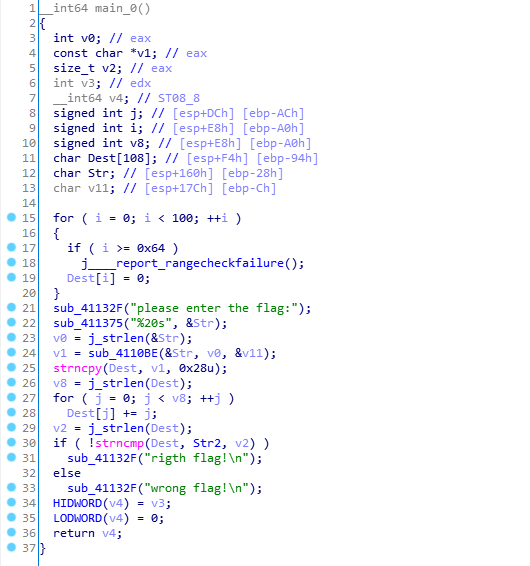
可以看到有兩步加密,第一步是先sub_4110BE(&Str, v0, &v11);用這個函式加密。然後再去迴圈加密
for ( j = 0; j < v8; ++j )
Dest[j] += j;然後把加密後的字串與str2相比較。str2的值為[email protected]@dH,先把迴圈逆向了。
#!usr/bin/env python
#!coding=utf-8

__author__ = 'zhengjim'

str2 ='[email protected]@dH'
flag =''

for i in range(len(str2)):
    flag += chr(ord(str2[i])- i)
print flag得到e2lfbDB2ZV95b3V9
然後看sub_4110BE()函式。一串長演算法,發現首先將輸入的flag每3位變成4位。然後有64位密碼錶。其實就是個base64加密(記下來,base64加密演算法的特徵)。
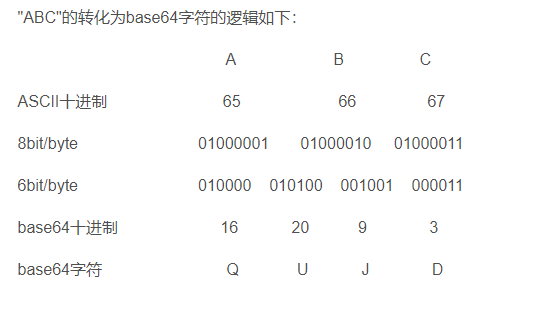
也就是將剛剛得到的值base64解密就是flag。
LoopAndLoop(阿里CTF)
下載檔案發現是apk ,先安裝執行下發現有一個輸入框,隨便輸入點getyourflag 跳出Not Right

用jadx-gui反編譯,雙擊看MainActivity檢視
package net.bluelotus.tomorrow.easyandroid;

import android.os.Bundle;
import android.support.v7.app.AppCompatActivity;
import android.view.Menu;
import android.view.MenuItem;
import android.view.View;
import android.view.View.OnClickListener;
import android.widget.Button;
import android.widget.EditText;
import android.widget.TextView;

public class MainActivity extends AppCompatActivity {
    public native int chec(int i, int i2);

    public native String stringFromJNI2(int i);

    protected void onCreate(Bundle savedInstanceState) {
        super.onCreate(savedInstanceState);
        setContentView((int) R.layout.activity_main);
        final TextView tv1 = (TextView) findViewById(R.id.textView2);
        final TextView tv2 = (TextView) findViewById(R.id.textView3);
        final EditText ed = (EditText) findViewById(R.id.editText);
        ((Button) findViewById(R.id.button)).setOnClickListener(new OnClickListener() {
            public void onClick(View v) {
                try {
                    int in_int = Integer.parseInt(ed.getText().toString());
                    if (MainActivity.this.check(in_int, 99) == 1835996258) {
                        tv1.setText("The flag is:");
                        tv2.setText("alictf{" + MainActivity.this.stringFromJNI2(in_int) + "}");
                        return;
                    }
                    tv1.setText("Not Right!");
                } catch (NumberFormatException e) {
                    tv1.setText("Not a Valid Integer number");
                }
            }
        });
    }

    public boolean onCreateOptionsMenu(Menu menu) {
        getMenuInflater().inflate(R.menu.menu_main, menu);
        return true;
    }

    public boolean onOptionsItemSelected(MenuItem item) {
        if (item.getItemId() == R.id.action_settings) {
            return true;
        }
        return super.onOptionsItemSelected(item);
    }

    public String messageMe(String text) {
        return "LoopOk" + text;
    }

    public int check(int input, int s) {
        return chec(input, s);
    }

    public int check1(int input, int s) {
        int t = input;
        for (int i = 1; i < 100; i++) {
            t += i;
        }
        return chec(t, s);
    }

    public int check2(int input, int s) {
        int t = input;
        int i;
        if (s % 2 == 0) {
            for (i = 1; i < 1000; i++) {
                t += i;
            }
            return chec(t, s);
        }
        for (i = 1; i < 1000; i++) {
            t -= i;
        }
        return chec(t, s);
    }

    public int check3(int input, int s) {
        int t = input;
        for (int i = 1; i < 10000; i++) {
            t += i;
        }
        return chec(t, s);
    }

    static {
        System.loadLibrary("lhm");
    }
}
看到關鍵程式碼:
public void onClick(View v) {
                try {
                    int in_int = Integer.parseInt(ed.getText().toString());
                    if (MainActivity.this.check(in_int, 99) == 1835996258) {
                        tv1.setText("The flag is:");
                        tv2.setText("alictf{" + MainActivity.this.stringFromJNI2(in_int) + "}");
                        return;
                    }
                    tv1.setText("Not Right!");
                } catch (NumberFormatException e) {
                    tv1.setText("Not a Valid Integer number");
                }
            }
流程為:將使用者輸入作為引數1(one),99作為引數2(two)傳入check函式裡,如果返回的值為1835996258,則將使用者輸入作為引數傳入stringFromJNI2函式計算,返回值與alictf{和}拼接組成flag 。
於是我們只要逆向出check函式,將1835996258帶入得到的值,拿到apk裡邊執行即可得到flag。
追過去發現check函式呼叫了chec函式 為Native層的函式

stringFromJNI2函式也為Native層的函式

載入了System.loadLibrary("lhm");,所以逆向liblhm.so檔案。
用IDA開啟,還是上面的辦法,找到了chec函式
這部分看得比較混亂,查了比較多的資料,所以有不對之處請指出來。
彙編

虛擬碼
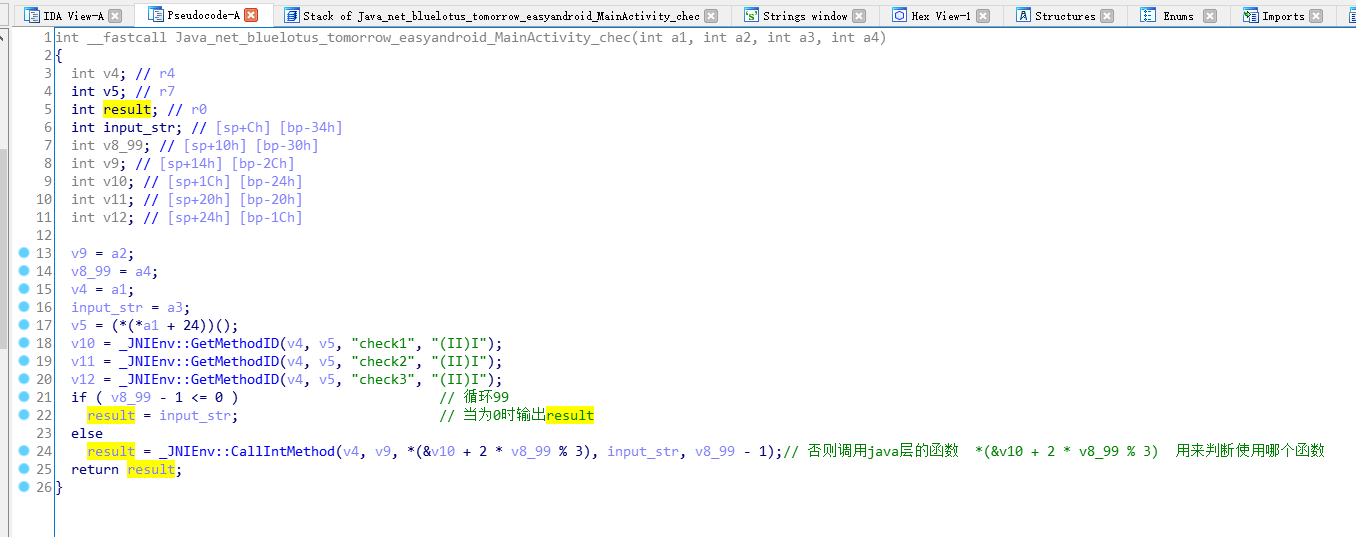
上面是自己加了註釋,然後通過看彙編與虛擬碼分析得出流程,即將傳入的99進行2 * i % 3運算,判斷得到的餘數。
- 如果等於0,將
one與two-1傳到JAVA層的check1進行計算 - 如果等於1,將
one與two-1傳到JAVA層的check2進行計算 - 如果等於2,將
one與two-1傳到JAVA層的check3進行計算
去檢視下check123函式
 public int check1(int input, int s) {
        int t = input;
        for (int i = 1; i < 100; i++) {
            t += i;
        }
        return chec(t, s);
    }

    public int check2(int input, int s) {
        int t = input;
        int i;
        if (s % 2 == 0) {
            for (i = 1; i < 1000; i++) {
                t += i;
            }
            return chec(t, s);
        }
        for (i = 1; i < 1000; i++) {
            t -= i;
        }
        return chec(t, s);
    }

    public int check3(int input, int s) {
        int t = input;
        for (int i = 1; i < 10000; i++) {
            t += i;
        }
        return chec(t, s);
}發現只是簡單的遍歷然後加減運算,計算完又返回chec函式
只到two小於等於1,輸出結果。
於是寫逆函式就不難了,check123 加變減,減變加就可以了。本來從99到2(因為two小於等於1),變成從2到99。
#!usr/bin/env python
#!coding=utf-8

__author__ = 'zhengjim'

def check1(input,s):
    t = input
    for i in range(1,100):
        t -= i
    return t

def check2(input,s):
    t = input
    if(s % 2 == 0):
        for i in range(1,1000):
            t -= i
        return t
    for i in range(1,1000):
        t += i
    return t

def check3(input,s):
    t = input
    for i in range(1,10000):
        t -= i
    return t

output = 1835996258
for i in range(2,100):
    flag =  2 * i % 3
    if flag == 0 :
        output = check1(output, i-1)
    elif flag == 1 :
        output = check2(output, i-1)
    elif flag == 2 :
        output = check3(output, i-1)
print output得到236492408 ,帶入apk執行出現flag。

easy-100(LCTF)
下載檔案發現是apk ,先安裝執行下(我的逍遙安卓執行失敗,不懂為啥)。
用jeb2反編譯(用jadx-gui反編譯出了問題,a方法過載反編譯出了問題),雙擊看MainActivity檢視
package com.example.ring.myapplication;

import android.content.pm.ApplicationInfo;
import android.os.Bundle;
import android.support.v7.a.q;
import java.io.InputStream;

public class MainActivity extends q {
    private String v;

    public MainActivity() {
        super();
    }

    static String a(MainActivity arg1) {
        return arg1.v;
    }

    static boolean a(MainActivity arg1, String arg2, String arg3) {
        return arg1.a(arg2, arg3);
    }

    private boolean a(String arg4, String arg5) {
        return new c().a(arg4, arg5).equals(new String(new byte[]{21, -93, -68, -94, 86, 117, -19, -68, -92, 33, 50, 118, 16, 13, 1, -15, -13, 3, 4, 103, -18, 81, 30, 68, 54, -93, 44, -23, 93, 98, 5, 59}));
    }

    protected void onCreate(Bundle arg3) {
        super.onCreate(arg3);
        this.setContentView(2130968602);
        ApplicationInfo v0 = this.getApplicationInfo();
        v0.flags &= 2;
        this.p();
        this.findViewById(2131427413).setOnClickListener(new d(this));
    }

    private void p() {
        try {
            InputStream v0_1 = this.getResources().getAssets().open("url.png");
            int v1 = v0_1.available();
            byte[] v2 = new byte[v1];
            v0_1.read(v2, 0, v1);
            byte[] v0_2 = new byte[16];
            System.arraycopy(v2, 144, v0_2, 0, 16);
            this.v = new String(v0_2, "utf-8");
        }
        catch(Exception v0) {
            v0.printStackTrace();
        }
    }
}
首先看onCreate()方法
protected void onCreate(Bundle arg3) {
        super.onCreate(arg3);
        this.setContentView(2130968602);
        ApplicationInfo v0 = this.getApplicationInfo();
        v0.flags &= 2;
        this.p();
        this.findViewById(2131427413).setOnClickListener(new d(this));
}執行了p()方法,然後建立了一個按鈕監聽事件在classs d 。
跟過去看下class d
package com.example.ring.myapplication;

import android.view.View$OnClickListener;
import android.view.View;
import android.widget.TextView;
import android.widget.Toast;

class d implements View$OnClickListener {
    d(MainActivity arg1) {
        this.a = arg1;
        super();
    }

    public void onClick(View arg5) {
        if(MainActivity.a(this.a, MainActivity.a(this.a), this.a.findViewById(2131427414).getText().toString())) {
            View v0 = this.a.findViewById(2131427412);
            Toast.makeText(this.a.getApplicationContext(), "Congratulations!", 1).show();
            ((TextView)v0).setText(2131099682);
        }
        else {
            Toast.makeText(this.a.getApplicationContext(), "Oh no.", 1).show();
        }
    }
}如果a()方法返回真,則輸出flag。第一個引數為控制代碼,第二個引數呼叫了另外一個a方法返回一個字串,第三個引數是我們輸入的字串。
跟過去看下a()方法,發現為過載(JAVA過載概念)
    static String a(MainActivity arg1) {
        return arg1.v;
    }

    static boolean a(MainActivity arg1, String arg2, String arg3) {
        return arg1.a(arg2, arg3);
    }

    private boolean a(String arg4, String arg5) {
        return new c().a(arg4, arg5).equals(new String(new byte[]{21, -93, -68, -94, 86, 117, -19, -68, -92, 33, 50, 118, 16, 13, 1, -15, -13, 3, 4, 103, -18, 81, 30, 68, 54, -93, 44, -23, 93, 98, 5, 59}));
    }
static String a(MainActivity arg1)方法直接返回了字串,返回的是arg1.vprivate boolean a(String arg4, String arg5)方法中呼叫了equals方法進行比較返回布林值。
由於arg4是類d中傳入的MainActivity.a(this.a),所以得先看返回了什麼字串v,而v是MainActivity的String型別的資料成員以及有相應的方法進行賦值p方法。
private void p() {
        try {
            InputStream v0_1 = this.getResources().getAssets().open("url.png");
            int v1 = v0_1.available();
            byte[] v2 = new byte[v1];
            v0_1.read(v2, 0, v1);
            byte[] v0_2 = new byte[16];
            System.arraycopy(v2, 144, v0_2, 0, 16);
            this.v = new String(v0_2, "utf-8");
        }
        catch(Exception v0) {
            v0.printStackTrace();
        }
}首先讀取url.png檔案以二進位制資料取出來。從檔案的144位置開始,讀取16字元儲存為v。
用winhex開啟這張檔案,找到144位置,往後的16位為this_is_the_key.
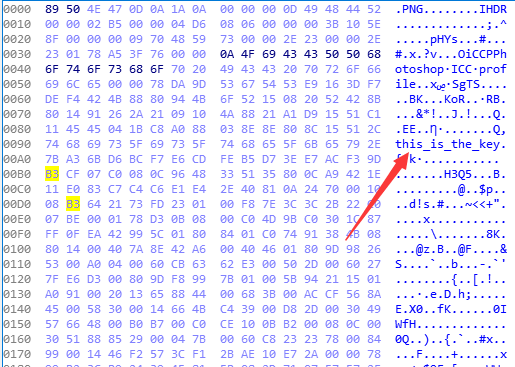
得到了key後,要看回三引數的a方法
static boolean a(MainActivity arg1, String arg2, String arg3) {
        return arg1.a(arg2, arg3);
    }

private boolean a(String arg4, String arg5) {
        return new c().a(arg4, arg5).equals(new String(new byte[]{21, -93, -68, -94, 86, 117, -19, -68, -92, 33, 50, 118, 16, 13, 1, -15, -13, 3, 4, 103, -18, 81, 30, 68, 54, -93, 44, -23, 93, 98, 5, 59}));
}發現三引數a方法呼叫了兩引數a方法,將this_is_the_key. 與使用者輸入作為引數傳了進去。.而兩引數a方法是呼叫類c的兩引數a方法.計算完後和後面的位元組比較。相等返回真。跟過去看下類c的兩引數a方法
public String a(String arg5, String arg6) {
        String v0 = this.a(arg5);
        String v1 = "";
        a v2 = new a();
        v2.a(v0.getBytes());
        try {
            v0 = new String(v2.b(arg6.getBytes()), "utf-8");
        }
        catch(Exception v0_1) {
            v0_1.printStackTrace();
            v0 = v1;
        }

        return v0;
}首先將this_is_the_key.傳入一個引數a方法,然後將返回值賦值給v0。看下一個引數a方法。
 private String a(String arg4) {
        String v0_2;
        try {
            arg4.getBytes("utf-8");
            StringBuilder v1 = new StringBuilder();
            int v0_1;
            for(v0_1 = 0; v0_1 < arg4.length(); v0_1 += 2) {
                v1.append(arg4.charAt(v0_1 + 1));
                v1.append(arg4.charAt(v0_1));
            }

            v0_2 = v1.toString();
        }
        catch(UnsupportedEncodingException v0) {
            v0.printStackTrace();
            v0_2 = null;
        }

        return v0_2;
}將傳入的字串每兩個字元為一組然後交換這兩個字元的位置最後返回改變後的字串。就是變成htsii__sht_eek.y,可以手動也可以寫指令碼。
#!usr/bin/env python
#!coding=utf-8

__author__ = 'zhengjim'

key = 'this_is_the_key.'
ckey =""
for i in range(0,len(key),2):
    ckey += key[i+1]
    ckey += key[i]
print(ckey)
回到類c的兩引數a方法,例項化的了類a,然後將使用者輸入作為引數帶入。跟過去看看。
package com.example.ring.myapplication;

import java.io.UnsupportedEncodingException;
import java.security.MessageDigest;
import java.security.NoSuchAlgorithmException;
import javax.crypto.Cipher;
import javax.crypto.NoSuchPaddingException;
import javax.crypto.spec.SecretKeySpec;

public class a {
    private SecretKeySpec a;
    private Cipher b;

    public a() {
        super();
    }

    protected void a(byte[] arg4) {
        if(arg4 != null) {
            goto label_15;
        }

        try {
            this.a = new SecretKeySpec(MessageDigest.getInstance("MD5").digest("".getBytes("utf-8")), "AES");
            this.b = Cipher.getInstance("AES/ECB/PKCS5Padding");
            return;
        label_15:
            this.a = new SecretKeySpec(arg4, "AES");
            this.b = Cipher.getInstance("AES/ECB/PKCS5Padding");
        }
        catch(UnsupportedEncodingException v0) {
            v0.printStackTrace();
        }
        catch(NoSuchAlgorithmException v0_1) {
            v0_1.printStackTrace();
        }
        catch(NoSuchPaddingException v0_2) {
            v0_2.printStackTrace();
        }
    }

    protected byte[] b(byte[] arg4) {
        this.b.init(1, this.a);
        return this.b.doFinal(arg4);
    }
}發現是用AES加密,ECB模式,PKCS5Padding填充。然後要找下金鑰。this.a = new SecretKeySpec(arg4, "AES");是將arg4作為金鑰。而arg4則是在類c中傳入的v0.getBytes(),也就是金鑰為htsii__sht_eek.y。
回到類c的兩引數a方法,將返回的字串賦值給v0然後再返回。到了MainActivity的兩引數a方法,與那串字串比較。正確則返回真,就出現Congratulations!。
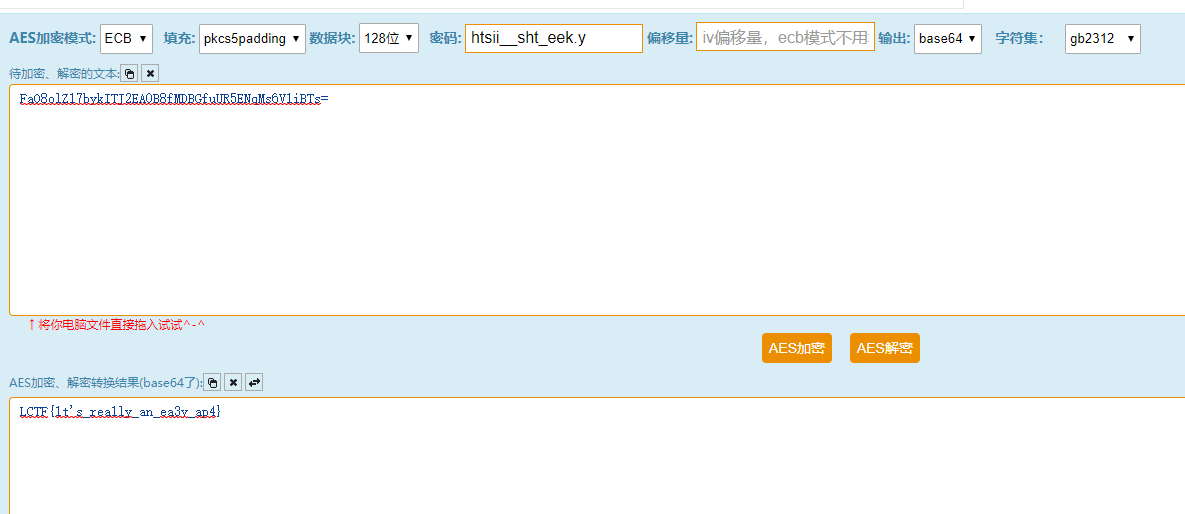
所以百度了一個AES解密網站。由於網站輸出的是base64。所以講密文轉為base64格式。
#!usr/bin/env python
#!coding=utf-8

__author__ = 'zhengjim'

import base64

str1 = [21, -93, -68, -94, 86, 117, -19, -68, -92, 33,50, 118, 16, 13, 1, -15, -13, 3, 4, 103, -18, 81, 30, 68, 54, -93, 44, -23, 93, 98, 5, 59]
ctext = ''
for i in str1:
    ctext += chr((i+256)%256)
a = base64.b64encode(ctext)
print(a)得到了密文為FaO8olZ17bykITJ2EA0B8fMDBGfuUR5ENqMs6V1iBTs=,金鑰為htsii__sht_eek.y,AES解密後出現flag。
SafeBox(NJCTF)
首先下載發現是apk,安裝執行下。就一個輸入框,其他的按不了。
用jadx-gui反編譯下,雙擊MainActivity檢視。
package com.geekerchina.hi;

import android.os.Bundle;
import android.support.v7.app.AppCompatActivity;
import android.view.Menu;
import android.view.MenuItem;
import android.view.View;
import android.view.View.OnClickListener;
import android.widget.Button;
import android.widget.EditText;

public class MainActivity extends AppCompatActivity {
    protected void onCreate(Bundle savedInstanceState) {
        super.onCreate(savedInstanceState);
        setContentView((int) R.layout.activity_main);
        final EditText Et1 = (EditText) findViewById(R.id.editText);
        ((Button) findViewById(R.id.button)).setOnClickListener(new OnClickListener() {
            public void onClick(View v) {
                String strTmp = "NJCTF{";
                int i = Integer.parseInt(Et1.getText().toString());
                if (i > 10000000 && i < 99999999) {
                    int t = 1;
                    int t1 = 10000000;
                    int flag = 1;
                    if (Math.abs(((i / 1000) % 100) - 36) == 3 && (i % 1000) % 584 == 0) {
                        for (int j = 0; j < 4; j++) {
                            if ((i / t) % 10 != (i / t1) % 10) {
                                flag = 0;
                                break;
                            }
                            t *= 10;
                            t1 /= 10;
                        }
                        if (flag == 1) {
                            char c2 = (char) ((i / 10000) % 100);
                            char c3 = (char) ((i / 100) % 100);
                            Et1.setText(strTmp + ((char) (i / 1000000)) + c2 + c3 + "f4n}");
                        }
                    }
                }
            }
        });
    }

    public boolean onCreateOptionsMenu(Menu menu) {
        getMenuInflater().inflate(R.menu.menu_main, menu);
        return true;
    }

    public boolean onOptionsItemSelected(MenuItem item) {
        if (item.getItemId() == R.id.action_settings) {
            return true;
        }
        return super.onOptionsItemSelected(item);
    }
}看到onCreate方法關鍵位置18行-37行,輸入一個8位數滿足條件後,將其變換後與NJCTF{和f4n}拼接。
用python指令碼來爆破
#!usr/bin/env python
#!coding=utf-8

__author__ = 'zhengjim'

import math

for i in range(10000000, 99999999):
    t = 1
    t1 =10000000
    flag = 1
    if (abs(((i / 1000) % 100) - 36) == 3 and (i % 1000) % 584 == 0):
        for j in range(4):
            if ((i / t) % 10 != (i / t1) % 10):
                flag = 0
                break
            t *= 10
            t1 /= 10
        if(flag ==1):
            print i
            c2 = chr((i / 10000) % 100)
            c3 = chr((i / 100) % 100)
            print('NJCTF{'+chr(i / 1000000)+c2+c3+'f4n}')
得到i應該為48533584 ,flag為NJCTF{05#f4n},但提交卻發現錯誤了。看了好幾遍發現沒錯。再看目錄發現了類androidTest。
package com.geekerchina.hi;

import android.os.Bundle;
import android.support.v7.app.AppCompatActivity;
import android.view.Menu;
import android.view.MenuItem;
import android.view.View;
import android.view.View.OnClickListener;
import android.widget.Button;
import android.widget.EditText;

public class androidTest extends AppCompatActivity {
    protected void onCreate(Bundle savedInstanceState) {
        super.onCreate(savedInstanceState);
        setContentView((int) R.layout.build);
        final EditText Et1 = (EditText) findViewById(R.id.editText);
        ((Button) findViewById(R.id.button)).setOnClickListener(new OnClickListener() {
            public void onClick(View v) {
                String strTmp = "NJCTF{have";
                int i = Integer.parseInt(Et1.getText().toString());
                if (i > 10000000 && i < 99999999) {
                    int t = 1;
                    int t1 = 10000000;
                    int flag = 1;
                    if (Math.abs(((i / 1000) % 100) - 36) == 3 && (i % 1000) % 584 == 0) {
                        for (int j = 0; j < 3; j++) {
                            if ((i / t) % 10 != (i / t1) % 10) {
                                flag = 0;
                                break;
                            }
                            t *= 10;
                            t1 /= 10;
                        }
                        if (flag == 1) {
                            char c2 = (char) ((i / 10000) % 100);
                            char c3 = (char) (((i / 100) % 100) + 10);
                            Et1.setText(strTmp + ((char) (i / 1000000)) + c2 + c3 + "f4n}");
                        }
                    }
                }
            }
        });
    }

    public boolean onCreateOptionsMenu(Menu menu) {
        getMenuInflater().inflate(R.menu.menu_main, menu);
        return true;
    }

    public boolean onOptionsItemSelected(MenuItem item) {
        if (item.getItemId() == R.id.action_settings) {
            return true;
        }
        return super.onOptionsItemSelected(item);
    }
}和MainActivity很像,但有細微不同:
第27行的String strTmp = "NJCTF{have";第27行的for (int j = 0; j < 3; j++) {第39行的char c3 = (char) (((i / 100) % 100) + 10);
python指令碼爆破
#!usr/bin/env python
#!coding=utf-8

__author__ = 'zhengjim'

import math

for i in range(10000000, 99999999):
    t = 1
    t1 = 10000000
    flag = 1
    if (abs(((i / 1000) % 100) - 36) == 3 and (i % 1000) % 584 == 0):
        for j in range(3):
            if ((i / t) % 10 != (i / t1) % 10):
                flag = 0
                break
            t *= 10
            t1 /= 10
        if (flag == 1):
            print i
            c2 = chr((i / 10000) % 100)
            c3 = chr((i / 100) % 100 + 10)
            print('NJCTF{have' + chr(i / 1000000) + c2 + c3 + 'f4n}')
得到兩組答案。
- i為
48533584,flag為NJCTF{have05-f4n} - i為
48539584,flag為NJCTF{have05if4n}
均提交試試發現第二組為正確。
Mountain climbing
下載後執行,發現要輸入最大數字,亂輸後跳出error。

用PEID 檢視下 發現有 UPX的殼。
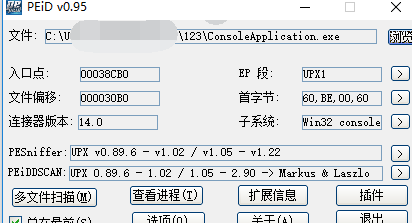
直接用52pojie的脫UPX工具進行脫殼。成功
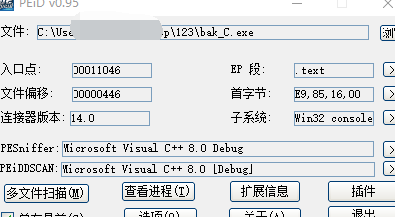
載入IDA
__int64 main_0()
{
  int v0; // edx
  __int64 v1; // ST04_8
  char v3; // [esp+0h] [ebp-160h]
  int v4; // [esp+D0h] [ebp-90h]
  int j; // [esp+DCh] [ebp-84h]
  int i; // [esp+E8h] [ebp-78h]
  char Str[104]; // [esp+F4h] [ebp-6Ch]

  srand(0xCu);
  j_memset(&unk_423D80, 0, 0x9C40u);
  for ( i = 1; i <= 20; ++i )
  {
    for ( j = 1; j <= i; ++j )
      dword_41A138[100 * i + j] = rand() % 100000;
  }
  ((void (__cdecl *)(const char *, char))sub_41134D)("input your key with your operation can get the maximum:", v3);
  sub_411249("%s", (unsigned int)Str);
  if ( j_strlen(Str) == 19 )
  {
    sub_41114F(Str);
    v4 = 0;
    j = 1;
    i = 1;
    dword_423D78 += dword_41A138[101];
    while ( v4 < 19 )
    {
      if ( Str[v4] == 76 )
      {
        dword_423D78 += dword_41A138[100 * ++i + j];
      }
      else
      {
        if ( Str[v4] != 82 )
        {
          ((void (__cdecl *)(const char *, char))sub_41134D)("error\n", v3);
          system("pause");
          goto LABEL_18;
        }
        dword_423D78 += dword_41A138[100 * ++i + ++j];
      }
      ++v4;
    }
    sub_41134D("your operation can get %d points\n", dword_423D78);
    system("pause");
  }
  else
  {
    ((void (__cdecl *)(const char *, char))sub_41134D)("error\n", v3);
    system("pause");
  }
LABEL_18:
  HIDWORD(v1) = v0;
  LODWORD(v1) = 0;
  return v1;
}首先生成一個數組存在。這個陣列由偽隨機數生成。srand(0xCu)隨機數種子一定,那麼rand出來的數也是一定的。
然後往下看,下面是自己加入了註釋。
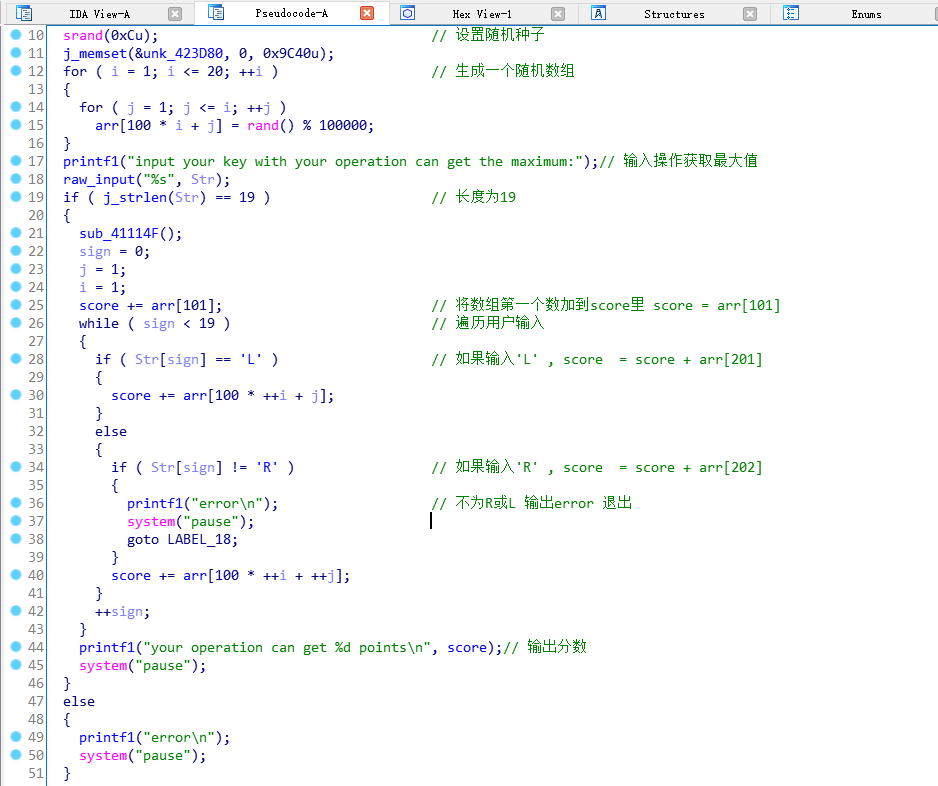
總得來看就是先將從arr[101] 相加,往下的迴圈為:
- 第一次迴圈:經過使用者按"L"或"R"來控制加
arr[201]還是arr[202] - 第二次迴圈:(情況1)第一次選擇了
arr[201]:經過使用者按"L"或"R"來控制加arr[301]還是arr[302](情況2)第二次選擇了arr[202]:經過使用者按"L"或"R"來控制加arr[302]還是arr[303]
跟兩次迴圈幫組理解,這樣子就很清楚了。整個題可以理解成站在山頂往下走,每一行走到的數字累加,每次只能走一格(左或右),走到最後一行。然後最後的數要最大。與題目Mountain climbing呼應
那首先要先找到這座山,看ida反編譯後是dword_41A138存在0041A138,我們用OD載入後運後,跟過去看看。
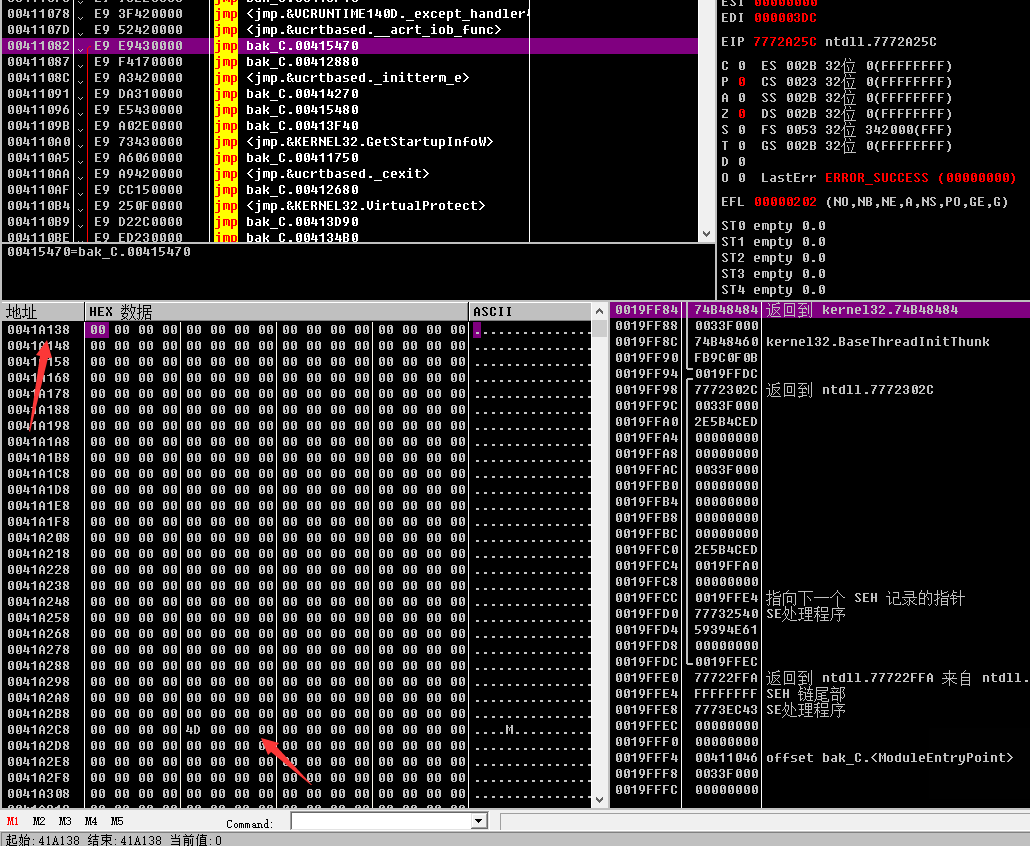
dword是4位元組的,而且第一個數是存在在[101]位置的。所以首位置存在41A2CC位置。往下的都是往後400節。
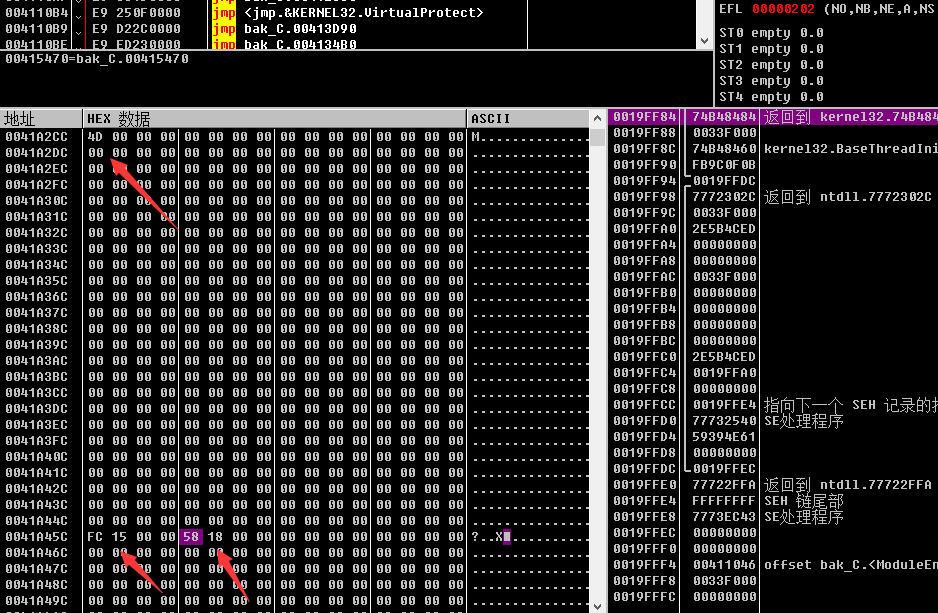
還是要注意小端儲存問題。所以可以得到arr[101] = 4D(16進位制) =77 , arr[201] = 15FC(16進位制) = 5628(10進位制) , arr[202] = 1858(16進位制) = 6232(10進位制)
有耐心的話可以一行行扣出來 ,沒有的話,直接還原c程式碼生成"一座山"。
程式碼如下:
srand(0xCu);
for (int i = 1; i <= 20; ++i)
{
    for (int j = 1; j <= i; ++j)
        arr[100 * i + j] = rand() % 100000;
}


for (int i = 1; i <= 20; ++i)
{
    for (int j = 1; j <= i; ++j)
        printf("%5d ", arr[100 * i + j]);
    cout << endl;
}得到完整的,與OD獲取的值是一致。
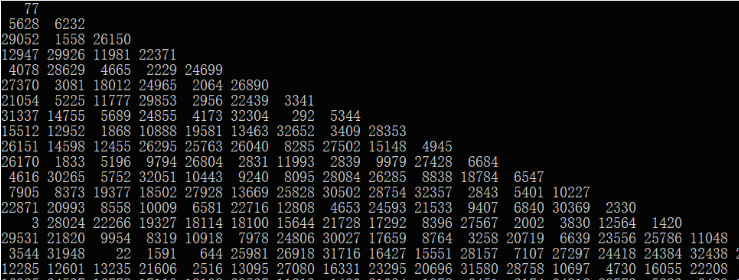
接下來就是找到最大解的路線。直接遍歷所有路線,然後比較最大數。
首先生成所有路徑
#!usr/bin/env python
#!coding=utf-8

__author__ = 'zhengjim'

import itertools

words = "LR"
r = itertools.product(words,repeat=19)
f = open("all_roads.txt",'a')
for i in r:
    f.write("".join(i)+"\n")
f.close()
然後將每個走法得到的值進行判斷大小,最大的值就是我們要的答案。
#!usr/bin/env python
#!coding=utf-8

__author__ = 'zhengjim'


s = [
    [77],
    [5628, 6232],
    [29052, 1558, 26150],
    [12947, 29926, 11981, 22371],
    [4078, 28629, 4665, 2229, 24699],
    [27370, 3081, 18012, 24965, 2064, 26890],
    [21054, 5225, 11777, 29853, 2956, 22439, 3341],
    [31337, 14755, 5689, 24855, 4173, 32304, 292, 5344],
    [15512, 12952, 1868, 10888, 19581, 13463, 32652, 3409, 28353],
    [26151, 14598, 12455, 26295, 25763, 26040, 8285, 27502, 15148, 4945],
    [26170, 1833, 5196, 9794, 26804, 2831, 11993, 2839, 9979, 27428, 6684],
    [4616, 30265, 5752, 32051, 10443, 9240, 8095, 28084, 26285, 8838, 18784, 6547],
    [7905, 8373, 19377, 18502, 27928, 13669, 25828, 30502, 28754, 32357, 2843, 5401, 10227],
    [22871, 20993, 8558, 10009, 6581, 22716, 12808, 4653, 24593, 21533, 9407, 6840, 30369, 2330],
    [3, 28024, 22266, 19327, 18114, 18100, 15644, 21728, 17292, 8396, 27567, 2002, 3830, 12564, 1420],
    [29531, 21820, 9954, 8319, 10918, 7978, 24806, 30027, 17659, 8764, 3258, 20719, 6639, 23556, 25786, 11048],
    [3544, 31948, 22, 1591, 644, 25981, 26918, 31716, 16427, 15551, 28157, 7107, 27297, 24418, 24384, 32438, 22224],
    [12285, 12601, 13235, 21606, 2516, 13095, 27080, 16331, 23295, 20696, 31580, 28758, 10697, 4730, 16055, 22208, 2391, 20143],
    [16325, 24537, 16778, 17119, 18198, 28537, 11813, 1490, 21034, 1978, 6451, 2174, 24812, 28772, 5283, 6429, 15484, 29353, 5942],
    [7299, 6961, 32019, 24731, 29103, 17887, 17338, 26840, 13216, 8789, 12474, 24299, 19818, 18218, 14564, 31409, 5256, 31930, 26804, 9736]]

all_score = {}
with open('all_roads.txt', 'r')as f:
    for line in f.readlines():
        row = 0
        go = 0
        score = s[row][go]
        for i in line:
            if i == 'L':
                row += 1
                score += s[row][go]
            elif i == 'R':
                row += 1
                go += 1
                score += s[row][go]
        all_score[line] = score

max_road = max(all_score, key=all_score.get)
print(max_road, all_score[max_road])
得到了最大路徑:RRRRRLLRRRLRLRRRLRL和最大值444740。
在程式輸入卻還是error

不知道是哪錯了,又看了一遍程式,發現第22行的sub_41114F(Str)對我們輸入的資料進行了處理。
跟進去,發現又呼叫了sub_411900(Str)在跟進去,發現呼叫了sub_4110A5(nullsub_1, sub_411994 - nullsub_1, 4)。再跟進去。

再往裡跟。sub_411750(lpAddress, a2, a3 = 4);
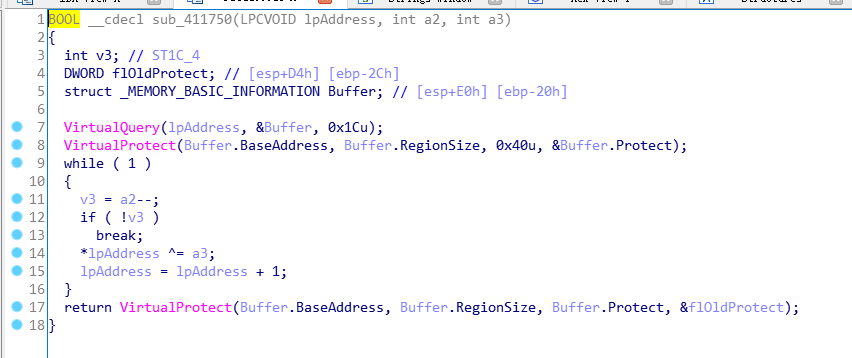
結合OD來檢視。
前面幾行是往記憶體獲取值理解成獲取使用者輸入。因為呼叫到了記憶體,所以結合OD來檢視。
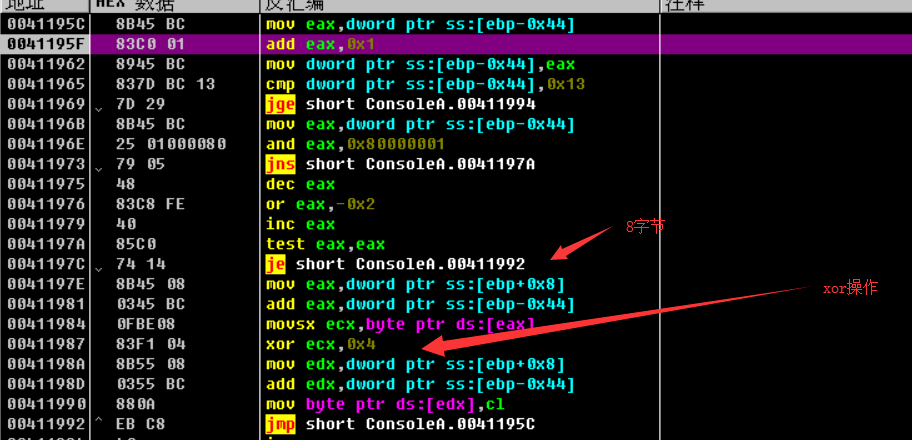
因為一個dword佔了4位元組,所以8位元組為第二字元。所以就是偶數位的字元與傳入的4進行xor運算。
#!usr/bin/env python
#!coding=utf-8

__author__ = 'zhengjim'

max_road = 'RRRRRLLRRRLRLRRRLRL'
flag = ''
for i, s in enumerate(max_road):
    if (i - 1) % 2 == 0:
        flag += chr(ord(s) ^ 4)
    else:
        flag += s
print(flag)得到flag:RVRVRHLVRVLVLVRVLVL

