
領域驅動模型
阿新 • • 發佈:2018-12-04
領域驅動模型
要想了解領域驅動模型,首先你要先知道基於領域驅動的架構目錄,如下圖
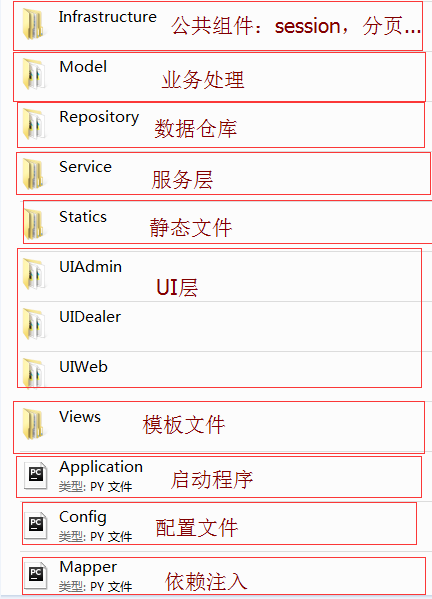
-
Repository 資料倉庫,用於資料訪問和持久化(功能是基於業務來做,並在業務裡定義介面來約束資料庫的操作功能)
-
Model 業務處理
-
建模(模型封裝業務需要的資料)
-
介面(約束資料庫的訪問功能)
-
協調 領域模型 和 資料訪問處理業務(呼叫資料庫訪問的xx方法,並把處理的資料封裝到模型中),把模型返回給服務層
-
service 服務層(請求有規則,響應有規則)---呼叫業務處理的協調者的協調方法
-
UI層 負責請求對應的類
領域驅動設計,用自己的話說就是業務邏輯場景驅動整個程式程式碼的設計
還是不懂?那看個例子吧,這個例子再尋常不過了
登陸場景
場景分析:
- 常見的兩種登陸方法--使用者名稱+密碼 或 郵箱+密碼,這就是前端提交後臺要處理的資料,三個一起交過去,沒有的就等於None
- 登陸失敗,要顯示錯誤資訊,登陸成功,就要顯示個人資訊,所以後臺處理完後要返回這些資料
領域模型,當然是從模型入手了,模型怎麼建了,模型是要封裝所有需要的資料,那我們需要哪些資料---登陸狀態,錯誤資訊,以及個人資訊,其中涉及資料庫訪問的就是個人資訊了,那麼模型就要封裝個人資訊
- 模型---個人資訊:id,使用者名稱,郵箱,最近登陸時間,使用者型別,會員型別(其中使用者型別和會員型別又可以分出小模型)
所以在Model裡建一個User.py
?| 1 2 3 4 5 6 7 8 9 10 11 12 13 14 15 16 17 18 19 20 21 22 23 24 25 26 27 28 29 30 31 32 33 34 35 36 37 38 39 40 41 42 43 44 45 46 |
#建立模型
class
VipType:
dic
=
{
1
:
'金牌'
,
2
:
'銀牌'
,
3
:
'銅牌'
}
def
__init__(
self
,nid):
self
.nid
=
nid
@property
def
caption(
self
):
for
i
in
VipType.dic:
if
i
=
=
self
.nid:
return
VipType.dic[i]
class
UserType:
dic
=
{
1
:
'普通使用者'
,
2
:
'商戶'
,
3
:
'管理員'
}
def
__init__(
self
,nid):
self
.nid
=
nid
@property
def
caption(
self
):
for
j
in
UserType.dic:
if
self
.nid
=
=
j:
return
UserType.dic[j]
class
User:
def
__init__(
self
,nid,username,email,last_login,vip_type_obj,user_type_obj):
self
.nid
=
self
.nid
self
.username
=
username
self
.email
=
email
self
.last_login
=
last_login
self
.vip_type
=
vip_type_obj
self
.user_type
=
user_type_obj
|
除了建模型,還在這裡定義介面(介面主要限制資料庫的訪問功能),分析認證的過程是郵箱或使用者名稱,可以分開定義成兩個方法,一個用使用者名稱驗證的方法,一個就是用郵箱驗證的方法,最後還要有更新使用者登陸時間的方法
?| 1 2 3 4 5 6 7 8 9 10 11 12 13 14 15 16 17 18 19 20 21 22 23 24 25 26 27 |
#定義介面
class
IUserRepository:
def
fetch_one_by_username(
self
,username,password):
'''
通過密碼到資料庫進行驗證
:param username: 使用者名稱
:param password: 密碼
:return:
'''
def
fetch_one_by_email(
self
,email,password):
'''
通過郵箱到資料庫進行驗證
:param email:
:param password:
:return:
'''
def
update_last_login_by_nid(
self
,nid,cur_date):
'''
通過nid更新資料庫的登陸時間
:param nid: id
:param cur_date: 最新時間
:return:
'''
|
好!介面和模型定義好後,就可以去Repository把接口裡方法實現了
- 資料訪問,資料訪問,肯定要要連線上資料庫才能訪問
在Repository建立了一個DbConnection.py,專門用連線資料庫的
?| 1 2 3 4 5 6 7 8 9 10 11 12 13 14 15 16 17 18 19 20 21 22 23 |
import
pymysql
import
Config
class
DbConnection:
def
__init__(
self
):
#資料庫的資訊寫在配置檔案裡
self
.__conn_dict
=
Config.PY_MYSQL_CONN_DICT
self
.conn
=
None
self
.cursor
=
None
#連線資料庫,建立遊標
def
connect(
self
,cursor
=
pymysql.cursors.DictCursor):
self
.conn
=
pymysql.connect(
*
*
self
.__conn_dict)
self
.cursor
=
self
.conn.cursor(cursor
=
cursor)
return
self
.cursor
#關閉遊標以及資料庫
def
close(
self
):
self
.conn.commit()
self
.cursor.close()
self
.conn.close()
|
做好了這一步,訪問資料庫時只要例項化這樣一個物件就可以了
針對業務層User建立一個UserRepository.py專門實現User檔案介面的方法,並處理得到的資料封裝到模型裡
?| 1 2 3 4 5 6 7 8 9 10 11 12 13 14 15 16 17 18 19 20 21 22 23 24 25 26 27 28 29 30 31 32 33 34 35 36 37 38 39 40 41 42 43 44 45 46 47 48 49 50 51 52 53 54 55 |
from
Model.User
import
VipType,User,UserType,IUserRepository
#進行資料庫連線的另成立模組
from
.DbConnection
import
DbConnection
class
UserDb(IUserRepository):
def
__init__(
self
):
self
.conn
=
DbConnection()
def
fetch_one_by_email(
self
,email,password):
ret
=
None
cursor
=
self
.conn.connect()
sql
=
'''select nid,username,email,last_login,vip_type,user_type
from UserInfo where email=% and password=%'''
cursor.execute(sql,(email,password))
#db_result是一個字典
db_result
=
cursor.fetchone()
self
.conn.close()
if
db_result:
#呼叫模型進行封裝
ret
=
User(nid
=
db_result[
'nid'
],
username
=
db_result[
'username'
],
email
=
db_result[
'email'
],
last_login
=
db_result[
'last_login'
],
user_type
=
UserType(nid
=
db_result[
'user_type'
]),
vip_type
=
VipType(nid
=
db_result[
'vip_type'
]))
return
ret
def
fetch_one_by_username(
self
,username,password):
ret
=
None
cursor
=
self
.conn.connect()
sql
=
'''select nid,username,email,last_login,vip_type,user_type
from UserInfo where username=% and password=%'''
cursor.execute(sql,(username,password))
#db_result是一個字典
db_result
=
cursor.fetchone()
self
.conn.close()
if
db_result:
#呼叫模型進行封裝
ret
=
User(nid
=
db_result[
'nid'
],
username
=
db_result[
'username'
],
email
=
db_result[
'email'
],
last_login
=
db_result[
'last_login'
],
user_type
=
UserType(nid
=
db_result[
'user_type'
]),
vip_type
=
VipType(nid
=
db_result[
'vip_type'
]))
return
ret
def
update_last_login_by_nid(
self
,nid,cur_date):
cursor
=
self
.conn.connect()
sql
=
'''update UserInfo set last_login=%s where nid=%s'''
cursor.execute(sql,(cur_date,nid))
self
.conn.close()
|
定義好介面方法後我們需要再次來到業務層,在Model的User.py寫入協調類,用於呼叫資料倉庫的方法,並把封裝好的模型物件返回給服務層,在呼叫方法前,需要需要先例項UserRepository物件,這裡可以用依賴注入
?| 1 2 3 4 5 6 7 8 9 10 11 12 13 14 15 16 |
#協調者,進行認證
class
UserService:
def
__init__(
self
,user_repostiory):
self
.db
=
user_repostiory
def
check_login(
self
,user,pwd,ema):
if
user:
user_model
=
self
.db.fetch_one_by_username(username
=
user,password
=
pwd)
else
:
user_model
=
self
.db.fetch_one_by_email(email
=
ema,password
=
pwd)
if
user_model:
|