webpack3.x 多入口打包的簡單配置
阿新 • • 發佈:2018-12-04
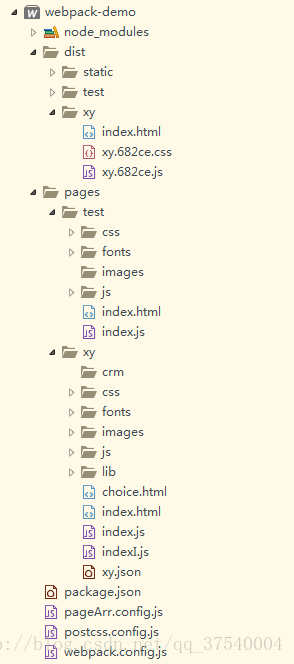
目錄結構
dist是生成的目錄
pages是你的多入口檔案的目錄
我把每個入口的檔案的js和css都抽離出來了,靜態資源集中放在同一個目錄
首先是 webpack.config.js
const webpack = require('webpack');
const path = require('path');
// 匹配檔案
const glob = require('glob')
// 自動安裝比如JS中的require import的未安裝的依賴
const NpmInstallPlugin = require('npm-install-webpack-plugin' );
// 提取css檔案
const ExtractTextPlugin = require("extract-text-webpack-plugin");
// 清空打包後的目錄
const CleanWebpackPlugin = require('clean-webpack-plugin');
//生成HTML模板
const HtmlWebpackPlugin = require('html-webpack-plugin')
// webpack服務
const wepackDevServer = require('webpack-dev-server')
// 提取json
var GenerateAssetPlugin = require ('generate-asset-webpack-plugin');
// 壓縮混淆js
const UglifyJSPlugin = require('uglifyjs-webpack-plugin');
// 動態獲取所有入口檔案
const getEntries = () => {
let obj = {};
glob.sync(path.join(__dirname, './pages/*'), {}).forEach(item => {
obj[`${item.split('/').pop()}`] = `${item}/index.js`
})
return obj
}
const webConfig = module.exports = {
// entry: {
// app: './pages/test/index.js',
// // 應用程式開始執行
// },
entry: getEntries(),
devtool: 'inline-source-map',
output: {
filename: './[name]/[name].[hash:5].js', // 檔名稱
path: path.resolve(__dirname, 'dist'), // 打包後文件輸出的目錄
publicPath: '../', //指定資原始檔引用的目錄 當前打包的資料夾
},
devServer: {
// 告訴伺服器從哪裡提供內容
contentBase: path.resolve(__dirname, 'static'),
// 是否壓縮
compress: true,
publicPath: '/',
// 指定埠號
port: 9000
},
module: {
rules: [
{
test: /\.js$/,
exclude: /node_modules/,
use: ['babel-loader']
},
{
test: /\.(css|sass|less|scss)$/,
exclude: /node_modules/,
use: ExtractTextPlugin.extract({
fallback: 'style-loader', // 當css沒有被提取的loader
use: [
{
loader: 'css-loader',
options: {
minimize: true //css壓縮
}
},
{
loader: 'postcss-loader', // 瀏覽器相容等
options: {
minimize: true //css壓縮
}
}
]
})
},
{
test: /\.(png|jpe?g|gif|svg)(\?.*)?$/,
exclude: /node_modules/,
loader: 'url-loader',
options: {
limit: 8192,
name: '[name].[hash:5].[ext]',
outputPath: './static/images/'
}
},
{
test: /\.(woff2?|eot|ttf|otf)(\?.*)?$/,
exclude: /node_modules/,
loader: 'url-loader',
options: {
limit: 8192,
name: '[name].[hash:5].[ext]',
outputPath: './static/fonts/'
// outputPath: './xy/fonts/'
// outputPath: './test/fonts/'
}
},
{
test: /\.html$/,
exclude: /node_modules/,
use: [{
loader: 'html-loader',
options: {
minmize: true
}
}]
},
{
test: /\.json$/,
exclude: /node_modules/,
loader: 'file-loader',
options: {
limit: 0,
name: '[name].[hash:5].[ext]',
outputPath: './static/json/',
}
}
]
},
plugins: [
// 啟用HMR webpack的熱載入
new webpack.HotModuleReplacementPlugin(),
/*
* 生成帶有hash的css js引用的html檔案例項
* filename 指定要生成的html檔案
* template 生成的html模板 可以指定你的原始html檔案當做模板
* chunks 指定需要的快 比如下面的test就需要test裡面的css、js啥的,就可以直接給個['test']就可以了
* */
// new HtmlWebpackPlugin({
// filename: './test/index.html',
// template: './pages/test/index.html',
// chunks: ['test']
// }),
//
// new HtmlWebpackPlugin({
// filename: './xy/index.html',
// template: './pages/xy/crm/index.html',
// chunks: ['xy']
// }),
// 自動安裝依賴
// new NpmInstallPlugin(),
// 清空dist目錄例項
new CleanWebpackPlugin(['dist']),
// 提取並生成css例項 控制css的輸出在這裡
new ExtractTextPlugin('./[name]/[name].[hash:5].css'),
new UglifyJSPlugin()
]
}
// 引入多入口的目錄
const pageArr = require('./pageArr.config.js')
pageArr.forEach((page) => {
const htmlPlugin = new HtmlWebpackPlugin({
filename: `./${page}/index.html`, // 根目錄是dist
template: `./pages/${page}/index.html`, // 根目錄就是當前根目錄
chunks: [page],
// title: ,
hash: true, // 為靜態資源生成hash值
// minify: true,
// xhtml: true,
// showErrors: true
});
webConfig.plugins.push(htmlPlugin);
});
postcss.config.js 的配置
module.exports = {
plugins: [
require('autoprefixer')({
browsers: ['last 5 versions']
})
]
}
pageArr.config.js 的配置 這個就是你的多檔案目錄的資料夾名字 避免每次都new一個 HtmlWebpackPlugin
module.exports = [
'xy',
'test'
];
我感覺比較容易暈的還是路徑的 配置 這個自己多寫寫 多試試 就明白啦 小弟還很菜 希望大佬們多多關照 多多提建議 感謝大佬 給大佬遞茶