
40.0 kubernetes初識
kubernetes基礎
大綱
基礎概念
叢集部署及陳述式命令管理

資源型別及配置清單
Pod資源
Pod控制器
Service資源
儲存卷
ConfigMap與Secret資源
StatefulSet控制器

認證、授權及准入控制
網路模型及網路策略
Pod資源排程
CRD、自定義資源、自定義控制器及自定義API server
資源指標與HPA控制器
Helm管理器
高可用Kubernetes
Linux Kernel
名稱空間:PID,Mount,Network,UTS(主機名和域名),IPC過程間通訊(Internet Process Connection),User,ControlGroups(資源分配)
容器是由linux核心提供的,是核心的一種特性,本來的一個使用者空間被擴充套件為多個使用者空間,每個空間都是行之有效的單獨執行環境,就像單獨使用一個核心,而核心把有限的資源分隔給每個使用者空間使用,每個使用者空間可以拿來當做一個完整的使用者空間,或者只執行一個程式(docker);父程序建立子程序,回收子程序,若子程序未回收,而子父程序結束,此時,子程序成為孤兒程序,回收不回來了,佔用資源;而在linux中,init程序是總的父程序,負責所有的子程序管理;這樣,一個使用者空間若有兩個程序,還需要第三個程序來管理可能產生的孤兒程序;一個容器執行一個程序,只有一個程序,此程序崩潰,docker的編排工具k8s會自動遷移;實現可高用,動態擴充套件,快速建立
程式設計師如果開發一個程式,需要windows10版,macos版,linux版,unix版等,需要多個版本,多個環境,人力,物力高,而如果程式設計師面向容器開發,容器執行此程式,只要windows10,macos,linux,unix等支援容器,則只需要開發一種程式(面向容器),而把具體的底層工作都交給容器實現,由容器提供統一標準的介面;這樣就可以一次開發,到處運行了;但容器太過底層,需要開發一種統一的工具以便使用
Docker最早採用LXC技術(LinuX Container的簡寫,LXC是Linux 原生支援的容器技術,可以提供輕量級的虛擬化,可以說 docker 就是基於 LXC 發展起來的,提供 LXC 的高階封裝,發展標準的配置方法),而虛擬化技術KVM(Kernel-based Virtual Machine) 基於模組實現,Docker後改為自己研發並開源的runc技術執行容器。docker即是容器的簡單實用的一種外殼
當在宿主機啟動較多的容器時候,如果都是手動操作會覺得比較麻煩而且容易出錯,這個時候推薦使用docker 單機編排工具docker compose,Docker Compose 是docker容器的一種編排服務,docker compose是一個管理多個容器的工具,比如可以解決容器之間的依賴關係,就像啟動一個web就必須得先把資料庫服務先啟動一樣,docker compose 完全可以替代docker run啟動容器
容器化應用docker的映象(可以把映象看做一個模板,由此摸版建立容器),可以通過環境變數來實現不同配置的同一個應用程式,或者通過指令碼;配置檔案更改,容器會動態載入;通過一個映象,多個配置檔案實現多個環境如開發環境,測試環境,生成環境;如果把配置放在一個配置中心,放在單獨的一個伺服器,通過一個外殼把不同環境的配置檔案注入到映象當中,docker沒有解決,此類容器編排由k8s實現,是一個抽象的外殼,可以實現多個主機節點上的多個容器之間的通訊,容器叢集等問題;
容器編排
Docker通過“映象”機制極富創造性地解決了應用程式打包的根本性難題,它推動了容器技術的快速普及及生成應用
容器本身僅提供了託管應用的底層邏輯,而容器編排(Orchestration)才是真正產生價值的位置所在;
容器編排是一個軟體,用來控制容器的建立,部署,動態伸縮,容器之間實時遷移,容器暴露服務以提供外部訪問,容器的健康性檢測,容器的服務發現實現Load balance,管理容器的生命週期管理,容器的Zero-downtime deploys, 儲存管理
容器編排系統
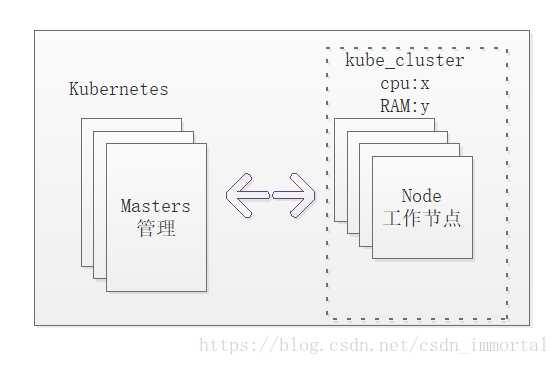
kubernetes:服務即平臺 PAAS,軟體邏輯實現一系列複雜的功能;Kubernetes is an open-source platform for automating deployments,scaling,and operations of application containers across clusters of hosts,providing container-centric infranstructure.
Docker Swarm
Apache Mesos and Marathon
kubernetes的最小排程單元是pod,pod裡面可以存在多個容器,每個容器執行一個程式且pod裡的容器共享linux的核心6個名稱空間
kubernetes是容器編排工具,容器的管理還需要靠容器管理工具,如docker,
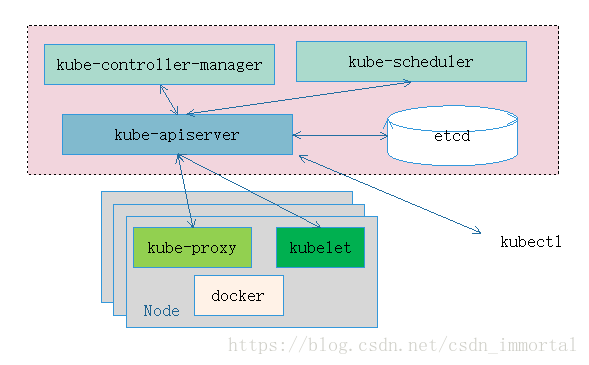
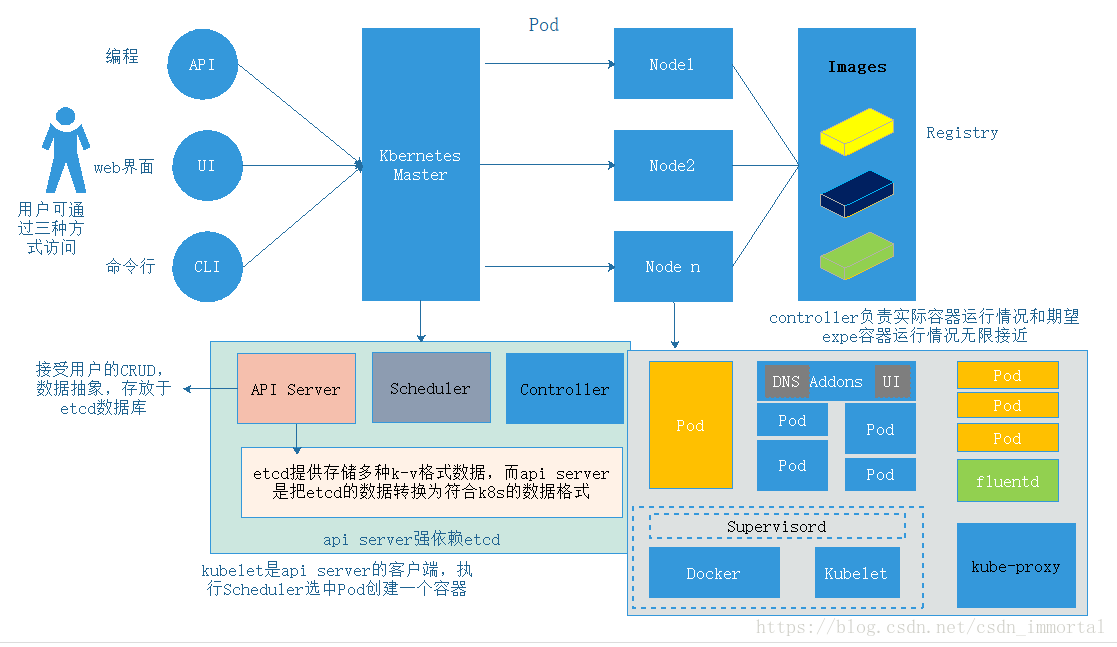
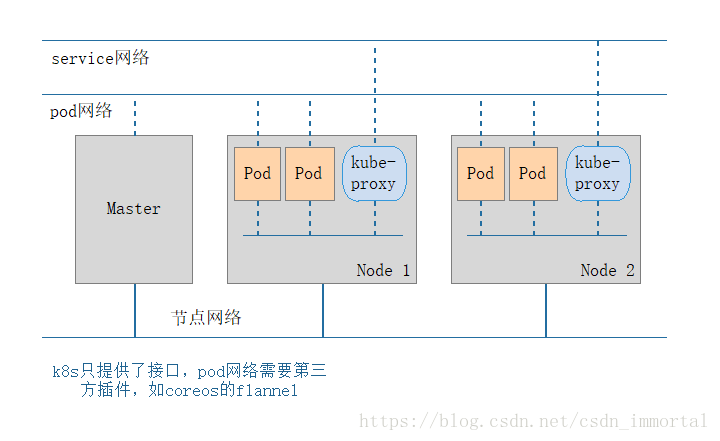
Kubernetes Components
Master Components
	kube-apiserver
	etcd
	kube-scheduler
	kube-controller-manager
	cloud-controller-manager
Node Components
	kubelet
	kube-proxy       對pod的固定訪問和動態建立和註冊
	Container Runtime
Addons               附加節點,可以提供更加完善的功能
	DNS
	Web UI(Dashboard)
	Contrainer Resource Monitoring
	Cluster-level Logging  (EFK(Fluented,Elastic Search,kibana))
圖共6個,此處是圖3-9-26
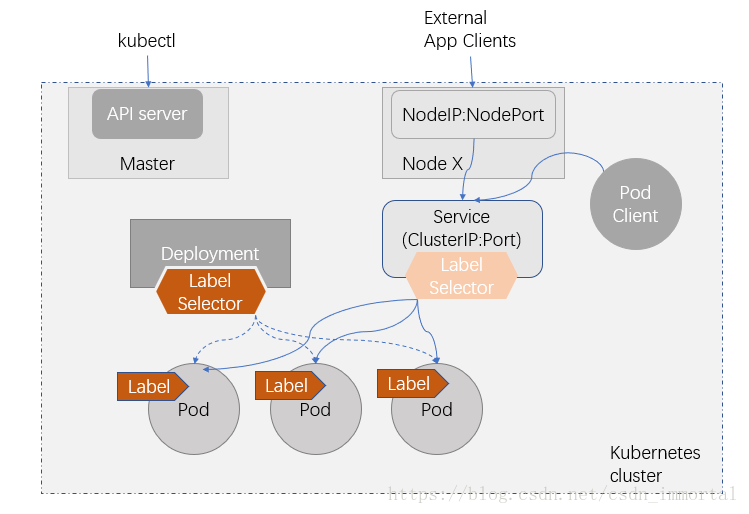
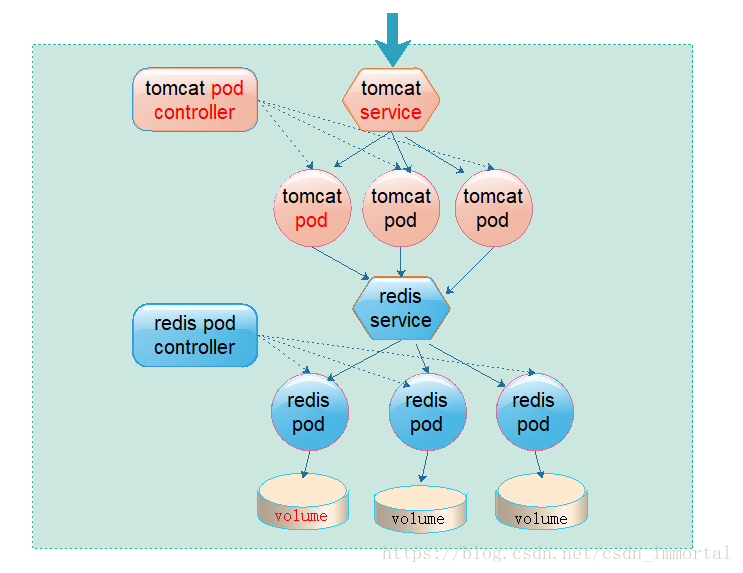
Kubernetes系統的基本工作邏輯
Kubernetes把應用程式及其周邊概念抽象為資源型別,並通過屬性賦值的方式例項化為物件,例如Pod資源型別及例項化的各Pod物件等;
使用者通過API server提交物件管理請求;請求建立的Pod物件由排程器排程至最佳匹配的Node上,並有kubelet建立和維護;
Kubernetes把施加於資源物件智商的運維操作過程程式化為控制器,例如部署、健康狀態監控、版本更新等,並由控制器通過“和解迴圈(reconcilation)”不間斷地監視相關物件的當前狀態是否與使用者自定義(也稱為期望)的狀態相吻合,二者不相符時,則啟動相關的操作過程讓當前狀態無限接近期望的狀態;
因此,使用者應該使用控制器物件建立和管理各類資源物件,包括Pod物件
控制器通過Label Selector挑選擁有符合條件的Label的Pod物件;
控制器物件的管理則由守護程序kube-controller-manager負責;
Pod物件存在生命週期,它們會在節點故障或被誤刪除等情形下被重建,英雌監聽於某套接字上提供服務的Pod物件無法向其客戶端程式提供一個穩定的訪問端點;
Kubernetes系統為提供同一類服務的Pod物件定義了一個抽象層–Service資源,它提供了固定不變的訪問介面,並在傳輸層反向代理並排程那些訪問Pod物件的服務的請求;
Service通過Label Selector挑選擁有符合條件的Label的Pod物件
Volume資源型別為Pod物件提供獨立於容器檔案系統之外的儲存空間,並且多數型別的儲存卷支援持久儲存機制
部署要點
測試環境
	可以使用單Master環境,單etcd例項;
	Node主機數量按需而定
	nfs或glusterfs等儲存系統
生產環境
	高可用etcd叢集,建立3、5或7個節點
	高可用Master
		kube-apisever無狀態,可多例項;
			藉助於keepalived進行vip流動實現多例項冗餘;
			或在多例項前端通過HAproxy或Nginx反代,並藉助於keepalived對代理伺服器進行冗餘;
		kube-scheduler及kube-controller-manager各自只能有一個活動例項,但可有多個備用
			各自自帶leader選舉的功能,並且預設處於啟動狀態;
	多Node主機,主機數量越多,冗餘能力越強
	ceph、glusterfs,iSCSI、FC SAN及各種雲端儲存等;
部署工具
常用的部署環境
	IaaS公有云環境:AWS(亞馬遜),GCE,Azure等;
	IaaS私有云環境:OpenStack和vSphere等;
	Baremetal環境:物理伺服器或獨立的虛擬機器等;
常用的部署工具
	kubeadm   接近生產可用
	kops
	kubespray 呼叫ansible,生產環境部署
	Kontena Pharos
	...
其它二次封裝的常用發行版
	Rancher
	Tectonic   coreOS研發
	Openshift	redhat研發
	...
此處是二進位制安裝執行圖右邊的模式,儘可能用pod,以方便升級等操作

kubeadm部署
https://kubernetes.io/docs/setup/independent/install-kubeadm/
https://github.com/kubernetes/kubeadm
kuberadm is a tool built to provide kubeadm init and kubeadm join as best-practice “fast paths” for creating Kubernetes clusters
kubeadm performs the actions necessary to get a mini viable cluster up and running
kuberspary
A tool deplooy a production Ready Kubernetes cluster
can be delployed on AWS,GCE,Azure,Openstack,vSphere,Oracle Cloud Infrastructure(Experimental),or BareMetal
Highly available cluster
Composable (Choice of the network plugin for instance)
Supports most popular Linux distributions
To deploy the cluster you can be
Ansible
Vagrant
https://github.com/kubernetes-incubator/kubespray
gcr.io 是google contrainer registry 映象倉庫。pod背後依賴此映象倉庫,國外訪問不了
國內阿里等有此映象倉庫,需要配置kubeadm(官方映象獲取不到,允許從第三方獲取映象)
192.168.31.7 master
192.168.31.17 node01
192.168.31.27 node02
192.168.31.37 node03
時間同步
[[email protected] ~ ]#ntpdate ntp1.aliyun.com
清空防火牆

[[email protected] ~ ]#systemctl stop firewalld.service
[[email protected] ~ ]#systemctl disable firewalld.service
[[email protected] ~ ]#iptables -F
其它同理
更改主機名
[[email protected] ~ ]#hostnamectl set-hostname master01
[[email protected] ~ ]#hostnamectl set-hostname node01
[[email protected] ~ ]#hostnamectl set-hostname node02
[[email protected] ~ ]#hostnamectl set-hostname node03
[[email protected] ~ ]#exec bash

[[email protected] ~ ]#vim /etc/hosts
127.0.0.1   localhost localhost.localdomain localhost4 localhost4.localdomain4
::1         localhost localhost.localdomain localhost6 localhost6.localdomain6
192.168.31.7 master01 master01.dhy.com
192.168.31.17 node01 node01.dhy.com
192.168.31.27 node02 node02.dhy.com
192.168.31.37 node03 node03.dhy.com

[[email protected] ~ ]#ssh-keygen -t rsa -P ''
[[email protected] ~ ]#ssh-copy-id -i .ssh/id_rsa.pub [email protected]
[[email protected] ~ ]#ssh [email protected] 'date'
Wed Sep 26 14:34:35 CST 2018
[[email protected] ~ ]#scp -rp .ssh/ node01:/root/
[[email protected] ~ ]#scp -rp .ssh/ node02:/root/
[[email protected] ~ ]#scp -rp .ssh/ node03:/root/
[[email protected] ~ ]#scp -p /etc/hosts node01:/etc/hosts
[[email protected] ~ ]#scp -p /etc/hosts node02:/etc/hosts
[[email protected] ~ ]#scp -p /etc/hosts node03:/etc/hosts

[[email protected] yum.repos.d ]#wget https://mirrors.aliyun.com/docker-ce/linux/centos/docker-ce.repo

[[email protected] yum.repos.d ]#vim /etc/yum.repos.d/kubernetes.repo
[kubernetes]
name=kubernetes
baseurl=https://mirrors.aliyun.com/kubernetes/yum/repos/kubernetes-el7-x86_64/
gpgcheck=1
gpgkey=https://mirrors.aliyun.com/kubernetes/yum/doc/rpm-package-key.gpg
enabled=1

[[email protected] yum.repos.d ]#yum repolist
===
[[email protected] ~ ]#yum install docker-ce kubelet kubeadm kubectl -y
Error: Package: docker-ce-18.06.1.ce-3.el7.x86_64 (docker-ce-stable)
           Requires: container-selinux >= 2.9
解決方法:
[[email protected] ~ ]#wget -O /etc/yum.repos.d/CentOS-Base.repo http://mirrors.aliyun.com/repo/Centos-7.repo

[[email protected] ~ ]#scp /etc/yum.repos.d/* [email protected]:/etc/yum.repos.d/
[[email protected] ~ ]#scp /etc/yum.repos.d/* [email protected]:/etc/yum.repos.d/
[[email protected] ~ ]#scp /etc/yum.repos.d/* [email protected]:/etc/yum.repos.d/

[[email protected] ~ ]#yum install docker-ce kubelet kubeadm -y
[[email protected] ~ ]#yum install docker-ce kubelet kubeadm -y
[[email protected] ~ ]#yum install docker-ce kubelet kubeadm -y
主節點master01
=================
#此處還是使用阿里雲映象加速器合適,由於下述代理失敗
瀏覽器開啟http://cr.console.aliyun.com,註冊或登入阿里雲賬號,點選左側的映象加速器,將會得到一個專屬的加速地址
[[email protected] ~ ]#vim /usr/lib/systemd/system/docker.service
[Service]
Type=notify
# the default is not to use systemd for cgroups because the delegate issues still
# exists and systemd currently does not support the cgroup feature set required
# for containers run by docker
Environment="HTTPS_PROXY=http://www.ik8s.io:10081"
Environment="NO_PROXY=192.168.0.0,127.0.0./8"
    #代理加速,需要個人消費買,
或者使用國內映象加速,或者提前下載到本地
==================
主節點忽略Swap啟用的狀態錯誤,並設定docker和kubelet開機自啟動
[[email protected] ~ ]#vim /etc/sysconfig/kubelet
KUBELET_EXTRA_ARGS="--fail-swap-on=false"
[[email protected] ~ ]#systemctl start docker
[[email protected] ~ ]#systemctl enable docker kubelet
#本地已經下好了,直接匯入
[[email protected] ~ ]#docker load -i kubernetes-v.1.11.3-master-components.tar.gz
[[email protected] ~ ]#docker image ls
REPOSITORY                                 TAG                 IMAGE ID            CREATED             SIZE
k8s.gcr.io/kube-proxy-amd64                v1.11.3             be5a6e1ecfa6        2 weeks ago         97.8MB
k8s.gcr.io/kube-controller-manager-amd64   v1.11.3             a710d6a92519        2 weeks ago         155MB
k8s.gcr.io/kube-scheduler-amd64            v1.11.3             ca1f38854f74        2 weeks ago         56.8MB
k8s.gcr.io/kube-apiserver-amd64            v1.11.3             3de571b6587b        2 weeks ago         187MB
k8s.gcr.io/coredns                         1.1.3               b3b94275d97c        4 months ago        45.6MB
k8s.gcr.io/etcd-amd64                      3.2.18              b8df3b177be2        5 months ago        219MB
quay.io/coreos/flannel                     v0.10.0-amd64       f0fad859c909        8 months ago        44.6MB
k8s.gcr.io/pause                           3.1                 da86e6ba6ca1        9 months ago        742kB
================
[[email protected] ~ ]#kubeadm --help
Available Commands:
  alpha       Experimental sub-commands not yet fully functional.
  completion  Output shell completion code for the specified shell (bash or zsh).
  config      Manage configuration for a kubeadm cluster persisted in a ConfigMap in the cluster.
  help        Help about any command
  init        Run this command in order to set up the Kubernetes master.
  join        Run this on any machine you wish to join an existing cluster
  reset       Run this to revert any changes made to this host by 'kubeadm init' or 'kubeadm join'.
  token       Manage bootstrap tokens.
  upgrade     Upgrade your cluster smoothly to a newer version with this command.
  version     Print the version of kubeadm

[[email protected] ~ ]#export HTTPS_PROXY="http://www.ik8s.io:10081"
[[email protected] ~ ]#kubeadm config print-default   #失敗,換成阿里映象加速成功
================
初始化master節點:
[[email protected] ~ ]# kubeadm init --kubernetes-version=v1.11.3 --pod-network-cidr=10.244.0.0/16 service-cidr=10.96.0.0/12 --ignore-preflight-errors=Swap
********
To start using your cluster, you need to run the following as a regular user:

  mkdir -p $HOME/.kube
  sudo cp -i /etc/kubernetes/admin.conf $HOME/.kube/config
  sudo chown $(id -u):$(id -g) $HOME/.kube/config

You should now deploy a pod network to the cluster.
Run "kubectl apply -f [podnetwork].yaml" with one of the options listed at:
  https://kubernetes.io/docs/concepts/cluster-administration/addons/

You can now join any number of machines by running the following on each node
as root:

  kubeadm join 172.18.123.153:6443 --token bnazzx.2j6nez2lsyl2rylo --discovery-token-ca-cert-hash
===================
初始化kubectl
[[email protected] ~ ]#mkdir .kube
[[email protected] ~ ]#cp /etc/kubernetes/admin.conf .kube/config
#檢視狀態為NotRedy
[[email protected] ~ ]#kubectl get nodes
NAME       STATUS     ROLES     AGE       VERSION
master01   NotReady   master    5m        v1.11.3

新增flannel網路附件
https://github.com/coreos/flannel網址有部署server網路命令
[[email protected] ~ ]#kubectl apply -f https://raw.githubusercontent.com/coreos/flannel/master/Documentation/kube-flannel.yml
測試:
[[email protected] ~ ]#kubectl get nodes
NAME       STATUS    ROLES     AGE       VERSION
master01   Ready     master    15m       v1.11.3
新增節點到叢集中
映象加速
[[email protected] ~ ]#scp /etc/docker/daemon.json [email protected]:/etc/docker/
[[email protected] ~ ]#scp /etc/docker/daemon.json [email protected]:/etc/docker/
[[email protected] ~ ]#scp /etc/docker/daemon.json [email protected]:/etc/docker/

忽略Swap開啟錯誤
[[email protected] ~ ]#scp /etc/sysconfig/kubelet [email protected]:/etc/sysconfig/
[[email protected] ~ ]#scp /etc/sysconfig/kubelet [email protected]:/etc/sysconfig/
[[email protected] ~ ]#scp /etc/sysconfig/kubelet [email protected]:/etc/sysconfig/

設定docker和kubelet開機自啟動
[[email protected] ~ ]#systemctl start docker
[[email protected] ~ ]#systemctl enable docker kubelet

#匯入映象,不在從官網倉庫載入,太慢
[[email protected] ~ ]#docker image ls
REPOSITORY                                 TAG                 IMAGE ID            CREATED             SIZE
k8s.gcr.io/kube-proxy-amd64                v1.11.3             be5a6e1ecfa6        2 weeks ago         97.8MB
k8s.gcr.io/kube-scheduler-amd64            v1.11.3             ca1f38854f74        2 weeks ago         56.8MB
k8s.gcr.io/kube-controller-manager-amd64   v1.11.3             a710d6a92519        2 weeks ago         155MB
k8s.gcr.io/kube-apiserver-amd64            v1.11.3             3de571b6587b        2 weeks ago         187MB
k8s.gcr.io/coredns                         1.1.3               b3b94275d97c        4 months ago        45.6MB
k8s.gcr.io/etcd-amd64                      3.2.18              b8df3b177be2        5 months ago        219MB
quay.io/coreos/flannel                     v0.10.0-amd64       f0fad859c909        8 months ago        44.6MB
k8s.gcr.io/pause                           3.1                 da86e6ba6ca1        9 months ago        742kB
[[email protected] ~ ]#docker save k8s.gcr.io/kube-proxy-amd64:v1.11.3 quay.io/coreos/flannel:v0.10.0-amd64 k8s.gcr.io/pause:3.1 -o node-componenets.tar.gz
[[email protected] ~ ]#
[[email protected] ~ ]#scp node-componenets.tar.gz [email protected]:
[[email protected] ~ ]#scp node-componenets.tar.gz [email protected]:
[[email protected] ~ ]#scp node-componenets.tar.gz [email protected]:

[[email protected] ~ ]#docker images
REPOSITORY          TAG                 IMAGE ID            CREATED             SIZE
[[email protected] ~ ]#docker load -i kubernetes-v1.11.3-node-components.tar.gz
[[email protected] ~ ]#docker image ls
REPOSITORY                    TAG                 IMAGE ID            CREATED             SIZE
k8s.gcr.io/kube-proxy-amd64   v1.11.3             be5a6e1ecfa6        2 weeks ago         97.8MB
quay.io/coreos/flannel        v0.10.0-amd64       f0fad859c909        8 months ago        44.6MB
k8s.gcr.io/pause              3.1                 da86e6ba6ca1        9 months ago        742kB

加入主節點
[[email protected] ~ ]#kubeadm join 172.18.123.153:6443 --token bnazzx.2j6nez2lsyl2rylo --discovery-token-ca-cert-hash sha256:6da9620ab06b091b4d3e4d4285a6f2fbe6de8abcd954477e8d8c4fb87c6e7b3a --ignore-preflight-errors=Swap

其它節點同理
kubectl config view
kubectl get nodes
kubectl run nginx --image=nginx:alpine-1.10 --replicas=1
kubectl describe pods
kubectl get pods -o wide 檢視ip
curl ip
kubectl scale deployment nginx --replicas=3
kubectl get pods -o wide
kubectl delete pods nginx-5999

kubectl expose deployment nginx --name nginx --port=80 --target=80 --protocol=TCP
kubectl get svc
kubectl describe svc nginx  有統一的ip
kubectl get svc -n kube-system
yum install bind-utils
dig -t A nginx.default.svc.cluster,local @10.196
資源:資源型別(Pod,Service)
例項化:物件
redis pod ->Pods
tomcat pod->Pods
API server
client library:呼叫庫
kubectl:命令列
Dashboard:圖形介面
資源管理
CRUD:增、刪、改、查
增:
控制器或Pod:run
刪:
delete TYPE NAEM
delete TYPE/NAME
delete svc redis
delete deployment redis
改:
edit
replace
查:
get TYPE [NAEM]
kubectl get svc ** -o yml
describe TYPE NAME
檢視日誌
kubectl logs POD [-c CON_NAME]
互動式介面
kubectl exec -it
kubectl exec POD [-c CON] -- COMMAND
[[email protected] ~ ]#kubectl run tomcat --image tomcat:8.5-alpine --replicas=2
[[email protected] ~ ]#kubectl get pods -w
NAME                     READY     STATUS              RESTARTS   AGE
nginx-5c89469986-z4mfd   0/1       ImagePullBackOff    0          1h
tomcat-667d6c9-l2hgq     0/1       ContainerCreating   0          18s
tomcat-667d6c9-pqcrz     0/1       ContainerCreating   0          18s

[[email protected] ~ ]#kubectl expose deployment tomcat --name tomcat --port=80 --target-port=8080
service/tomcat exposed

[[email protected] ~ ]#kubectl get svc
NAME         TYPE        CLUSTER-IP     EXTERNAL-IP   PORT(S)   AGE
kubernetes   ClusterIP   10.96.0.1      <none>        443/TCP   2h
tomcat       ClusterIP   10.108.2.237   <none>        80/TCP    17s
[[email protected] ~ ]#curl 10.108.2.237:80

[[email protected] ~ ]#kubectl edit svc tomcat
 type: ClusterIP改為NodePort

[[email protected] ~ ]#kubectl get svc
NAME         TYPE        CLUSTER-IP     EXTERNAL-IP   PORT(S)        AGE
kubernetes   ClusterIP   10.96.0.1      <none>        443/TCP        2h
tomcat       NodePort    10.108.2.237   <none>        80:31581/TCP   7m
瀏覽器輸入http://192.168.31.7:31581/ 顯示Apache Tomcat/8.5.34等