
git生成Key操作儲存到GITHUB中
https://blog.csdn.net/sinat_23880167/article/details/78502528
1. 在git中通過命令:
$ ssh-keygen Generating public/private rsa key pair. Enter file in which to save the key (/c/Users/NorthK_PC/.ssh/id_rsa): /c/Users/NorthK_PC/.ssh/id_rsa already exists. Overwrite (y/n)? yes Enter passphrase (empty for no passphrase): Enter same passphrase again: Your identification has been savedin /c/Users/NorthK_PC/.ssh/id_rsa. Your public key has been saved in /c/Users/NorthK_PC/.ssh/id_rsa.pub. The key fingerprint is: SHA256:iw00WYyDiCcbJpeA1HXUSu4oqgPGRIMfIm80627ZGOg [email protected]-HF14RRR The key's randomart image is: +---[RSA 2048]----+ |=+.o.o.=o | |X+O.. ++.. | |[email protected]+ *.. | |..= . + | |o+ + S | |ooo. . = . | |+..=. . o | |.E= . | |oo | +----[SHA256]-----+
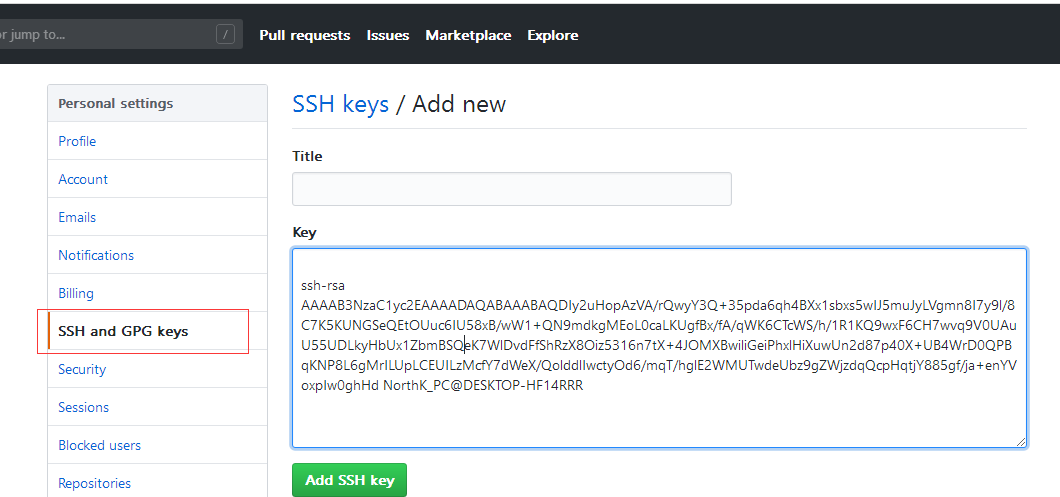
2. 檢視公鑰
$ cat /c/Users/NorthK_PC/.ssh/id_rsa.pub ssh-rsa AAAAB3NzaC1yc2EAAAADAQABAAABAQDIy2uHozVA/rQwyY3Q+35pda6qh4BXx1sbxs5wIJ5muJyLVgmn
8I7y9l/8C7K5KUNGSeQEtOUuc6IU58xB/wW1+QN9mdkgMEoL0caLKUgfBx/fA/qWK6CTcWS/h/1R1KQ9wxF6CH7wv
q9V0UAuU55UDLkyHbUx1ZbmBSQeK7WlDvdFfShRzX8Oiz5316n7tX+4JOMXBwiliGeiPhxlHiXuwUn2d87p40X+UB
WrD0QPBqKNP8L6gMrILUpLCEUILzMcfY7dWeX/QolddlIwctyOd6/mqT/hglE2WMUTwdeUbz9gZWjzdqQcpHqtjY
885gf/ja+enYVoxpIw0ghHd[email protected]
3. Github中新增公鑰
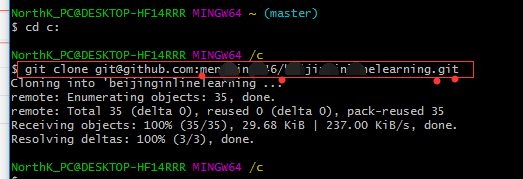
4. 通過git clone 到本地
將github上的專案,克隆到本地一份 git clone [email protected]:賬號名/專案名.git
黑馬的視訊,以前看過廖雪峰的git,總是學不懂,這次終於看會了,結合視訊更佳,紅色字是重點。
基於linux下面git百度雲視訊教程:http://pan.baidu.com/s/1bpk472B 密碼:x4fl
安裝: sudo apt-get install git
分散式版本控制系統 :歷史回溯,多人協作。
註冊賬號:郵箱+密碼
Your identification has been saved in /home/lichun/.ssh/id_rsa.
Your public key has been saved in /home/lichun/.ssh/id_rsa.pub.
建立github賬號
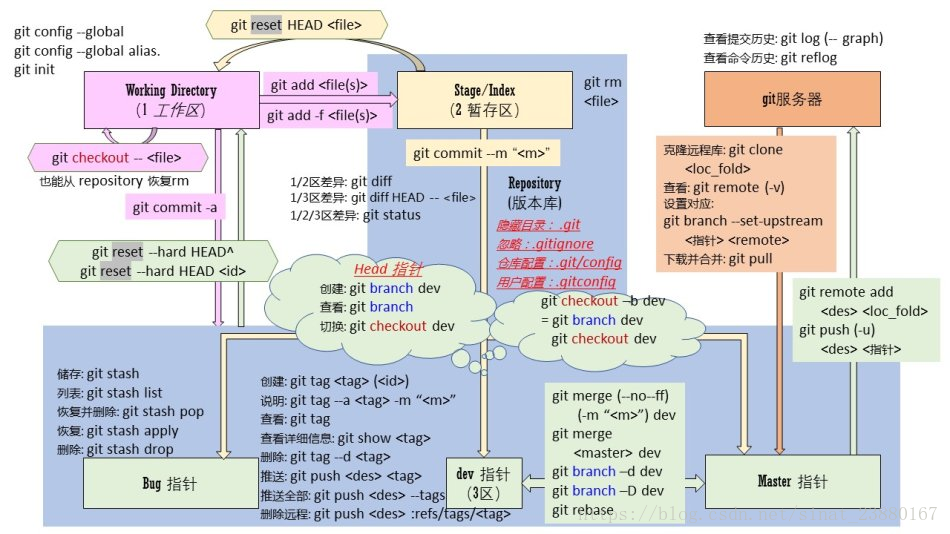
本地Git倉庫和GitHub倉庫之間的傳輸是通過SSH加密的
step1:本地建立專案的SSH Key
ssh-keygen -t rsa -C "[email protected]"
建立完成後,在使用者主目錄裡找到.ssh目錄,裡面有id_rsa和id_rsa.pub兩個檔案,這兩個就是SSH Key的祕鑰對,id_rsa是私鑰,不能洩露出去,id_rsa.pub是公鑰,可以放心地告訴任何人
step2:* 登入github註冊或登入賬號,開啟“settings”的“SSH Keys”頁面,然後,點“New SSH Key”,填上任意Title,在Key文字框裡貼上id_rsa.pub檔案的內容,點“Add Key”,你就應該看到已經新增的Key
建立遠端庫
登陸GitHub
在右上角找到“new repository”按鈕,建立一個新的倉庫,遠端建立庫,本地只能從遠端拷貝 注意!!!
從遠端庫克隆
將github上的專案,克隆到本地一份 git clone [email protected]:賬號名/專案名.git
與遠端庫互動(進入專案目錄)
從遠端庫獲取到本地 git pull
將本地提交遠端庫 git push origin master
提示:每次提交前,需要先獲取,解決衝突後再次提交
已經可以本地和遠端關聯
本地倉庫的操作
建立空目錄
mkdir test7
cd test7
在目錄下建立本地倉庫 git init
下面的都是本地倉庫做的事情
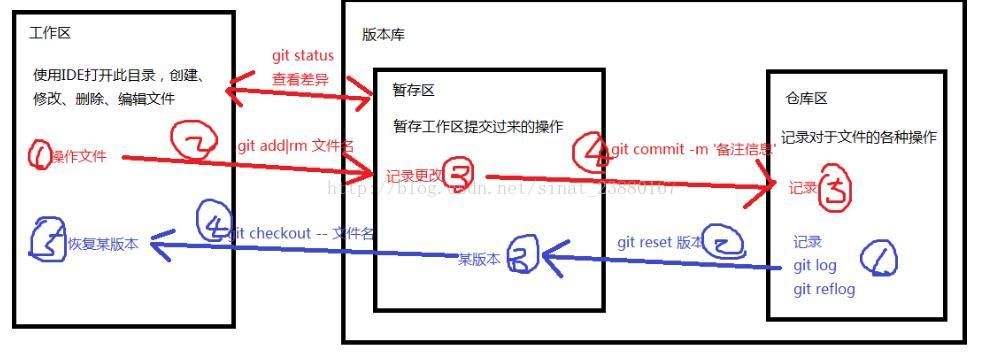
工作區與暫存區
使用IDE開啟目錄,建立專案,將檔案新增到暫存區
git add 檔案1 檔案2 ...
git add 目錄 git add ./當前目錄
使用暫時區的內容恢復工作區的內容
git checkout -- 檔名
檢視暫存區的狀態
git status
暫存區與倉庫區
將暫存區的記錄新增到倉庫區
git commit -m '本次提交的說明資訊'
檢視倉庫區的歷史
當前版本的歷史版本:git log
簡版顯示:git log --pretty=oneline
歷史命令:git reflog
在Git中,用HEAD表示當前版本,也就是最新的提交3628164...882e1e0(注意我的提交ID和你的肯定不一樣),上一個版本就是HEAD^,上上一個版本就是HEAD^^,當然往上100個版本寫100個^比較容易數不過來,所以寫成HEAD~100
對比工作區和倉庫區中某版本某檔案的不同
git diff HEAD -- 檔名
回退歷史版本到暫存區
git reset HEAD^或版本號
刪除檔案
依次執行如下命令
rm 檔名
git rm 檔名
git commit -m '說明資訊'
總結:
安裝:sudo apt-get install git
本地 ssh-keygen -t rsa -C "[email protected]" 建立公鑰私鑰,搞得雲伺服器
rm -rf haha 遞迴刪除資料夾
配置一下,本地才知道網上在哪
git config --global user.email "[email protected]"
git config --global user.name "cqSpringLee"
遠端本地互動:
遠端庫克隆 git clone [email protected]:cqSpringLee/test.git 主頁有
更改更新,進入目錄: 下載:git pull 上傳:git push origin master
本地操作:
git init 建立本地倉庫工作區
git add ./ 當前本地目錄加入快取區,
git commit -m '備註' 本地倉庫
git push origin master 最後遠端上傳
---------------------
作者:努力一點點堅持一點點
來源:CSDN
原文:https://blog.csdn.net/sinat_23880167/article/details/78502528
版權宣告:本文為博主原創文章,轉載請附上博文連結!