
D3D12渲染技術之紋理案例
我們現在回顧一下將紋理新增到箱子模型上面,就跟以前的部落格中提到的那樣。下面我們詳細介紹如何實現?
指定紋理座標
GeometryGenerator :: CreateBox生成箱子的紋理座標,以便將整個紋理影象對映到箱子的每個面上。 為簡潔起見,我們僅顯示正面,背面和頂面的頂點定義。 另請注意,我們省略了頂點建構函式中法線和切線向量的座標(紋理座標以粗體顯示)。
GeometryGenerator::MeshData GeometryGenerator::CreateBox(
  float width, float height, float depth,
  uint32 numSubdivisions)
{
  MeshData meshData;
   Vertex v[24];

  float w2 = 0.5f*width;
  float h2 = 0.5f*height;
  float d2 = 0.5f*depth;

  // Fill in the front face vertex data.
  v[0] = Vertex(-w2, -h2, -d2, …, 0.0f, 1.0f);
  v[1] = Vertex(-w2, +h2, -d2, …, 0.0f, 0.0f);
  v[2] = Vertex(+w2, +h2, -d2, …, 1.0f, 0.0f);
  v[3] = Vertex(+w2, -h2, -d2, …, 1.0f, 1.0f);

  // Fill in the back face vertex data.
  v[4] = Vertex(-w2, -h2, +d2, …, 1.0f, 1.0f);
  v[5] = Vertex(+w2, -h2, +d2, …, 0.0f, 1.0f);
  v[6] = Vertex(+w2, +h2, +d2, …, 0.0f, 0.0f);
  v[7] = Vertex(-w2, +h2, +d2, …, 1.0f, 0.0f);
  // Fill in the top face vertex data.
  v[8] = Vertex(-w2, +h2, -d2, …, 0.0f, 1.0f);
  v[9] = Vertex(-w2, +h2, +d2, …, 0.0f, 0.0f);
  v[10] = Vertex(+w2, +h2, +d2, …, 1.0f, 0.0f);
  v[11] = Vertex(+w2, +h2, -d2, …, 1.0f, 1.0f);
建立紋理
我們在初始化時從檔案建立紋理,如下所示:
// Helper structure to group data related to the texture.
struct Texture
{
  // Unique material name for lookup.
  std::string Name;

  std::wstring Filename;

  Microsoft::WRL::ComPtr<ID3D12Resource> Resource = nullptr;
  Microsoft::WRL::ComPtr<ID3D12Resource> UploadHeap = nullptr;
  };

std::unordered_map<std::string, std::unique_ptr<Texture>> mTextures;

void CrateApp::LoadTextures()
{
  auto woodCrateTex = std::make_unique<Texture>();
  woodCrateTex->Name = "woodCrateTex";
  woodCrateTex->Filename = L"Textures/WoodCrate01.dds";
  ThrowIfFailed(DirectX::CreateDDSTextureFromFile12(md3dDevice.Get(),
    mCommandList.Get(), woodCrateTex->Filename.c_str(),
    woodCrateTex->Resource, woodCrateTex->UploadHeap));

  mTextures[woodCrateTex->Name] = std::move(woodCrateTex);
}
我們將所有獨特紋理儲存在無序地圖中,以便我們可以按名稱查詢它們。 在程式碼中,在載入紋理之前,需要檢查紋理資料是否已經載入(即,它是否已經包含在無序對映中),以便它不會多次載入。
設定紋理
一旦建立了紋理並在描述符堆中為它建立了SRV,將紋理繫結到管道以便可以在著色器程式中使用它只需將其設定為需要紋理的根簽名引數:
// Get SRV to texture we want to bind.
CD3DX12_GPU_DESCRIPTOR_HANDLE tex(
mSrvDescriptorHeap->GetGPUDescriptorHandleForHeapStart());
tex.Offset(ri->Mat->DiffuseSrvHeapIndex, mCbvSrvDescriptorSize);

…

// Bind to root parameter 0. The root parameter description specifies which
// shader register slot this corresponds to.
cmdList->SetGraphicsRootDescriptorTable(0, tex);
紋理轉換
我們沒有討論過的兩個常量緩衝區變數是gTexTransform和gMatTransform。 這些變數在頂點著色器中用於變換輸入紋理座標:
在這裡插入程式碼片// Output vertex attributes for interpolation across triangle.
float4 texC = mul(float4(vin.TexC, 0.0f, 1.0f), gTexTransform);
vout.TexC = mul(texC, gMatTransform).xy;
紋理座標表示紋理平面中的2D點, 因此,我們可以像任何其他點一樣平移,旋轉和縮放它們, 以下是轉換紋理的一些示例用法:
1、磚紋理沿牆壁被拉伸, 牆頂點當前具有範圍[0,1]中的紋理座標。 我們將紋理座標放大4倍,以將它們放大到範圍[0,4],這樣紋理將在牆上重複四到四次。
2、天空飄動的雲層, 通過將紋理座標轉換為時間的函式,雲在天空上就可以飄動了。
3、紋理旋轉有時對粒子效果非常有用,例如,我們會隨著時間的推移旋轉火球紋理。
在本篇部落格提供的案例中,我們使用單位矩陣變換,以便輸入紋理座標保持不變,但在下篇部落格中,我們將解釋使用紋理變換的演示。
請注意,要將2D紋理座標轉換為4×4矩陣,我們將其擴充套件為4D向量:
vin.TexC ---> float4(vin.Tex, 0.0f, 1.0f)
在乘法完成之後,通過丟棄z分量和w分量將得到的4D向量轉回到2D向量。
vout.TexC = mul(float4(vin.TexC, 0.0f, 1.0f), gTexTransform).xy;
我們使用兩個單獨的紋理變換矩陣gTexTransform和gMatTransform,因為有時它對材質轉換紋理(對於像水這樣的動畫材料)更有意義,但有時它使紋理變換更有意義成為物件的屬性。
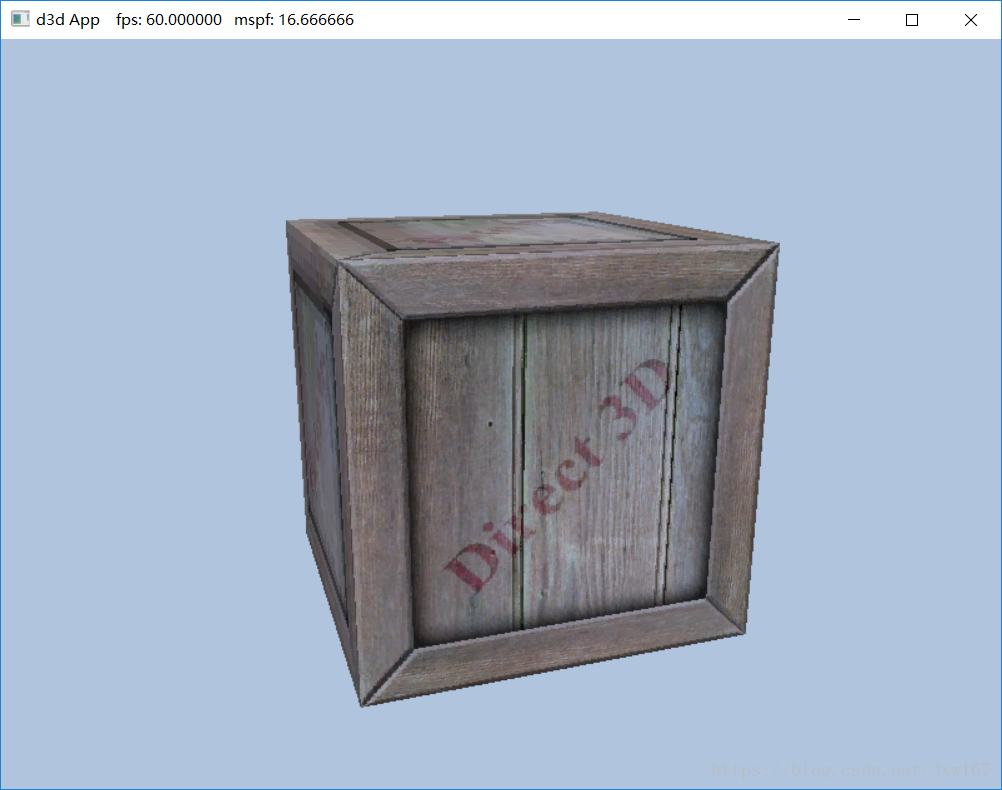
因為我們正在處理2D紋理座標,所以我們只關心對前兩個座標進行的轉換。 例如,如果紋理矩陣轉換了z座標,則它對結果紋理座標沒有影響。最後給大家看一下實現的Demo:
Demo下載地址:連結:https://pan.baidu.com/s/1X0Vikf6qGYGPKU-Nwf-wYA 密碼:h79q