
centos7 搭建keepalived+Nginx+tomcat
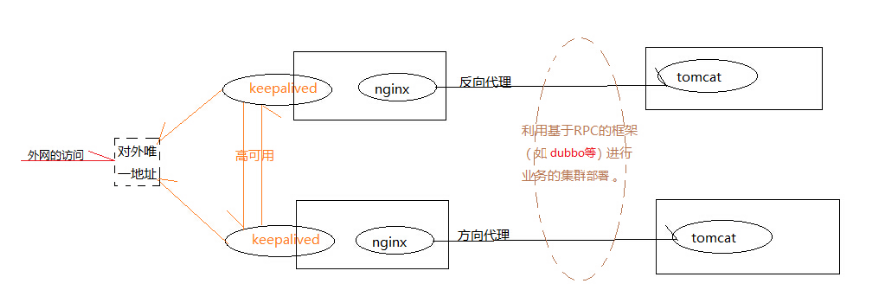
準備1臺 192.168.2.224 安裝Nginx,2檯安裝tomcat 192.168.2.222 192.168.2.223
1、安裝Nginx:
上傳pcre-8.36.tar.gz、zlib-1.2.8.tar.gz到伺服器
下載地址:pcre-8.36.tar.gz https://o3cex9zsl.qnssl.com/libs/nginx/pcre-8.36.tar.gz
#######新建nginx使用者和nginx組
[[email protected]]# groupadd -r nginx && useradd -r -g nginx -s /bin/false -M nginx
#######yum安裝nginx必須的依賴庫
[[email protected]
#######官網下載Nginx1.9.0的tar包,然後解壓到伺服器上
[[email protected] jason]# wget -c http://nginx.org/download/nginx-1.9.0.tar.gz
[[email protected] jason]# tar -zxf nginx-1.9.0.tar.gz && cd nginx-1.9.0
上傳pcre-8.36.tar(支援Nginx的Rewrite功能)、zlib-1.2.8.tar(支援Nginx的Gzip壓縮功能)
#######新建Nginx1.9.0安裝時所需要的目錄
[[email protected] nginx-1.9.0]# cd /var/tmp/ && mkdir -p /var/tmp/nginx/{client,proxy,fastcgi,uwsgi,scgi}
[[email protected] tmp]# mkdir -p /var/run/nginx && cd /home/jason/nginx-1.9.0
[[email protected] nginx-1.9.0]#

./configure --prefix=/usr/local/nginx --pid-path=/var/run/nginx/nginx.pid --lock-path=/var/lock/nginx.lock --error-log-path=/var/log/nginx/error.log --http-log-path=/var/log/nginx/access.log --with-http_gzip_static_module --http-client-body-temp-path=/var/tmp/nginx/client --http-proxy-temp-path=/var/tmp/nginx/proxy --conf-path=/usr/local/nginx/conf/nginx.conf --http-fastcgi-temp-path=/var/tmp/nginx/fastcgi --http-uwsgi-temp-path=/var/tmp/nginx/uwsgi --http-scgi-temp-path=/var/tmp/nginx/scgi --sbin-path=/usr/sbin/nginx
具體的含義:

[[email protected] nginx-1.9.0]make && make install
上傳指令碼Nginx到/etc/init.d 並賦予只讀許可權,將Nginx服務新增到啟動項並給予開機自動啟動,啟動Nginx服務
Nginx
  1 #! /bin/bash
  2 #
  3 # nginx - this script starts and stops the nginx daemon
  4 #
  5 # chkconfig:   - 85 15
  6 # description:  Nginx is an HTTP(S) server, HTTP(S) reverse \
  7 #               proxy and IMAP/POP3 proxy server
  8 #
  9 # processname: nginx
 10 # config:      /etc/nginx/nginx.conf
 11 # pidfile:     /var/run/nginx/nginx.pid
 12
 13 # Source function library.
 14 . /etc/rc.d/init.d/functions
 15
 16 # Source networking configuration.
 17 . /etc/sysconfig/network
 18
 19 # Check that networking is up.
 20 [ "$NETWORKING" = "no" ] && exit 0
 21
 22 nginx="/usr/sbin/nginx"
 23 prog=$(basename $nginx)
 24
 25 NGINX_CONF_FILE="/usr/local/nginx/conf/nginx.conf"
 26
 27 [ -f /etc/sysconfig/nginx ] && . /etc/sysconfig/nginx
 28
 29 lockfile=/var/lock/nginx.lock
 30
 31 start() {
 32     [ -x $nginx ] || exit 5
 33     [ -f $NGINX_CONF_FILE ] || exit 6
 34     echo -n $"Starting $prog: "
 35     daemon $nginx -c $NGINX_CONF_FILE
 36     retval=$?
 37     echo
 38     [ $retval -eq 0 ] && touch $lockfile
 39     return $retval
 40 }
 41
 42 stop() {
 43     echo -n $"Stopping $prog: "
 44     killproc $prog -QUIT
 45     retval=$?
 46     echo
 47     [ $retval -eq 0 ] && rm -f $lockfile
 48     return $retval
 49 }
 50
 51 restart() {
 52     configtest || return $?
 53     stop
 54     sleep 1
 55     start
 56 }
 57
 58 reload() {
 59     configtest || return $?
 60     echo -n $"Reloading $prog: "
 61     killproc $nginx -HUP
 62     RETVAL=$?
 63     echo
 64 }
 65
 66 force_reload() {
 67     restart
 68 }
 69
 70 configtest() {
 71   $nginx -t -c $NGINX_CONF_FILE
 72 }
 73
 74 rh_status() {
 75     status $prog
 76 }
 77
 78 rh_status_q() {
 79     rh_status >/dev/null 2>&1
 80 }
 81
 82 case "$1" in
 83     start)
 84         rh_status_q && exit 0
 85         $1
 86         ;;
 87     stop)
 88         rh_status_q || exit 0
 89         $1
 90         ;;
 91     restart|configtest)
 92         $1
 93         ;;
 94     reload)
 95         rh_status_q || exit 7
 96         $1
 97         ;;
 98     force-reload)
 99         force_reload
100         ;;
101     status)
102         rh_status
103         ;;
104     condrestart|try-restart)
105         rh_status_q || exit 0
106             ;;
107     *)
108         echo $"Usage: $0 {start|stop|status|restart|condrestart|try-restart|reload|force-reload|configtest}"
109         exit 2
110 esac
[[email protected] init.d]chkconfig --add nginx
[[email protected] init.d]chkconfig nginx on
[[email protected] init.d]service nginx start
檢視安裝的Nginx1.9.0的詳細資訊
[[email protected] init.d]# nginx -V
nginx version: nginx/1.9.0
built by gcc 4.8.2 20140120 (Red Hat 4.8.2-16) (GCC)
configure arguments: --prefix=/usr/local/nginx --pid-path=/var/run/nginx/nginx.pid --lock-path=/var/lock/nginx.lock --error-log-path=/var/log/nginx/error.log --http-log-path=/var/log/nginx/access.log --with-http_gzip_static_module --http-client-body-temp-path=/var/tmp/nginx/client --http-proxy-temp-path=/var/tmp/nginx/proxy --conf-path=/usr/local/nginx/conf/nginx.conf --http-fastcgi-temp-path=/var/tmp/nginx/fastcgi --http-uwsgi-temp-path=/var/tmp/nginx/uwsgi --http-scgi-temp-path=/var/tmp/nginx/scgi --sbin-path=/usr/sbin/nginx

2、安裝tomcat
檢視現有版本、解除安裝並安裝jdk1.8
[[email protected] jason]# java -version
java version "1.7.0_51"
[[email protected] jason]# rpm -qa |grep jdk
[[email protected] jason]# yum remove java-1.7.0-openjdk
[[email protected] jason]# ls
apache-tomcat-9.0.4.tar.gz Desktop Documents Downloads jdk-8u11-linux-x64.rpm Music Pictures Public Templates Videos
[[email protected] jason]# rpm -ivh jdk-8u11-linux-x64.rpm
Preparing... ################################# [100%]
Updating / installing...
1:jdk-2000:1.8.0_11-fcs ################################# [100%]
Unpacking JAR files...
rt.jar...
jsse.jar...
charsets.jar...
tools.jar...
localedata.jar...
jfxrt.jar...
[[email protected] jason]# java -version
java version "1.8.0_11"
Java(TM) SE Runtime Environment (build 1.8.0_11-b12)
Java HotSpot(TM) 64-Bit Server VM (build 25.11-b03, mixed mode)
[[email protected] jason]# cd /usr/local/
[[email protected] local]# mkdir tomcat
[[email protected] local]# ls
bin etc games include lib lib64 libexec sbin share src tomcat
解壓apache-tomcat-9.0.4並移動到/usr/local/tomcat/
[[email protected] jason]# mv apache-tomcat-9.0.4 /usr/local/tomcat/
開啟檔案 /etc 目錄下的 profile 檔案,將如下程式碼追加到 profile 檔案末尾:
# idea - tomcat9 config start - 2018-7-24

export CATALINA_HOM=/usr/local/tomcat/apache-tomcat-9.0.4
export CATALINA_BASE=/usr/local/tomcat/apache-tomcat-9.0.4
export TOMCAT_HOME=/usr/local/tomcat/apache-tomcat-9.0.4

# idea - tomcat9 config end - 2018-7-24
修改 tomcat 的埠號和字元編碼
vim /usr/local/tomcat/apache-tomcat-9.0.4/conf/server.xml
找到如下程式碼:
<Connector port="8080" protocol="HTTP/1.1" connectionTimeout="20000" redirectPort="8443" />
將其中的 8080 改成 HTTP 協議的預設埠 80,改後的程式碼如下:
<Connector port="80" protocol="HTTP/1.1" connectionTimeout="20000" redirectPort="8443" URIEncoding="UTF-8" />
增加 manager-gui 圖形化管理介面的訪問許可權(不需要的話,此步驟可忽略):
[[email protected] tomcat]# cd apache-tomcat-9.0.4/conf/
[[email protected] conf]# ls
catalina.policy catalina.properties context.xml jaspic-providers.xml jaspic-providers.xsd logging.properties server.xml tomcat-users.xml tomcat-users.xsd web.xml
[[email protected] conf]# vim tomcat-users.xml
- 在 </tomcat-users> 標籤前加入如下程式碼:
<role rolename="admin-gui"/>


<role rolename="admin-script"/>


<role rolename="manager-gui"/>


<role rolename="manager-script"/>


<role rolename="manager-jmx"/>


<role rolename="manager-status"/>


<user username="tomcat" password="mytomcatadmin" roles="manager-gui,manager-script,manager-jmx,manager-status,admin-script,admin-gui"/>
進入
[[email protected] apache-tomcat-9.0.4]# cd webapps/manager/META-INF/
[[email protected] META-INF]# vi context.xml
進入
[[email protected]]#cd /usr/local/tomcat/apache-tomcat-9.0.4/webapps/host-manager/META-INF/
[[email protected] META-INF]# vim context.xml
(或者和上面的一樣註釋掉)
這裡設定的 username 是tomcat;password 都是 mytomcatadmin,角色為 manager-gui;
如果要某網段可以訪問tomcat
在tomcat-users.xml裡添上幾句即可
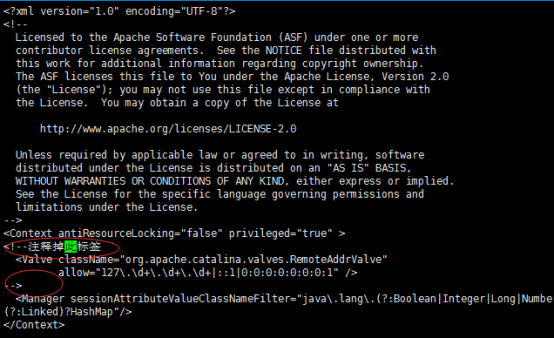
開啟webapps下的host-manager和manager,都有一個共同的資料夾META-INF,裡面都有context.xml,這個檔案的內容是:
<Context antiResourceLocking="false" privileged="true" >
<Valve className="org.apache.catalina.valves.RemoteAddrValve"
allow="127.d+.d+.d+|::1|0:0:0:0:0:0:0:1" />
</Context>
通過檢視官方文件,知道,這段程式碼的作用是限制來訪IP的,127.d+.d+.d+|::1|0:0:0:0:0:0:0:1,是正則表示式,表示IPv4和IPv6的本機環回地址,所以這也解釋了,為什麼我們本機可以訪問管理介面,但是其他機器確403。
找到原因了,那麼修改一下這裡的正則表示式即可,比如我們只允許內網網段192.168.2訪問管理頁面,那麼改成這樣就可以:
<Context antiResourceLocking="false" privileged="true" >
<Valve className="org.apache.catalina.valves.RemoteAddrValve"
allow="192.168.2.*" />
</Context>
修改完畢,關閉瀏覽器,重新開啟tomcat,問題解決!
進入到 /usr/local/tomcat/apache-tomcat-9.0.0.M4/bin 目錄中:
cd ../bin/
開啟 vi catalina.sh 檔案:
在 # OS specific support. 上面一行加入如下程式碼(不能有空格):
JAVA_HOME=/usr/java/jdk1.8.0_11/
JRE_HOME=$JAVA_HOME/jre
檢視java_home目錄
[[email protected] bin]# rpm -qa|grep jdk
jdk-1.8.0_11-fcs.x86_64
[[email protected] bin]# rpm -ql jdk-1.8.0_11-fcs.x86_64
啟動 tomcat 服務:
./startup.sh
列印如下資訊則表明啟動 Tomcat 服務成功:
[[email protected] bin]# ./startup.sh
Using CATALINA_BASE: /usr/local/tomcat/apache-tomcat-9.0.4
Using CATALINA_HOME: /usr/local/tomcat/apache-tomcat-9.0.4
Using CATALINA_TMPDIR: /usr/local/tomcat/apache-tomcat-9.0.4/temp
Using JRE_HOME: /usr/java/jdk1.8.0_11//jre
Using CLASSPATH: /usr/local/tomcat/apache-tomcat-9.0.4/bin/bootstrap.jar:/usr/local/tomcat/apache-tomcat-9.0.4/bin/tomcat-juli.jar
Tomcat started.
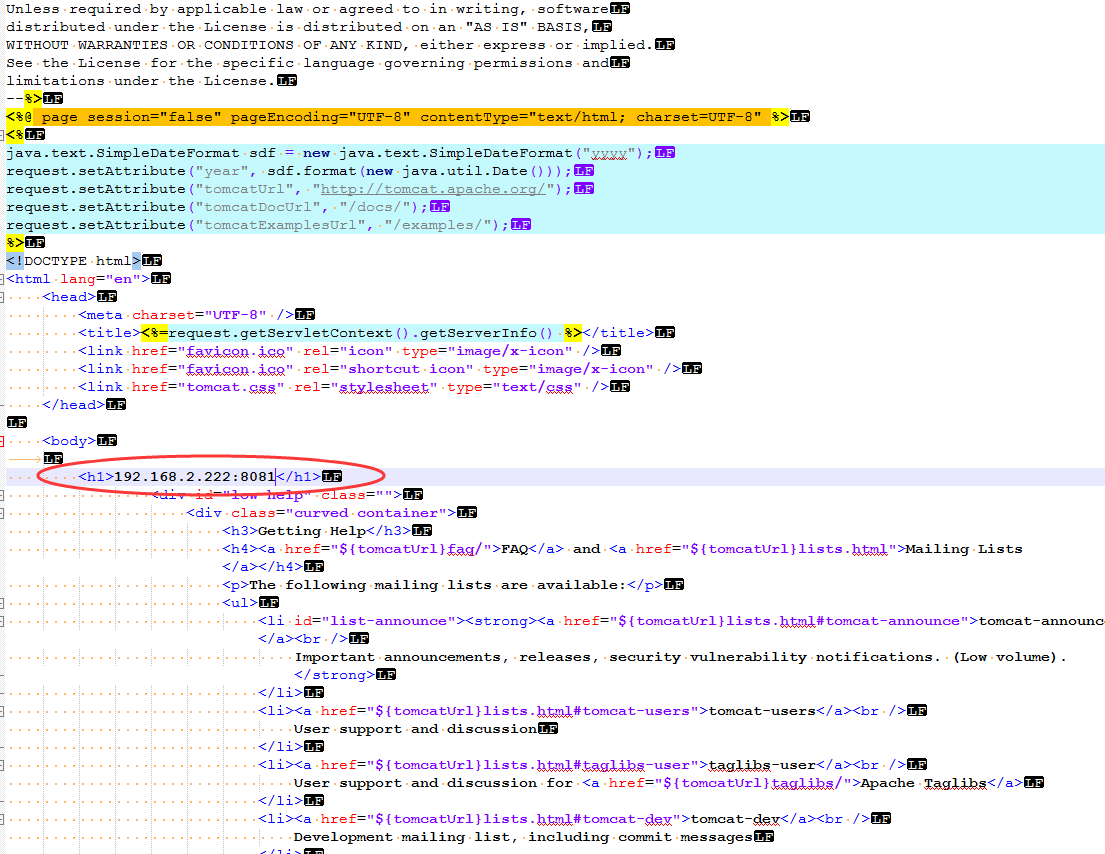
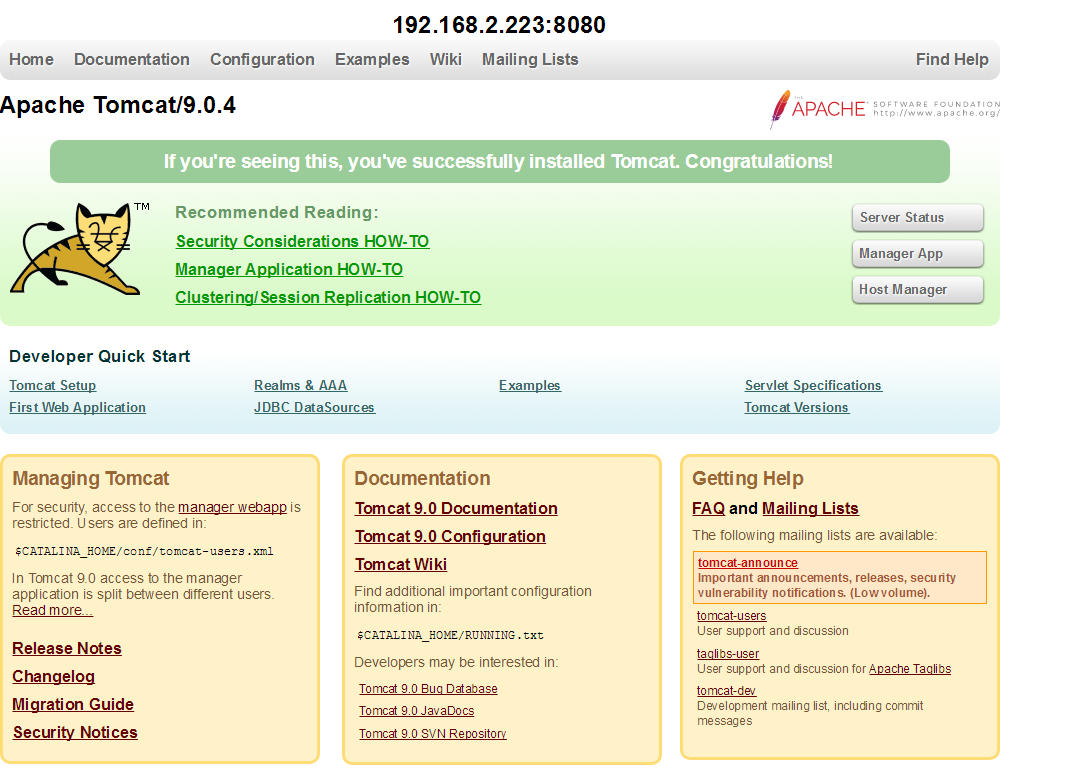
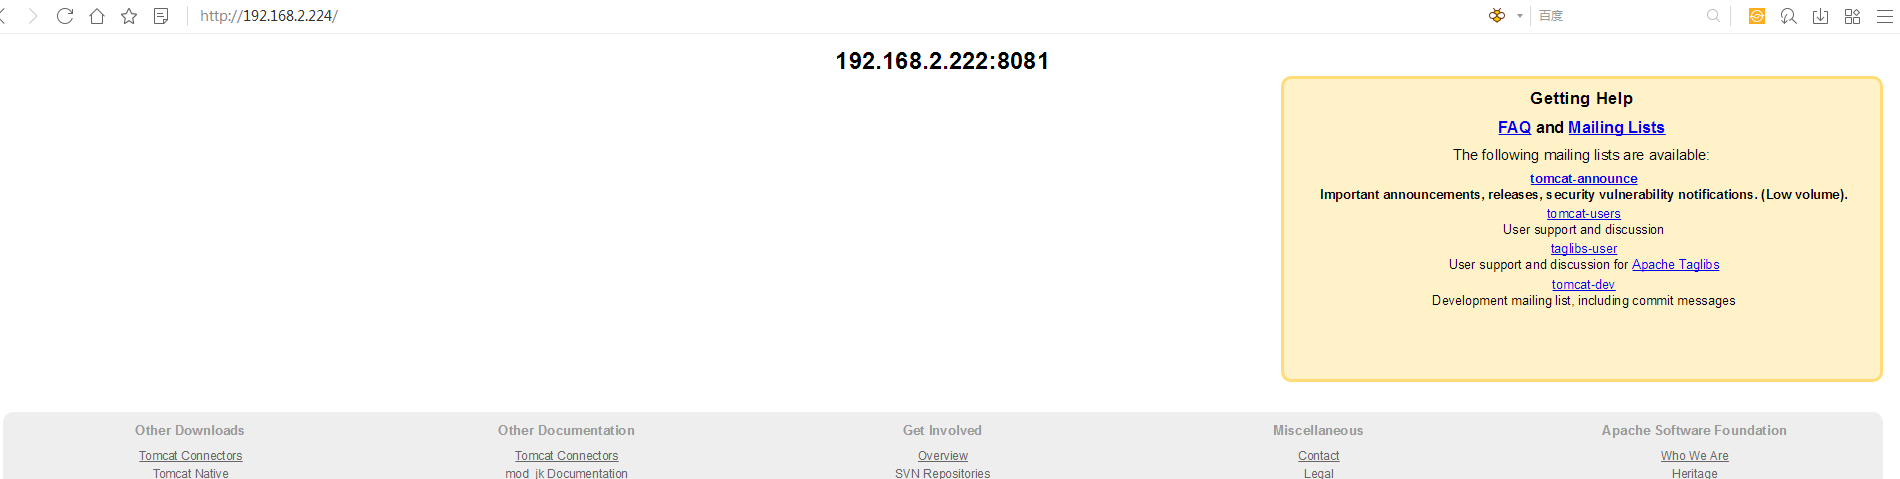
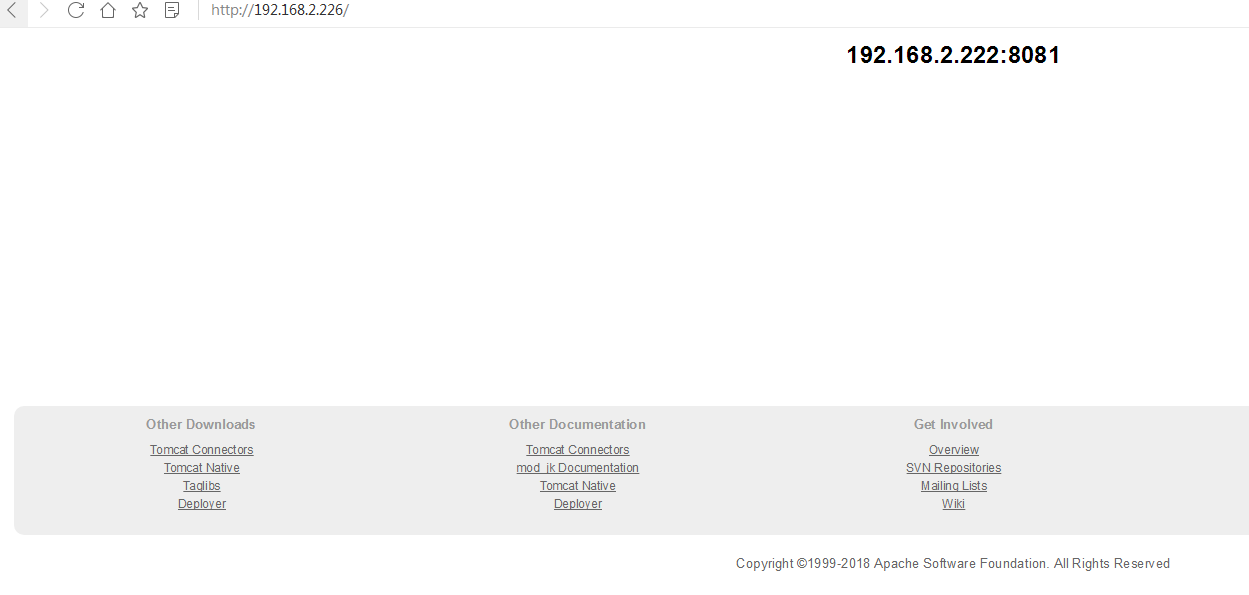
開啟瀏覽器輸入 IP(修改測試頁面)
進入
/usr/local/tomcat/apache-tomcat-9.0.4/webapps/ROOT
修改index.jsp
簡化啟動服務
cd /etc/init.d/
vim tomcat
# idea - tomcat config start - 2018-2-1

  #!/bin/bash
   # description: Tomcat Start Stop Restart
   # processname: tomcat
   # chkconfig: 2345 20 80
   JAVA_HOME=/usr/java/jdk1.8.0_11/
   export JAVA_HOME
   PATH=$JAVA_HOME/bin:$PATH
   export PATH
   CATALINA_HOME=/usr/local/tomcat/apache-tomcat-9.0.4

   case $1 in
   start)
     sh $CATALINA_HOME/bin/startup.sh
   ;;
   stop)
     sh $CATALINA_HOME/bin/shutdown.sh
   ;;
   restart)
     sh $CATALINA_HOME/bin/shutdown.sh
     sh $CATALINA_HOME/bin/startup.sh
   ;;
   esac
   exit 0

   #chmod 755 tomcat
   #chkconfig --add tomcat
   #chkconfig --level 2345 tomcat on
   #chkconfig --list tomcat

  # idea - tomcat config end - 2018-2-1
[[email protected] conf] chmod +x tomcat
[[email protected] conf]chkconfig --add tomcat
[[email protected] conf]chkconfig tomcat on
啟動tomcat
進入/usr/local/tomcat/apache-tomcat-9.0.4/bin
[[email protected] bin]# ./startup.sh
[[email protected] bin]# ./shutdown.sh (更改配置檔案之後重新載入需要停止tomcat再啟用)
開機自動啟動
vi /etc/rc.d/rc.local 新增
/usr/local/tomcat/apache-tomcat-9.0.4/bin/startup.sh
linux 系統中的 /etc 目錄表示“裝置”,意為與硬體裝置相關的資訊;
/etc/init.d 目錄下的檔案表示當前裝置的初始化配置資訊;
命令 chkconfig 表示新增(--add)、刪除(--del)、檢視(--list)
3、修改Nginx配置檔案(192.168.2.224
cd /usr/local/nginx/conf
vim nginx.conf
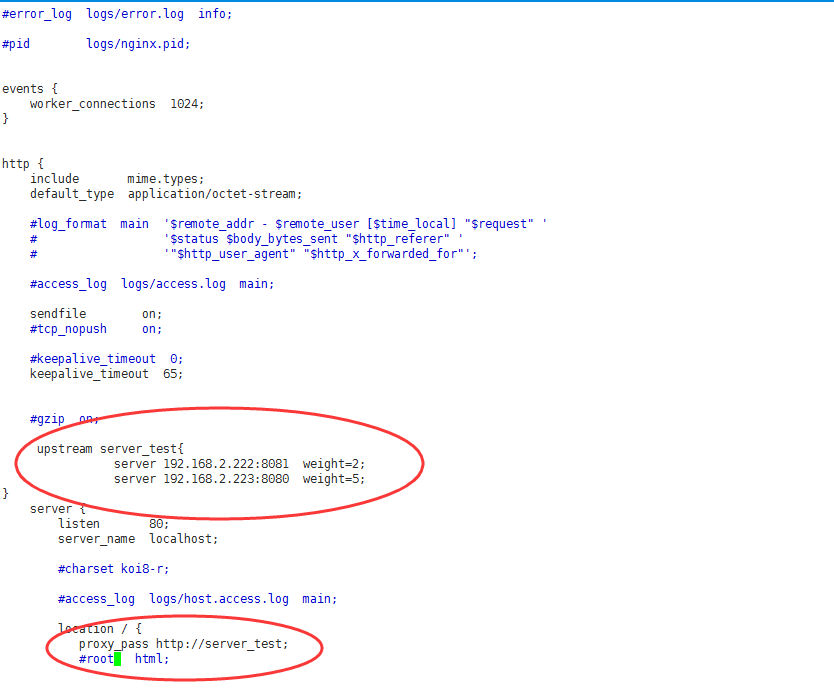
在server配置的上面新增upstream 配置,後面的“server_tomcat”相當於該配置別名,供後面的“proxy_pass”配置使用。
upstream 裡面配置的就是2個tomcat的訪問地址,IP:埠號,不用寫http:// 。
proxy_pass 轉發定位到upstream 裡面配置的多臺伺服器proxy_pass 配置的http:// 必須要寫。(不是https)
修改完成後,重新載入nginx服務的配置
nginx -s reload
看到這,肯定會有人有疑問,如果有一臺伺服器突然掛掉了怎麼辦?別急,這種情況nginx已經給我們處理了,當有臺伺服器掛掉了,nginx預設不會訪問掛掉的服務,繼續訪問其他正在執行的服務,提供了很好的容錯機制。
能不能讓兩臺伺服器訪問的概率不一樣了?能,nginx給我們提供了 weight這個屬性,可以給各個伺服器分配權重,配置如下:
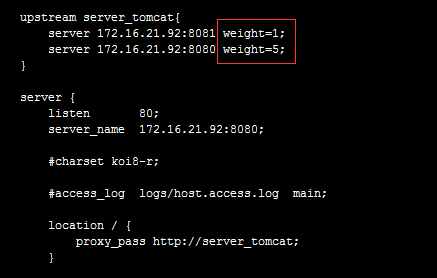
weight 預設為1.weight越大,負載的權重就越大。
通過上面的配置,重新整理頁面,會發現訪問tomcat1的概率明顯比訪問tomcat2的概率大。
PS:upstream目前支援5種方式的分配
1、輪詢(預設)
每個請求按時間順序逐一分配到不同的後端伺服器,如果後端伺服器down掉,能自動剔除。
2、weight
指定輪詢機率,weight和訪問比率成正比,用於後端伺服器效能不均的情況。
例如:
- upstream bakend {
- server 192.168.0.14 weight=10;
- server 192.168.0.15 weight=10;
- }
3、ip_hash
每個請求按訪問ip的hash結果分配,這樣每個訪客固定訪問一個後端伺服器,可以解決session的問題。
例如:
- upstream bakend {
- ip_hash;
- server 192.168.0.14:88;
- server 192.168.0.15:80;
- }
4、fair(第三方)
按後端伺服器的響應時間來分配請求,響應時間短的優先分配。
- upstream backend {
- server server1;
- server server2;
- fair;
- }
5、url_hash(第三方)
按訪問url的hash結果來分配請求,使每個url定向到同一個後端伺服器,後端伺服器為快取時比較有效。
例:在upstream中加入hash語句,server語句中不能寫入weight等其他的引數,hash_method是使用的hash演算法
- upstream backend {
- server squid1:3128;
- server squid2:3128;
- hash $request_uri;
- hash_method crc32;
- }
- tips:
- upstream bakend{#定義負載均衡裝置的Ip及裝置狀態
- ip_hash;
- server 127.0.0.1:9090 down;
- server 127.0.0.1:8080 weight=2;
- server 127.0.0.1:6060;
- server 127.0.0.1:7070 backup;
- }
在需要使用負載均衡的server中增加
proxy_pass http://bakend/;
每個裝置的狀態設定為:
1.down 表示單前的server暫時不參與負載
2.weight 預設為1.weight越大,負載的權重就越大。
3.max_fails :允許請求失敗的次數預設為1.當超過最大次數時,返回proxy_next_upstream 模組定義的錯誤
4.fail_timeout:max_fails次失敗後,暫停的時間。
5.backup: 其它所有的非backup機器down或者忙的時候,請求backup機器。所以這臺機器壓力會最輕。
nginx支援同時設定多組的負載均衡,用來給不用的server來使用。
client_body_in_file_only 設定為On 可以講client post過來的資料記錄到檔案中用來做debug
client_body_temp_path 設定記錄檔案的目錄 可以設定最多3層目錄
location 對URL進行匹配。可以進行重定向或者進行新的代理 負載均衡
3、安裝keepalive
yum install -y keepalived
修改config檔案
vim /etc/keepalived\keepalived.conf
keepalived.conf各項的含義
MASTER
! Configuration File for keepalived

#全域性配置

global_defs {

   #keepalived切換的時候,發訊息到指定的email,可配置多個email

   notification_email {

     [email protected]

[email protected]

   }

   #通知郵件從哪個地址發出

   notification_email_from [email protected]

   #通知郵件的smtp地址

   smtp_server smtp.exmail.qq.com

   #連線smtp伺服器的超時時間,單位秒

   smtp_connect_timeout 30

   #Keepalived的機器標識,一個網路內保持唯一

   router_id nginx-master

}


#執行指令碼配置

vrrp_script chk_nginx {

#指令碼所在路徑

    script "/home/project/keepalived/check_nginx.sh"

#指令碼執行間隔時間,秒

    interval 2

#優先順序

    weight 2

}

#keepalived例項配置

vrrp_instance VI_1 {

#指定例項的初始狀態,MASTER或BACKUP兩種狀態,並且需要大寫

    state MASTER

#例項繫結的網絡卡

    interface ens33

#虛擬路由標識,是一個數字,整個VRRP內唯一,如果keepalived配置了主備,需要相同

    virtual_router_id 51

#優先順序,數值愈大,優先順序越高

    priority 100

#MASTER與BACKUP之間同步檢查的時間間隔,單位為秒

    advert_int 1

#通訊驗證

    authentication {

        auth_type PASS

        auth_pass feinik

    }

#追蹤外圍指令碼

    track_script {

    #這裡配置vrrp_script的名稱

        chk_nginx

    }

#虛擬ip配置,可配置多個

    virtual_ipaddress {

        192.168.10.200

    }

}
BACKUP
! Configuration File for keepalived

#全域性配置

global_defs {

   #keepalived切換的時候,發訊息到指定的email,可配置多個email

   notification_email {

     [email protected]

[email protected]

   }

   #通知郵件從哪個地址發出

   notification_email_from [email protected]

   #通知郵件的smtp地址

   smtp_server smtp.exmail.qq.com

   #連線smtp伺服器的超時時間,單位秒

   smtp_connect_timeout 30

   #Keepalived的機器標識,一個網路內保持唯一

   router_id nginx-master

}


#執行指令碼配置

vrrp_script chk_nginx {

#指令碼所在路徑

    script "/home/project/keepalived/check_nginx.sh"

#指令碼執行間隔時間,秒

    interval 2

#優先順序

    weight 2

}

#keepalived例項配置

vrrp_instance VI_1 {

#指定例項的初始狀態,MASTER或BACKUP兩種狀態,並且需要大寫

    state BACKUP

#例項繫結的網絡卡

    interface ens33

#虛擬路由標識,是一個數字,整個VRRP內唯一,如果keepalived配置了主備,需要相同

    virtual_router_id 51

#優先順序,數值愈大,優先順序越高

    priority 99

#MASTER與BACKUP之間同步檢查的時間間隔,單位為秒

    advert_int 1

#通訊驗證

    authentication {

        auth_type PASS

        auth_pass feinik

    }

#追蹤外圍指令碼

    track_script {

    #這裡配置vrrp_script的名稱

        chk_nginx

    }

#虛擬ip配置,可配置多個

    virtual_ipaddress {

        192.168.10.200

    }

}
我的實驗配置
master
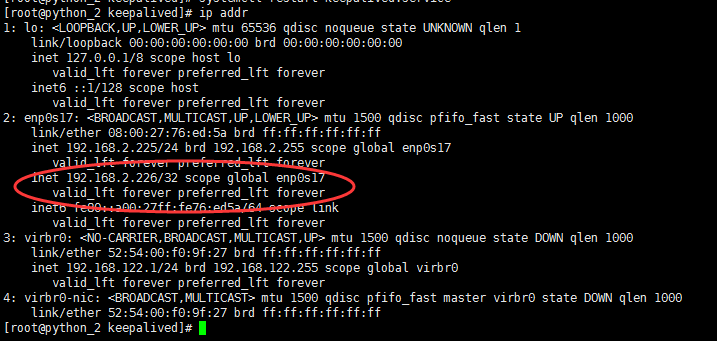
! Configuration File for keepalived

global_defs {
   notification_email {
     [email protected]
     [email protected]
     [email protected]ewall.loc
   }
   notification_email_from [email protected]
   smtp_server 192.168.200.1
   smtp_connect_timeout 30
   router_id LVS_DEVEL
   vrrp_skip_check_adv_addr
   vrrp_garp_interval 0
   vrrp_gna_interval 0

}

vrrp_script chk_nginx {
  script "/etc/keepalived/nginx_check.sh"
  interval 3
  weight 2
}
vrrp_instance VI_1 {
    state MASTER
    interface enp0s17
    virtual_router_id 51
    priority 100
    advert_int 1
    authentication {
        auth_type PAS
        auth_pass 1111
    }
    track_script {
       chk_nginx
    }
    virtual_ipaddress {
        192.168.2.226
    }

}
backup
! Configuration File for keepalived

global_defs {
   ...
}

rrp_script chk_nginx {
  script "/etc/keepalived/nginx_check.sh"
  interval 3
  weight 2
}

vrrp_instance VI_1 {
    state BACKUP
    interface enp0s17
    virtual_router_id 51
    priority 90
    advert_int 1
    authentication {
        auth_type PASS
        auth_pass 1111
    }
    track_script {
        chk_nginx
    }
    virtual_ipaddress {
        192.168.2.226
    }
}
檢視VIP(ip addr)
nginx_check.sh指令碼(賦予只讀許可權 chmod +x nginx_check.sh)
如果 nginx 停止執行,嘗試啟動,如果無法啟動則殺死本機的 keepalived 程序,keepalived將虛擬 ip 繫結到 BACKUP 機器上。內容如下:
#!/bin/bash
A=`ps -C nginx –no-header |wc -l`
if [ $A -eq 0 ];then
    /home/wangzi/soft/nginx/sbin/nginx
    sleep 5
    if [ `ps -C nginx --no-header |wc -l` -eq 0 ];then
        killall keepalived
    fi
fi
測試

準備1臺 192.168.2.224 安裝Nginx,2檯安裝tomcat 192.168.2.222 192.168.2.223
1、安裝Nginx:
上傳pcre-8.36.tar.gz、zlib-1.2.8.tar.gz到伺服器
下載地址:pcre-8.36.tar.gz https://o3cex9zsl.qnssl.com/libs/nginx/pcre-8.36.tar.gz
zlib-1.2.8.tar.gz https://o3cex9zsl.qnssl.com/libs/nginx/zlib-1.2.8.tar.gz
#######新建nginx使用者和nginx組
[[email protected]]# groupadd -r nginx && useradd -r -g nginx -s /bin/false -M nginx
#######yum安裝nginx必須的依賴庫
[[email protected]]#yum -y install openssl openssl-devel libxml2-devel libxslt-devel perl-devel perl-ExtUtils-Embed
#######官網下載Nginx1.9.0的tar包,然後解壓到伺服器上
[[email protected] jason]# wget -c http://nginx.org/download/nginx-1.9.0.tar.gz
[[email protected] jason]# tar -zxf nginx-1.9.0.tar.gz && cd nginx-1.9.0
上傳pcre-8.36.tar(支援Nginx的Rewrite功能)、zlib-1.2.8.tar(支援Nginx的Gzip壓縮功能)
#######新建Nginx1.9.0安裝時所需要的目錄
[[email protected] nginx-1.9.0]# cd /var/tmp/ && mkdir -p /var/tmp/nginx/{client,proxy,fastcgi,uwsgi,scgi}
[[email protected] tmp]# mkdir -p /var/run/nginx && cd /home/jason/nginx-1.9.0
[[email protected] nginx-1.9.0]#
./configure --prefix=/usr/local/nginx --pid-path=/var/run/nginx/nginx.pid --lock-path=/var/lock/nginx.lock --error-log-path=/var/log/nginx/error.log --http-log-path=/var/log/nginx/access.log --with-http_gzip_static_module --http-client-body-temp-path=/var/tmp/nginx/client --http-proxy-temp-path=/var/tmp/nginx/proxy --conf-path=/usr/local/nginx/conf/nginx.conf --http-fastcgi-temp-path=/var/tmp/nginx/fastcgi --http-uwsgi-temp-path=/var/tmp/nginx/uwsgi --http-scgi-temp-path=/var/tmp/nginx/scgi --sbin-path=/usr/sbin/nginx
具體的含義:
[[email protected] nginx-1.9.0]make && make install
上傳指令碼Nginx到/etc/init.d 並賦予只讀許可權,將Nginx服務新增到啟動項並給予開機自動啟動,啟動Nginx服務
Nginx
  1 #! /bin/bash
  2 #
  3 # nginx - this script starts and stops the nginx daemon
  4 #
  5 # chkconfig:   - 85 15
  6 # description:  Nginx is an HTTP(S) server, HTTP(S) reverse \
  7 #               proxy and IMAP/POP3 proxy server
  8 #
  9 # processname: nginx
 10 # config:      /etc/nginx/nginx.conf
 11 # pidfile:     /var/run/nginx/nginx.pid
 12
 13 # Source function library.
 14 . /etc/rc.d/init.d/functions
 15
 16 # Source networking configuration.
 17 . /etc/sysconfig/network
 18
 19 # Check that networking is up.
 20 [ "$NETWORKING" = "no" ] && exit 0
 21
 22 nginx="/usr/sbin/nginx"
 23 prog=$(basename $nginx)
 24
 25 NGINX_CONF_FILE="/usr/local/nginx/conf/nginx.conf"
 26
 27 [ -f /etc/sysconfig/nginx ] && . /etc/sysconfig/nginx
 28
 29 lockfile=/var/lock/nginx.lock
 30
 31 start() {
 32     [ -x $nginx ] || exit 5
 33     [ -f $NGINX_CONF_FILE ] || exit 6
 34     echo -n $"Starting $prog: "
 35     daemon $nginx -c $NGINX_CONF_FILE
 36     retval=$?
 37     echo
 38     [ $retval -eq 0 ] && touch $lockfile
 39     return $retval
 40 }
 41
 42 stop() {
 43     echo -n $"Stopping $prog: "
 44     killproc $prog -QUIT
 45     retval=$?
 46     echo
 47     [ $retval -eq 0 ] && rm -f $lockfile
 48     return $retval
 49 }
 50
 51 restart() {
 52     configtest || return $?
 53     stop
 54     sleep 1
 55     start
 56 }
 57
 58 reload() {
 59     configtest || return $?
 60     echo -n $"Reloading $prog: "
 61     killproc $nginx -HUP
 62     RETVAL=$?
 63     echo
 64 }
 65
 66 force_reload() {
 67     restart
 68 }
 69
 70 configtest() {
 71   $nginx -t -c $NGINX_CONF_FILE
 72 }
 73
 74 rh_status() {
 75     status $prog
 76 }
 77
 78 rh_status_q() {
 79     rh_status >/dev/null 2>&1
 80 }
 81
 82 case "$1" in
 83     start)
 84         rh_status_q && exit 0
 85         $1
 86         ;;
 87     stop)
 88         rh_status_q || exit 0
 89         $1
 90         ;;
 91     restart|configtest)
 92         $1
 93         ;;
 94     reload)
 95         rh_status_q || exit 7
 96         $1
 97         ;;
 98     force-reload)
 99         force_reload
100         ;;
101     status)
102         rh_status
103         ;;
104     condrestart|try-restart)
105         rh_status_q || exit 0
106             ;;
107     *)
108         echo $"Usage: $0 {start|stop|status|restart|condrestart|try-restart|reload|force-reload|configtest}"
109         exit 2
110 esac
[[email protected] init.d]chkconfig --add nginx
[[email protected] init.d]chkconfig nginx on
[[email protected] init.d]service nginx start
檢視安裝的Nginx1.9.0的詳細資訊
[[email protected] init.d]# nginx -V
nginx version: nginx/1.9.0
built by gcc 4.8.2 20140120 (Red Hat 4.8.2-16) (GCC)
configure arguments: --prefix=/usr/local/nginx --pid-path=/var/run/nginx/nginx.pid --lock-path=/var/lock/nginx.lock --error-log-path=/var/log/nginx/error.log --http-log-path=/var/log/nginx/access.log --with-http_gzip_static_module --http-client-body-temp-path=/var/tmp/nginx/client --http-proxy-temp-path=/var/tmp/nginx/proxy --conf-path=/usr/local/nginx/conf/nginx.conf --http-fastcgi-temp-path=/var/tmp/nginx/fastcgi --http-uwsgi-temp-path=/var/tmp/nginx/uwsgi --http-scgi-temp-path=/var/tmp/nginx/scgi --sbin-path=/usr/sbin/nginx
2、安裝tomcat
檢視現有版本、解除安裝並安裝jdk1.8
[[email protected] jason]# java -version
java version "1.7.0_51"
[[email protected] jason]# rpm -qa |grep jdk
[[email protected] jason]# yum remove java-1.7.0-openjdk
[[email protected] jason]# ls
apache-tomcat-9.0.4.tar.gz Desktop Documents Downloads jdk-8u11-linux-x64.rpm Music Pictures Public Templates Videos
[[email protected] jason]# rpm -ivh jdk-8u11-linux-x64.rpm
Preparing... ################################# [100%]
Updating / installing...
1:jdk-2000:1.8.0_11-fcs ################################# [100%]
Unpacking JAR files...
rt.jar...
jsse.jar...
charsets.jar...
tools.jar...
localedata.jar...
jfxrt.jar...
[[email protected] jason]# java -version
java version "1.8.0_11"
Java(TM) SE Runtime Environment (build 1.8.0_11-b12)
Java HotSpot(TM) 64-Bit Server VM (build 25.11-b03, mixed mode)
[[email protected] jason]# cd /usr/local/
[[email protected] local]# mkdir tomcat
[[email protected] local]# ls
bin etc games include lib lib64 libexec sbin share src tomcat
解壓apache-tomcat-9.0.4並移動到/usr/local/tomcat/
[[email protected] jason]# mv apache-tomcat-9.0.4 /usr/local/tomcat/
開啟檔案 /etc 目錄下的 profile 檔案,將如下程式碼追加到 profile 檔案末尾: