Flutter開發三 淺談Flutter UI佈局
1 Flutter佈局淺述
對於一個應用來說,開發UI介面是很基礎的一個工作。Flutter中的佈局是直接寫在程式碼中的,沒有像Android一樣使用xml來佈局,這一點與RN中使用jsx來佈局類似,它遵循的也是一切都是widget的思想。因此Flutter 中UI介面的佈局就是組合各種widget的過程。我們可以參考下面的一段話
In Android, the View is the foundation of everything that shows up on the screen. Buttons, toolbars, and inputs, everything is a View. In Flutter, the rough equivalent to a View is a Widget. Widgets don’t map exactly to Android views, but while you’re getting acquainted with how Flutter works you can think of them as “the way you declare and construct UI”.
大意是在Android中,View是螢幕上顯示的所有內容的基礎, 按鈕、工具欄、輸入框等一切都是View。 在Flutter中,View相當於是Widget。所以在Android中我們把所有的UI元素都看成View,在Flutter中widget就類似於View
與Android不同的是,Flutter提供的widget是在是太多了,對於相同的UI介面也可以使用不同的widget來實現,不過在Flutter中有一個原則,那就是儘量使用輕量級的widget來實現
關於如何在Flutter中進行佈局,我們還是來參考官方的例子吧
https://flutter.io/docs/development/ui/layout

開啟這個例子可以看到Flutter如何教我們佈局,下面大體說以下步驟
2 佈局拆分
第一步是將佈局拆分成基本的元素:
找出行和列.
佈局包含網格嗎?
有重疊的元素嗎?
是否需要選項卡?
注意需要對齊、填充和邊框的區域.
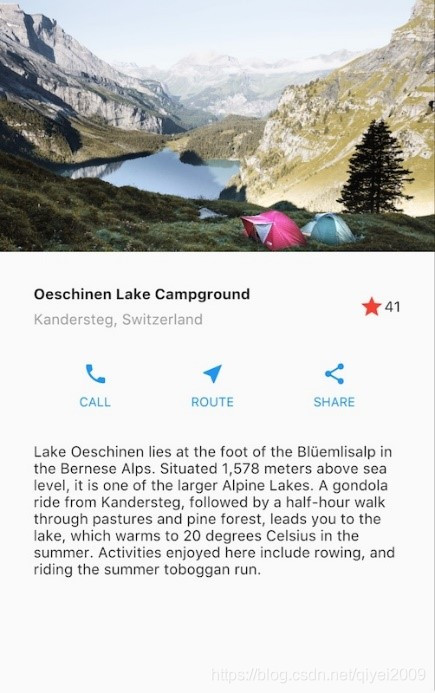
首先,確定更大的元素。在這個例子中,四個元素排列成一列:一個影象,兩個行和一個文字塊

其實這個和Android中的佈局類似,如上的佈局,在Android中我們也會採用一個線性佈局,child分別是imageview,線性佈局 線性佈局 TextView。
3 確定根佈局
由於我們一般會遵循MD設計,因此可以先寫出如下的根佈局
class MyApp extends StatelessWidget {

  @override
  Widget build(BuildContext context) {

    // TODO: implement build
    return MaterialApp(
      title: "Flutter Layout Demo",
      home: Scaffold(
        appBar: AppBar(
          centerTitle: true,
          title: Text("Flutter Layout Demo"),
        ),
        body: ,
      ),
    );
  }
}
下面開始佈局body部分了,body部分我們可以採用一個Column或者ListView,官方是ListView 可能主要是怕螢幕空間不夠吧。
4 佈局Image
我們還是按照官方的佈局來。首先佈局ImageView
body: ListView(
          children: <Widget>[
            Image.asset(
              "assets/images/lake.jpg",
              height: 240.0,
              fit: BoxFit.cover,
            ),
          ],
        ),
這裡首先把lake.jpg拷貝到工程的assets/images目錄下,並且在pubspec.yaml 檔案中修改如下
  assets:
    - assets/images/lake.jpg
執行Demo,我們的效果如下:

5 佈局標題行
看下圖的標題行

可以看到,首先是一個Row widget,它有三個child一列文字,一個星形圖示和一個數字,第一個child是一個Column佈局,有兩個child,包含2行文字
另外,第一列佔用大量空間,所以它必須包裝在Expanded widget中。
因此佈局如下:
Widget titleSection = Container(
      padding: EdgeInsets.all(32.0),
      child: Row(
        //3個child 水平排列
        children: <Widget>[
          //佔滿剩餘空間
          Expanded(
            // 2 個child豎直排列
            child: Column(
              crossAxisAlignment: CrossAxisAlignment.start,
              children: <Widget>[
                Container(
                  padding: EdgeInsets.only(bottom: 8.0),
                  child: Text(
                    "Oeschinen Lake Campground",
                    style: TextStyle(fontWeight: FontWeight.bold),
                  ),
                ),
                Text(
                  "Kandersteg, Switzerland",
                  style: TextStyle(color: Colors.grey[500]),
                )
              ],
            ),
          ),

          Icon(
            Icons.star,
            color: Colors.red[500],
          ),

          Text("41"),
        ],
      ),
    );
接著,修改我們的ListView如下:
// TODO: implement build
    return MaterialApp(
      title: "Flutter Layout Demo",
      theme: ThemeData(
        primarySwatch: Colors.blue,
      ),
      home: Scaffold(
        appBar: AppBar(
          centerTitle: true,
          title: Text("Flutter Layout Demo"),
        ),
        body: ListView(
          children: <Widget>[
            Image.asset(
              "assets/images/lake.jpg",
              height: 240.0,
              fit: BoxFit.cover,
            ),
            titleSection,
          ],
        ),
      ),
    );
執行效果如下:

6 實現Button佈局
對於Button佈局,可以看出這首先是一個Row佈局,然後有三個child

這裡我們參考官方的例子,寫出一個函式來建立佈局
  /// 構建button
  Column _buildButtonColumn(BuildContext context, IconData icon, String label) {
    Color color = Theme.of(context).primaryColor;

    return Column(
      mainAxisSize: MainAxisSize.min,
      mainAxisAlignment: MainAxisAlignment.center,
      //列布局
      children: <Widget>[
        Icon(
          icon,
          color: color,
        ),
        Container(
          margin: EdgeInsets.only(top: 8.0),
          child: Text(
            label,
            style: TextStyle(
              fontSize: 12.0,
              fontWeight: FontWeight.w400,
              color: color,
            ),
          ),
        )
      ],
    );
  }
函式呼叫如下:
    Widget buttonSection = Container(
      child: Row(
        mainAxisAlignment: MainAxisAlignment.spaceAround,
        children: <Widget>[
          _buildButtonColumn(context, Icons.call, "Call"),
          _buildButtonColumn(context, Icons.near_me, "Route"),
          _buildButtonColumn(context, Icons.share, "Share"),
        ],
      ),
    );
需要說明一下的是官方主軸方向通過 MainAxisAlignment.spaceEvenly 平均的分配每個列佔據的行空間,我這裡是MainAxisAlignment.spaceAround,注意這二者之間的細微差別。最後執行效果如下:

7 佈局Text文字
關於Text文字的佈局就很簡單了,這裡不再細說了,可以參考官方例子。下面看一下完成後的例子
程式碼
void main() => runApp(MyApp());

class MyApp extends StatelessWidget {

  var text =  '''
Lake Oeschinen lies at the foot of the Blüemlisalp in the Bernese Alps. Situated 1,578 meters above sea level, it is one of the larger Alpine Lakes. A gondola ride from Kandersteg, followed by a half-hour walk through pastures and pine forest, leads you to the lake, which warms to 20 degrees Celsius in the summer. Activities enjoyed here include rowing, and riding the summer toboggan run.
        ''';

  @override
  Widget build(BuildContext context) {
    Widget titleSection = Container(
      padding: EdgeInsets.all(32.0),
      child: Row(
        //3個child 水平排列
        children: <Widget>[
          //佔滿剩餘空間
          Expanded(
            // 2 個child豎直排列
            child: Column(
              crossAxisAlignment: CrossAxisAlignment.start,
              children: <Widget>[
                Container(
                  padding: EdgeInsets.only(bottom: 8.0),
                  child: Text(
                    "Oeschinen Lake Campground",
                    style: TextStyle(fontWeight: FontWeight.bold),
                  ),
                ),
                Text(
                  "Kandersteg, Switzerland",
                  style: TextStyle(color: Colors.grey[500]),
                )
              ],
            ),
          ),

          Icon(
            Icons.star,
            color: Colors.red[500],
          ),

          Text("41"),
        ],
      ),
    );

    Widget buttonSection = Container(
      child: Row(
        mainAxisAlignment: MainAxisAlignment.spaceAround,
        children: <Widget>[
          _buildButtonColumn(context, Icons.call, "Call"),
          _buildButtonColumn(context, Icons.near_me, "Route"),
          _buildButtonColumn(context, Icons.share, "Share"),
        ],
      ),
    );

    Widget textSection = Container(
      padding: EdgeInsets.all(32.0),
      child: Text(
        text,
        softWrap: true,
      ),
    );

    // TODO: implement build
    return MaterialApp(
      title: "Flutter Layout Demo",
      theme: ThemeData(
        primarySwatch: Colors.blue,
      ),
      home: Scaffold(
        appBar: AppBar(
          centerTitle: true,
          title: Text("Flutter Layout Demo"),
        ),
        body: ListView(
          children: <Widget>[
            Image.asset(
              "assets/images/lake.jpg",
              height: 240.0,
              fit: BoxFit.cover,
            ),
            titleSection,
            buttonSection,
            textSection,

          ],
        ),
      ),
    );
  }

  /// 構建button
  Column _buildButtonColumn(BuildContext context, IconData icon, String label) {
    Color color = Theme.of(context).primaryColor;

    return Column(
      mainAxisSize: MainAxisSize.min,
      mainAxisAlignment: MainAxisAlignment.center,
      //列布局
      children: <Widget>[
        Icon(
          icon,
          color: color,
        ),
        Container(
          margin: EdgeInsets.only(top: 8.0),
          child: Text(
            label,
            style: TextStyle(
              fontSize: 12.0,
              fontWeight: FontWeight.w400,
              color: color,
            ),
          ),
        )
      ],
    );
  }
}
執行效果

8 Flutter佈局總結
1 Flutter的佈局一切都是widget,佈局過程就是widget的組合
2 Flutter佈局中需要清楚的劃分Row Column Stack ListView GridView等
3 佈局過程中的margin padding等可考慮使用Container
4 對於有狀態的Widget需要使用StatefulWidget子類來實現
5 對於同一佈局能用多種不同的widget來實現的,儘量使用輕量級的widget
