javaEE shiro框架,許可權控制。基於Spring框架的shiro許可權控制
阿新 • • 發佈:2018-12-10
許可權控制的方式: 方式一:通過過濾器或Struts2的攔截器實現許可權控制 方式二:為Struts2的Action加入註解(標識),然後為Action建立代理物件;代理物件進行許可權校驗,校驗通過後通過反射呼叫目標方法。
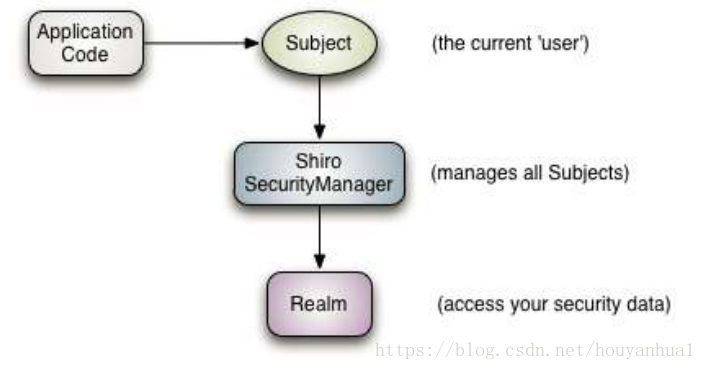
shiro框架可以進行認證、授權、會話管理、加密等。
shiro框架認證/授權流程:
web.xml(web核心配置檔案,配置Spring提供的shiro過濾器):
<?xml version="1.0" encoding="UTF-8"?>
<web-app xmlns:xsi="http://www.w3.org/2001/XMLSchema-instance" xmlns="http://java.sun.com/xml/ns/javaee" xsi:schemaLocation="http://java.sun.com/xml/ns/javaee http://java.sun.com/xml/ns/javaee/web-app_2_5.xsd" version="2.5">
  <display-name>MyWeb</display-name>

  <!-- 配置spring框架提供的用於整合shiro框架的過濾器。(要在Struts2的過濾器前面配置) -->
  <filter>
  	<filter-name>shiroFilter</filter-name>
  	<filter-class>org.springframework.web.filter.DelegatingFilterProxy</filter-class>
  </filter>
  <filter-mapping>
  	<filter-name>shiroFilter</filter-name>
  	<url-pattern>/*</url-pattern>
  </filter-mapping>

  <!-- 配置過濾器,解決hibernate延遲載入no-session的問題 -->
  <filter>
  	<filter-name>openSessionInView</filter-name>
  	<filter-class>org.springframework.orm.hibernate5.support.OpenSessionInViewFilter</filter-class>
  </filter>
  <filter-mapping>
  	<filter-name>openSessionInView</filter-name>
  	<url-pattern>/*</url-pattern>
  </filter-mapping>

  <!-- 通過上下文引數指定spring配置檔案位置 -->
  <context-param>
  	<param-name>contextConfigLocation</param-name>
  	<param-value>classpath:applicationContext.xml</param-value>
  </context-param>

  <!-- 配置spring框架的監聽器 -->
  <listener>
  	<listener-class>org.springframework.web.context.ContextLoaderListener</listener-class>
  </listener>

  <!-- 配置struts2的過濾器 -->
  <filter>
  	<filter-name>struts2</filter-name>
  	<filter-class>org.apache.struts2.dispatcher.ng.filter.StrutsPrepareAndExecuteFilter</filter-class>
  </filter>
  <filter-mapping>
  	<filter-name>struts2</filter-name>
  	<url-pattern>/*</url-pattern>
  	<dispatcher>REQUEST</dispatcher>
  	<dispatcher>FORWARD</dispatcher>
  </filter-mapping>

  <welcome-file-list>
    <welcome-file>index.html</welcome-file>
    <welcome-file>index.htm</welcome-file>
    <welcome-file>index.jsp</welcome-file>
    <welcome-file>default.html</welcome-file>
    <welcome-file>default.htm</welcome-file>
    <welcome-file>default.jsp</welcome-file>
  </welcome-file-list>
</web-app>
applicationContext.xml(Spring的核心配置檔案):
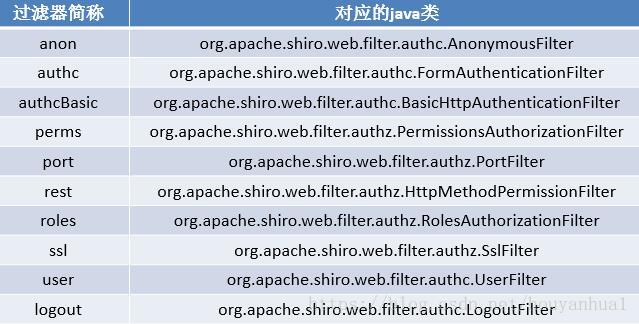
<?xml version="1.0" encoding="UTF-8"?>
<beans xmlns="http://www.springframework.org/schema/beans"
	xmlns:xsi="http://www.w3.org/2001/XMLSchema-instance"
	xmlns:context="http://www.springframework.org/schema/context"
	xmlns:aop="http://www.springframework.org/schema/aop"
	xmlns:tx="http://www.springframework.org/schema/tx"
	xmlns:jaxws="http://cxf.apache.org/jaxws"
	xmlns:soap="http://cxf.apache.org/bindings/soap"
	xsi:schemaLocation="http://www.springframework.org/schema/beans
						http://www.springframework.org/schema/beans/spring-beans.xsd
						http://www.springframework.org/schema/context
						http://www.springframework.org/schema/context/spring-context.xsd
						http://www.springframework.org/schema/aop
						http://www.springframework.org/schema/aop/spring-aop.xsd
						http://www.springframework.org/schema/tx
						http://www.springframework.org/schema/tx/spring-tx.xsd
						http://cxf.apache.org/bindings/soap
						http://cxf.apache.org/schemas/configuration/soap.xsd
						http://cxf.apache.org/jaxws
						http://cxf.apache.org/schemas/jaxws.xsd
						">

	<!-- XXXXXXXXXXXXXXXXXXXXXXXXXXXXXXXXXXXXXXXXXXXXXXXXXXX -->

	<!-- ====================================================================== -->

	<!-- 配置shiro框架的過濾器工廠物件。"shiroFilter"要和web.xml中配置的過濾器名保持相同 -->
	<bean id="shiroFilter" class="org.apache.shiro.spring.web.ShiroFilterFactoryBean">
		<!-- 注入安全管理器物件 -->
		<property name="securityManager" ref="securityManager"/>
		<!-- 注入訪問相關頁面的URL -->
		<property name="loginUrl" value="/login.jsp"/>
		<property name="successUrl" value="/index.jsp"/>
		<property name="unauthorizedUrl" value="/unauthorized.jsp"/>  <!-- 許可權不足的錯誤提示頁 -->
		<!--注入URL攔截規則 -->
		<property name="filterChainDefinitions">
			<value>
				/css/** = anon   <!-- anon是過濾器的別名(簡稱)。 兩個*表示遞迴所有層子目錄 -->
				/js/** = anon    <!-- 過濾器有次序之分,依次匹配過濾器 -->
				/images/** = anon
				/validatecode.jsp* = anon
				/login.jsp = anon
				/userAction_login.action = anon
				/page_base_staff.action = perms["staff-list"]  <!-- 必須先認證(登入)後,才會進行授權(許可權分配)。"staff-list"是自定義的許可權名 -->
				/* = authc    <!-- authc表示是否已認證(已登入) -->
			</value>
		</property>
	</bean>

	<!-- 註冊安全管理器物件 -->
	<bean id="securityManager" class="org.apache.shiro.web.mgt.DefaultWebSecurityManager">
		<property name="realm" ref="bosRealm"/>  <!-- 將Realm注入安全管理器 -->
	</bean>

	<!-- 註冊realm -->
	<bean id="bosRealm" class="com.xxx.bos.realm.BOSRealm"></bean>
</beans>
UserAction.java(Struts2的Action):
package com.xxx.bos.web.action;

import java.io.IOException;

import org.apache.commons.lang3.StringUtils;
import org.apache.shiro.SecurityUtils;
import org.apache.shiro.authc.AuthenticationToken;
import org.apache.shiro.authc.UsernamePasswordToken;
import org.apache.shiro.subject.Subject;
import org.apache.struts2.ServletActionContext;
import org.springframework.beans.factory.annotation.Autowired;
import org.springframework.context.annotation.Scope;
import org.springframework.stereotype.Controller;

import com.xxx.bos.domain.User;
import com.xxx.bos.service.IUserService;
import com.xxx.bos.utils.BOSUtils;
import com.xxx.bos.utils.MD5Utils;
import com.xxx.bos.web.action.base.BaseAction;

@Controller
@Scope("prototype")
public class UserAction extends BaseAction<User> {

	/**
	 * 使用者登入,使用shiro框架提供的方式進行認證操作
	 */
	public String login(){
		//使用shiro框架提供的方式進行認證操作
		Subject subject = SecurityUtils.getSubject();//獲得當前使用者物件,狀態為"未認證"
		//建立使用者名稱密碼令牌物件
		AuthenticationToken token = new UsernamePasswordToken(model.getUsername(),MD5Utils.md5(model.getPassword()));//建立使用者名稱密碼令牌物件
		try{
			//認證(登入) (和注入了Realm的安全管理器(SecurityManager)進行互動,認證)
			subject.login(token);  //登入失敗(認證失敗)就會拋異常
		}catch(Exception e){  //如果拋異常說明登入失敗(認證失敗)。 沒有該使用者和使用者密碼錯誤丟擲的異常是不同的,可以分開catch。
			e.printStackTrace();
			return LOGIN;
		}
		//沒拋異常說明認證成功
		User user = (User) subject.getPrincipal();  //返回的是例項化SimpleAuthenticationInfo()時的第一個引數
		ServletActionContext.getRequest().getSession().setAttribute("loginUser", user);
		return HOME;
	}

}
BOSRealm.java(繼承AuthorizingRealm):
package com.xxx.bos.realm;

import org.apache.shiro.authc.AuthenticationException;
import org.apache.shiro.authc.AuthenticationInfo;
import org.apache.shiro.authc.AuthenticationToken;
import org.apache.shiro.authc.SimpleAuthenticationInfo;
import org.apache.shiro.authc.UsernamePasswordToken;
import org.apache.shiro.authz.AuthorizationInfo;
import org.apache.shiro.realm.AuthorizingRealm;
import org.apache.shiro.subject.PrincipalCollection;
import org.springframework.beans.factory.annotation.Autowired;

import com.xxx.bos.dao.IUserDao;
import com.xxx.bos.domain.User;

public class BOSRealm extends AuthorizingRealm{
	@Autowired
	private IUserDao userDao;

	//認證方法
	@Override
	protected AuthenticationInfo doGetAuthenticationInfo(AuthenticationToken token) throws AuthenticationException {
		System.out.println("自定義的realm中認證方法執行了。。。。");
		UsernamePasswordToken passwordToken = (UsernamePasswordToken)token;
		//獲得頁面輸入的使用者名稱
		String username = passwordToken.getUsername();
		//根據使用者名稱查詢資料庫中的密碼
		User user = userDao.findUserByUsername(username);
		if(user == null){
			//頁面輸入的使用者名稱不存在
			return null;  //return null 說明認證失敗,安全管理器(SecurityManager)就會拋異常
		}
		//簡單認證資訊物件  (引數二:資料庫中的密碼;引數三:類名"BOSRealm")
		AuthenticationInfo info = new SimpleAuthenticationInfo(user, user.getPassword(), this.getName());
		//框架負責比對資料庫中的密碼和頁面輸入的密碼是否一致
		return info;  //交給安全管理器(SecurityManager)去比對密碼。比對不一致也會拋異常(認證失敗)。
	}

	//授權方法
	@Override
	protected AuthorizationInfo doGetAuthorizationInfo(PrincipalCollection principals) {
		return null;
	}
}
applicationContext.xml(Spring的核心配置檔案)中的shiro過濾器: