
Spring詳解(IOC和AOP)
Spring框架—控制反轉(IOC)
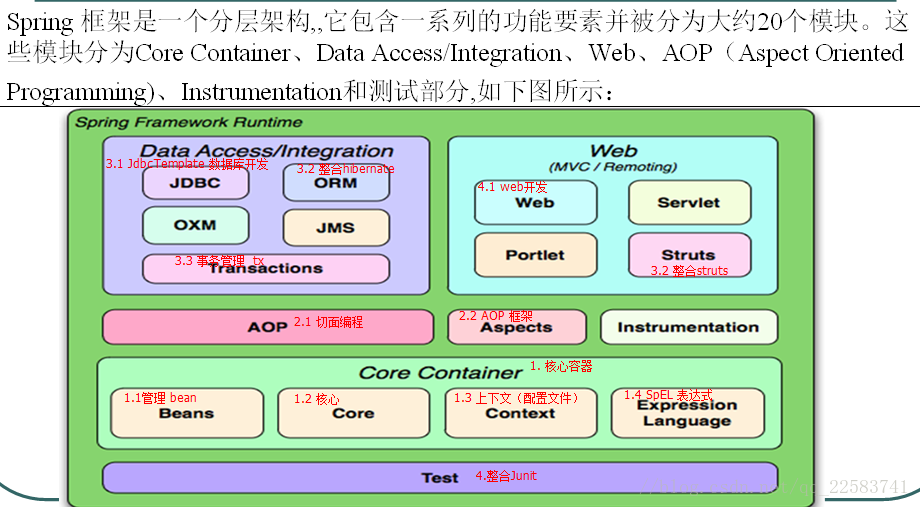
1 Spring框架概述
1.1 什麼是Spring
Spring是一個開源框架,Spring是於2003 年興起的一個輕量級的Java 開發框架,由Rod Johnson 在其著作Expert One-On-One J2EE Development and Design中闡述的部分理念和原型衍生而來。它是為了解決企業應用開發的複雜性而建立的。框架的主要優勢之一就是其分層架構,分層架構允許使用者選擇使用哪一個元件,同時為 J2EE 應用程式開發提供整合的框架。Spring使用基本的JavaBean來完成以前只可能由EJB完成的事情。然而,Spring的用途不僅限於伺服器端的開發。從簡單性、可測試性和鬆耦合的角度而言,任何Java應用都可以從Spring中受益。Spring的核心是控制反轉(IoC)和麵向切面(AOP)。
1.2 Spring的優點
- 方便解耦,簡化開發 (高內聚低耦合) Spring就是一個大工廠(容器),可以將所有物件建立和依賴關係維護,交給Spring管理 spring工廠是用於生成bean
- AOP程式設計的支援 Spring提供面向切面程式設計,可以方便的實現對程式進行許可權攔截、執行監控等功能
- 宣告式事務的支援 只需要通過配置就可以完成對事務的管理,而無需手動程式設計
- 方便程式的測試 Spring對Junit4支援,可以通過註解方便的測試Spring程式
- 方便整合各種優秀框架Spring不排斥各種優秀的開源框架,其內部提供了對各種優秀框架(如:Struts、Hibernate、MyBatis、Quartz等)的直接支援
- 降低JavaEE API的使用難度 Spring 對JavaEE開發中非常難用的一些API(JDBC、JavaMail、遠端呼叫等),都提供了封裝,使這些API應用難度大大降低
1.3 Spring的體系結構
2 入門案例:(IoC)
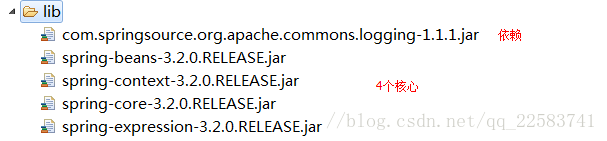
2.1匯入jar包
- 4 + 1 : 4個核心(beans、core、context、expression) + 1個依賴(commons-loggins…jar)

2.2目標類
- 提供UserService介面和實現類
- 獲得UserService實現類的例項 之前開發中,直接new一個物件即可。學習spring之後,將由Spring建立物件例項–> IoC 控制反轉(Inverse of Control) 之後需要例項物件時,從spring工廠(容器)中獲得,需要將實現類的全限定名稱配置到xml檔案中
public interface UserService {
    public void addUser();
}
public class UserServiceImpl implements UserService {
    @Override
    public void addUser() {
        System.out.println("a_ico add user");
    }
}
2.3 配置檔案
- 位置:任意,開發中一般在classpath下(src)
- 名稱:任意,開發中常用applicationContext.xml
- 內容:新增schema約束 約束檔案位置:spring-framework-3.2.0.RELEASE\docs\spring-framework-reference\html\ xsd-config.html
<?xml version="1.0" encoding="UTF-8"?>
<beans xmlns="http://www.springframework.org/schema/beans"
       xmlns:xsi="http://www.w3.org/2001/XMLSchema-instance"
       xsi:schemaLocation="http://www.springframework.org/schema/beans
                           http://www.springframework.org/schema/beans/spring-beans.xsd">
    <!-- 配置service
        <bean> 配置需要建立的物件
            id :用於之後從spring容器獲得例項時使用的
            class :需要建立例項的全限定類名
    -->
    <bean id="userServiceId" class="com.itheima.a_ioc.UserServiceImpl"></bean>
</beans>
2.4測試
   @Test
    public void demo02(){
        //從spring容器獲得
        //1 獲得容器
        String xmlPath = "com/itheima/a_ioc/beans.xml";
        ApplicationContext applicationContext = new ClassPathXmlApplicationContext(xmlPath);
        //2獲得內容 --不需要自己new,都是從spring容器獲得
        UserService userService = (UserService) applicationContext.getBean("userServiceId");
        userService.addUser();
3 入門案例:DI
-
例如:
class BookServiceImpl{
    //之前開發:介面 = 實現類  (service和dao耦合)
    //private BookDao bookDao = new BookDaoImpl();
    //spring之後 (解耦:service實現類使用dao介面,不知道具體的實現類)
    private BookDao bookDao;
    setter方法
}
模擬spring執行過程
建立service例項:BookService bookService = new BookServiceImpl()     -->IoC  <bean>
建立dao例項:BookDao bookDao = new BookDaoImple()                -->IoC
將dao設定給service:bookService.setBookDao(bookDao);             -->DI   <property>
3.1 目標類
- 建立BookService介面和實現類
- 建立BookDao介面和實現類
- 將dao和service配置 xml檔案
- 使用api測試
3.2 dao
public interface BookDao {
    public void save();
}
public class BookDaoImpl implements BookDao {

    @Override
    public void save() {
        System.out.println("di  add book");
    }
}
3.3 service
public interface BookService {

    public abstract void addBook();

}
public class BookServiceImpl implements BookService {

    // 方式1:之前,介面=實現類
//  private BookDao bookDao = new BookDaoImpl();
    // 方式2:介面 + setter
    private BookDao bookDao;
    public void setBookDao(BookDao bookDao) {
        this.bookDao = bookDao;
    }

    @Override
    public void addBook(){
        this.bookDao.save();
    }

}
3.4 配置檔案
<beans xmlns="http://www.springframework.org/schema/beans"
       xmlns:xsi="http://www.w3.org/2001/XMLSchema-instance"
       xsi:schemaLocation="http://www.springframework.org/schema/beans
                           http://www.springframework.org/schema/beans/spring-beans.xsd">
    <!--
    模擬spring執行過程
        建立service例項:BookService bookService = new BookServiceImpl() IoC  <bean>
        建立dao例項:BookDao bookDao = new BookDaoImpl()         IoC
        將dao設定給service:bookService.setBookDao(bookDao);     DI   <property>

        <property> 用於進行屬性注入
            name: bean的屬性名,通過setter方法獲得
                setBookDao ##> BookDao  ##> bookDao
            ref :另一個bean的id值的引用
     -->

    <!-- 建立service -->
    <bean id="bookServiceId" class="com.itheima.b_di.BookServiceImpl">
        <property name="bookDao" ref="bookDaoId"></property>
    </bean>

    <!-- 建立dao例項 -->
    <bean id="bookDaoId" class="com.itheima.b_di.BookDaoImpl"></bean>


</beans>
3.5 測試
    @Test
    public void demo01(){
        //從spring容器獲得
        String xmlPath = "com/itheima/b_di/beans.xml";
        ApplicationContext applicationContext = new ClassPathXmlApplicationContext(xmlPath);
        BookService bookService = (BookService) applicationContext.getBean("bookServiceId");
        bookService.addBook();
    }
4 依賴注入裝配Bean 基於xml
4.1屬性依賴注入
- 依賴注入方式:手動裝配 和 自動裝配
- 手動裝配:一般進行配置資訊都採用手動 基於xml裝配:構造方法、setter方法
- 基於註解裝配:
4.1.1 構造方法
目標類
public class User {

    private Integer uid;
    private String username;
    private Integer age;

    public User(Integer uid, String username) {
        super();
        this.uid = uid;
        this.username = username;
    }

    public User(String username, Integer age) {
        super();
        this.username = username;
        this.age = age;
    }
spring配置
    <!-- 構造方法注入
        * <constructor-arg> 用於配置構造方法一個引數argument
            name :引數的名稱
            value:設定普通資料
            ref:引用資料,一般是另一個bean id值

            index :引數的索引號,從0開始 。如果只有索引,匹配到了多個構造方法時,預設使用第一個。
            type :確定引數型別
        例如:使用名稱name
            <constructor-arg name="username" value="jack"></constructor-arg>
            <constructor-arg name="age" value="18"></constructor-arg>
        例如2:【型別type 和  索引 index】
            <constructor-arg index="0" type="java.lang.String" value="1"></constructor-arg>
            <constructor-arg index="1" type="java.lang.Integer" value="2"></constructor-arg>
    -->
    <bean id="userId" class="com.itheima.f_xml.a_constructor.User" >
        <constructor-arg index="0" type="java.lang.String" value="1"></constructor-arg>
        <constructor-arg index="1" type="java.lang.Integer" value="2"></constructor-arg>
    </bean>
4.1.2 setter方法
<!-- setter方法注入
        * 普通資料
            <property name="" value="值">
            等效
            <property name="">
                <value>值
        * 引用資料
            <property name="" ref="另一個bean">
            等效
            <property name="">
                <ref bean="另一個bean"/>

    -->
    <bean id="personId" class="com.itheima.f_xml.b_setter.Person">
        <property name="pname" value="陽志"></property>
        <property name="age">
            <value>1234</value>
        </property>

        <property name="homeAddr" ref="homeAddrId"></property>
        <property name="companyAddr">
            <ref bean="companyAddrId"/>
        </property>
    </bean>

    <bean id="homeAddrId" class="com.itheima.f_xml.b_setter.Address">
        <property name="addr" value="阜南"></property>
        <property name="tel" value="911"></property>
    </bean>
    <bean id="companyAddrId" class="com.itheima.f_xml.b_setter.Address">
        <property name="addr" value="北京八寶山"></property>
        <property name="tel" value="120"></property>
    </bean>
4.2 集合依賴注入
<!--
        集合的注入都是給<property>新增子標籤
            陣列:<array>
            List:<list>
            Set:<set>
            Map:<map> ,map存放k/v 鍵值對,使用<entry>描述
            Properties:<props>  <prop key=""></prop>  【】

        普通資料:<value>
        引用資料:<ref>
    -->
    <bean id="collDataId" class="com.itheima.f_xml.e_coll.CollData" >
        <property name="arrayData">
            <array>
                <value>DS</value>
                <value>DZD</value>
                <value>屌絲</value>
                <value>屌中屌</value>
            </array>
        </property>

        <property name="listData">
            <list>
                <value>於嵩楠</value>
                <value>曾衛</value>
                <value>楊煜</value>
                <value>曾小賢</value>
            </list>
        </property>

        <property name="setData">
            <set>
                <value>停封</value>
                <value>薄紙</value>
                <value>關係</value>
            </set>
        </property>

        <property name="mapData">
            <map>
                <entry key="jack" value="傑克"></entry>
                <entry>
                    <key><value>rose</value></key>
                    <value>肉絲</value>
                </entry>
            </map>
        </property>

        <property name="propsData">
            <props>
                <prop key="高富帥">嫐</prop>
                <prop key="白富美">嬲</prop>
                <prop key="男屌絲">挊</prop>
            </props>
        </property>
    </bean>
5 依賴注入裝配Bean 基於註解
- 註解:就是一個類,使用@註解名稱
-
開發中:使用註解 取代 xml配置檔案。 1.
@Component取代<bean class="">@Component("id") 取代 <bean id="" class="">2.web開發,提供3個@Component註解衍生註解(功能一樣)取代@Repository :dao層@Service:service層@Controller:web層3.依賴注入,給私有欄位設值,也可以給setter方法設值- 普通值:
@Value(" ") - 引用值:
方式1:按照【型別】注入 @Autowired 方式2:按照【名稱】注入1 @Autowired @Qualifier("名稱") 方式3:按照【名稱】注入2 @Resource("名稱")4.生命週期初始化:@PostConstruct 銷燬:@PreDestroy5.作用域@Scope("prototype") 多例註解使用前提,新增名稱空間,讓spring掃描含有註解類<beans xmlns="http://www.springframework.org/schema/beans" xmlns:xsi="http://www.w3.org/2001/XMLSchema-instance" xmlns:context="http://www.springframework.org/schema/context" xsi:schemaLocation="http://www.springframework.org/schema/beans http://www.springframework.org/schema/beans/spring-beans.xsd http://www.springframework.org/schema/context http://www.springframework.org/schema/context/spring-context.xsd"> <!-- 元件掃描,掃描含有註解的類 --> <context:component-scan base-package="com.itheima.g_annotation.a_ioc"></context:component-scan> </beans>
- 普通值:
Spring框架—面向切面程式設計(AOP)
1 什麼是AOP
- 在軟體業,AOP為Aspect Oriented Programming的縮寫,意為:面向切面程式設計,通過預編譯方式和執行期動態代理實現程式功能的統一維護的一種技術。AOP是OOP(面向物件程式設計)的延續,是軟體開發中的一個熱點,也是Spring框架中的一個重要內容,是函數語言程式設計的一種衍生範型。利用AOP可以對業務邏輯的各個部分進行隔離,從而使得業務邏輯各部分之間的耦合度降低,提高程式的可重用性,同時提高了開發的效率。
- AOP採取橫向抽取機制,取代了傳統縱向繼承體系重複性程式碼
- 經典應用:事務管理、效能監視、安全檢查、快取 、日誌等
- Spring AOP使用純Java實現,不需要專門的編譯過程和類載入器,在執行期通過代理方式向目標類織入增強程式碼
- AspectJ是一個基於Java語言的AOP框架,Spring2.0開始,Spring AOP引入對Aspect的支援,AspectJ擴充套件了Java語言,提供了一個專門的編譯器,在編譯時提供橫向程式碼的織入
2 AOP實現原理
- aop底層將採用代理機制進行實現。
- 介面 + 實現類 :spring採用 jdk 的動態代理Proxy。
- 實現類:spring 採用 cglib位元組碼增強。
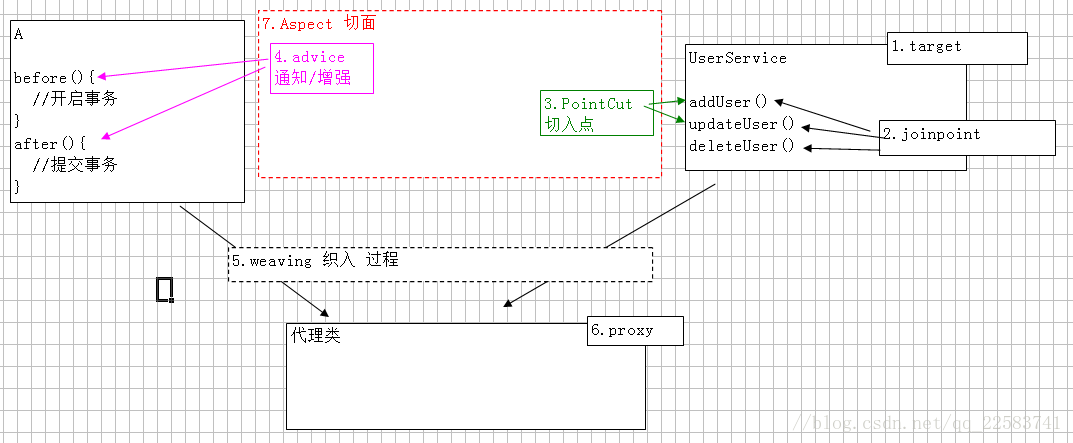
3 AOP術語【掌握】
1.target:目標類,需要被代理的類。例如:UserService
2.Joinpoint(連線點):所謂連線點是指那些可能被攔截到的方法。例如:所有的方法
3.PointCut 切入點:已經被增強的連線點。例如:addUser()
4.advice 通知/增強,增強程式碼。例如:after、before
5. Weaving(織入):是指把增強advice應用到目標物件target來建立新的代理物件proxy的過程.
6.proxy 代理類
7. Aspect(切面): 是切入點pointcut和通知advice的結合
一個線是一個特殊的面。
一個切入點和一個通知,組成成一個特殊的面。
4 AOP實現方式
4.1手動方式
4.1.1JDK動態代理
- JDK動態代理 對“裝飾者”設計模式 簡化。使用前提:必須有介面
1.目標類:介面 + 實現類
public interface UserService {
    public void addUser();
    public void updateUser();
    public void deleteUser();
}
2.切面類:用於存通知 MyAspect
public class MyAspect {
    public void before(){
        System.out.println("雞首");
    }
    public void after(){
        System.out.println("牛後");
    }
}
3.工廠類:編寫工廠生成代理
public class MyBeanFactory {

    public static UserService createService(){
        //1 目標類
        final UserService userService = new UserServiceImpl();
        //2切面類
        final MyAspect myAspect = new MyAspect();
        /* 3 代理類:將目標類(切入點)和 切面類(通知) 結合 --> 切面
         *  Proxy.newProxyInstance
         *      引數1:loader ,類載入器,動態代理類 執行時建立,任何類都需要類載入器將其載入到記憶體。
         *          一般情況:當前類.class.getClassLoader();
         *                  目標類例項.getClass().get...
         *      引數2:Class[] interfaces 代理類需要實現的所有介面
         *          方式1:目標類例項.getClass().getInterfaces()  ;注意:只能獲得自己介面,不能獲得父元素介面
         *          方式2:new Class[]{UserService.class}
         *          例如:jdbc 驅動  --> DriverManager  獲得介面 Connection
         *      引數3:InvocationHandler  處理類,介面,必須進行實現類,一般採用匿名內部
         *          提供 invoke 方法,代理類的每一個方法執行時,都將呼叫一次invoke
         *              引數31:Object proxy :代理物件
         *              引數32:Method method : 代理物件當前執行的方法的描述物件(反射)
         *                  執行方法名:method.getName()
         *                  執行方法:method.invoke(物件,實際引數)
         *              引數33:Object[] args :方法實際引數
         *
         */
        UserService proxService = (UserService)Proxy.newProxyInstance(
                                MyBeanFactory.class.getClassLoader(),
                                userService.getClass().getInterfaces(),
                                new InvocationHandler() {

                                    @Override
                                    public Object invoke(Object proxy, Method method, Object[] args) throws Throwable {

                                        //前執行
                                        myAspect.before();

                                        //執行目標類的方法
                                        Object obj = method.invoke(userService, args);

                                        //後執行
                                        myAspect.after();

                                        return obj;
                                    }
                                });

        return proxService;
    }

}
4.測試
@Test
    public void demo01(){
        UserService userService = MyBeanFactory.createService();
        userService.addUser();
        userService.updateUser();
        userService.deleteUser();
    }
4.1.2 CGLIB位元組碼增強
- 沒有介面,只有實現類。
- 採用位元組碼增強框架 cglib,在執行時 建立目標類的子類,從而對目標類進行增強。
工廠類
public class MyBeanFactory {

    public static UserServiceImpl createService(){
        //1 目標類
        final UserServiceImpl userService = new UserServiceImpl();
        //2切面類
        final MyAspect myAspect = new MyAspect();
        // 3.代理類 ,採用cglib,底層建立目標類的子類
        //3.1 核心類
        Enhancer enhancer = new Enhancer();
        //3.2 確定父類
        enhancer.setSuperclass(userService.getClass());
        /* 3.3 設定回撥函式 , MethodInterceptor介面 等效 jdk InvocationHandler介面
         *  intercept() 等效 jdk  invoke()
         *      引數1、引數2、引數3:以invoke一樣
         *      引數4:methodProxy 方法的代理
         *
         *
         */
        enhancer.setCallback(new MethodInterceptor(){

            @Override
            public Object intercept(Object proxy, Method method, Object[] args, MethodProxy methodProxy) throws Throwable {

                //前
                myAspect.before();

                //執行目標類的方法
                Object obj = method.invoke(userService, args);
                // * 執行代理類的父類 ,執行目標類 (目標類和代理類 父子關係)
                methodProxy.invokeSuper(proxy, args);

                //後
                myAspect.after();

                return obj;
            }
        });
        //3.4 建立代理
        UserServiceImpl proxService = (UserServiceImpl) enhancer.create();

        return proxService;
    }

}
4.2半自動
- 讓spring 建立代理物件,從spring容器中手動的獲取代理物件
4.2.1目標類
public interface UserService {
    public void addUser();
    public void updateUser();
    public void deleteUser();
}
4.2.2切面類
/**
 * 切面類中確定通知,需要實現不同介面,介面就是規範,從而就確定方法名稱。
 * * 採用“環繞通知” MethodInterceptor
 *
 */
public class MyAspect implements MethodInterceptor {

    @Override
    public Object invoke(MethodInvocation mi) throws Throwable {

        System.out.println("前3");

        //手動執行目標方法
        Object obj = mi.proceed();

        System.out.println("後3");
        return obj;
    }
}
4.2.3Spring 配置
<!-- 1 建立目標類 -->
    <bean id="userServiceId" class="com.itheima.b_factory_bean.UserServiceImpl"></bean>
    <!-- 2 建立切面類 -->
    <bean id="myAspectId" class="com.itheima.b_factory_bean.MyAspect"></bean>

    <!-- 3 建立代理類
        * 使用工廠bean FactoryBean ,底層呼叫 getObject() 返回特殊bean
        * ProxyFactoryBean 用於建立代理工廠bean,生成特殊代理物件
            interfaces : 確定介面們
                通過<array>可以設定多個值
                只有一個值時,value=""
            target : 確定目標類
            interceptorNames : 通知 切面類的名稱,型別String[],如果設定一個值 value=""
            optimize :強制使用cglib
                <property name="optimize" value="true"></property>
        底層機制
            如果目標類有介面,採用jdk動態代理
            如果沒有介面,採用cglib 位元組碼增強
            如果宣告 optimize = true ,無論是否有介面,都採用cglib

    -->
    <bean id="proxyServiceId" class="org.springframework.aop.framework.ProxyFactoryBean">
        <property name="interfaces" value="com.itheima.b_factory_bean.UserService"></property>
        <property name="target" ref="userServiceId"></property>
        <property name="interceptorNames" value="myAspectId"></property>
    </bean>
4.2.4 測試
    @Test
    public void demo01(){
        String xmlPath = "com/itheima/b_factory_bean/beans.xml";
        ApplicationContext applicationContext = new ClassPathXmlApplicationContext(xmlPath);

        //獲得代理類
        UserService userService = (UserService) applicationContext.getBean("proxyServiceId");
        userService.addUser();
        userService.updateUser();
        userService.deleteUser();
    }
4.3全自動
- 從spring容器獲得目標類,如果配置aop,spring將自動生成代理。
4.3.1 Spring配置
<?xml version="1.0" encoding="UTF-8"?>
<beans xmlns="http://www.springframework.org/schema/beans"
       xmlns:xsi="http://www.w3.org/2001/XMLSchema-instance"
       xmlns:aop="http://www.springframework.org/schema/aop"
       xsi:schemaLocation="http://www.springframework.org/schema/beans
                           http://www.springframework.org/schema/beans/spring-beans.xsd
                           http://www.springframework.org/schema/aop
                           http://www.springframework.org/schema/aop/spring-aop.xsd">
    <!-- 1 建立目標類 -->
    <bean id="userServiceId" class="com.itheima.c_spring_aop.UserServiceImpl"></bean>
    <!-- 2 建立切面類(通知) -->
    <bean id="myAspectId" class="com.itheima.c_spring_aop.MyAspect"></bean>
    <!-- 3 aop程式設計
        3.1 匯入名稱空間
        3.2 使用 <aop:config>進行配置
                proxy-target-class="true" 宣告時使用cglib代理
            <aop:pointcut> 切入點 ,從目標物件獲得具體方法
            <aop:advisor> 特殊的切面,只有一個通知 和 一個切入點
                advice-ref 通知引用
                pointcut-ref 切入點引用
        3.3 切入點表示式
            execution(* com.itheima.c_spring_aop.*.*(..))
            選擇方法         返回值任意   包             類名任意   方法名任意   引數任意

    -->
    <aop:config proxy-target-class="true">
        <aop:pointcut expression="execution(* com.itheima.c_spring_aop.*.*(..))" id="myPointCut"/>
        <aop:advisor advice-ref="myAspectId" pointcut-ref="myPointCut"/>
    </aop:config>
</beans>
4.3.2 測試
    @Test
    public void demo01(){
        String xmlPath = "com/itheima/c_spring_aop/beans.xml";
        ApplicationContext applicationContext = new ClassPathXmlApplicationContext(xmlPath);

        //獲得目標類
        UserService userService = (UserService) applicationContext.getBean("userServiceId");
        userService.addUser();
        userService.updateUser();
        userService.deleteUser();
    }