
Service和IntentService,Service和Activity之間通訊
阿新 • • 發佈:2018-12-10
Service
		 /**
         * Android四大元件之一,Service 是長期執行在後臺的應用程式元件。
         * Service 不是程序,也不是執行緒,它和應用程式在同一個程序中
         * Service中不能做耗時操作,執行在主執行緒中。
         */
Service應用場景
後臺播放音樂,定位服務,每隔一定時間和伺服器進行互動。等。
service兩種啟動方式,和生命週期
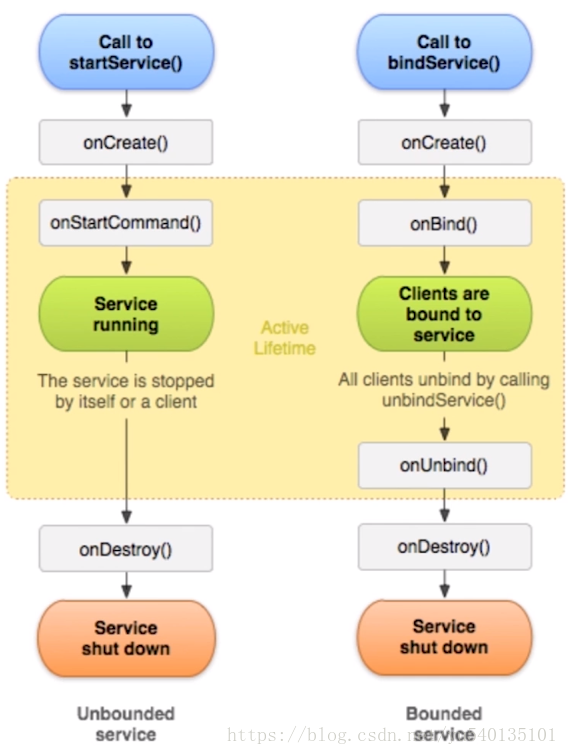
	    /**
         * > startService:
         * Service在系統中被啟動多次,onCreate只會執行一次,onStartCommand方法呼叫次數和啟動次數一致
         *
         * > stopService
         * 呼叫stopService後,內部會執行onDestroy方法,如果一個Service被綁定了,在沒有解綁的前提下,呼叫stopService是無效的
         *
         * > bindService
         * 繫結Service內部會呼叫onCreate,onBind
         *
         * > unBindService
         * 解綁Service,內部呼叫onUnbind,onDestroy
         */
特殊情況,啟動服務和繫結服務的結合體
		 /**
         * > 使用場景
         *
         * 使用startService啟動一個後臺服務,需要獲取後臺資訊的時候,使activity繫結到該服務,不用的時候需要先解綁
         *
         * > 啟動服務的優先順序高於繫結服務
         *
         * 先啟動服務後繫結服務,生命週期保持不變
         * 先繫結服務後啟動服務,生命週期變為啟動服務
         */
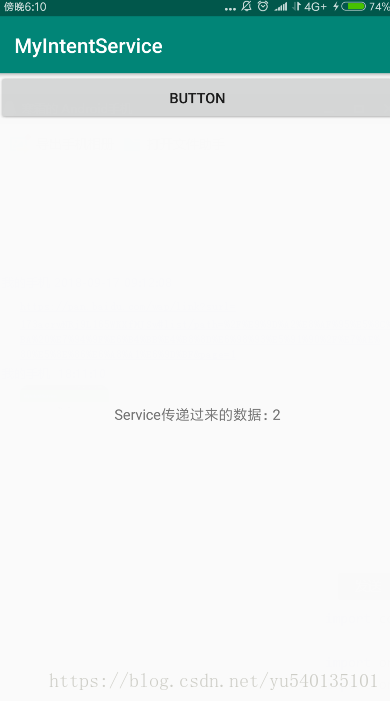
Service和Activity之間的通訊(重要)
		/**
         * Activity傳遞資料到Service使用Intent
         * Service傳遞資料到Activity用到Binder機制,不太好用(這裡推薦使用EventBus)
         *
         * 關於EventBus視訊教程
         * https://ke.qq.com/course/171663#term_id=100200824
         */
IntentService(推薦使用)
    /**
         * IntentService 是繼承於 Service 並處理非同步請求的一個類,
         * 在 IntentService 內有一個工作執行緒來處理耗時操作,
         * 啟動 IntentService 的方式和啟動傳統 Service 一樣,
         * 同時,當任務執行完後,IntentService 會自動停止,而不需要我們去手動控制。
         * 另外,可以啟動 IntentService 多次,
         * 而每一個耗時操作會以工作佇列的方式在IntentService 的 onHandleIntent 回撥方法中執行,
         * 並且,每次只會執行一個工作執行緒,執行完第一個再執行第二個,以此類推。
         *
         * 而且,所有請求都在一個單執行緒中,不會阻塞應用程式的主執行緒(UI Thread),
         * 同一時間只處理一個請求。 那麼,用 IntentService 有什麼好處呢?
         * 首先,我們省去了在 Service 中手動開執行緒的麻煩,
         * 第二,當操作完成時,我們不用手動停止 Service。
         */
一個Demo(需要在Manifest中註冊)
	<application
       ...
        <service android:name=".Service.MyIntentService"/>
    </application>
import android.content.Intent;
import android.os.Bundle;
import android.support.v7.app.AppCompatActivity;
import android.view.View;
import android.widget.Button;
import android.widget.TextView;

import com.example.zhangyu.myintentservice.Bean.UpdateMain;
import com.example.zhangyu.myintentservice.Service.MyIntentService;

import org.greenrobot.eventbus.EventBus;
import org.greenrobot.eventbus.Subscribe;
import org.greenrobot.eventbus.ThreadMode;

public class MainActivity extends AppCompatActivity {

    private Button button;
    private TextView textView;

    @Override
    protected void onCreate(Bundle savedInstanceState) {
        super.onCreate(savedInstanceState);
        setContentView(R.layout.activity_main);
        EventBus.getDefault().register(this);
        initView();
    }

    @Subscribe(threadMode = ThreadMode.MAIN)
    public void EventBusReceiver(UpdateMain updateMain) {
        textView.setText(updateMain.getI() + "");
    }

    private void initView() {
        button = (Button) findViewById(R.id.button);
        textView = (TextView) findViewById(R.id.textView);

        button.setOnClickListener(new View.OnClickListener() {
            @Override
            public void onClick(View v) {
                //最好用getApplicationContext
                Intent intent = new Intent(getApplicationContext(), MyIntentService.class);
                intent.putExtra("url", "https://www.baidu.com/");
                startService(intent);
            }
        });
    }

    @Override
    protected void onDestroy() {
        super.onDestroy();
        if (EventBus.getDefault().isRegistered(this)) {
            EventBus.getDefault().unregister(this);
        }
    }
}
import android.app.IntentService;
import android.content.Intent;
import android.support.annotation.Nullable;
import android.util.Log;
import com.example.zhangyu.myintentservice.Bean.UpdateMain;

import org.greenrobot.eventbus.EventBus;

public class MyIntentService extends IntentService {
    private final String TAG = "MyIntentService";

    /**
     * Creates an IntentService.  Invoked by your subclass's constructor.
     *
     * @param name Used to name the worker thread, important only for debugging.
     */
    public MyIntentService(String name) {
        super(name);
    }

    public MyIntentService() {
        this("MyIntentServiceThread");
    }


    @Override
    protected void onHandleIntent(@Nullable Intent intent) {
        String url = intent.getStringExtra("url");
        Log.d(TAG, "onHandleIntent: " + url);
        // 模擬耗時操作,注意不用開啟子執行緒
        for (int i = 0; i < 5; i++) {
            try {
                Thread.sleep(1000);
                UpdateMain updateMain = new UpdateMain();
                updateMain.setI(i);
                EventBus.getDefault().post(updateMain);

            } catch (InterruptedException e) {
                // TODO Auto-generated catch block
                e.printStackTrace();
            }
        }

        Log.d(TAG, "onHandleIntent: " + Thread.currentThread().getName());
    }

    @Override
    public void onDestroy() {
        super.onDestroy();
        Log.d(TAG, "onDestroy: ");
    }


}