小程式-藍芽實戰
導語
藍芽在日常生活中廣泛使用的一項技術,小程式給了我們前端工程師一個控制藍芽的方法,帶上你的裝置,來看看怎麼控制你的藍芽裝置吧。
1. 背景介紹
藍芽是愛立信公司創立的一種無線技術標準,為短距離的硬體裝置提供低成本的通訊規範。藍芽規範由藍芽技術聯盟(Bluetooth Special Interest Group,簡稱SIG)管理,在計算機,手機,傳真機,耳機,汽車,家用電器等等很多場景廣泛使用。藍芽具有以下一些特點:
(1) 免費使用:使用的工作頻段在2.4GHz的工科醫(ISM)頻段,無需申請許可證。
(2) 功耗低:BLE4.0包含了一個低功耗標準(Bluetooth Low Energy),可以讓藍芽的功耗顯著降低
(3) 安全性高:藍芽規範提供了一套安全加密機制和授權機制,可以有效防範資料被竊取
(4) 傳輸率高:目前最新BLE4.0版本,理論傳輸速率可達3Mbit/s(實際肯定達不到),理論覆蓋範圍可達100米。


2.小程式藍芽介紹
小程式API提供了一套藍芽操作介面,所以作為我們前端開發人員可以更加方便的進行藍芽裝置開發,而無需瞭解安卓和IOS的各種藍芽底層概念。小程式的藍芽操作大多都是通過非同步呼叫來處理的,這裡面就存在著一些坑,後面會詳細介紹。在使用小程式藍芽API之前有幾個概念或者說術語需要預先了解:
(1) 藍芽終端:我們常說的硬體裝置,包括手機,電腦等等。
(2) UUID:是由子母和數字組成的40個字串的序號,根據硬體裝置有關聯的唯一ID。
(3) 裝置地址:每個藍芽裝置都有一個裝置地址deviceId,但是安卓和IOS差別很大,安卓下裝置地址就是mac地址,但是IOS無法獲取mac地址,所以裝置地址是針對本機範圍有效的UUID,所以這裡需要注意,後面會介紹。
(4) 裝置服務列表:每個裝置都存在一些服務列表,可以跟不同的裝置進行通訊,服務有一個serviceId來維護,每個服務包含了一組特徵值。
(5) 服務特徵值:包含一個單獨的value值和0 –n個用來描述characteristic 值(value)的descriptors。一個characteristics可以被認為是一種型別的,類似於一個類。
(6) ArrayBuffer:小程式中對藍芽資料的傳遞是使用ArrayBuffer的二進位制型別來的,所以在我們的使用過程中需要進行轉碼。
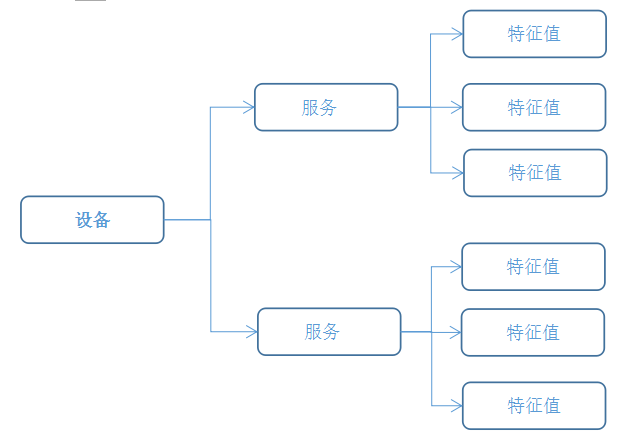
3. API總覽
小程式對藍芽裝置的操作有18個API
| API名稱 | 說明 |
|---|---|
| openBluetoothAdapter | 初始化藍芽介面卡,在此可用判斷藍芽是否可用 |
| closeBluetoothAdapter | 關閉藍芽連線,釋放資源 |
| getBluetoothAdapterState | 獲取藍芽介面卡狀態,如果藍芽未開或不可用,這裡可用檢測到 |
| onBluetoothAdapterStateChange | 藍芽介面卡狀態發生變化事件,這裡可用監控藍芽的關閉和開啟動作 |
| startBluetoothDevicesDiscovery | 開始搜尋裝置,藍芽初始化成功後就可以搜尋裝置 |
| stopBluetoothDevicesDiscovery | 當找到目標裝置以後需要停止搜尋,因為搜尋裝置是比較消耗資源的操作 |
| getBluetoothDevices | 獲取已經搜尋到的裝置列表 |
| onBluetoothDeviceFound | 當搜尋到一個裝置時的事件,在此可用過濾目標裝置 |
| getConnectedBluetoothDevices | 獲取已連線的裝置 |
| createBLEConnection | 建立BLE連線 |
| closeBLEConnection | 關閉BLE連線 |
| getBLEDeviceServices | 獲取裝置的服務列表,每個藍芽裝置都有一些服務 |
| getBLEDeviceCharacteristics | 獲取藍芽裝置某個服務的特徵值列表 |
| readBLECharacteristicValue | 讀取低功耗藍芽裝置的特徵值的二進位制資料值 |
| writeBLECharacteristicValue | 向藍芽裝置寫入資料 |
| notifyBLECharacteristicValueChange | 開啟藍芽裝置notify提醒功能,只有開啟這個功能才能接受到藍芽推送的資料 |
| onBLEConnectionStateChange | 監聽藍芽裝置錯誤事件,包括異常斷開等等 |
| onBLECharacteristicValueChange | 監聽藍芽推送的資料,也就是notify資料 |
4. 主要流程
藍芽通訊的一個正常流程是下面的圖示
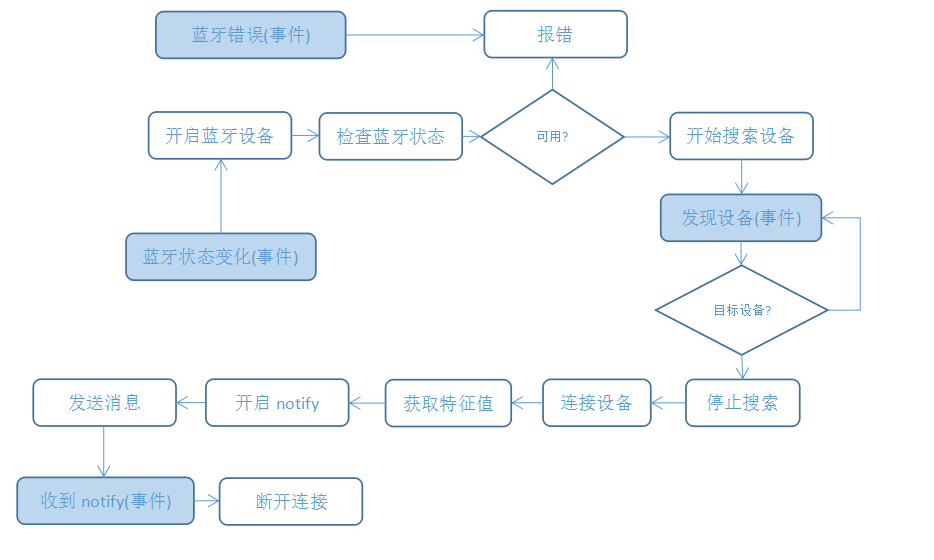
(1) 開啟藍芽:呼叫openBluetoothAdapter來開啟和初始化藍芽,這個時候可以根據狀態判斷使用者裝置是否支援藍芽
(2) 檢查藍芽狀態:呼叫getBluetoothAdapterState來檢查藍芽是否開啟,如果沒有開啟可以在這裡提醒使用者開啟藍芽,並且能在開啟後自動啟動下面的步驟
這裡有一個坑:IOS裡面藍芽狀態變化以後不能馬上開始搜尋,否則會搜尋不到裝置,必須要等待2秒以上。
function connect(){
  wx.openBluetoothAdapter({
    success: function (res) {
    },
    fail(res){
    },
    complete(res){
      wx.onBluetoothAdapterStateChange(function(res) {
        if(res.available){
          setTimeout(function(){
            connect();
          },2000);
        }
      })
   //開始搜尋
    }
  })
}
(3) 搜尋裝置:startBluetoothDevicesDiscovery開始搜尋裝置,當發現一個裝置會觸發onBluetoothDeviceFound事件,首先看下標準API
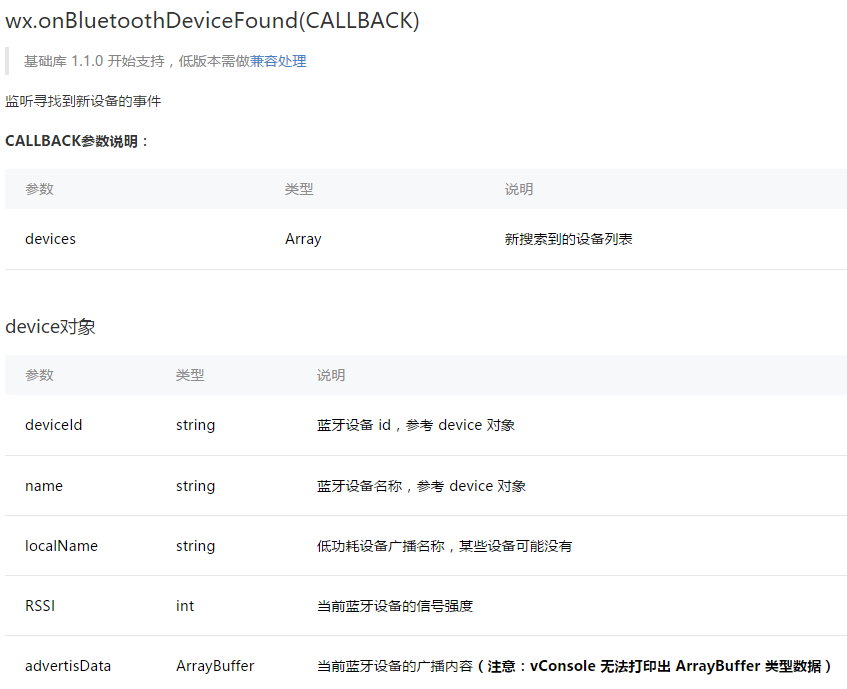
由於IOS無法獲取Mac地址所以這裡需要區分兩個場景
a) 安卓:安卓下可以根據Mac地址來搜尋裝置,或者跳過此步直接連線到裝置。當搜尋到一個裝置以後,可以在onBluetoothDeviceFound事件回撥中判斷當前裝置的deviceID是否為指定的Mac地址
let mac = "XXXXXXXXXXXXXXX";
wx.startBluetoothDevicesDiscovery({
  services:[],
  success(res) {
    wx.onBluetoothDeviceFound(res=>{
        let devices = res.devices;
        for(let i = 0;i<devices.length;i++){
          if(devices[i].deviceId = mac){
            console.log("find");
            wx.stopBluetoothDevicesDiscovery({
              success:res=>console.log(res),
              fail:res=>console.log(res),
            })
          }
        }
    });

  },
  fail(res){
      console.log(res);
  }
})
b) IOS:IOS下獲取裝置Mac地址的方法已經被遮蔽,所以不存在mac地址,此時只能通過其他方式來判斷,比如在藍芽裝置advertisData欄位新增一些特別的資訊來判斷等等,可以轉字串來判斷,也可以直接用二進位制來判斷。
let id = "XXXXXXXXXXXXXXX",//裝置識別符號
    deviceId = "";
wx.startBluetoothDevicesDiscovery({
  services:[],
  success(res) {
    wx.onBluetoothDeviceFound(res=>{
        var devices = res.devices;
        for(let i = 0;i<devices.length;i++){
          let advertisData = devices[i].advertisData;
          var data = arrayBufferToHexString(advertisData);//二進位制轉字串
          if (!!data && data.indexOf(id) > -1) {
              console.log("find");
        deviceId = devices[i].deviceId;
          }
        }
    });
  },
  fail(res){
      console.log(res);
  }
});
function arrayBufferToHexString(buffer) {
  let bufferType = Object.prototype.toString.call(buffer)
  if (buffer != '[object ArrayBuffer]') {
    return
  }
  let dataView = new DataView(buffer)

  var hexStr = '';
  for (var i = 0; i < dataView.byteLength; i++) {
    var str = dataView.getUint8(i);
    var hex = (str & 0xff).toString(16);
    hex = (hex.length === 1) ? '0' + hex : hex;
    hexStr += hex;
  }
****
  return hexStr.toUpperCase();
}
這裡需要注意的是:如果知道mac地址在安卓下可以直接略過搜尋過程直接連線,如果不知道mac地址或者是IOS場景下需要開啟搜尋,由於搜尋是比較消耗資源的動作,所以發現目標裝置以後一定要及時關閉搜尋,以節省系統消耗。
(4) 搜尋到裝置以後,就是連線裝置createBLEConnection:
(5) 連線成功以後就開始查詢裝置的服務列表:getBLEDeviceServices,然後根據目標服務ID或者識別符號來找到指定的服務ID
let deviceId = "XXXX";
wx.getBLEDeviceServices({
  deviceId: device_id,
  success: function (res) {
    let service_id = "";
    for(let i = 0;i<res.services.length;i++){
      if(services[i].uuid.toUpperCase().indexOf("TEST") != -1){
        service_id = services[i].uuid;
        break;
      }
    }

    return service_id;
  },
  fail(res){
    console.log(res);
  }
})
這裡有個坑的地方:如果是安卓下如果你知道裝置的服務ID,你可以省去getBLEDeviceServices的過程,但是IOS下即使你知道了服務ID,也不能省去getBLEDeviceServices的過程,這是小程式裡面需要注意的一點。
(6) 獲取服務特徵值:每個服務都包含了一組特徵值用來描述服務的一些屬性,比如是否可讀,是否可寫,是否可以開啟notify通知等等,當你跟藍芽通訊時需要這些特徵值ID來傳遞資料。
getBLEDeviceCharacteristics方法返回了res引數包含了以下屬性:

characteristics包含了一組特徵值列表
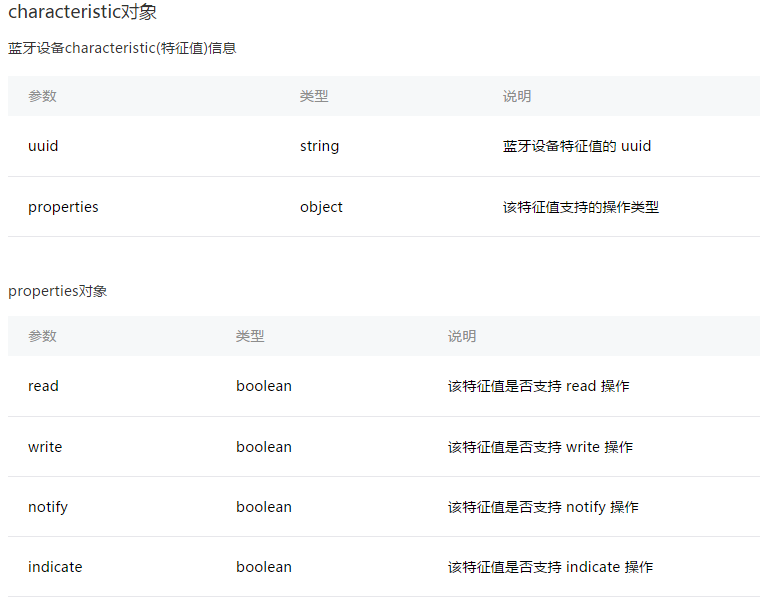
通過遍歷特徵值物件來獲取想要的特徵值ID
wx.getBLEDeviceCharacteristics({
  deviceId: device_id,
  serviceId: service_id,
  success: function (res) {
    let notify_id,write_id,read_id;
    for (let i = 0; i < res.characteristics.length; i++) {
      let charc = res.characteristics[i];
      if (charc.properties.notify) {
        notify_id = charc.uuid;
      }
      if(charc.properties.write){
        write_id = charc.uuid;
      }
      if(charc.properties.write){
        read_id = charc.uuid;
      }
    }
  },
  fail(res){
    console.log(res);
  }
})
這個例子就通過搜尋特徵值取到了 notify特徵值ID,寫ID和讀取ID
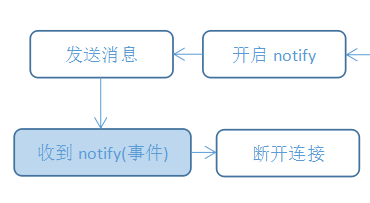
(7) 獲取特徵值ID以後就可以開啟notify通知模式,同時開啟監聽特徵值變化訊息
wx.notifyBLECharacteristicValueChange({
  state: true,
  deviceId: device_id,
  serviceId: service_id,
  characteristicId:notify_id,
  complete(res) {
    wx.onBLECharacteristicValueChange(function (res) {
      console.log(arrayBufferToHexString(res.value));
    })
  },
  fail(res){
    console.log(res);
  }
})
(8) 一切都準備好以後,就可以開始給藍芽傳送訊息,一旦藍芽有響應,就可以在onBLECharacteristicValueChange事件中得到訊息並打印出來。
這裡面有個坑:開啟notify以後並不能馬上傳送訊息,藍芽裝置有個準備的過程,需要在setTimeout中延遲1秒以上才能傳送,否則會發送失敗
let buf = hexStringToArrayBuffer("test");
wx.writeBLECharacteristicValue({
  deviceId: device_id,
  serviceId: service_id,
  characteristicId:write_id,
  value: buf,
  success: function (res) {
    console.log(buf);
  },
  fail(res){
    console.log(res);
  }
})
function hexStringToArrayBuffer(str) {
  if (!str) {
    return new ArrayBuffer(0);
  }
  var buffer = new ArrayBuffer(str.length);
  let dataView = new DataView(buffer)
  let ind = 0;
  for (var i = 0, len = str.length; i < len; i += 2) {
    let code = parseInt(str.substr(i, 2), 16)
    dataView.setUint8(ind, code)
    ind++
  }
  return buffer;
}
(9) 所有都通訊完畢後可以斷開連線:
wx.closeBLEConnection({
  deviceId: device_id,
  success(res) {
    console.log(res)
  },
  fail(res) {
    console.log(res)
  }
})
wx.closeBluetoothAdapter({
  success: function (res) {
    console.log(res)
  }
})
5. 完整例子
這裡為了簡潔,把fail等異常處理已經省去,主要流程就是設定裝置ID和服務ID的過濾值,在開啟notify之後寫入測試訊息,然後監聽藍芽傳送過來的訊息,整個過程採用簡化處理,沒有使用事件通訊來驅動,僅做參考。
let blueApi = {
  cfg:{
    device_info:"AAA",
    server_info:"BBB",
    onOpenNotify:null
  },
  blue_data:{
    device_id:"",
    service_id:"",
    write_id:""
  },
  setCfg(obj){
    this.cfg = Object.assign({},this.cfg,obj);
  },
  connect(){
    if(!wx.openBluetoothAdapter){
      this.showError("當前微信版本過低,無法使用該功能,請升級到最新微信版本後重試。");
      return;
    }
    var _this = this;
    wx.openBluetoothAdapter({
      success: function (res) {
      },
      complete(res){
        wx.onBluetoothAdapterStateChange(function(res) {
          if(res.available){
            setTimeout(function(){
              _this.connect();
            },2000);
          }
        })
        _this.getBlueState();
      }
    })
  },
  //傳送訊息
  sendMsg(msg,toArrayBuf = true) {
    let _this = this;
    let buf = toArrayBuf ? this.hexStringToArrayBuffer(msg) : msg;
    wx.writeBLECharacteristicValue({
      deviceId: _this.blue_data.device_id,
      serviceId: _this.blue_data.service_id,
      characteristicId:_this.blue_data.write_id,
      value: buf,
      success: function (res) {
        console.log(res);
      }
    })
  },
  //監聽訊息
  onNotifyChange(callback){
    var _this = this;
    wx.onBLECharacteristicValueChange(function (res) {
      let msg = _this.arrayBufferToHexString(res.value);
      callback && callback(msg);
      console.log(msg);
    })
  },
  disconnect(){
    var _this = this;
    wx.closeBLEConnection({
      deviceId: _this.blue_data.device_id,
      success(res) {
      }
    })
  },
  /*事件通訊模組*/

  /*連線裝置模組*/
  getBlueState() {
    var _this = this;
    if(_this.blue_data.device_id != ""){
      _this.connectDevice();
      return;
    }

    wx.getBluetoothAdapterState({
      success: function (res) {
        if (!!res && res.available) {//藍芽可用
          _this.startSearch();
        }
      }
    })
  },
  startSearch(){
    var _this = this;
    wx.startBluetoothDevicesDiscovery({
      services:[],
      success(res) {
        wx.onBluetoothDeviceFound(function(res){
          var device = _this.filterDevice(res.devices);
          if(device){
            _this.blue_data.device_id = device.deviceId;
            _this.stopSearch();
            _this.connectDevice();
          }
        });
      }
    })
  },
  //連線到裝置
  connectDevice(){
    var _this = this;
    wx.createBLEConnection({
      deviceId: _this.blue_data.device_id,
      success(res) {
        _this.getDeviceService();
      }
    })
  },
  //搜尋裝置服務
  getDeviceService(){
    var _this = this;
    wx.getBLEDeviceServices({
      deviceId: _this.blue_data.device_id,
      success: function (res) {
        var service_id = _this.filterService(res.services);
        if(service_id != ""){
          _this.blue_data.service_id = service_id;
          _this.getDeviceCharacter();
        }
      }
    })
  },
  //獲取連線裝置的所有特徵值
  getDeviceCharacter() {
    let _this = this;
    wx.getBLEDeviceCharacteristics({
      deviceId: _this.blue_data.device_id,
      serviceId: _this.blue_data.service_id,
      success: function (res) {
        let notify_id,write_id,read_id;
        for (let i = 0; i < res.characteristics.length; i++) {
          let charc = res.characteristics[i];
          if (charc.properties.notify) {
            notify_id = charc.uuid;
          }
          if(charc.properties.write){
            write_id = charc.uuid;
          }
          if(charc.properties.write){
            read_id = charc.uuid;
          }
        }
        if(notify_id != null && write_id != null){
          _this.blue_data.notify_id = notify_id;
          _this.blue_data.write_id = write_id;
          _this.blue_data.read_id = read_id;

          _this.openNotify();
        }
      }
    })
  },
  openNotify(){
    var _this = this;
    wx.notifyBLECharacteristicValueChange({
        state: true,
        deviceId: _this.blue_data.device_id,
        serviceId: _this.blue_data.service_id,
        characteristicId: _this.blue_data.notify_id,
        complete(res) {
          setTimeout(function(){
            _this.onOpenNotify && _this.onOpenNotify();
          },1000);
          _this.onNotifyChange();//接受訊息
        }
    })
  },
  /*連線裝置模組*/


  /*其他輔助模組*/
  //停止搜尋周邊裝置
  stopSearch() {
    var _this = this;
    wx.stopBluetoothDevicesDiscovery({
      success: function (res) {
      }
    })
  },
  arrayBufferToHexString(buffer) {
    let bufferType = Object.prototype.toString.call(buffer)
    if (buffer != '[object ArrayBuffer]') {
      return
    }
    let dataView = new DataView(buffer)

    var hexStr = '';
    for (var i = 0; i < dataView.byteLength; i++) {
      var str = dataView.getUint8(i);
      var hex = (str & 0xff).toString(16);
      hex = (hex.length === 1) ? '0' + hex : hex;
      hexStr += hex;
    }

    return hexStr.toUpperCase();
  },
  hexStringToArrayBuffer(str) {
    if (!str) {
      return new ArrayBuffer(0);
    }

    var buffer = new ArrayBuffer(str.length);
    let dataView = new DataView(buffer)

    let ind = 0;
    for (var i = 0, len = str.length; i < len; i += 2) {
      let code = parseInt(str.substr(i, 2), 16)
      dataView.setUint8(ind, code)
      ind++
    }

    return buffer;
  }
  //過濾目標裝置
  filterDevice(device){
    var data = blueApi.arrayBufferToHexString(device.advertisData);
    if (data && data.indexOf(this.device_info.substr(4).toUpperCase()) > -1) {
        var obj = { name: device.name, deviceId: device.deviceId }
        return obj
    }
    else{
      return null;
    }
  },
  //過濾主服務
  filterService(services){
    let service_id = "";
    for(let i = 0;i<services.length;i++){
      if(services[i].uuid.toUpperCase().indexOf(this.server_info) != -1){
        service_id = services[i].uuid;
        break;
      }
    }

    return service_id;
  }
  /*其他輔助模組*/
}

blueApi.setCfg({
    device_info:"AAA",
    server_info:"BBB",
    onOpenNotify:function(){
      blueApi.sendMsg("test");
    }
})
blueApi.connect();
blueApi.onNotifyChange(function(msg){
  console.log(msg);
})
6. 跳坑總結
(1) 等待響應:很多情況下需要等待裝置響應,尤其在IOS環境下,比如
監聽到藍芽開啟後,不能馬上開始搜尋,需要等待2秒
開啟notify以後,不能馬上傳送訊息,需要等待1秒
(2) Mac和UUID:安卓的mac地址是可以獲取到的所以裝置的ID是固定的,但是IOS是獲取不到MAC地址的,只能獲取裝置的UUID,而且是動態的,所以需要使用其他方法來查詢。
(3) IOS下只有搜尋可以省略,如果你知道了裝置的ID,服務ID和各種特徵值ID,在安卓下可以直接連線,然後傳送訊息,省去搜索裝置,搜尋服務和搜尋特徵值的過程,但是在IOS下,只能指定裝置ID連線,後面的過程是不能省略的。
(4) 監聽到的訊息要進行過濾處理,有些裝置會抽風一樣的傳送同樣的訊息,需要在處理邏輯裡面去重。
(5) 操作完成後要及時關閉連線,同時也要關閉藍芽裝置,否則安卓下再次進入會搜尋不到裝置除非關閉小程式程序再進才可以,IOS不受影響。
wx.closeBLEConnection({
      deviceId: _this.blue_data.device_id,
      success(res) {
      },
      fail(res) {
      }
    })
  wx.closeBluetoothAdapter({
      success(res){
      },
      fail(res){
      }
    })
除了以上的常見問題,你還需要處理很多異常情況,比如藍芽中途關閉,網路斷開,GPS未開啟等等場景,總之和硬體裝置打交道跟純UI互動還是有很大的差別的。

