
html分頁查詢實現案例
阿新 • • 發佈:2018-12-11
這裡主要運用了pagehelper的分頁外掛,大家可以在這個網址檢視怎麼使用:https://pagehelper.github.io/docs/howtouse/?tdsourcetag=s_pctim_aiomsg,下面我就拿我自己寫的一個案例給大家講一下
主要運用的技術:Mybatis+pagehelper分頁外掛+layui
基本專案結構: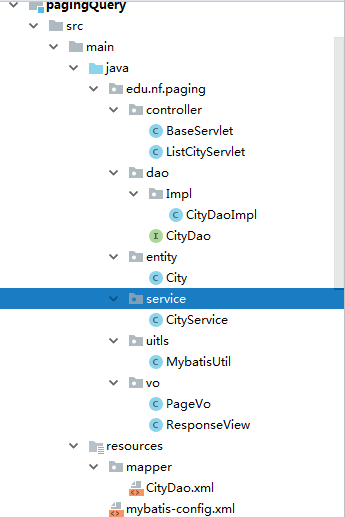
1.新建一個Maven專案,在Maven專案的pom.xml配置中新增分頁外掛的依賴,如下
<dependency> <groupId>com.github.pagehelper</groupId><artifactId>pagehelper</artifactId> <version>5.1.6</version> </dependency>
2.需要在mybatis-config.xml中配置分頁外掛
<?xml version="1.0" encoding="utf-8"?> <!DOCTYPE configuration PUBLIC "-//mybatis.org//DTD Config 3.0//EN" "http://mybatis.org/dtd/mybatis-3-config.dtd"> <configuration> <typeAliases> <package name="edu.nf.paging.entity"/> </typeAliases> <!--配置分頁外掛--> <plugins> <!--pageInterceptor是核心的分頁攔截器--> <plugin interceptor="com.github.pagehelper.PageInterceptor"> <!--配置攔截器的引數 --> <!-- 設定資料庫方言--> <property name="helperDialect" value="mysql"/> <!-- 設定分頁合理化,pageNum<=0 時會查詢第一頁, pageNum>pages(超過總數時),會查詢最後一頁--> <property name="reasonable" value="true"/> </plugin> </plugins> <environments default="mysql"> <environment id="mysql"> <transactionManager type="JDBC"/> <dataSource type="POOLED"> <property name="driver" value="com.mysql.jdbc.Driver"/> <property name="url" value="jdbc:mysql://localhost:3306/mydb?useSSL=true&useUnicode=true&characterEncoding=utf-8"/> <property name="username" value="root"/> <property name="password" value="root"/> </dataSource> </environment> </environments> <mappers> <!--<mapper class="edu.nf.mybatis3.dao.ClazzInfo"></mapper>--> <mapper resource="mapper/CityDao.xml"></mapper> </mappers> </configuration>
3.資料庫查詢介面類:
package edu.nf.paging.dao;

import edu.nf.paging.entity.City;
import org.apache.ibatis.annotations.ResultMap;
import org.apache.ibatis.annotations.Select;

import java.util.List;

/**
 * @Author lance
 * @Date 2018/9/20 0020
 */
public interface CityDao {

    @Select("select * from city_info")
    @ResultMap("edu.nf.paging.dao.CityDao.CityMap")
    List<City> listCity();
}
4.介面實現類:
package edu.nf.paging.dao.Impl;

import edu.nf.paging.dao.CityDao;
import edu.nf.paging.entity.City;
import edu.nf.paging.uitls.MybatisUtil;
import org.apache.ibatis.session.SqlSession;

import java.util.List;

/**
 * 描述:
 * 實現類
 *
 * @author lance
 * @create 2018-09-20 10:41
 */
public class CityDaoImpl implements CityDao {
    @Override
    public List<City> listCity() {
        SqlSession session = MybatisUtil.getSession();
        List<City> list = null;
        try {
            CityDao dao = session.getMapper(CityDao.class);
            list = dao.listCity();
        } catch (Exception e) {
            e.printStackTrace();
            throw new RuntimeException(e.getMessage());
        } finally {
            session.close();
        }
        return list;
    }
}
5.在業務邏輯層將資料庫中查詢出來的資料封裝到PageInfo物件集合中(分頁外掛中的一個類):
package edu.nf.paging.service;

import com.github.pagehelper.PageHelper;
import com.github.pagehelper.PageInfo;
import edu.nf.paging.dao.CityDao;
import edu.nf.paging.dao.Impl.CityDaoImpl;
import edu.nf.paging.entity.City;

import java.util.List;

/**
 * 描述:
 * 業務層
 *
 * @author lance
 * @create 2018-09-20 11:31
 */
public class CityService {
    /**
     * 查詢城市資訊,並封裝成pageInfo物件
     * pageInfo物件包含了所有的城市資訊
     * page:表示從第幾頁開始
     * limit:表示查詢多少條資料
     * */
    public PageInfo<City> listCity(Integer page,Integer limit){
        //設定分頁
        PageHelper.startPage(page,limit);
        //拿到所有的城市資訊
        CityDao dao = new CityDaoImpl();
        List<City> list = dao.listCity();
        //將城市資訊存放到pageInfo物件中
        PageInfo<City> pageInfo = new PageInfo<>(list);
        return pageInfo;
    }
}
6.兩個檢視物件,主要用於對資料的封裝,返回到html頁面中
package edu.nf.paging.vo;

import com.github.pagehelper.PageInfo;

/**
 * 描述:
 * 分頁響應檢視
 * 這個vo專門用於分頁使用,繼承ResponseView
 * @author lance
 * @create 2018-09-20 11:52
 *
 */
public class PageVo extends ResponseView{

    /**
     * 為layui外掛準備一個總記錄數,用於頁面外掛的使用
     * */
    private Long count;

    public Long getCount() {
        return count;
    }

    public void setCount(Long count) {
        this.count = count;
    }
}
package edu.nf.paging.vo;

/**
 * 描述:
 * 檢視響應
 *
 * @author lance
 * @create 2018-09-20 11:47
 */
public class ResponseView {
    private Integer code = 200;
    private String message;
    private Object data;

    public Integer getCode() {
        return code;
    }

    public void setCode(Integer code) {
        this.code = code;
    }

    public String getMessage() {
        return message;
    }

    public void setMessage(String message) {
        this.message = message;
    }

    public Object getData() {
        return data;
    }

    public void setData(Object data) {
        this.data = data;
    }
}
7.控制層
BaseServlet:主要用於封裝兩個檢視物件,返回html頁面中,繼承HttpServlet,作用:當有一些用到分頁時和沒用到分頁時都可以從父類中直接拿到檢視物件來進行封裝,不用分頁的寫一個方法,不分頁的也寫一個方法,而且這個類中還繼承HttpServlet,我們可以直接繼承BaseServlet這個類時就可以了
package edu.nf.paging.controller;

import com.github.pagehelper.PageInfo;
import edu.nf.paging.vo.PageVo;
import edu.nf.paging.vo.ResponseView;

import javax.servlet.http.HttpServlet;

/**
 * 描述:
 * 這個類主要用於封裝檢視物件返回到html頁面中,繼承HttpServlet(面向物件的思想)
 *
 * @author lance
 * @create 2018-09-20 11:46
 */
public class BaseServlet extends HttpServlet {

    /**
     * 封裝PageVo的物件
     * */
    protected PageVo pageVo(PageInfo<?> pageInfo){
        PageVo vo = new PageVo();
        //layui的狀態響應碼為0
        vo.setCode(0);
        //將分頁的list設定到vo的data中來
        vo.setData(pageInfo.getList());
        //設定分頁的總數
        vo.setCount(pageInfo.getTotal());
        return vo;
    }
    /**
     * 封裝ResponseView的物件(不需要分頁的資料)
     * */
    protected ResponseView responseView(Object data){
        ResponseView vo = new ResponseView();
        vo.setData(data);
        return vo;
    }
    /**
     * 封裝ResponseView的物件的錯誤訊息
     * */
    protected ResponseView responseView(Integer code ,String message){
        ResponseView vo = new ResponseView();
        vo.setCode(code);
        vo.setMessage(message);
        return vo;
    }

}
8.與直接頁面互動的,將資料封裝成json返回到頁面中:
package edu.nf.paging.controller;

import com.github.pagehelper.PageInfo;
import com.google.gson.Gson;
import edu.nf.paging.entity.City;
import edu.nf.paging.service.CityService;
import edu.nf.paging.vo.PageVo;

import javax.servlet.ServletException;
import javax.servlet.annotation.WebServlet;
import javax.servlet.http.HttpServlet;
import javax.servlet.http.HttpServletRequest;
import javax.servlet.http.HttpServletResponse;
import java.io.IOException;

/**
 * 描述:
 * 分頁
 *
 * @author lance
 * @create 2018-09-20 11:41
 */
@WebServlet("/listCity")
public class ListCityServlet extends BaseServlet {
    @Override
    protected void service(HttpServletRequest req, HttpServletResponse resp) throws ServletException, IOException {
        resp.setContentType("application/json;charset=utf-8");
        //從頁面中拿到頁數和行數(這兩個是預設就有的)
        String pageStr = req.getParameter("page");
        String limitStr = req.getParameter("limit");
        //轉為Integer型別的
        Integer page = Integer.valueOf(pageStr);
        Integer limit = Integer.valueOf(limitStr);
        //從業務層拿到list集合中的資料
        CityService service = new CityService();
        //將list集合中的資料存放到PageInfo物件集合中
        PageInfo<City> pageInfo = service.listCity(page,limit);
        //用檢視層將資料封裝起來
        PageVo vo = pageVo(pageInfo);
        //將檢視層資料封裝成json物件寫回頁面
        String json = new Gson().toJson(vo);
        resp.getWriter().print(json);
    }
}
9.html頁面程式碼
注:因為這裡用到layui,大家要在layui官網下載layui的外掛,這是官網地址:https://www.layui.com/
https://www.layui.com/doc/ 這是layui的API文件說明,大家有興趣可以學習一下
<!DOCTYPE html>
<html>
<head>
    <meta charset="utf-8">
    <title>城市列表</title>
    <meta name="renderer" content="webkit">
    <meta http-equiv="X-UA-Compatible" content="IE=edge,chrome=1">
    <meta name="viewport" content="width=device-width, initial-scale=1, maximum-scale=1">
    <link rel="stylesheet" href="layui/css/layui.css"  media="all">
    <!-- 注意:如果你直接複製所有程式碼到本地,上述css路徑需要改成你本地的 -->
</head>
<body>

<table class="layui-hide" id="test"></table>


<script src="layui/layui.js" charset="utf-8"></script>
<!-- 注意:如果你直接複製所有程式碼到本地,上述js路徑需要改成你本地的 -->

<script>
    //模組化匯入
    layui.use(['table'], function(){
        //使用table物件
        var table = layui.table;
        //使用table物件
        table.render({
            elem: '#test' //對應表格的id
            ,url:'listCity' //後臺請求
            ,cols: [[ //設定表頭資訊,field指定返回json中的欄位名(也就是你實體類的欄位名)
                //title:表的列名
                {field:'cityId', width:'20%', title: '城市編號'}
                ,{field:'cityCn', width:'20%', title: '城市名稱'}
                ,{field:'countryCode', width:'20%', title: 'CN'}
                ,{field:'countryCn', width: '20%', title: '國家名稱'}
                ,{field:'provinceCn', width: '20%', title: '省份'}
            ]]
            ,page: true //啟用分頁
        });
    });
</script>

</body>
</html>
最後附上實現頁面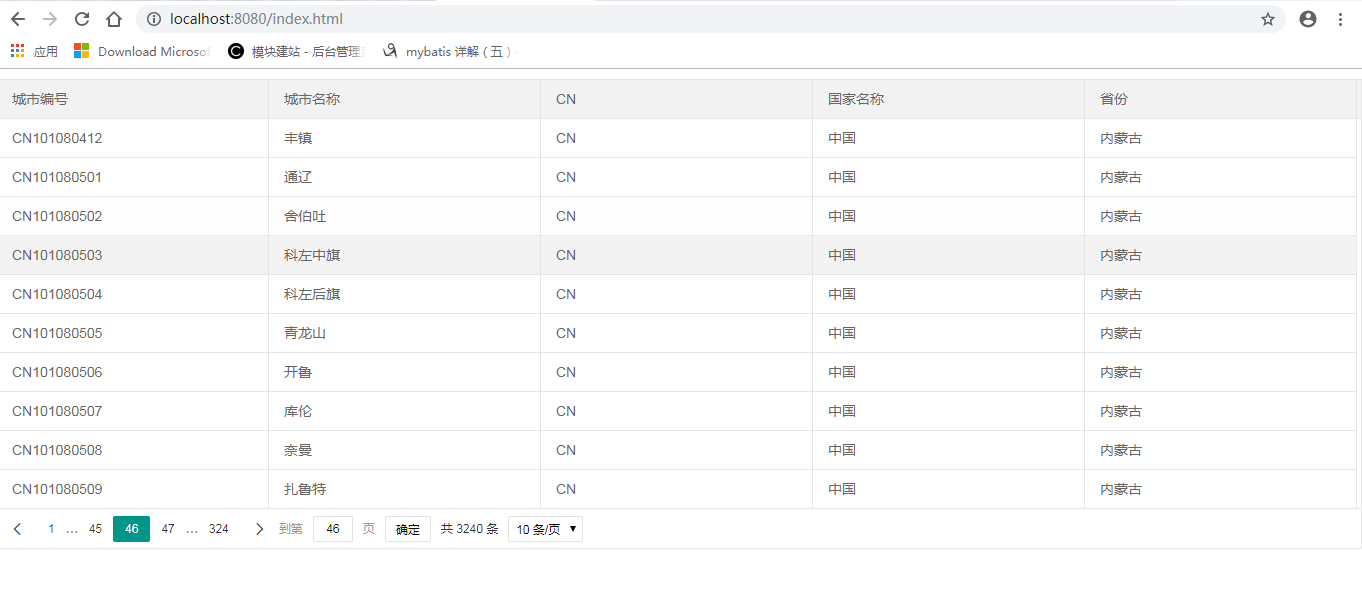
好了,大家如果有什麼不懂可以留言問我,我會盡力幫助大家解答