
Go語言的介面
一、介面的定義和好處
我們都知道介面給類提供了一種多型的機制,什麼是多型,多型就是系統根據型別的具體實現完成不同的行為。
以下程式碼簡單說明了介面的作用
package main import ( "fmt" "io" "net/http" "os" ) // init 在main 函式之前呼叫 func init() { if len(os.Args) != 2 { fmt.Println("Usage: ./example2 <url>") os.Exit(-1) } } // main 是應用程式的入口func main() { // 從Web 伺服器得到響應 r, err := http.Get(os.Args[1]) if err != nil { fmt.Println(err) return } // 從Body 複製到Stdout io.Copy(os.Stdout, r.Body) if err := r.Body.Close(); err != nil { fmt.Println(err) } }
①注意下 http.Get(os.Args[1]) 這裡他的返回值r是一個Response物件的指標,也就是請求的結果
做過web開發的都知道,下面是原始碼
func Get(url string) (resp *Response, err error) {
    return DefaultClient.Get(url)
}
以下是Response的結構,這裡有一個Body,是一個io.ReadCloser型別的,這是啥?往下看
type Response struct { Status string // e.g. "200 OK" StatusCode int // e.g. 200 Proto string // e.g. "HTTP/1.0" ProtoMajor int// e.g. 1 ProtoMinor int // e.g. 0 Header Header Body io.ReadCloser ContentLength int64 TransferEncoding []string Close bool Uncompressed bool Trailer Header Request *Request TLS *tls.ConnectionState }
ReadCloser是一個介面哦!Reader和Closer也同樣是介面,接口裡面都是方法。
type ReadCloser interface {
    Reader
    Closer
}
Reader介面
type Reader interface {
    Read(p []byte) (n int, err error)
}
Closer介面
type Closer interface {
    Close() error
}
②io.Copy(os.Stdout, r.Body) 這個方法,檢視原始碼如下
func Copy(dst Writer, src Reader) (written int64, err error) {
    return copyBuffer(dst, src, nil)
}
這裡的輸入引數dst是一個實現了Writer介面的物件,而src則是一個實現了Reader介面的物件,由此,我們可以知道為什麼io.Copy(os.Stdout, r.Body)的第二個引數可以傳r.Body了,因為①中展示了Body這個物件是實現了Reader介面的。同理os.Stdout物件這個介面值表示標準輸出裝置,並且已經實現了io.Writer 介面
補充:http://www.flysnow.org/2017/05/08/go-in-action-go-reader-writer.html 這篇文章解釋了stdout是怎麼樣繼承了Reader和Writer介面的。
os.Stdout返回的是一個*File, File裡面只有一個*file,而*file是實現了下面兩個介面的,下面是Go的原始碼
func (f *File) Read(b []byte) (n int, err error) {
    if err := f.checkValid("read"); err != nil {
        return 0, err
    }
    n, e := f.read(b)
    return n, f.wrapErr("read", e)
}

func (f *File) Write(b []byte) (n int, err error) {
    if err := f.checkValid("write"); err != nil {
        return 0, err
    }
    n, e := f.write(b)
    if n < 0 {
        n = 0
    }
    if n != len(b) {
        err = io.ErrShortWrite
    }

    epipecheck(f, e)

    if e != nil {
        err = f.wrapErr("write", e)
    }

    return n, err
}
所以說*File本身是繼承了Writer和Reader介面的型別。
綜上有了引數或者返回值是介面型別,就不用關注於具體的返回型別是什麼,只要實現了的介面的方法都是可以被接受的。
二、介面值和實際物件值是怎麼轉化和儲存的
我們都知道 如果一個型別實現了某個介面,那麼這個型別的實際值是可以賦值給一個介面的變數的。
在C#中是這樣的,例如將一個List賦值給一個IEnumerable型別的變數
IEnumerable<int> list = new List<int>();
在Go語言中也是這樣的,請看下面的程式碼
package main

import (
    "fmt"
)

type eat interface{
    eat()(string)
}

type Bird struct
{
    Name string
}

func (bird Bird) eat()string{
    return "Bird:"+bird.Name+" eat"
}

func print(e eat){
    fmt.Println(e.eat())
}

// main 是應用程式的入口
func main() {

    bird1:= Bird{Name:"Big"}
    bird2:= new(Bird)
    bird2.Name = "Small"

    print(bird1)
    print(bird2)

    var eat1 eat
    eat1 = bird1
    print(eat1)
}
結果
Bird:Big eat

Bird:Small eat

Bird:Big eat
這裡定義了一個eat介面,有一個Bird的型別實現了該介面,print函式接受一個eat介面型別的引數,
這裡可以看到前兩次直接把bird1和bird2作為引數傳入到print函式內,第二次則是聲明瞭一個eat介面型別的變數eat1,然後將bird1進行了賦值。換句話說介面型別變數實際承載了實際型別值。這裡是如何承載的呢?
這裡我們把 eat1 稱作 介面值,將bird1稱作實體型別值,eat1和bird1的關係如下:

介面值可以看成兩部分組合(都是指標)而成的。第一部分是【iTable的地址】第二部分是【實體型別值的地址】
關於interface的解析:
https://www.cnblogs.com/qqmomery/p/6298771.html
三、方法集的概念
簡單的講:方法集定義了介面的接受規則
舉例說明:
package main

import (
    "fmt"
)

type notifier interface {
    notify()
}

type user struct {
    name string
    email string
}

func (u user) notify() {
    fmt.Printf("Sending user email to %s<%s>\n",
        u.name,
        u.email)
}

func sendNotification(n notifier) {
    n.notify()
}

func main() {
    u := user{"Bill", "[email protected]"}
    sendNotification(u)

}
如上程式碼,定義了一個notifier介面,有一個方法nitify()方法,定義了一個user型別的結構,實現了notify方法,接收者型別是user,即實現了notifier介面,又定義了一個sendNotification方法,接收一個實現notifier介面的型別,並呼叫notify方法。
func (u *user) notify() {
    fmt.Printf("Sending user email to %s<%s>\n",
        u.name,
        u.email)
}

func main() {
    u := user{"Bill", "[email protected]"}
    sendNotification(u)
}
現在修正一下程式碼,將接收者改為user的指標型別。此時會發現原來呼叫的地方會出現錯誤。
cannot use u (type user) as type notifier in argument to sendNotification:user does not implement notifier (notify method has pointer receiver)
不能將u(型別是user)作為sendNotification 的引數型別notifier:user 型別並沒有實現notifier(notify 方法使用指標接收者宣告)
為什麼會出現上面的問題?要了解用指標接收者來實現介面時為什麼user 型別的值無法實現該介面,需要先了解方法集。方法集定義了一組關聯到給定型別的值或者指標的方法。
定義方法時使用的接收者的型別決定了這個方法是關聯到值,還是關聯到指標,還是兩個都關聯。
補充資料:
https://studygolang.com/articles/9681
https://www.kancloud.cn/liupengjie/go/570054
以下是Go語言規範中的方法集:
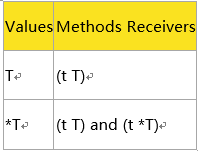
上表的意思是:型別的值只能實現值接收者的介面;指向型別的指標,既可以實現值接收者的介面,也可以實現指標接收者的介面。
從接收者的角度來看一下這些規則
如果是值接收者,實體型別的值和指標都可以實現對應的介面;如果是指標接收者,那麼只有型別的指標能夠實現對應的介面。
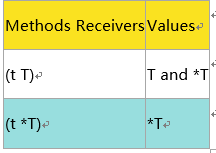
所以針對上面的問題,將傳入的u變成傳入地址就可以了(可以套用一下表格,接收者*user對應的values是*user,所以傳地址對應上面表格淺藍色部分)
func (u *user) notify() {
fmt.Printf("Sending user email to %s<%s>\n",
u.name,
u.email)
}
func main() {
u := user{"Bill", "[email protected]"}
sendNotification(&u)
}
綜上我們總結一下,也就是說如果你的方法的接受者的型別是指標型別,那麼方法的實現者就只能是指向該型別的指標型別,如果方法的接收者是值型別,那麼方法的實現者可以是值型別也可以是指向該型別的指標型別。
面試題一個,下面的程式碼能否編譯通過?
package main
import (
    "fmt"
)
type People interface {
    Speak(string) string
}
type Stduent struct{}
func (stu *Stduent) Speak(think string) (talk string) {
    if think == "bitch" {
        talk = "You are a good boy"
    } else {
        talk = "hi"
    }
    return
}
func main() {
    var peo People = Stduent{}
    think := "bitch"
    fmt.Println(peo.Speak(think))
}
答案:不能。
分析:首先Speak的方法的接收者是*Student , 根據上面的規則,那麼實現該方法的實現者只能是 *Student,但是 var peo People = Student{} 這裡卻將Student作為實現者賦值給了介面,這裡就會出現問題。
補充:書上解釋這個規則,為什麼會有這種限制的原因,說的是golang不是總能找到值的地址,這個地方不是很明白,可以參考下面的資料進行分析https://segmentfault.com/q/1010000015316158
簡單解釋:就是因為 Integer(25).pretty() 將被優化成一個整數(常量)25 呼叫 pretty 函式 。
裡面涉及到了一個 可定址物件的問題,可以參考下面的連線
https://colobu.com/2018/02/27/go-addressable/
下面的連線,說明了為什麼Integer(25) 將被優化成一個整數(常量)25
Because literal values are constants in Go, they only exist at compile time and don’t have an address.
https://www.ardanlabs.com/blog/2017/07/interface-semantics.html
https://segmentfault.com/a/1190000002687627 字面量的定義
Integer(25) 是一個字面量,而字面量是一個常量,所以沒有辦法定址
四、多型
// Sample program to show how polymorphic behavior with interfaces.
package main

import (
    "fmt"
)

type notifier interface {
    notify()
}

// user defines a user in the program.
type user struct {
    name string
    email string
}

func (u *user) notify() {
    fmt.Printf("Sending user email to %s<%s>\n",
        u.name,
        u.email)
}

type admin struct {
    name string
    email string
}

func (a *admin) notify() {
    fmt.Printf("Sending admin email to %s<%s>\n",
        a.name,
        a.email)
}

// main is the entry point for the application.
func main() {
    // Create a user value and pass it to sendNotification.
    bill := user{"Bill", "[email protected]"}
    sendNotification(&bill)

    // Create an admin value and pass it to sendNotification.
    lisa := admin{"Lisa", "[email protected]"}
    sendNotification(&lisa)
}

func sendNotification(n notifier) {
    n.notify()
}
上面的程式碼很好的說明的介面的多型,user和admin都實現了notify方法,既實現了的notifier介面,sendNotification函式接收一個實現notifier介面的例項,從而user和admin都可以當作引數使用sendNotification函式,而sendNotification裡面的notify方法執行根據的是具體傳入的例項中實現的方法。