
Spring Boot RabbitMQ 延遲訊息實現完整版
概述
曾經去網易面試的時候,面試官問了我一個問題,說
下完訂單後,如果使用者未支付,需要取消訂單,可以怎麼做
我當時的回答是,用定時任務掃描DB表即可。面試官不是很滿意,提出:
用定時任務無法做到準實時通知,有沒有其他辦法?
我當時的回答是:
可以用佇列,訂單下完後,傳送一個訊息到佇列裡,並指定過期時間,時間一到,執行回撥介面。
面試官聽完後,就不再問了。其實我當時的思路是對的,只不過講的不是很專業而已。專業說法是利用延遲訊息。
其實用定時任務,確實有點問題,原本業務系統希望10分鐘後,如果訂單未支付,就馬上取消訂單,並釋放商品庫存。但是一旦資料量大的話,就會加長獲取未支付訂單資料的時間,部分訂單就做不到10分鐘後取消了,可能是15分鐘,20分鐘之類的。這樣的話,庫存就無法及時得到釋放,也就會影響成單數。而利用延遲訊息,則理論上是可以做到按照設定的時間,進行訂單取消操作的。
目前網上關於使用RabbitMQ實現延遲訊息的文章,大多都是講如何利用RabbitMQ的死信佇列來實現,實現方案看起來都很繁瑣複雜,並且還是使用原始的RabbitMQ Client API來實現的,更加顯得囉嗦。
Spring Boot 已經對RabbitMQ Client API進行了包裝,使用起來簡潔很多,下面詳細介紹一下如何利用rabbitmq_delayed_message_exchange 外掛和Spring Boot來實現延遲訊息。
軟體準備
erlang
本文使用的版本是:
Erlang 20.3
RabbitMQ
本文使用的是window版本的RabbitMQ,版本號是:
3.7.4
rabbitmq_delayed_message_exchange外掛
外掛下載地址:
開啟網址後,ctrl + f,搜尋rabbitmq_delayed_message_exchange。
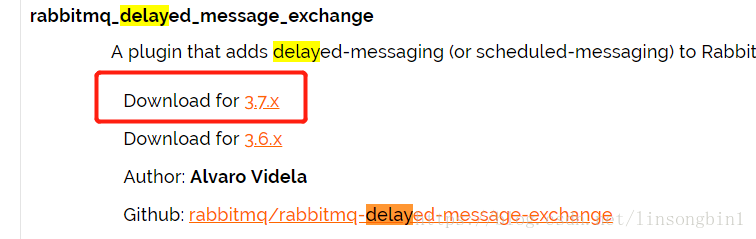
千萬記住,一定選好版本號,由於我使用的是RabbitMQ 3.7.4,因此對應的rabbitmq_delayed_message_exchange外掛也必須選擇3.7.x的。
如果沒有選對版本,在使用延遲訊息的時候,會遇到各種各樣的奇葩問題,而且網上還找不到解決方案。我因為這個問題,折騰了整整一個晚上。請牢記,要選對外掛版本。
下載完外掛後,將其放置到RabbitMQ安裝目錄下的plugins
rabbitmq-plugins enable rabbitmq_delayed_message_exchange
如果啟動成功會出現如下資訊:
The following plugins have been enabled: rabbitmq_delayed_message_exchange
啟動外掛成功後,記得重啟一下RabbitMQ,讓其生效。
整合RabbitMQ
這個就非常簡單了,直接在maven工程的pom.xml檔案中加入
<dependency>
        <groupId>org.springframework.boot</groupId>
        <artifactId>spring-boot-starter-amqp</artifactId>
</dependency>- 1
- 2
- 3
- 4
Spring Boot的版本我使用的是2.0.1.RELEASE.
接下來在application.properties檔案中加入redis配置:
spring.rabbitmq.host=127.0.0.1
spring.rabbitmq.port=5672
spring.rabbitmq.username=guest
spring.rabbitmq.password=guest- 1
- 2
- 3
- 4
定義ConnectionFactory和RabbitTemplate
也很簡單,程式碼如下:
package com.mq.rabbitmq;

import org.springframework.amqp.rabbit.connection.CachingConnectionFactory;
import org.springframework.amqp.rabbit.connection.ConnectionFactory;
import org.springframework.amqp.rabbit.core.RabbitTemplate;
import org.springframework.boot.context.properties.ConfigurationProperties;
import org.springframework.context.annotation.Bean;
import org.springframework.context.annotation.Configuration;

@Configuration
@ConfigurationProperties(prefix = "spring.rabbitmq")
public class RabbitMqConfig {
    private String host;
    private int port;
    private String userName;
    private String password;

    @Bean
    public ConnectionFactory connectionFactory() {
        CachingConnectionFactory cachingConnectionFactory = new CachingConnectionFactory(host,port);
        cachingConnectionFactory.setUsername(userName);
        cachingConnectionFactory.setPassword(password);
        cachingConnectionFactory.setVirtualHost("/");
        cachingConnectionFactory.setPublisherConfirms(true);
        return cachingConnectionFactory;
    }

    @Bean
    public RabbitTemplate rabbitTemplate() {
        RabbitTemplate rabbitTemplate = new RabbitTemplate(connectionFactory());
        return rabbitTemplate;
    }

    public String getHost() {
        return host;
    }

    public void setHost(String host) {
        this.host = host;
    }

    public int getPort() {
        return port;
    }

    public void setPort(int port) {
        this.port = port;
    }

    public String getUserName() {
        return userName;
    }

    public void setUserName(String userName) {
        this.userName = userName;
    }

    public String getPassword() {
        return password;
    }

    public void setPassword(String password) {
        this.password = password;
    }
}
- 1
- 2
- 3
- 4
- 5
- 6
- 7
- 8
- 9
- 10
- 11
- 12
- 13
- 14
- 15
- 16
- 17
- 18
- 19
- 20
- 21
- 22
- 23
- 24
- 25
- 26
- 27
- 28
- 29
- 30
- 31
- 32
- 33
- 34
- 35
- 36
- 37
- 38
- 39
- 40
- 41
- 42
- 43
- 44
- 45
- 46
- 47
- 48
- 49
- 50
- 51
- 52
- 53
- 54
- 55
- 56
- 57
- 58
- 59
- 60
- 61
- 62
- 63
- 64
- 65
- 66
Exchange和Queue配置
package com.mq.rabbitmq;

import org.springframework.amqp.core.*;
import org.springframework.context.annotation.Bean;
import org.springframework.context.annotation.Configuration;

import java.util.HashMap;
import java.util.Map;

@Configuration
public class QueueConfig {

    @Bean
    public CustomExchange delayExchange() {
        Map<String, Object> args = new HashMap<>();
        args.put("x-delayed-type", "direct");
        return new CustomExchange("test_exchange", "x-delayed-message",true, false,args);
    }

    @Bean
    public Queue queue() {
        Queue queue = new Queue("test_queue_1", true);
        return queue;
    }

    @Bean
    public Binding binding() {
        return BindingBuilder.bind(queue()).to(delayExchange()).with("test_queue_1").noargs();
    }
}
- 1
- 2
- 3
- 4
- 5
- 6
- 7
- 8
- 9
- 10
- 11
- 12
- 13
- 14
- 15
- 16
- 17
- 18
- 19
- 20
- 21
- 22
- 23
- 24
- 25
- 26
- 27
- 28
- 29
- 30
- 31
這裡要特別注意的是,使用的是CustomExchange,不是DirectExchange,另外CustomExchange的型別必須是x-delayed-message。
實現訊息傳送
package com.mq.rabbitmq;

import org.springframework.amqp.AmqpException;
import org.springframework.amqp.core.Message;
import org.springframework.amqp.core.MessagePostProcessor;
import org.springframework.amqp.rabbit.core.RabbitTemplate;
import org.springframework.beans.factory.annotation.Autowired;
import org.springframework.stereotype.Service;

import java.text.SimpleDateFormat;
import java.util.Date;

@Service
public class MessageServiceImpl {

    @Autowired
    private RabbitTemplate rabbitTemplate;

    public void sendMsg(String queueName,String msg) {
        SimpleDateFormat sdf = new SimpleDateFormat("yyyy-MM-dd HH:mm:ss");
        System.out.println("訊息傳送時間:"+sdf.format(new Date()));
        rabbitTemplate.convertAndSend("test_exchange", queueName, msg, new MessagePostProcessor() {
            @Override
            public Message postProcessMessage(Message message) throws AmqpException {
                message.getMessageProperties().setHeader("x-delay",3000);
                return message;
            }
        });
    }
}
- 1
- 2
- 3
- 4
- 5
- 6
- 7
- 8
- 9
- 10
- 11
- 12
- 13
- 14
- 15
- 16
- 17
- 18
- 19
- 20
- 21
- 22
- 23
- 24
- 25
- 26
- 27
- 28
- 29
- 30
- 31
注意在傳送的時候,必須加上一個header
x-delay
在這裡我設定的延遲時間是3秒。
訊息消費者
package com.mq.rabbitmq;

import org.springframework.amqp.rabbit.annotation.RabbitHandler;
import org.springframework.amqp.rabbit.annotation.RabbitListener;
import org.springframework.stereotype.Component;

import java.text.SimpleDateFormat;
import java.util.Date;

@Component
public class MessageReceiver {

    @RabbitListener(queues = "test_queue_1")
    public void receive(String msg) {
        SimpleDateFormat sdf = new SimpleDateFormat("yyyy-MM-dd HH:mm:ss");
        System.out.println("訊息接收時間:"+sdf.format(new Date()));
        System.out.println("接收到的訊息:"+msg);
    }
}- 1
- 2
- 3
- 4
- 5
- 6
- 7
- 8
- 9
- 10
- 11
- 12
- 13
- 14
- 15
- 16
- 17
- 18
- 19
執行Spring Boot程式和傳送訊息
直接在main方法裡執行Spring Boot程式,Spring Boot會自動解析MessageReceiver類的。
接下來只需要用Junit執行一下發送訊息的介面即可。
package com.mq.rabbitmq;

import org.junit.Test;
import org.junit.runner.RunWith;
import org.springframework.beans.factory.annotation.Autowired;
import org.springframework.boot.test.context.SpringBootTest;
import org.springframework.test.context.junit4.SpringRunner;

@RunWith(SpringRunner.class)
@SpringBootTest
public class RabbitmqApplicationTests {

    @Autowired
    private MessageServiceImpl messageService;

    @Test
    public void send() {
        messageService.sendMsg("test_queue_1","hello i am delay msg");
    }

}
- 1
- 2
- 3
- 4
- 5
- 6
- 7
- 8
- 9
- 10
- 11
- 12
- 13
- 14
- 15
- 16
- 17
- 18
- 19
- 20
- 21
- 22
執行完後,可以看到如下資訊:
訊息傳送時間:2018-05-03 12:44:53
3秒鐘後,Spring Boot控制檯會輸出:
訊息接收時間:2018-05-03 12:44:56 接收到的訊息:hello i am delay msg
--------------------- 本文來自 Sam哥哥 的CSDN 部落格 ,全文地址請點選:https://blog.csdn.net/linsongbin1/article/details/80178122?utm_source=copy