wordpress 安裝備忘
1. 先安裝資料庫 mariadb
1.1 指令
vi /etc/yum.repos.d/mariadb.repo
1.2 輸入以下內容儲存
[mariadb]
name = MariaDB
baseurl = http://yum.mariadb.org/10.3/centos7-amd64
gpgkey=https://yum.mariadb.org/RPM-GPG-KEY-MariaDB
gpgcheck=1
1.3 指令
yum install MariaDB-server MariaDB-client
1.4 執行 mariadb
systemctl start mysql
1.5 配置 mariadb, root 密碼等,根據提示操作
mysql_secure_installation
1.6 Linux配置mysql表明忽略大小寫
vi /etc/my.cnf
修改 (或新增)
lower_case_table_names=1
儲存後重啟mysql,over
systemctl restart mysql
二、下載 WordPress
1. 建立目錄 /opt/www
mkdir -p /opt/www
2. 進入該目錄
cd /opt/www
3. 下載最新WordPress
wget https://wordpress.org/latest.zip
4. 解壓到當前資料夾 /opt/www
unzip latest.zip

三、配置 WordPress
1. 進入wordpress 目錄
cd /opt/www/wordpress
2. 建立配置檔案(通過複製配置檔案模板)
cp wp-config-sample.php wp-config.php
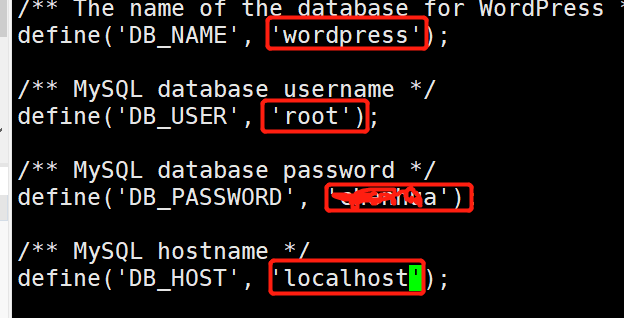
3. 修改資料連線資訊
vi wp-config.php

四、安裝php 7.2
1. 安裝 php,採用remi的源
yum -y install http://rpms.famillecollet.com/enterprise/remi-release-7.rpm
yum --enablerepo=remi,remi-php72 install php-fpm php-common
2. 安裝通用模組
yum --enablerepo=remi,remi-php72 install php-opcache php-pecl-apcu php-cli php-pear php-pdo php-mysqlnd php-pgsql php-pecl-mongodb php-pecl-redis php-pecl-memcache php-pecl-memcached php-gd php-mbstring php-mcrypt php-xml
3. 啟動
systemctl start php-fpm
五、安裝web伺服器nginx
1. 新增 nginx repo
vi /etc/yum.repos.d/nginx.repo
新增如下內容
[nginx]
name=nginx repo
baseurl=http://nginx.org/packages/centos/7/$basearch/
gpgcheck=0
enabled=1
2. 安裝yum
yum install nginx
3. 在 /etc/nginx/conf.d/ 下建立檔案 wordpress.conf 輸入如下 內容(我這裡刪除了預設配置檔案 default.conf ,也可以直接再default中改)
server {
listen 80;
server_name _;
index index.php index.html index.htm;
root /opt/www/wordpress;
location / {
try_files $uri $uri/ /index.php?q=$uri&$args;
}
error_page 404 /404.html;
error_page 500 502 503 504 /50x.html;
location = /50x.html {
root /opt/www/wordpress;
}
location ~ \.php$ {
try_files $uri =404;
fastcgi_pass unix:/var/run/php-fpm/php-fpm.sock;
fastcgi_index index.php;
fastcgi_param SCRIPT_FILENAME $document_root$fastcgi_script_name;
include fastcgi_params;
}
}
4. 配置 php 和 nginx (最好是用nginx+apache+php, 懶了, 直接 nginx+fastcgi php-fpm)
vi /etc/php-fpm.d/www.conf
修改如下:
user = nginx
group = nginx
listen.owner = nginx
listen.group = nginx
listen = 127.0.0.1:9000
listen = /var/run/php-fpm/php-fpm.sock
5. 配置資料夾許可權
chown -R nginx /opt/www/wordpress
6. 重啟 nginx 和 php-fpm
systemctl start php-fpm
systemctl start nginx
7. 建立資料庫
登入資料庫
mysql -u root -p 回車
輸入密碼後登入,
create database wordpress 回車,ok
開啟mysql遠端訪問(看你需要,如果之前沒有配置遠端訪問,還需要修改配置檔案,請自己百度)
GRANT ALL PRIVILEGES ON *.* TO 'root'@'%' IDENTIFIED BY 'password' WITH GRANT OPTION;
GRANT ALL PRIVILEGES ON *.* TO 'root'@'192.168.100.%' IDENTIFIED BY 'my-new-password' WITH GRANT OPTION;
六、不出什麼問題的話, 訪問ip,能夠看到如下介面

到此,安裝就結束了, 可以開始專心搞wordpress的東東了,
