【我的Android進階之旅】git 分支的使用
幾乎所有的版本控制系統都以某種形式支援分支。 使用分支意味著你可以把你的工作從開發主線上分離開來,以免影響開發主線。 在很多版本控制系統中,這是一個略微低效的過程——常常需要完全建立一個原始碼目錄的副本。對於大專案來說,這樣的過程會耗費很多時間。
有人把 Git 的分支模型稱為它的`‘必殺技特性’’,也正因為這一特性,使得 Git 從眾多版本控制系統中脫穎而出。 Git 處理分支的方式可謂是難以置信的輕量,建立新分支這一操作幾乎能在瞬間完成,並且在不同分支之間的切換操作也是一樣便捷。 與許多其它版本控制系統不同,Git 鼓勵在工作流程中頻繁地使用分支與合併,哪怕一天之內進行許多次。 理解和精通這一特性,你便會意識到 Git 是如此的強大而又獨特,並且從此真正改變你的開發方式。
分支簡介
Git 儲存的不是檔案的變化或者差異,而是一系列不同時刻的檔案快照。
在進行提交操作時,Git 會儲存一個提交物件(commit object)。知道了 Git 儲存資料的方式,我們可以很自然的想到——該提交物件會包含一個指向暫存內容快照的指標。 但不僅僅是這樣,該提交物件還包含了作者的姓名和郵箱、提交時輸入的資訊以及指向它的父物件的指標。首次提交產生的提交物件沒有父物件,普通提交操作產生的提交物件有一個父物件,而由多個分支合併產生的提交物件有多個父物件。
Git 的分支,騎士分支上僅僅是指向提交物件的可變指標。 Git的預設分支名字是 master 。在多次提交操作之後,你其實已經有一個指向最後那個提交物件的 master 分支。它會在每次的提交操作中自動向前移動。
注意: Git的 “master” 分支並不是一個特殊分支。它就跟其他分支完全沒有區別。之所以幾乎每一個倉庫都有 master 分支,是因為 git init 命令預設建立它,並且大多數人都懶得去改動它。
分支的建立
Git 建立新分支其實很簡單,它只是為你建立了一個可以移動的新的指標。例如,建立一個 testing 分支,你需要用 git branch 命令:
$ git branch testing- 1
這會在當前所在的提交物件上建立一個指標。
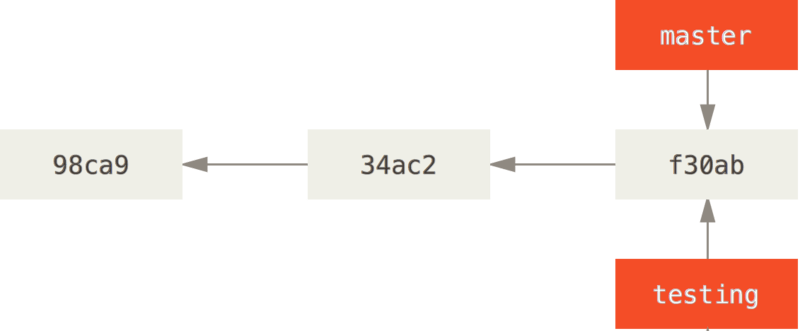
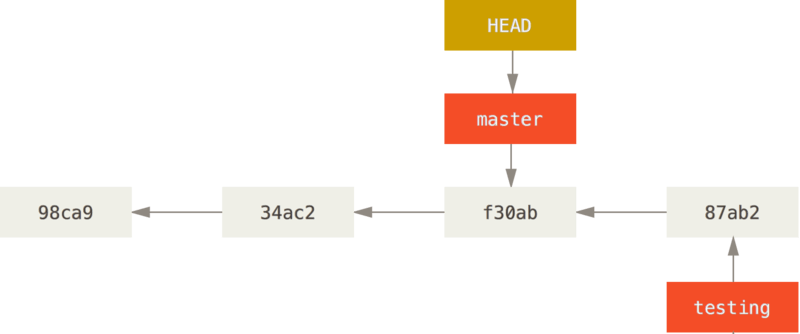
那麼,Git 是如何知道當前在哪一個分支上呢? 也很簡單,它有一個名為 HEAD 的特殊指標。 請注意它和許多其它版本控制系統(如 Subversion 或 CVS)裡的 HEAD 概念完全不同。 在 Git 中,它是一個指標,指向當前所在的本地分支
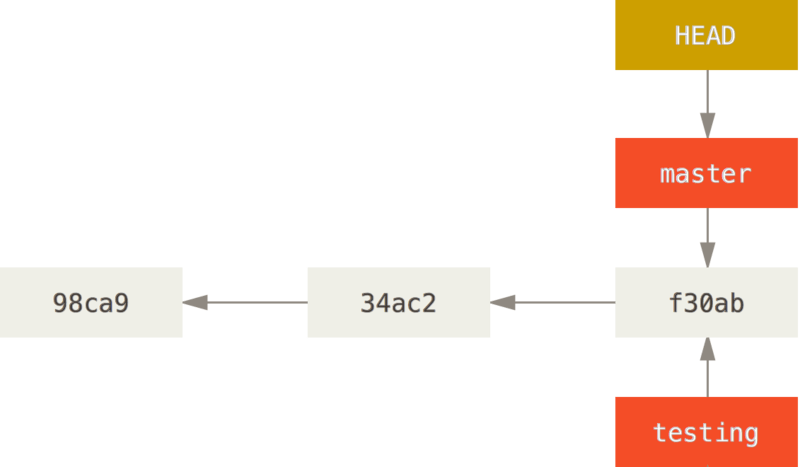
你可以簡單地使用 git log 命令檢視各個分支當前所指的物件。 提供這一功能的引數是 –decorate。
$ git log --oneline --decorate
f30ab (HEAD, master, testing) add feature #32 - ability to add new
34ac2 fixed bug #1328 - stack overflow under certain conditions
98ca9 initial commit of my project- 1
- 2
- 3
- 4
正如你所見,當前 “master” 和 “testing” 分支均指向校驗和以 f30ab 開頭的提交物件。
分支切換
要切換到一個已存在的分支,使用 git checkout 命令。現在我們切換到新建立的 testing 分支去:
$ git checkout testing- 1
這樣 HEAD 就指向 testing 分支了。
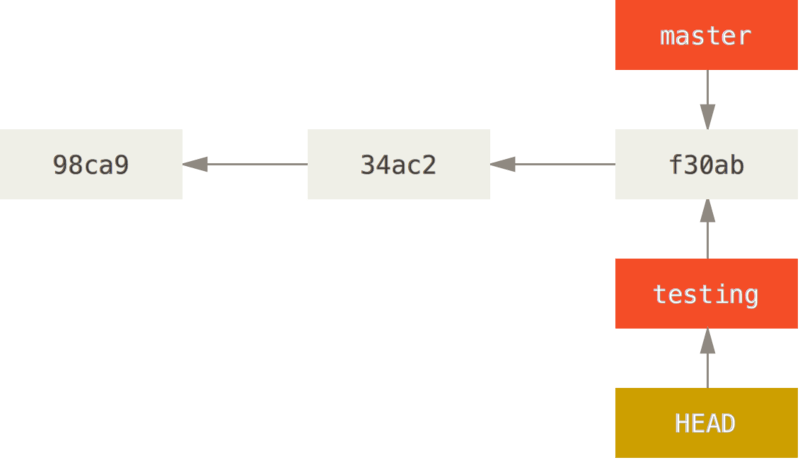
那麼,這樣的實現方式會給我們帶來什麼好處呢?現在改動下在提交一次:
$ vim test.rb
$ git commit -a -m 'made a change'- 1
- 2
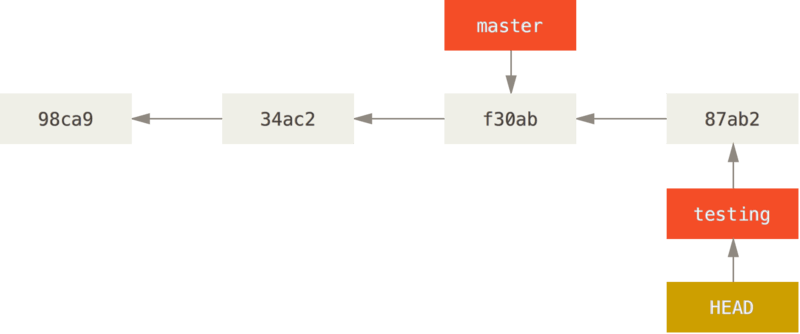
如圖所示,你的 testing 分支向前移動了,但是 master 分支卻沒有,它仍然指向執行 git checkout 時所指的物件。 這就有意思了,現在我們切換回 master 分支看看:
$ git checkout master- 1
這條命令做了兩件事。 一是使 HEAD 指回 master 分支,二是將工作目錄恢復成 master 分支所指向的快照內容。 也就是說,你現在做修改的話,專案將始於一個較舊的版本。 本質上來講,這就是忽略 testing 分支所做的修改,以便於向另一個方向進行開發。
分支切換會改變你工作目錄中的檔案
在切換分支時,一定要注意你工作目錄裡的檔案會被改變。 如果是切換到一個較舊的分支,你的工作目錄會恢復到該分支最後一次提交時的樣子。 如果 Git 不能幹淨利落地完成這個任務,它將禁止切換分支。
再稍微做些修改並提交:
$ vim test.rb
$ git commit -a -m 'made other changes'- 1
- 2
現在,這個專案的提交歷史已經產生了分叉。 因為剛才建立了一個新分支,並切換過去進行了一些工作,隨後又切換回 master 分支進行了另外一些工作。 上述兩次改動針對的是不同分支,你可以在不同分支間不斷地來回切換和工作,並在時機成熟時將它們合併起來。 而所有這些工作,你需要的命令只有 branch、checkout 和 commit。
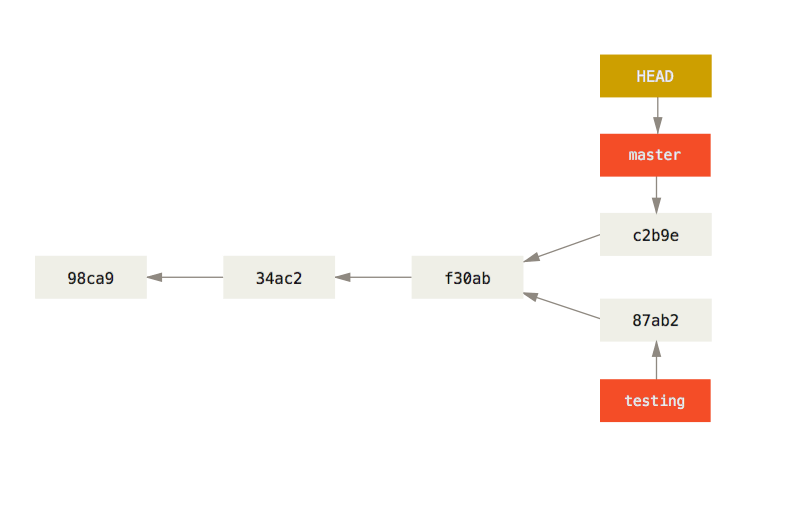
在使用 git log 命令檢視分叉歷史。 執行 git log –oneline –decorate –graph –all ,它會輸出你的提交歷史、各個分支的指向以及專案的分支分叉情況。
$ git log --oneline --decorate --graph --all
* c2b9e (HEAD, master) made other changes
| * 87ab2 (testing) made a change
|/
* f30ab add feature #32 - ability to add new formats to the
* 34ac2 fixed bug #1328 - stack overflow under certain conditions
* 98ca9 initial commit of my project- 1
- 2
- 3
- 4
- 5
- 6
- 7
由於 Git 的分支實質上僅是包含所指物件校驗和(長度為 40 的 SHA-1 值字串)的檔案,所以它的建立和銷燬都異常高效。 建立一個新分支就像是往一個檔案中寫入 41 個位元組(40 個字元和 1 個換行符),如此的簡單能不快嗎?
這與過去大多數版本控制系統形成了鮮明的對比,它們在建立分支時,將所有的專案檔案都複製一遍,並儲存到一個特定的目錄。 完成這樣繁瑣的過程通常需要好幾秒鐘,有時甚至需要好幾分鐘。所需時間的長短,完全取決於專案的規模。而在 Git 中,任何規模的專案都能在瞬間建立新分支。 同時,由於每次提交都會記錄父物件,所以尋找恰當的合併基礎(譯註:即共同祖先)也是同樣的簡單和高效。 這些高效的特性使得 Git 鼓勵開發人員頻繁地建立和使用分支。
分支的新建與合併
新建分支
建立新分支可以使用 git branch 命令,但想要在新建一個分支並同時切換到那個分支上怎麼辦呢?可以執行一個帶有 -b 引數的 git checkout 命令,如你現在的線上系統出現一個 #10 問題,你可以專為這個問題建立一個分支進行修復:
$ git checkout -b issue10
Switched to a new branch "issue10"- 1
- 2
它是下面兩條命令的簡寫:
$ git branch issue10
$ git checkout issue10- 1
- 2
現在你就可以在 issue10 這個分支上進行你的修復工作而不影響 master 分支。在此過程中,issue10 分支會不斷向前推進,因為你已經切換到該分支。當然在這個過程中你也可以切換回 master 分支中開發。
合併分支
當你在 issue10 分支中修復之後就需要合併到 master 分支了,首先應該切換到 master 分支,但是,在切換之前,要留意你的工作目錄和暫存區裡那些還沒有被提交的修改,它可能會和你即將檢出的分支產生衝突從而阻止 Git 切換到該分支。 最好的方法是,在你切換分支之前,保持好一個乾淨的狀態。 有一些方法可以繞過這個問題(即,儲存進度(stashing) 和 修補提交(commit amending))。 現在,我們假設你已經把你的修改全部提交了,這時你可以切換回 master 分支了:
$ git checkout master- 1
當你切換回 master 後就可以使用 git merge 命令進行分支的合併工作了:
$ git merge issue10- 1
執行上述命令後 Git 會很聰明的為你完成合並工作,Git 將此次合併的結果做一個新的快照並且自動建立一個新的提交指向它,一切就是這麼簡單。
遇到衝突時的分支合併
一個在聰明的人也會有出錯的時候,Git 也一樣,有時候合併操作並不會如此順利。如果你在兩個不同的分支中,對同一個檔案的同一個部分進行了不同的修改,Git 就沒法乾淨的合併它們。 如果你在對 #10 問題的修改和在 master 的修改都涉及到同一個檔案的同一處,在合併它們的時候就會產生合併衝突:
$ git merge issue10
Auto-merging index.html
CONFLICT (content): Merge conflict in index.html
Automatic merge failed; fix conflicts and then commit the result.- 1
- 2
- 3
- 4
此時 Git 做了合併,但是沒有自動地建立一個新的合併提交。 Git 會暫停下來,等待你去解決合併產生的衝突。 你可以在合併衝突後的任意時刻使用 git status 命令來檢視那些因包含合併衝突而處於未合併(unmerged)狀態的檔案。
任何因包含合併衝突而有待解決的檔案,都會以未合併狀態標識出來。 Git 會在有衝突的檔案中加入標準的衝突解決標記,這樣你可以開啟這些包含衝突的檔案然後手動解決衝突。 出現衝突的檔案會包含一些特殊區段,看起來像下面這個樣子:
<<<<<<< HEAD:index.html
<div id="footer">contact : [email protected]</div>
=======
<div id="footer">
 please contact us at [email protected]
</div>
>>>>>>> issue10:index.html- 1
- 2
- 3
- 4
- 5
- 6
- 7
這表示 HEAD 所指示的版本(也就是你的 master 分支所在的位置,因為你在執行 merge 命令的時候已經檢出到了這個分支)在這個區段的上半部分(======= 的上半部分),而 issue10 分支所指示的版本在 ======= 的下半部分。 為了解決衝突,你必須選擇使用由 ======= 分割的兩部分中的一個,或者你也可以自行合併這些內容。 例如,你可以通過把這段內容換成下面的樣子來解決衝突:
<div id="footer">
please contact us at [email protected]
</div>- 1
- 2
- 3
上述的衝突解決方案僅保留了其中一個分支的修改,並且 <<<<<<< , ======= , 和 >>>>>>> 這些行被完全刪除了。 在你解決了所有檔案裡的衝突之後,對每個檔案使用 git add 命令來將其標記為衝突已解決。 一旦暫存這些原本有衝突的檔案,Git 就會將它們標記為衝突已解決。
你可以再次執行 git status 來確認所有的合併衝突都已被解決,如果你對結果感到滿意,並且確定之前有衝突的的檔案都已經暫存了,這時你可以輸入 git commit 來完成合並提交。
刪除分支
既然分支 issue10 的修復已經完全合併到 master 分支了,你已不在需要 issue10 分支了,刪除它並不會丟失任何東西。現在你可以使用帶引數 -d 的 git branch 命令進行分支的刪除工作:
$ git branch -d issue10- 1
分支管理
git branch 命令不只是可以建立與刪除分支。 如果不加任何引數執行它,會得到當前所有分支的一個列表:
$ git branch
  iss53
* master
testing- 1
- 2
- 3
- 4
注意 master 分支前的 * 字元:它代表現在檢出的那一個分支(也就是說,當前 HEAD 指標所指向的分支)。 這意味著如果在這時候提交,master 分支將會隨著新的工作向前移動。 如果需要檢視每一個分支的最後一次提交,可以執行 git branch -v 命令:
$ git branch -v
  iss53   93b412c fix javascript issue
* master  7a98805 Merge branch 'iss53'
testing 782fd34 add scott to the author list in the readmes- 1
- 2
- 3
- 4
–merged 與 –no-merged 這兩個有用的選項可以過濾這個列表中已經合併或尚未合併到當前分支的分支。
當包含了還未合併的工作的分支,嘗試使用 git branch -d 命令刪除它時會失敗,如果真的想要刪除分支並丟掉那些工作,可以使用 -D 選項強制刪除它。
分支開發工作流
由於分支管理的便捷,因此衍生出一些典型的工作模式,可根據專案實際情況選擇使用。
長期分支
因為 Git 使用簡單的三方合併,所以就算在一段較長的時間內,反覆把一個分支合併入另一個分支,也不是什麼難事。 也就是說,在整個專案開發週期的不同階段,你可以同時擁有多個開放的分支;你可以定期地把某些特性分支合併入其他分支中。
許多使用 Git 的開發者都喜歡使用這種方式來工作,比如只在 master 分支上保留完全穩定的程式碼——有可能僅僅是已經發布或即將釋出的程式碼。 他們還有一些名為 develop 或者 next 的平行分支,被用來做後續開發或者測試穩定性——這些分支不必保持絕對穩定,但是一旦達到穩定狀態,它們就可以被合併入 master 分支了。 這樣,在確保這些已完成的特性分支(短期分支,比如之前的 issue10 分支)能夠通過所有測試,並且不會引入更多 bug 之後,就可以合併入主幹分支中,等待下一次的釋出。
一些大型專案還有一個 proposed(建議) 或 pu: proposed updates(建議更新)分支,它可能因包含一些不成熟的內容而不能進入 next 或者 master 分支。 這麼做的目的是使你的分支具有不同級別的穩定性;當它們具有一定程度的穩定性後,再把它們合併入具有更高級別穩定性的分支中。 再次強調一下,使用多個長期分支的方法並非必要,但是這麼做通常很有幫助,尤其是當你在一個非常龐大或者複雜的專案中工作時。
特性分支
特性分支對任何規模的專案都適用。 特性分支是一種短期分支,它被用來實現單一特性或其相關工作。 也許你從來沒有在其他的版本控制系統(VCS)上這麼做過,因為在那些版本控制系統中建立和合並分支通常很費勁。 然而,在 Git 中一天之內多次建立、使用、合併、刪除分支都很常見。
你在自己的特性分支(如 iss53 和 hotfix 分支)中提交了一些更新,並且在它們合併入主幹分支之後,你又刪除了它們。 這項技術能使你快速並且完整地進行上下文切換(context-switch)——因為你的工作被分散到不同的流水線中,在不同的流水線中每個分支都僅與其目標特性相關,因此,在做程式碼審查之類的工作的時候就能更加容易地看出你做了哪些改動。 你可以把做出的改動在特性分支中保留幾分鐘、幾天甚至幾個月,等它們成熟之後再合併,而不用在乎它們建立的順序或工作進度。
請牢記,當你做這麼多操作的時候,這些分支全部都存於本地。 當你新建和合並分支的時候,所有這一切都只發生在你本地的 Git 版本庫中 —— 沒有與伺服器發生互動。
遠端分支
遠端引用是對遠端倉庫的引用(指標),包括分支、標籤等等。 可通過 git ls-remote (remote) 來顯式地獲得遠端引用的完整列表,或者通過 git remote show (remote) 獲得遠端分支的更多資訊。 然而,一個更常見的做法是利用遠端跟蹤分支。
遠端跟蹤分支是遠端分支狀態的引用。 它們是你不能移動的本地引用,當你做任何網路通訊操作時,它們會自動移動。 遠端跟蹤分支像是你上次連線到遠端倉庫時,那些分支所處狀態的書籤。
它們以 (remote)/(branch) 形式命名。假設你的網路裡有一個在 git.ourcompany.com 的 Git 伺服器。 如果你從這裡克隆,Git 的 clone 命令會為你自動將其命名為 origin,拉取它的所有資料,建立一個指向它的 master 分支的指標,並且在本地將其命名為 origin/master。 Git 也會給你一個與 origin 的 master 分支在指向同一個地方的本地 master 分支,這樣你就有工作的基礎。
“origin” 並無特殊含義 遠端倉庫名字 “origin” 與分支名字 “master” 一樣,在 Git 中並沒有任何特別的含義一樣。 同時 “master” 是當你執行 git init 時預設的起始分支名字,原因僅僅是它的廣泛使用,“origin” 是當你執行 git clone 時預設的遠端倉庫名字。 如果你執行 git clone -o booyah,那麼你預設的遠端分支名字將會是 booyah/master。
推送分支到遠端伺服器
當你想要公開分享一個分支時,需要將其推送到有寫入許可權的遠端倉庫上。 本地的分支並不會自動與遠端倉庫同步 - 你必須顯式地推送想要分享的分支。 這樣,你就可以把不願意分享的內容放到私人分支上,而將需要和別人協作的內容推送到公開分支。
如果希望和別人一起在名為 serverfix 的分支上工作,你可以像推送第一個分支那樣推送它。 執行 git push (remote) (branch):
$ git push origin serverfix
Counting objects: 24, done.
Delta compression using up to 8 threads.
Compressing objects: 100% (15/15), done.
Writing objects: 100% (24/24), 1.91 KiB | 0 bytes/s, done.
Total 24 (delta 2), reused 0 (delta 0)
To https://github.com/schacon/simplegit
 * [new branch]      serverfix -> serverfix
 ```
Git 自動將 serverfix 分支名字展開為 refs/heads/serverfix:refs/heads/serverfix,那意味著,“推送本地的 serverfix 分支來更新遠端倉庫上的 serverfix 分支。”
下一次其他協作者從伺服器上抓取資料時,他們會在本地生成一個遠端分支 origin/serverfix,指向伺服器的 serverfix 分支的引用:
$ git fetch origin
remote: Counting objects: <span class="hljs-number">7</span>, <span class="hljs-keyword">done</span>.
remote: Compressing objects: <span class="hljs-number">100</span>% (<span class="hljs-number">2</span>/<span class="hljs-number">2</span>), <span class="hljs-keyword">done</span>.
remote: Total <span class="hljs-number">3</span> (delta <span class="hljs-number">0</span>), reused <span class="hljs-number">3</span> (delta <span class="hljs-number">0</span>)
Unpacking objects: <span class="hljs-number">100</span>% (<span class="hljs-number">3</span>/<span class="hljs-number">3</span>), <span class="hljs-keyword">done</span>.
From https:<span class="hljs-comment">//github.com/schacon/simplegit</span>
* [<span class="hljs-keyword">new</span> branch] serverfix -> origin/serverfix
<div <span class="hljs-keyword">class</span>=<span class="hljs-string">"se-preview-section-delimiter"</span>></div>
</code></pre><ul class="pre-numbering" style="width:48px;background-color:rgb(238,240,244);"><li style="color:rgb(153,153,153);">1</li><li style="color:rgb(153,153,153);">2</li><li style="color:rgb(153,153,153);">3</li><li style="color:rgb(153,153,153);">4</li><li style="color:rgb(153,153,153);">5</li><li style="color:rgb(153,153,153);">6</li><li style="color:rgb(153,153,153);">7</li><li style="color:rgb(153,153,153);">8</li><li style="color:rgb(153,153,153);">9</li><li style="color:rgb(153,153,153);">10</li><li style="color:rgb(153,153,153);">11</li><li style="color:rgb(153,153,153);">12</li><li style="color:rgb(153,153,153);">13</li><li style="color:rgb(153,153,153);">14</li><li style="color:rgb(153,153,153);">15</li><li style="color:rgb(153,153,153);">16</li><li style="color:rgb(153,153,153);">17</li><li style="color:rgb(153,153,153);">18</li><li style="color:rgb(153,153,153);">19</li><li style="color:rgb(153,153,153);">20</li><li style="color:rgb(153,153,153);">21</li><li style="color:rgb(153,153,153);">22</li><li style="color:rgb(153,153,153);">23</li><li style="color:rgb(153,153,153);">24</li><li style="color:rgb(153,153,153);">25</li><li style="color:rgb(153,153,153);">26</li><li style="color:rgb(153,153,153);">27</li><li style="color:rgb(153,153,153);">28</li></ul><p style="line-height:26px;background-color:rgb(255,255,255);">
要特別注意的一點是當抓取到新的遠端跟蹤分支時,本地不會自動生成一份可編輯的副本(拷貝)。 換一句話說,這種情況下,不會有一個新的 serverfix 分支 - 只有一個不可以修改的 origin/serverfix 指標。</p>
<p style="line-height:26px;background-color:rgb(255,255,255);">
可以執行 git merge origin/serverfix 將這些工作合併到當前所在的分支。 如果想要在自己的 serverfix 分支上工作,可以將其建立在遠端跟蹤分支之上:</p>
<pre class="prettyprint" style="font-family:Consolas, Inconsolata, Courier, monospace;margin-left:0px;line-height:22px;color:rgb(0,0,0);background-color:rgb(246,248,250);border-style:none;"><code class="language-git hljs livecodeserver has-numbering" style="font-family:Consolas, Inconsolata, Courier, monospace;font-size:14px;color:rgb(0,0,0);background-color:rgb(246,248,250);">$ git checkout -b serverfix origin/serverfix
Branch serverfix <span class="hljs-built_in">set</span> up <span class="hljs-built_in">to</span> track remote branch serverfix <span class="hljs-built_in">from</span> origin.
Switched <span class="hljs-built_in">to</span> <span class="hljs-operator">a</span> <span class="hljs-built_in">new</span> branch <span class="hljs-string">'serverfix'</span>
<<span class="hljs-operator">div</span> class=<span class="hljs-string">"se-preview-section-delimiter"</span>></<span class="hljs-operator">div</span>>
</code></pre><ul class="pre-numbering" style="width:48px;background-color:rgb(238,240,244);"><li style="color:rgb(153,153,153);">1</li><li style="color:rgb(153,153,153);">2</li><li style="color:rgb(153,153,153);">3</li><li style="color:rgb(153,153,153);">4</li><li style="color:rgb(153,153,153);">5</li><li style="color:rgb(153,153,153);">6</li><li style="color:rgb(153,153,153);">7</li><li style="color:rgb(153,153,153);">8</li><li style="color:rgb(153,153,153);">9</li></ul><p style="line-height:26px;background-color:rgb(255,255,255);">
這會給你一個用於工作的本地分支,並且起點位於 origin/serverfix。</p>
<h3 id="跟蹤分支" style="line-height:30px;font-size:22px;background-color:rgb(255,255,255);">
<a name="t15" style="background:transparent;font-weight:400;"></a>跟蹤分支</h3>
<p style="line-height:26px;background-color:rgb(255,255,255);">
從一個遠端跟蹤分支檢出一個本地分支會自動建立一個叫做 “跟蹤分支”(有時候也叫做 “上游分支”)。 跟蹤分支是與遠端分支有直接關係的本地分支。 如果在一個跟蹤分支上輸入 git pull,Git 能自動地識別去哪個伺服器上抓取、合併到哪個分支。</p>
<p style="line-height:26px;background-color:rgb(255,255,255);">
當克隆一個倉庫時,它通常會自動地建立一個跟蹤 origin/master 的 master 分支。 然而,如果你願意的話可以設定其他的跟蹤分支 - 其他遠端倉庫上的跟蹤分支,或者不跟蹤 master 分支。 可執行 git checkout -b [branch] [remotename]/[branch]。 這是一個十分常用的操作所以 Git 提供了 –track 快捷方式:</p>
<pre class="prettyprint" style="font-family:Consolas, Inconsolata, Courier, monospace;margin-left:0px;line-height:22px;color:rgb(0,0,0);background-color:rgb(246,248,250);border-style:none;"><code class="language-git hljs livecodeserver has-numbering" style="font-family:Consolas, Inconsolata, Courier, monospace;font-size:14px;color:rgb(0,0,0);background-color:rgb(246,248,250);">$ git checkout <span class="hljs-comment">--track origin/serverfix</span>
Branch serverfix <span class="hljs-built_in">set</span> up <span class="hljs-built_in">to</span> track remote branch serverfix <span class="hljs-built_in">from</span> origin.
Switched <span class="hljs-built_in">to</span> <span class="hljs-operator">a</span> <span class="hljs-built_in">new</span> branch <span class="hljs-string">'serverfix'</span>
<<span class="hljs-operator">div</span> class=<span class="hljs-string">"se-preview-section-delimiter"</span>></<span class="hljs-operator">div</span>>
</code></pre><ul class="pre-numbering" style="width:48px;background-color:rgb(238,240,244);"><li style="color:rgb(153,153,153);">1</li><li style="color:rgb(153,153,153);">2</li><li style="color:rgb(153,153,153);">3</li><li style="color:rgb(153,153,153);">4</li><li style="color:rgb(153,153,153);">5</li><li style="color:rgb(153,153,153);">6</li><li style="color:rgb(153,153,153);">7</li><li style="color:rgb(153,153,153);">8</li><li style="color:rgb(153,153,153);">9</li></ul><p style="line-height:26px;background-color:rgb(255,255,255);">
將本地分支與遠端分支設定為不同名字:</p>
<pre class="prettyprint" style="font-family:Consolas, Inconsolata, Courier, monospace;margin-left:0px;line-height:22px;color:rgb(0,0,0);background-color:rgb(246,248,250);border-style:none;"><code class="language-git hljs livecodeserver has-numbering" style="font-family:Consolas, Inconsolata, Courier, monospace;font-size:14px;color:rgb(0,0,0);background-color:rgb(246,248,250);">$ git checkout -b sf origin/serverfix
Branch sf <span class="hljs-built_in">set</span> up <span class="hljs-built_in">to</span> track remote branch serverfix <span class="hljs-built_in">from</span> origin.
Switched <span class="hljs-built_in">to</span> <span class="hljs-operator">a</span> <span class="hljs-built_in">new</span> branch <span class="hljs-string">'sf'</span>
<<span class="hljs-operator">div</span> class=<span class="hljs-string">"se-preview-section-delimiter"</span>></<span class="hljs-operator">div</span>>
</code></pre><ul class="pre-numbering" style="width:48px;background-color:rgb(238,240,244);"><li style="color:rgb(153,153,153);">1</li><li style="color:rgb(153,153,153);">2</li><li style="color:rgb(153,153,153);">3</li><li style="color:rgb(153,153,153);">4</li><li style="color:rgb(153,153,153);">5</li><li style="color:rgb(153,153,153);">6</li><li style="color:rgb(153,153,153);">7</li><li style="color:rgb(153,153,153);">8</li><li style="color:rgb(153,153,153);">9</li></ul><p style="line-height:26px;background-color:rgb(255,255,255);">
現在,本地分支 sf 會自動從 origin/serverfix 拉取。</p>
<p style="line-height:26px;background-color:rgb(255,255,255);">
設定已有的本地分支跟蹤一個剛剛拉取下來的遠端分支,或者想要修改正在跟蹤的上游分支,你可以在任意時間使用 -u 或 –set-upstream-to 選項執行 git branch 來顯式地設定。</p>
<pre class="prettyprint" style="font-family:Consolas, Inconsolata, Courier, monospace;margin-left:0px;line-height:22px;color:rgb(0,0,0);background-color:rgb(246,248,250);border-style:none;"><code class="language-git hljs applescript has-numbering" style="font-family:Consolas, Inconsolata, Courier, monospace;font-size:14px;color:rgb(0,0,0);background-color:rgb(246,248,250);">$ git branch -u origin/serverfix
Branch serverfix <span class="hljs-keyword">set</span> up <span class="hljs-keyword">to</span> track remote branch serverfix <span class="hljs-keyword">from</span> origin.
<<span class="hljs-keyword">div</span> <span class="hljs-type">class</span>=<span class="hljs-string">"se-preview-section-delimiter"</span>></<span class="hljs-keyword">div</span>>
</code></pre><ul class="pre-numbering" style="width:48px;background-color:rgb(238,240,244);"><li style="color:rgb(153,153,153);">1</li><li style="color:rgb(153,153,153);">2</li><li style="color:rgb(153,153,153);">3</li><li style="color:rgb(153,153,153);">4</li><li style="color:rgb(153,153,153);">5</li><li style="color:rgb(153,153,153);">6</li><li style="color:rgb(153,153,153);">7</li><li style="color:rgb(153,153,153);">8</li></ul><p style="line-height:26px;background-color:rgb(255,255,255);">
檢視設定的所有跟蹤分支,可以使用 git branch 的 -vv 選項。 這會將所有的本地分支列出來並且包含更多的資訊,如每一個分支正在跟蹤哪個遠端分支與本地分支是否是領先、落後或是都有。</p>
<pre class="prettyprint" style="font-family:Consolas, Inconsolata, Courier, monospace;margin-left:0px;line-height:22px;color:rgb(0,0,0);background-color:rgb(246,248,250);border-style:none;"><code class="language-git hljs livecodeserver has-numbering" style="font-family:Consolas, Inconsolata, Courier, monospace;font-size:14px;color:rgb(0,0,0);background-color:rgb(246,248,250);">$ git branch -vv
iss53 <span class="hljs-number">7e424</span>c3 [origin/iss53: ahead <span class="hljs-number">2</span>] forgot <span class="hljs-operator">the</span> brackets
master <span class="hljs-number">1</span>ae2a45 [origin/master] deploying index fix
* serverfix f8674d9 [teamone/server-fix-good: ahead <span class="hljs-number">3</span>, behind <span class="hljs-number">1</span>] this should <span class="hljs-built_in">do</span> <span class="hljs-keyword">it</span>
testing <span class="hljs-number">5</span>ea463a trying something <span class="hljs-built_in">new</span>
<<span class="hljs-operator">div</span> class=<span class="hljs-string">"se-preview-section-delimiter"</span>></<span class="hljs-operator">div</span>>
</code></pre><ul class="pre-numbering" style="width:48px;background-color:rgb(238,240,244);"><li style="color:rgb(153,153,153);">1</li><li style="color:rgb(153,153,153);">2</li><li style="color:rgb(153,153,153);">3</li><li style="color:rgb(153,153,153);">4</li><li style="color:rgb(153,153,153);">5</li><li style="color:rgb(153,153,153);">6</li><li style="color:rgb(153,153,153);">7</li><li style="color:rgb(153,153,153);">8</li><li style="color:rgb(153,153,153);">9</li><li style="color:rgb(153,153,153);">10</li><li style="color:rgb(153,153,153);">11</li></ul><p style="line-height:26px;background-color:rgb(255,255,255);">
這裡可以看到 iss53 分支正在跟蹤 origin/iss53 並且 “ahead” 是 2,意味著本地有兩個提交還沒有推送到伺服器上。 也能看到 master 分支正在跟蹤 origin/master 分支並且是最新的。 接下來可以看到 serverfix 分支正在跟蹤 teamone 伺服器上的 server-fix-good 分支並且領先 2 落後 1,意味著伺服器上有一次提交還沒有合併入同時本地有三次提交還沒有推送。 最後看到 testing 分支並沒有跟蹤任何遠端分支。</p>
<p style="line-height:26px;background-color:rgb(255,255,255);">
需要重點注意的一點是這些數字的值來自於你從每個伺服器上最後一次抓取的資料。 這個命令並沒有連線伺服器,它只會告訴你關於本地快取的伺服器資料。 如果想要統計最新的領先與落後數字,需要在執行此命令前抓取所有的遠端倉庫。 可以像這樣做:$ git fetch –all; git branch -vv</p>
<h3 id="拉取" style="line-height:30px;font-size:22px;background-color:rgb(255,255,255);">
<a name="t16" style="background:transparent;font-weight:400;"></a>拉取</h3>
<p style="line-height:26px;background-color:rgb(255,255,255);">
當 git fetch 命令從伺服器上抓取本地沒有的資料時,它並不會修改工作目錄中的內容。 它只會獲取資料然後讓你自己合併。 然而,有一個命令叫作 git pull 在大多數情況下它的含義是一個 git fetch 緊接著一個 git merge 命令。 如果有一個像之前章節中演示的設定好的跟蹤分支,不管它是顯式地設定還是通過 clone 或 checkout 命令為你建立的,git pull 都會查詢當前分支所跟蹤的伺服器與分支,從伺服器上抓取資料然後嘗試合併入那個遠端分支。</p>
<p style="line-height:26px;background-color:rgb(255,255,255);">
由於 git pull 的魔法經常令人困惑所以通常單獨顯式地使用 fetch 與 merge 命令會更好一些。</p>
<h3 id="刪除遠端分支" style="line-height:30px;font-size:22px;background-color:rgb(255,255,255);">
<a name="t17" style="background:transparent;font-weight:400;"></a>刪除遠端分支</h3>
<p style="line-height:26px;background-color:rgb(255,255,255);">
假設你已經通過遠端分支做完所有的工作了 - 也就是說你和你的協作者已經完成了一個特性並且將其合併到了遠端倉庫的 master 分支(或任何其他穩定程式碼分支)。 可以執行帶有 –delete 選項的 git push 命令來刪除一個遠端分支。 如果想要從伺服器上刪除 serverfix 分支,執行下面的命令:</p>
<p style="line-height:26px;background-color:rgb(255,255,255);">
<code style="font-family:Consolas, Inconsolata, Courier, monospace;color:rgb(199,37,78);background-color:rgb(249,242,244);">git <br>
$ git push origin --delete serverfix <br>
To https://github.com/schacon/simplegit <br>
- [deleted] serverfix <br></code></p>
<p style="line-height:26px;background-color:rgb(255,255,255);">
基本上這個命令做的只是從伺服器上移除這個指標。 Git 伺服器通常會保留資料一段時間直到垃圾回收執行,所以如果不小心刪除掉了,通常是很容易恢復的。</p>
<p style="line-height:26px;background-color:rgb(255,255,255);">
至此,你現在應該能自如地建立並切換至新分支、在不同分支之間切換以及合併本地分支,你現在應該也能通過推送你的分支至共享服務以分享它們、使用共享分支與他人協作。</p>
