自定義View和自定義ViewGroup一步到位
1.自定義View
首先我們要明白,為什麼要自定義View?主要是Android系統內建的View無法實現我們的需求,我們需要針對我們的業務需求定製我們想要的View。自定義View我們大部分時候只需重寫兩個函式:onMeasure()、onDraw()。onMeasure負責對當前View的尺寸進行測量,onDraw負責把當前這個View繪製出來。當然了,你還得寫至少寫2個建構函式:
public MyView(Context context) {
super(context);
}
public MyView(Context context, AttributeSet attrs) {
super - 1
- 2
- 3
- 4
- 5
- 6
- 7
1.1.onMeasure
我們自定義的View,首先得要測量寬高尺寸。為什麼要測量寬高尺寸?我在剛學自定義View的時候非常無法理解!因為我當時覺得,我在xml檔案中已經指定好了寬高尺寸了,我自定義View中有必要再次獲取寬高並設定寬高嗎?既然我自定義的View是繼承自View類,google團隊直接在View類中直接把xml設定的寬高獲取,並且設定進去不就好了嗎?那google為啥讓我們做這樣的“重複工作”呢?客官別急,馬上給您上茶~
在學習Android的時候,我們就知道,在xml佈局檔案中,我們的layout_width和layout_height
wrap_content或者是match_parent。其意思我們都知道,就是將尺寸設定為“包住內容”和“填充父佈局給我們的所有空間”。這兩個設定並沒有指定真正的大小,可是我們繪製到螢幕上的View必須是要有具體的寬高的,正是因為這個原因,我們必須自己去處理和設定尺寸。當然了,View類給了預設的處理,但是如果View類的預設處理不滿足我們的要求,我們就得重寫onMeasure函式啦~。這裡舉個例子,比如我們希望我們的View是個正方形,如果在xml中指定寬高為wrap_content,如果使用View類提供的measure處理方式,顯然無法滿足我們的需求~。
先看看onMeasure函式原型:
protected void onMeasure(int widthMeasureSpec, int heightMeasureSpec) - 1
引數中的widthMeasureSpec和heightMeasureSpec是個什麼鬼?看起來很像width和height,沒錯,這兩個引數就是包含寬和高的資訊。什麼?包含?難道還要其他資訊?是的!它還包含測量模式,也就是說,一個int整數,裡面放了測量模式和尺寸大小。那麼一個數怎麼放兩個資訊呢?我們知道,我們在設定寬高時有3個選擇:wrap_content、match_parent以及指定固定尺寸,而測量模式也有3種:UNSPECIFIED,EXACTLY,AT_MOST,當然,他們並不是一一對應關係哈,這三種模式後面我會詳細介紹,但測量模式無非就是這3種情況,而如果使用二進位制,我們只需要使用2個bit就可以做到,因為2個bit取值範圍是[0,3]裡面可以存放4個數足夠我們用了。那麼Google是怎麼把一個int同時放測量模式和尺寸資訊呢?我們知道int型資料佔用32個bit,而google實現的是,將int資料的前面2個bit用於區分不同的佈局模式,後面30個bit存放的是尺寸的資料。
那我們怎麼從int資料中提取測量模式和尺寸呢?放心,不用你每次都要寫一次移位<<和取且&操作,Android內建類MeasureSpec幫我們寫好啦~,我們只需按照下面方法就可以拿到啦:
int widthMode = MeasureSpec.getMode(widthMeasureSpec);
int widthSize = MeasureSpec.getSize(widthMeasureSpec);- 1
- 2
愛思考的你肯定會問,既然我們能通過widthMeasureSpec拿到寬度尺寸大小,那我們還要測量模式幹嘛?測量模式會不會是多餘的?請注意:這裡的的尺寸大小並不是最終我們的View的尺寸大小,而是父View提供的參考大小。我們看看測量模式,測量模式是幹啥用的呢?
| 測量模式 | 表示意思 |
|---|---|
| UNSPECIFIED | 父容器沒有對當前View有任何限制,當前View可以任意取尺寸 |
| EXACTLY | 當前的尺寸就是當前View應該取的尺寸 |
| AT_MOST | 當前尺寸是當前View能取的最大尺寸 |
而上面的測量模式跟我們的佈局時的wrap_content、match_parent以及寫成固定的尺寸有什麼對應關係呢?
match_parent—>EXACTLY。怎麼理解呢?match_parent就是要利用父View給我們提供的所有剩餘空間,而父View剩餘空間是確定的,也就是這個測量模式的整數裡面存放的尺寸。
wrap_content—>AT_MOST。怎麼理解:就是我們想要將大小設定為包裹我們的view內容,那麼尺寸大小就是父View給我們作為參考的尺寸,只要不超過這個尺寸就可以啦,具體尺寸就根據我們的需求去設定。
固定尺寸(如100dp)—>EXACTLY。使用者自己指定了尺寸大小,我們就不用再去幹涉了,當然是以指定的大小為主啦。
1.2.動手重寫onMeasure函式
上面講了太多理論,我們實際操作一下吧,感受一下onMeasure的使用,假設我們要實現這樣一個效果:將當前的View以正方形的形式顯示,即要寬高相等,並且預設的寬高值為100畫素。就可以這些編寫:
 private int getMySize(int defaultSize, int measureSpec) {
        int mySize = defaultSize;

        int mode = MeasureSpec.getMode(measureSpec);
        int size = MeasureSpec.getSize(measureSpec);

        switch (mode) {
            case MeasureSpec.UNSPECIFIED: {//如果沒有指定大小,就設定為預設大小
                mySize = defaultSize;
                break;
            }
            case MeasureSpec.AT_MOST: {//如果測量模式是最大取值為size
                //我們將大小取最大值,你也可以取其他值
                mySize = size;
                break;
            }
            case MeasureSpec.EXACTLY: {//如果是固定的大小,那就不要去改變它
                mySize = size;
                break;
            }
        }
        return mySize;
}

@Override
protected void onMeasure(int widthMeasureSpec, int heightMeasureSpec) {
        super.onMeasure(widthMeasureSpec, heightMeasureSpec);
        int width = getMySize(100, widthMeasureSpec);
        int height = getMySize(100, heightMeasureSpec);

        if (width < height) {
            height = width;
        } else {
            width = height;
        }

        setMeasuredDimension(width, height);
}
- 1
- 2
- 3
- 4
- 5
- 6
- 7
- 8
- 9
- 10
- 11
- 12
- 13
- 14
- 15
- 16
- 17
- 18
- 19
- 20
- 21
- 22
- 23
- 24
- 25
- 26
- 27
- 28
- 29
- 30
- 31
- 32
- 33
- 34
- 35
- 36
- 37
- 38
- 39
我們設定一下佈局
  <com.hc.studyview.MyView
        android:layout_width="match_parent"
        android:layout_height="100dp"
        android:background="#ff0000" />
- 1
- 2
- 3
- 4
- 5
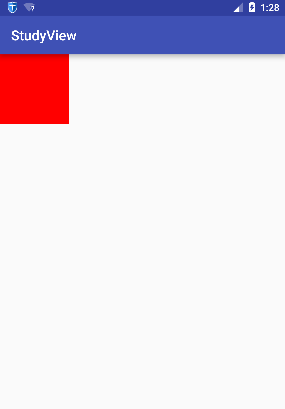
看看使用了我們自己定義的onMeasure函式後的效果:
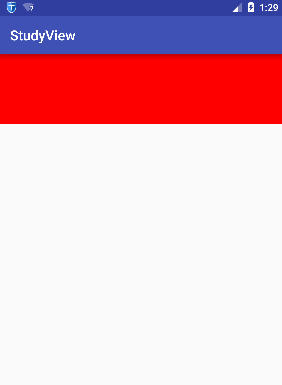
而如果我們不重寫onMeasure,效果則是如下:
1.3.重寫onDraw
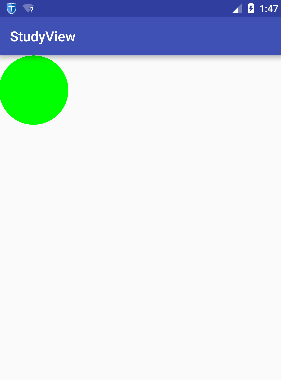
上面我們學會了自定義尺寸大小,那麼尺寸我們會設定了,接下來就是把我們想要的效果畫出來吧~繪製我們想要的效果很簡單,直接在畫板Canvas物件上繪製就好啦,過於簡單,我們以一個簡單的例子去學習:假設我們需要實現的是,我們的View顯示一個圓形,我們在上面已經實現了寬高尺寸相等的基礎上,繼續往下做:
  @Override
    protected void onDraw(Canvas canvas) {
        //呼叫父View的onDraw函式,因為View這個類幫我們實現了一些
        // 基本的而繪製功能,比如繪製背景顏色、背景圖片等
        super.onDraw(canvas);
        int r = getMeasuredWidth() / 2;//也可以是getMeasuredHeight()/2,本例中我們已經將寬高設定相等了
        //圓心的橫座標為當前的View的左邊起始位置+半徑
        int centerX = getLeft() + r;
        //圓心的縱座標為當前的View的頂部起始位置+半徑
        int centerY = getTop() + r;

        Paint paint = new Paint();
        paint.setColor(Color.GREEN);
        //開始繪製
        canvas.drawCircle(centerX, centerY, r, paint);


    }
- 1
- 2
- 3
- 4
- 5
- 6
- 7
- 8
- 9
- 10
- 11
- 12
- 13
- 14
- 15
- 16
- 17
- 18
- 19
1.4.自定義佈局屬性
如果有些屬性我們希望由使用者指定,只有當用戶不指定的時候才用我們硬編碼的值,比如上面的預設尺寸,我們想要由使用者自己在佈局檔案裡面指定該怎麼做呢?那當然是通我們自定屬性,讓使用者用我們定義的屬性啦~
首先我們需要在res/values/styles.xml檔案(如果沒有請自己新建)裡面宣告一個我們自定義的屬性:
<resources>

    <!--name為宣告的"屬性集合"名,可以隨便取,但是最好是設定為跟我們的View一樣的名稱-->
    <declare-styleable name="MyView">
        <!--宣告我們的屬性,名稱為default_size,取值型別為尺寸型別(dp,px等)-->
        <attr name="default_size" format="dimension" />
    </declare-styleable>
</resources>
- 1
- 2
- 3
- 4
- 5
- 6
- 7
- 8
- 9
接下來就是在佈局檔案用上我們的自定義的屬性啦~
<?xml version="1.0" encoding="utf-8"?>
<LinearLayout xmlns:android="http://schemas.android.com/apk/res/android"
    xmlns:hc="http://schemas.android.com/apk/res-auto"
    android:layout_width="match_parent"
    android:layout_height="match_parent">

    <com.hc.studyview.MyView
        android:layout_width="match_parent"
        android:layout_height="100dp"
        hc:default_size="100dp" />

</LinearLayout>
- 1
- 2
- 3
- 4
- 5
- 6
- 7
- 8
- 9
- 10
- 11
- 12
- 13
注意:需要在根標籤(LinearLayout)裡面設定名稱空間,名稱空間名稱可以隨便取,比如hc,名稱空間後面取得值是固定的:"http://schemas.android.com/apk/res-auto"
最後就是在我們的自定義的View裡面把我們自定義的屬性的值取出來,在建構函式中,還記得有個AttributeSet屬性嗎?就是靠它幫我們把佈局裡面的屬性取出來:
 private int defalutSize;
  public MyView(Context context, AttributeSet attrs) {
      super(context, attrs);
      //第二個引數就是我們在styles.xml檔案中的<declare-styleable>標籤
        //即屬性集合的標籤,在R檔案中名稱為R.styleable+name
        TypedArray a = context.obtainStyledAttributes(attrs, R.styleable.MyView);

        //第一個引數為屬性集合裡面的屬性,R檔名稱:R.styleable+屬性集合名稱+下劃線+屬性名稱
        //第二個引數為,如果沒有設定這個屬性,則設定的預設的值
        defalutSize = a.getDimensionPixelSize(R.styleable.MyView_default_size, 100);

        //最後記得將TypedArray物件回收
        a.recycle();
   }
- 1
- 2
- 3
- 4
- 5
- 6
- 7
- 8
- 9
- 10
- 11
- 12
- 13
- 14
- 15
- 16
最後,把MyView的完整程式碼附上:
package com.hc.studyview;

import android.content.Context;
import android.content.res.TypedArray;
import android.graphics.Canvas;
import android.graphics.Color;
import android.graphics.Paint;
import android.util.AttributeSet;
import android.util.Log;
import android.view.MotionEvent;
import android.view.View;

/**
 * Package com.hc.studyview
 * Created by HuaChao on 2016/6/3.
 */
public class MyView extends View {

    private int defalutSize;

    public MyView(Context context) {
        super(context);
    }

    public MyView(Context context, AttributeSet attrs) {
        super(context, attrs);
        //第二個引數就是我們在styles.xml檔案中的<declare-styleable>標籤
        //即屬性集合的標籤,在R檔案中名稱為R.styleable+name
        TypedArray a = context.obtainStyledAttributes(attrs, R.styleable.MyView);
        //第一個引數為屬性集合裡面的屬性,R檔名稱:R.styleable+屬性集合名稱+下劃線+屬性名稱
        //第二個引數為,如果沒有設定這個屬性,則設定的預設的值
        defalutSize = a.getDimensionPixelSize(R.styleable.MyView_default_size, 100);
        //最後記得將TypedArray物件回收
        a.recycle();
    }


    private int getMySize(int defaultSize, int measureSpec) {
        int mySize = defaultSize;

        int mode = MeasureSpec.getMode(measureSpec);
        int size = MeasureSpec.getSize(measureSpec);

        switch (mode) {
            case MeasureSpec.UNSPECIFIED: {//如果沒有指定大小,就設定為預設大小
                mySize = defaultSize;
                break;
            }
            case MeasureSpec.AT_MOST: {//如果測量模式是最大取值為size
                //我們將大小取最大值,你也可以取其他值
                mySize = size;
                break;
            }
            case MeasureSpec.EXACTLY: {//如果是固定的大小,那就不要去改變它
                mySize = size;
                break;
            }
        }
        return mySize;
    }

    @Override
    protected void onMeasure(int widthMeasureSpec, int heightMeasureSpec) {
        super.onMeasure(widthMeasureSpec, heightMeasureSpec);
        int width = getMySize(defalutSize, widthMeasureSpec);
        int height = getMySize(defalutSize, heightMeasureSpec);

        if (width < height) {
            height = width;
        } else {
            width = height;
        }

        setMeasuredDimension(width, height);
    }

    @Override
    protected void onDraw(Canvas canvas) {
        //呼叫父View的onDraw函式,因為View這個類幫我們實現了一些
        // 基本的而繪製功能,比如繪製背景顏色、背景圖片等
        super.onDraw(canvas);
        int r = getMeasuredWidth() / 2;//也可以是getMeasuredHeight()/2,本例中我們已經將寬高設定相等了
        //圓心的橫座標為當前的View的左邊起始位置+半徑
        int centerX = getLeft() + r;
        //圓心的縱座標為當前的View的頂部起始位置+半徑
        int centerY = getTop() + r;

        Paint paint = new Paint();
        paint.setColor(Color.GREEN);
        //開始繪製
        canvas.drawCircle(centerX, centerY, r, paint);


    }


}
- 1
- 2
- 3
- 4
- 5
- 6
- 7
- 8
- 9
- 10
- 11
- 12
- 13
- 14
- 15
- 16
- 17
- 18
- 19
- 20
- 21
- 22
- 23
- 24
- 25
- 26
- 27
- 28
- 29
- 30
- 31
- 32
- 33
- 34
- 35
- 36
- 37
- 38
- 39
- 40
- 41
- 42
- 43
- 44
- 45
- 46
- 47
- 48
- 49
- 50
- 51
- 52
- 53
- 54
- 55
- 56
- 57
- 58
- 59
- 60
- 61
- 62
- 63
- 64
- 65
- 66
- 67
- 68
- 69
- 70
- 71
- 72
- 73
- 74
- 75
- 76
- 77
- 78
- 79
- 80
- 81
- 82
- 83
- 84
- 85
- 86
- 87
- 88
- 89
- 90
- 91
- 92
- 93
- 94
- 95
- 96
- 97
- 98
- 99
2 自定義ViewGroup
自定義View的過程很簡單,就那幾步,可自定義ViewGroup可就沒那麼簡單啦~,因為它不僅要管好自己的,還要兼顧它的子View。我們都知道ViewGroup是個View容器,它裝納child View並且負責把child View放入指定的位置。我們假象一下,如果是讓你負責設計ViewGroup,你會怎麼去設計呢?
1.首先,我們得知道各個子View的大小吧,只有先知道子View的大小,我們才知道當前的ViewGroup該設定為多大去容納它們。
2.根據子View的大小,以及我們的ViewGroup要實現的功能,決定出ViewGroup的大小
3.ViewGroup和子View的大小算出來了之後,接下來就是去擺放了吧,具體怎麼去擺放呢?這得根據你定製的需求去擺放了,比如,你想讓子View按照垂直順序一個挨著一個放,或者是按照先後順序一個疊一個去放,這是你自己決定的。
4.已經知道怎麼去擺放還不行啊,決定了怎麼擺放就是相當於把已有的空間”分割”成大大小小的空間,每個空間對應一個子View,我們接下來就是把子View對號入座了,把它們放進它們該放的地方去。
現在就完成了ViewGroup的設計了,我們來個具體的案例:將子View按從上到下垂直順序一個挨著一個擺放,即模仿實現LinearLayout的垂直佈局。
首先重寫onMeasure,實現測量子View大小以及設定ViewGroup的大小:
    @Override
    protected void onMeasure(int widthMeasureSpec, int heightMeasureSpec) {
        super.onMeasure(widthMeasureSpec, heightMeasureSpec);
        //將所有的子View進行測量,這會觸發每個子View的onMeasure函式
        //注意要與measureChild區分,measureChild是對單個view進行測量
        measureChildren(widthMeasureSpec, heightMeasureSpec);

        int widthMode = MeasureSpec.getMode(widthMeasureSpec);
        int widthSize = MeasureSpec.getSize(widthMeasureSpec);
        int heightMode = MeasureSpec.getMode(heightMeasureSpec);
        int heightSize = MeasureSpec.getSize(heightMeasureSpec);

        int childCount = getChildCount();

        if (childCount == 0) {//如果沒有子View,當前ViewGroup沒有存在的意義,不用佔用空間
            setMeasuredDimension(0, 0);
        } else {
            //如果寬高都是包裹內容
            if (widthMode == MeasureSpec.AT_MOST && heightMode == MeasureSpec.AT_MOST) {
                //我們將高度設定為所有子View的高度相加,寬度設為子View中最大的寬度
                int height = getTotleHeight();
                int width = getMaxChildWidth();
                setMeasuredDimension(width, height);

            } else if (heightMode == MeasureSpec.AT_MOST) {//如果只有高度是包裹內容
                //寬度設定為ViewGroup自己的測量寬度,高度設定為所有子View的高度總和
                setMeasuredDimension(widthSize, getTotleHeight());
            } else if (widthMode == MeasureSpec.AT_MOST) {//如果只有寬度是包裹內容
                //寬度設定為子View中寬度最大的值,高度設定為ViewGroup自己的測量值
                setMeasuredDimension(getMaxChildWidth(), heightSize);

            }
        }
    }
    /***
     * 獲取子View中寬度最大的值
     */
    private int getMaxChildWidth() {
        int childCount = getChildCount();
        int maxWidth = 0;
        for (int i = 0; i < childCount; i++) {
            View childView = getChildAt(i);
            if (childView.getMeasuredWidth() > maxWidth)
                maxWidth = childView.getMeasuredWidth();

        }

        return maxWidth;
    }

    /***
     * 將所有子View的高度相加
     **/
    private int getTotleHeight() {
        int childCount = getChildCount();
        int height = 0;
        for (int i = 0; i < childCount; i++) {
            View childView = getChildAt(i);
            height += childView.getMeasuredHeight();

        }

        return height;
}- 1
- 2
- 3
- 4
- 5
- 6
- 7
- 8
- 9
- 10
- 11
- 12
- 13
- 14
- 15
- 16
- 17
- 18
- 19
- 20
- 21
- 22
- 23
- 24
- 25
- 26
- 27
- 28
- 29
- 30
- 31
- 32
- 33
- 34
- 35
- 36
- 37
- 38
- 39
- 40
- 41
- 42
- 43
- 44
- 45
- 46
- 47
- 48
- 49
- 50
- 51
- 52
- 53
- 54
- 55
- 56
- 57
- 58
- 59
- 60
- 61
- 62
- 63
- 64
- 65
- 66
程式碼中的註釋我已經寫得很詳細,不再對每一行程式碼進行講解。上面的onMeasure將子View測量好了,以及把自己的尺寸也設定好了,接下來我們去擺放子View吧~
 @Override
    protected void onLayout(boolean changed, int l, int t, int r, int b) {
        int count = getChildCount();
        //記錄當前的高度位置
        int curHeight = t;
        //將子View逐個擺放
        for (int i = 0; i < count; i++) {
            View child = getChildAt(i);
            int height = child.getMeasuredHeight();
            int width = child.getMeasuredWidth();
            //擺放子View,引數分別是子View矩形區域的左、上、右、下邊
            child.layout(l, curHeight, l + width, curHeight + height);
            curHeight += height;
        }
    }
- 1
- 2
- 3
- 4
- 5
- 6
- 7
- 8
- 9
- 10
- 11
- 12
- 13
- 14
- 15
- 16
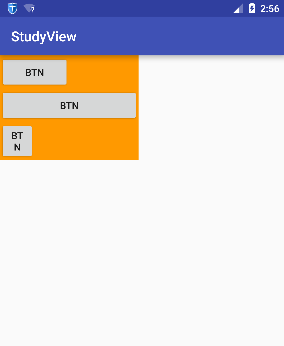
我們測試一下,將我們自定義的ViewGroup裡面放3個Button ,將這3個Button的寬度設定不一樣,把我們的ViewGroup的寬高都設定為包裹內容wrap_content,為了看的效果明顯,我們給ViewGroup加個背景:
<?xml version="1.0" encoding="utf-8"?>
<LinearLayout xmlns:android="http://schemas.android.com/apk/res/android"
    android:layout_width="match_parent"
    android:layout_height="match_parent">

    <com.hc.studyview.MyViewGroup
        android:layout_width="wrap_content"
        android:layout_height="wrap_content"
        android:background="#ff9900">

        <Button
            android:layout_width="100dp"
            android:layout_height="wrap_content"
            android:text="btn" />

        <Button
            android:layout_width="200dp"
            android:layout_height="wrap_content"
            android:text="btn" />

        <Button
            android:layout_width="50dp"
            android:layout_height="wrap_content"
            android:text="btn" />


    </com.hc.studyview.MyViewGroup>

</LinearLayout>
- 1
- 2
- 3
- 4
- 5
- 6
- 7
- 8
- 9
- 10
- 11
- 12
- 13
- 14
- 15
- 16
- 17
- 18
- 19
- 20
- 21
- 22
- 23
- 24
- 25
- 26
- 27
- 28
- 29
- 30
- 31
看看最後的效果吧~
是不是很激動~我們自己也可以實現LinearLayout的效果啦~~~~
最後附上MyViewGroup的完整原始碼:
package com.hc.studyview;

import android.content.Context;
import android.util.AttributeSet;
import android.view.MotionEvent;
import android.view.View;
import android.view.ViewGroup;

/**
 * Package com.hc.studyview
 * Created by HuaChao on 2016/6/3.
 */
public class MyViewGroup extends ViewGroup {
    public MyViewGroup(Context context) {
        super(context);
    }

    public MyViewGroup(Context context, AttributeSet attrs) {

        super(context, attrs);
    }

    /***
     * 獲取子View中寬度最大的值
     */
    private int getMaxChildWidth() {
        int childCount = getChildCount();
        int maxWidth = 0;
        for (int i = 0; i < childCount; i++) {
            View childView = getChildAt(i);
            if (childView.getMeasuredWidth() > maxWidth)
                maxWidth = childView.getMeasuredWidth();

        }

        return maxWidth;
    }

    /***
     * 將所有子View的高度相加
     **/
    private int getTotleHeight() {
        int childCount = getChildCount();
        int height = 0;
        for (int i = 0; i < childCount; i++) {
            View childView = getChildAt(i);
            height += childView.getMeasuredHeight();

        }

        return height;
    }

    @Override
    protected void onMeasure(int widthMeasureSpec, int heightMeasureSpec) {
        super.onMeasure(widthMeasureSpec, heightMeasureSpec);
        //將所有的子View進行測量,這會觸發每個子View的onMeasure函式
        //注意要與measureChild區分,measureChild是對單個view進行測量
        measureChildren(widthMeasureSpec, heightMeasureSpec);

        int widthMode = MeasureSpec.getMode(widthMeasureSpec);
        int widthSize = MeasureSpec.getSize(widthMeasureSpec);
        int heightMode = MeasureSpec.getMode(heightMeasureSpec);
        int heightSize = MeasureSpec.getSize(heightMeasureSpec);

        int childCount = getChildCount();

        if (childCount == 0) {//如果沒有子View,當前ViewGroup沒有存在的意義,不用佔用空間
            setMeasuredDimension(0, 0);
        } else {
            //如果寬高都是包裹內容
            if (widthMode == MeasureSpec.AT_MOST && heightMode == MeasureSpec.AT_MOST) {
                //我們將高度設定為所有子View的高度相加,寬度設為子View中最大的寬度
                int height = getTotleHeight();
                int width = getMaxChildWidth();
                setMeasuredDimension(width, height);

            } else if (heightMode == MeasureSpec.AT_MOST) {//如果只有高度是包裹內容
                //寬度設定為ViewGroup自己的測量寬度,高度設定為所有子View的高度總和
                setMeasuredDimension(widthSize, getTotleHeight());
            } else if (widthMode == MeasureSpec.AT_MOST) {//如果只有寬度是包裹內容
                //寬度設定為子View中寬度最大的值,高度設定為ViewGroup自己的測量值
                setMeasuredDimension(getMaxChildWidth(), heightSize);

            }
        }
    }

    @Override
    protected void onLayout(boolean changed, int l, int t, int r, int b) {
        int count = getChildCount();
        //記錄當前的高度位置
        int curHeight = t;
        for (int i = 0; i < count; i++) {
            View child = getChildAt(i);
            int height = child.getMeasuredHeight();
            int width = child.getMeasuredWidth();
            child.layout(l, curHeight, l + width, curHeight + height);
            curHeight += height;
        }
    }


}
- 1
- 2
- 3
- 4
- 5
- 6
- 7
- 8
- 9
- 10
- 11
- 12
- 13
- 14
- 15
- 16
- 17
- 18
- 19
- 20
- 21
- 22
- 23
- 24
- 25
- 26
- 27
- 28
- 29
- 30
- 31
- 32
- 33
- 34
- 35
- 36
- 37
- 38
- 39
- 40
- 41
- 42
- 43
- 44
- 45
- 46
- 47
- 48
- 49
- 50
- 51
- 52
- 53
- 54
- 55
- 56
- 57
- 58
- 59
- 60
- 61
- 62
- 63
- 64
- 65
- 66
- 67
- 68
- 69
- 70
- 71
- 72
- 73
- 74
- 75
- 76
- 77
- 78
- 79
- 80
- 81
- 82
- 83
- 84
- 85
- 86
- 87
- 88
- 89
- 90
- 91
- 92
- 93
- 94
- 95
- 96
- 97
- 98
- 99
- 100
- 101
- 102
- 103
- 104
- 105
好啦~自定義View的學習到此結束,是不是發現自定義View如此簡單呢?


