
shiro框架之四------在web中使用shiro

1. 下載
在Maven專案中的依賴配置如下:

<!-- shiro配置 -->
<dependency>
  <groupId>org.apache.shiro</groupId>
   <artifactId>shiro-core</artifactId>
   <version>1.3.2</version>
</dependency>
<dependency>
   <groupId>org.apache.shiro</groupId>
   <artifactId>shiro-web</artifactId>
   <version>1.3.2</version>
</dependency>

<!-- 配置日誌元件 -->
<dependency>
   <groupId>org.slf4j</groupId>
   <artifactId>slf4j-api</artifactId>
   <version>1.7.25</version>
</dependency>
<dependency>
   <groupId>org.slf4j</groupId>
   <artifactId>slf4j-jcl</artifactId>
   <version>1.7.25</version>
</dependency>
<dependency>
  <groupId>commons-logging</groupId>
  <artifactId>commons-logging</artifactId>
  <version>1.2</version>
</dependency>
特別地!Shiro使用了日誌框架slf4j,因此需要對應配置指定的日誌實現元件,如:log4j,logback等。
而且,由於shiro-web元件使用apache commons logging元件中的工具類,所以在專案中必須新增commongs logging元件。
否則,程式啟動時將會報錯:
java.lang.NoClassDefFoundError: org/apache/commons/logging/LogFactory
at org.apache.commons.beanutils.ConvertUtilsBean.<init>(ConvertUtilsBean.java:157)
at org.apache.commons.beanutils.BeanUtilsBean.<init>(BeanUtilsBean.java:117)
at org.apache.commons.beanutils.BeanUtilsBean$1.initialValue(BeanUtilsBean.java:68)
at org.apache.commons.beanutils.ContextClassLoaderLocal.get(ContextClassLoaderLocal.java:153)
at org.apache.commons.beanutils.BeanUtilsBean.getInstance(BeanUtilsBean.java:80)
at org.apache.commons.beanutils.PropertyUtilsBean.getInstance(PropertyUtilsBean.java:114)
at org.apache.commons.beanutils.PropertyUtils.getPropertyDescriptor(PropertyUtils.java:460)
at org.apache.shiro.config.ReflectionBuilder.isTypedProperty(ReflectionBuilder.java:409)
at org.apache.shiro.config.ReflectionBuilder.applyProperty(ReflectionBuilder.java:702)
at org.apache.shiro.config.ReflectionBuilder.applySingleProperty(ReflectionBuilder.java:364)
at org.apache.shiro.config.ReflectionBuilder.applyProperty(ReflectionBuilder.java:325)
at org.apache.shiro.config.ReflectionBuilder$AssignmentStatement.doExecute(ReflectionBuilder.java:955)
at org.apache.shiro.config.ReflectionBuilder$Statement.execute(ReflectionBuilder.java:887)
at org.apache.shiro.config.ReflectionBuilder$BeanConfigurationProcessor.execute(ReflectionBuilder.java:765)
at org.apache.shiro.config.ReflectionBuilder.buildObjects(ReflectionBuilder.java:260)
at org.apache.shiro.config.IniSecurityManagerFactory.buildInstances(IniSecurityManagerFactory.java:167)
at org.apache.shiro.config.IniSecurityManagerFactory.createSecurityManager(IniSecurityManagerFactory.java:130)
at org.apache.shiro.config.IniSecurityManagerFactory.createSecurityManager(IniSecurityManagerFactory.java:108)
at org.apache.shiro.config.IniSecurityManagerFactory.createInstance(IniSecurityManagerFactory.java:94)
at org.apache.shiro.config.IniSecurityManagerFactory.createInstance(IniSecurityManagerFactory.java:46)
at org.apache.shiro.config.IniFactorySupport.createInstance(IniFactorySupport.java:123)
at org.apache.shiro.util.AbstractFactory.getInstance(AbstractFactory.java:47)
at org.apache.shiro.web.env.IniWebEnvironment.createWebSecurityManager(IniWebEnvironment.java:203)
....
2.整合Shiro
在Java Web應用中使用Shiro,需要特別的整合方式,不再像在非Web環境的獨立應用中使用Shiro那麼簡單(只需要下載Shiro並新增到專案即可)。
通常,在Java Web應用中整合框架都是從配置web.xml開始的,整合Shiro也不例外。
web.xml:
<listener>
    <listener-class>org.apache.shiro.web.env.EnvironmentLoaderListener</listener-class>
</listener>

<filter>
    <filter-name>ShiroFilter</filter-name>
    <filter-class>org.apache.shiro.web.servlet.ShiroFilter</filter-class>
</filter>
<filter-mapping>
    <filter-name>ShiroFilter</filter-name>
    <url-pattern>/*</url-pattern>
    <dispatcher>REQUEST</dispatcher>
    <dispatcher>FORWARD</dispatcher>
    <dispatcher>INCLUDE</dispatcher>
    <dispatcher>ERROR</dispatcher>
</filter-mapping>
通常,在Java Web應用中整合第三方框架,都是從Filter開始。Shiro也是如此,即需要將所有請求都經過Shiro指定的Filter進行攔截,這樣才能完成使用者對指定資源訪問的授權驗證。
特別地,從Shiro 1.2+版本之後,在Java Web應用中整合Shiro非常簡單,甚至都不需要明確指定shiro配置檔案的路徑,而是直接在web.xml中新增org.apache.shiro.web.env.EnvironmentLoaderListener即可(只需要保證在${webapp}/WEB-INF/目錄下存在檔案shiro.ini)。
3. 資料來源配置
在Shiro中,Realm定義了訪問資料的方式,用來連線不同的資料來源,如:LDAP,關係資料庫,配置檔案等等。
Realm類圖: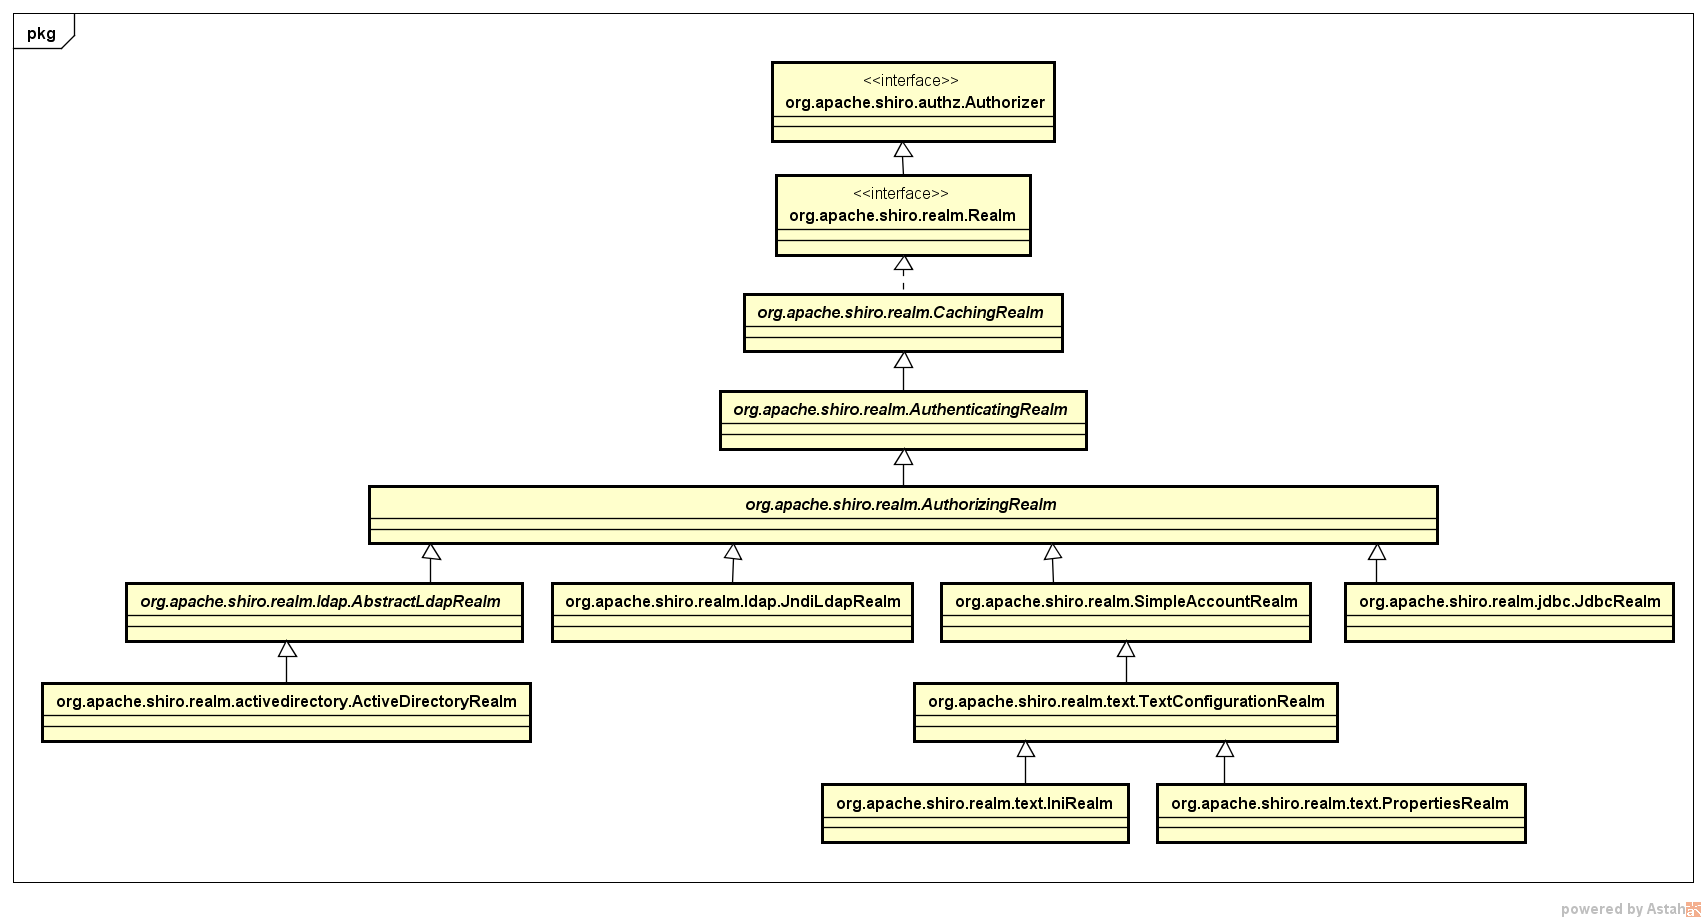
也就是說,可以根據實際需求及應用的許可權管理複雜度靈活選擇指定資料來源。
在此,以org.apache.shiro.realm.text.IniRealm為例,具體配置如下:
shiro.ini:
[main]
# 自定義過濾器
sessionFilter = org.chench.test.shiroweb.filter.SessionFilter
authc.loginUrl = /index
ssl.enabled = false

# -----------------------------------------------------------------------------
# Users and their (optional) assigned roles
# username = password, role1, role2, ..., roleN
# -----------------------------------------------------------------------------
[users]
root = secret, admin
guest = guest, guest
presidentskroob = 12345, president
darkhelmet = ludicrousspeed, darklord, schwartz
lonestarr = vespa, goodguy, schwartz

# -----------------------------------------------------------------------------
# Roles with assigned permissions
# roleName = perm1, perm2, ..., permN
# -----------------------------------------------------------------------------
[roles]
admin = *
schwartz = lightsaber:*
goodguy = winnebago:drive:eagle5

# -----------------------------------------------------------------------------
# The format of each line in the urls section is as follows:
# _URL_Ant_Path_Expression_ = _Path_Specific_Filter_Chain_
# -----------------------------------------------------------------------------
[urls]
/index = anon, sessionFilter
/user/signin = anon
/user/login = anon
/user/** = authc
/home/** = authc
#/admin/** = authc, roles[administrator]
#/rest/** = authc, rest
#/remoting/rpc/** = authc, perms["remote:invoke"]
4. 認證
在Shiro中,認證即執行使用者登入,讀取指定Realm連線的資料來源,以驗證使用者身份的有效性與合法性。
關於Shiro在Web應用中的認證流程,與Shiro在非Web環境的獨立應用中的認證流程一樣,都需要執行使用者登入,即:
Subject currentUser = SecurityUtils.getSubject();
if(!currentUser.isAuthenticated()) {
  UsernamePasswordToken token = new UsernamePasswordToken(name, password);
  try {
    currentUser.login(token);
  } catch (UnknownAccountException e) {
       exception = e;
       logger.error(String.format("user not found: %s", name), e);
    } catch(IncorrectCredentialsException e) {
       exception = e;
       logger.error(String.format("user: %s pwd: %s error", name, password), e);
    } catch (ConcurrentAccessException e) {
       exception = e;
       logger.error(String.format("user has been authenticated: %s", name), e);
    } catch (AuthenticationException e) {
       exception = e;
       logger.error(String.format("account except: %s", name), e);
    }
}
唯一的區別就是,在Java Web環境中,使用者名稱和密碼引數是通過前端頁面進行傳遞。
5. 授權
需要再三強調!!!Shiro作為許可權框架,僅僅只能控制對資源的操作許可權,並不能完成對資料許可權的業務需求。
而對於Java Web環境下Shiro授權,包含個方面的含義。
其一,對於前端來說,使用者只能看到他對應訪問許可權的元素。
其二,當用戶執行指定操作(即:訪問某個uri資源)時,需要驗證使用者是否具備對應許可權。
對於第一點,在Java Web環境下,通過Shiro提供的JSP標籤實現。
<shiro:hasRole name="admin">
    <a>使用者管理</a>
</shiro:hasRole>
<shiro:hasPermission name="winnebago:drive:eagle5">
    <a>操作審計</a>
</shiro:hasPermission>
必須在jsp頁面中引入shiro標籤庫:
<%@ taglib prefix="shiro" uri="http://shiro.apache.org/tags" %>
對於第二點,與在非Java Web環境下一樣,需要在後端呼叫API進行許可權(或者角色)檢驗。如果在Spring框架中整合Shiro,還可以直接通過Java註解方式實現。
api呼叫:
String roleAdmin = "admin";
Subject currentUser = SecurityUtils.getSubject();
if(!currentUser.hasRole(roleAdmin)) {
    //todo something
}
6. 完整示例
詳見:https://git.oschina.net/cchanghui/test-shiroweb.git