
memcached原理 部署memcached 、 Session共享-


NSD OPERATION DAY04
1 案例1:構建memcached服務
1.1 問題
本案例要求先快速搭建好一臺memcached伺服器,並對memcached進行簡單的增、刪、改、查操作:
- 安裝memcached軟體,並啟動服務
- 使用telnet測試memcached服務
- 對memcached進行增、刪、改、查等操作
1.2 方案
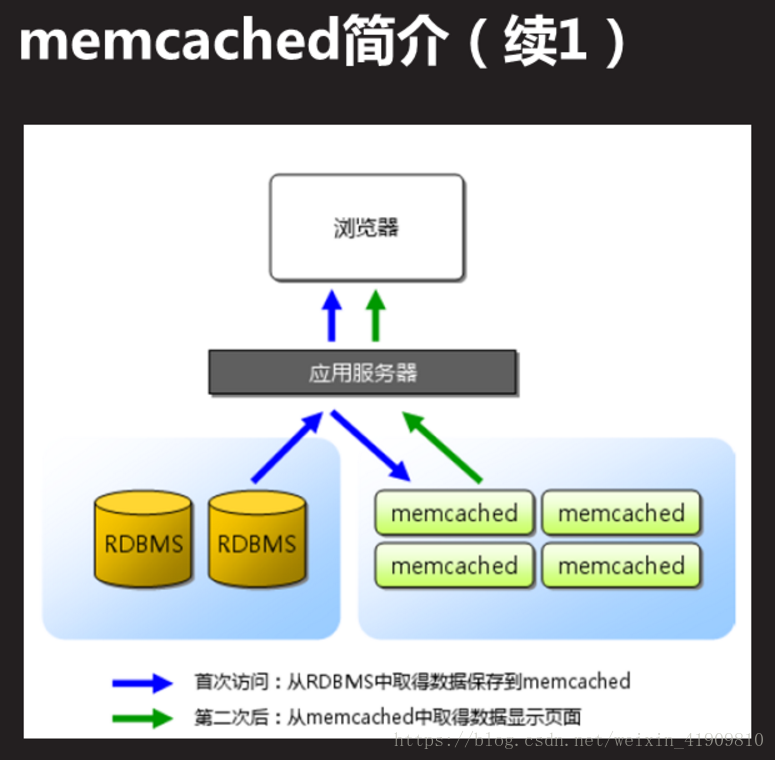
memcached是高效能的分散式快取伺服器,用來集中快取資料庫查詢結果,減少資料庫訪問次數,以提高動態Web應用的響應速度。訪問拓撲如圖-1所示。

圖-1
使用1臺RHEL7虛擬機器作為memcached伺服器(192.168.4.5)。
在RHEL7系統光碟中包含有memcached,因此需要提前配置yum源,即可直接使用yum安裝,客戶端測試時需要提前安裝telnet遠端工具。
驗證時需要客戶端主機安裝telnet,遠端memcached來驗證伺服器的功能:
- add name 0 180 10 //變數不存在則新增
- set name 0 180 10 //新增或替換變數
- replace name 0 180 10 //替換
- get name //讀取變數
- append name 0 180 10 //向變數中追加資料
- delete name //刪除變數
- stats //檢視狀態
- flush_all //清空所有
- 提示:0表示不壓縮,180為資料快取時間,10為需要儲存的資料位元組數量。
1.3 步驟
實現此案例需要按照如下步驟進行。
步驟一:構建memcached服務
1)使用yum安裝軟體包memcached
[[email protected] ~]# yum -y  install   memcached
[[email protected] ~]# rpm -qa memcached
memcached-1.4.15-10.el7_3.1.x86_64
2) memcached配置檔案(檢視即可,不需要修改)
[[email protected] ~]# vim /usr/lib/systemd/system/memcached.service
ExecStart=/usr/bin/memcached -u $USER -p $PORT -m $CACHESIZE -c $MAXCONN $OPTIONS
[[email protected] ~]# vim /etc/sysconfig/memcached PORT=“11211” USER=“memcached” MAXCONN=“1024” CACHESIZE=“64” OPTIONS=""
3)啟動服務並檢視網路連線狀態驗證是否開啟成功:
netstat命令可以檢視系統中啟動的埠資訊,該命令常用選項如下:
-a顯示所有埠的資訊
-n以數字格式顯示埠號
-t顯示TCP連線的埠
-u顯示UDP連線的埠
-l顯示服務正在監聽的埠資訊,如httpd啟動後,會一直監聽80埠
-p顯示監聽埠的服務名稱是什麼(也就是程式名稱)
注意:在RHEL7系統中,使用ss命令可以替代netstat,功能與選項一樣。
[[email protected] ~]# systemctl  start  memcached
[[email protected] ~]# systemctl  status  memcached
[[email protected] ~]# netstat  -anptu  |  grep memcached
tcp	0	0 0.0.0.0:11211		0.0.0.0:*		LISTEN		2839/memcached
tcp	0	0 :::11211			::?				LISTEN		2839/memcached
udp	0	0 0.0.0.0:11211		0.0.0.0:*					2839/memcached
udp	0	0 :::11211			::?							2839/memcached
[[email protected] ~]# setenforce 0
[[email protected] ~]# firewall-cmd --set-default-zone=trusted
步驟二:使用telnet訪問memcached伺服器
1)使用yum安裝telnet
[[email protected] ~]# yum -y install telnet
2)使用telnet連線伺服器測試memcached伺服器功能,包括增、刪、改、查等操作。
[[email protected] ~]# telnet  192.168.4.5  11211
Trying 192.168.4.5…
……
##提示:0表示不壓縮,180為資料快取時間,3為需要儲存的資料位元組數量。
set name 0 180 3				//定義變數,變數名稱為name
plj							//輸入變數的值,值為plj
STORED
get name						//獲取變數的值
VALUE name 0 3     			//輸出結果
plj
END
##提示:0表示不壓縮,180為資料快取時間,3為需要儲存的資料位元組數量。
add myname 0 180 10			//新建,myname不存在則新增,存在則報錯
set myname 0 180 10			//新增或替換變數
replace myname 0 180 10		//替換,如果myname不存在則報錯
get myname					//讀取變數
append myname 0 180 10		//向變數中追加資料
delete myname					//刪除變數
stats						//檢視狀態
flush_all						//清空所有
quit							//退出登入
2 案例2:LNMP+memcached
2.1 問題
沿用練習一,部署LNMP+memcached網站平臺,通過PHP頁面實現對memcached伺服器的資料操作,實現以下目標:
- 部署LNMP實現PHP動態網站架構
2.2 方案
使用2臺RHEL7虛擬機器,其中一臺作為memcached及LNMP伺服器(192.168.4.5)、另外一臺作為測試用的Linux客戶機(192.168.4.100),如圖-1所示。

圖-1
在RHEL7系統光碟中包含有我們需要的MariaDB、PHP,我們需要使用原始碼安裝Nginx,使用RPM包安裝FPM。另外如果希望使用PHP來操作memcached,注意必須要為PHP安裝memcache擴充套件(php-pecl-memcache),否則PHP無法解析連線memcached的指令。客戶端測試時需要提前安裝telnet遠端工具。
2.3 步驟
實現此案例需要按照如下步驟進行。
步驟一:部署LNMP環境(如果環境中已經存在LNMP環境本步驟可以忽略)
1)使用yum安裝基礎依賴包
[[email protected] ~]# yum -y install gcc openssl-devel pcre-devel zlib-devel
.. ..
2)原始碼安裝Nginx
[[email protected] ~]# tar -xf nginx-1.12.2.tar.gz
[[email protected] ~]# cd nginx-1.12.2
[[email protected] nginx-1.12.2]#  ./configure   \
> --with-http_ssl_module
[[email protected] nginx-1.12.2]# make && make install
3)安裝MariaDB資料庫
[[email protected] ~]# yum -y install mariadb mariadb-server mariadb-devel
4)安裝PHP
[[email protected] ~]# yum -y install  php  php-mysql
[[email protected] ~]# yum -y install  php-fpm-5.4.16-42.el7.x86_64.rpm
5)修改Nginx配置檔案
[[email protected] ~]# vim /usr/local/nginx/conf/nginx.conf
location / {
            root   html;
            index  index.php  index.html   index.htm;
        }
 location  ~  \.php$  {
            root           html;
            fastcgi_pass   127.0.0.1:9000;
            fastcgi_index  index.php;
           # fastcgi_param   SCRIPT_FILENAME  $document_root$fastcgi_script_name;
            include        fastcgi.conf;
        }
步驟二:啟動服務(如果所有服務已經啟動,也可以忽略這一步驟)
1)啟動Nginx服務
這裡需要注意的是,如果伺服器上已經啟動了其他監聽80埠的服務軟體(如httpd),則需要先關閉該服務,否則會出現衝突。
[[email protected] ~]# systemctl stop  httpd				//如果該服務存在,則關閉該服務
[[email protected] ~]# /usr/local/nginx/sbin/nginx
[[email protected] ~]# netstat -utnlp | grep :80
tcp	0	0 0.0.0.0:80		0.0.0.0:*		LISTEN		32428/nginx
2)啟動MySQL服務
[[email protected] ~]# systemctl start mariadb
[[email protected] ~]# systemctl status mariadb
3)啟動PHP-FPM服務
[[email protected] ~]# systemctl start php-fpm
[[email protected] ~]# systemctl status php-fpm
4)關閉SELinux、防火牆
[[email protected] ~]# setenforce 0
[[email protected] ~]# firewall-cmd --set-default-zone=trusted
步驟三:建立PHP頁面,使用PHP語言測試memcached服務
1)部署測試頁面
建立PHP首頁文件/usr/local/nginx/html/index.php,測試頁面可以參考lnmp_soft/php_scripts/mem.php:
 [[email protected] ~]# vim /usr/local/nginx/html/test.php
<?php
$memcache=new Memcache;				//建立memcache物件
$memcache->connect('localhost',11211) or die ('could not connect!!');
$memcache->set('key','test');    		 //定義變數
$get_values=$memcache->get('key');    	//獲取變數值
echo $get_values;
?>
2)客戶端測試(結果會失敗)
客戶端使用瀏覽器訪問伺服器PHP首頁文件,檢驗對memcached的操作是否成功:
[[email protected] ~]# firefox http://192.168.4.5/test.php
注意:這裡因為沒有給PHP安裝擴充套件包,預設PHP無法連線memcached資料庫,需要給PHP安裝擴充套件模組才可以連線memcached資料庫。
3)為PHP新增memcache擴充套件
[[email protected] ~]# yum -y install  php-pecl-memcache
[[email protected] ~]# systemctl restart php-fpm
4)客戶端再次測試(結果會成功顯示資料結果)
[[email protected] ~]# firefox http://192.168.4.5/test.php
3 案例3:PHP的本地Session資訊
3.1 問題
通過Nginx排程器負載後端兩臺Web伺服器,實現以下目標:
- 部署Nginx為前臺排程伺服器
- 排程演算法設定為輪詢
- 後端為兩臺LNMP伺服器
- 部署測試頁面,檢視PHP本地的Session資訊
3.2 方案
使用4臺RHEL7虛擬機器,其中一臺作為Nginx前端排程器伺服器(eth0:192.168.4.5,eth1:192.168.2.5)、兩臺虛擬機器部署為LNMP伺服器,分別為Web1伺服器(192.168.2.100)和Web2伺服器(192.168.2.200),另外一臺作為測試用的Linux客戶機(192.168.4.100),拓撲如圖-2所示。

圖-2
3.3 步驟
實現此案例需要按照如下步驟進行。
步驟一:部署後端LNMP伺服器相關軟體
注意:以下部署LNMP伺服器的操作,需要在兩臺後端伺服器做相同的操作,下面我們以一臺Web1伺服器(192.168.2.100)為例,對Web2伺服器執行相同操作即可。
1)使用yum安裝基礎依賴包
[[email protected] ~]# yum -y install gcc openssl-devel pcre-devel zlib-devel
.. ..
2)原始碼安裝Nginx
[[email protected] ~]# tar -xf nginx-1.12.2.tar.gz
[[email protected] ~]# cd nginx-1.12.2
[[email protected] nginx-1.12.2]#  ./configure   \
> --with-http_ssl_module
[[email protected] nginx-1.12.2]# make && make install
3)安裝MariaDB資料庫
[[email protected] ~]# yum -y install mariadb mariadb-server mariadb-devel
4)安裝PHP(php-fpm軟體包在lnmp_soft中有提供)
[[email protected] ~]# yum -y install  php  php-mysql
[[email protected] ~]# yum -y install  php-fpm-5.4.16-42.el7.x86_64.rpm
5)修改Nginx配置檔案(修改預設首頁與動靜分離)
[[email protected] ~]# vim /usr/local/nginx/conf/nginx.conf
location / {
            root   html;
            index  index.php  index.html   index.htm;
        }
 location  ~  \.php$  {
            root           html;
            fastcgi_pass   127.0.0.1:9000;
            fastcgi_index  index.php;
           # fastcgi_param   SCRIPT_FILENAME  $document_root$fastcgi_script_name;
            include        fastcgi.conf;
        }
步驟二:啟動LNMP伺服器相關的服務
1)啟動Nginx服務
這裡需要注意的是,如果伺服器上已經啟動了其他監聽80埠的服務軟體(如httpd),則需要先關閉該服務,否則會出現衝突。
[[email protected] ~]# systemctl stop  httpd				//如果該服務存在,則關閉該服務
[[email protected] ~]# /usr/local/nginx/sbin/nginx
[[email protected] ~]# netstat -utnlp | grep :80
tcp	0	0 0.0.0.0:80		0.0.0.0:*		LISTEN		32428/nginx
2)啟動MySQL服務
[[email protected] ~]# systemctl start mariadb
[[email protected] ~]# systemctl status mariadb
3)啟動PHP-FPM服務
[[email protected] ~]# systemctl start  php-fpm
[[email protected] ~]# systemctl status php-fpm
4)關閉SELinux、防火牆
[[email protected] ~]# setenforce 0
[[email protected] ~]# firewall-cmd --set-default-zone=trusted
步驟三:部署前端Nginx排程伺服器
1)使用原始碼安裝nginx軟體(如果Nginx軟體包已存在可以忽略此步驟)
[[email protected] ~]# yum  -y  install   pcre-devel openssl-devel
[[email protected] ~]# tar -xf nginx-1.12.2.tar.gz
[[email protected] ~]# cd nginx-1.12.2
[[email protected] nginx-1.12.2]# ./configure
[[email protected] nginx-1.12.2]# make && make install
2)修改Nginx配置檔案
Nginx配置檔案中,通過upstream定義後端伺服器地址池,預設排程策略為輪詢,使用proxy_pass呼叫upstream定義的伺服器地址池:
[[email protected] ~]# vim /usr/local/nginx/conf/nginx.conf
.. ..
upstream webs  {
        server 192.168.2.100:80;
        server 192.168.2.200:80;
  }
 server  {
          listen       80;
          server_name  localhost;
          location  /  {
			  proxy_pass http://webs;
            root   html;
            index  index.php index.html index.htm;
          }
}
3)重新載入配置檔案
[[email protected] ~]# /usr/local/nginx/sbin/nginx -s reload
#請先確保nginx是啟動狀態才可以執行命令成功,否則報錯,報錯資訊如下:
#[error] open() "/usr/local/nginx/logs/nginx.pid" failed (2: No such file or directory)
4)關閉SELinux、防火牆
[[email protected] ~]# setenforce 0
[[email protected] ~]# firewall-cmd --set-default-zone=trusted
步驟四:測試環境是否配置成功
1)瀏覽器訪問測試頁面驗證。
[[email protected] ~]# curl http://192.168.4.5/index.html //檢視是否有資料
步驟五:部署測試頁面
1)部署測試頁面(Web1伺服器)。
測試頁面可以參考lnmp_soft/php_scripts/php-memcached-demo.tar.gz。
[[email protected] ~]# cd lnmp_soft/php_scripts/
[[email protected] php_scripts]# tar -xf php-memcached-demo.tar.gz
[[email protected] php_scripts]# cd php-memcached-demo
[[email protected] php-memcached-demo]# cp -a  *  /usr/local/nginx/html/
2)瀏覽器直接訪問後端伺服器的測試頁面(Web1伺服器)。
[[email protected] ~]# firefox http://192.168.2.100			//填寫賬戶資訊
[[email protected] ~]# cd /var/lib/php/session/			//檢視伺服器本地的Session資訊
[[email protected] ~]# ls
sess_ahilcq9bguot0vqsjtd84k7244						//注意這裡的ID是隨機的
[[email protected] ~]# cat sess_ahilcq9bguot0vqsjtd84k7244
注意:可用修改index.php和home.php兩個檔案的內容,新增頁面顏色屬性,以區別後端兩臺不同的伺服器:<body bgcolor=blue>。
3)部署測試頁面(Web2伺服器)。
測試頁面可以參考lnmp_soft/php_scripts/php-memcached-demo.tar.gz。
[[email protected] ~]# cd lnmp_soft/php_scripts/
[[email protected] php_scripts]# tar -xf php-memcached-demo.tar.gz
[[email protected] php_scripts]# cd php-memcached-demo
[[email protected] php-memcached-demo]# cp -a  *  /usr/local/nginx/html/
4)瀏覽器直接訪問後端伺服器的測試頁面(Web2伺服器)。
[[email protected] ~]# firefox http://192.168.2.100		     //填寫賬戶資訊
[[email protected] ~]# cd /var/lib/php/session/			//檢視伺服器本地的Session資訊
[[email protected] ~]# ls
sess_qqek1tmel07br8f63d6v9ch401						//注意這裡的ID是隨機的
[[email protected] ~]# cat sess_qqek1tmel07br8f63d6v9ch401
注意:可用修改index.php和home.php兩個檔案的內容,新增頁面顏色屬性,以區別後端兩臺不同的伺服器:<body bgcolor=green>。
5)瀏覽器訪問前端排程器測試(不同後端伺服器Session不一致)。
推薦使用google瀏覽器測試。
[[email protected] ~]# google-chrome http://192.168.4.5
//填寫註冊資訊後,重新整理,還需要再次註冊,說明兩臺計算機使用的是本地Session
//第二臺主機並不知道你再第一臺主機已經登入,第一臺主機的登入資訊也沒有傳遞給第二臺主機
4 案例4:PHP實現session共享
4.1 問題
沿用練習三,通過修改PHP-FPM配置檔案,實現session會話共享,本案例需要在練習三的基礎上實現:
- 配置PHP使用memcached伺服器共享Session資訊
- 客戶端訪問兩臺不同的後端Web伺服器時,Session 資訊一致
4.2 方案
在練習三拓撲的基礎上,Nginx伺服器除了承擔排程器外,還需要擔任memcached資料庫的角色,並在兩臺後端LNMP伺服器上實現PHP的session會話共享。拓撲結構如圖-4所示。

圖-4
4.3 步驟
實現此案例需要按照如下步驟進行。
步驟一:構建memcached服務
1)安裝Memcached服務(如果192.168.4.5上已經有本軟體包,此步驟可以忽略)
[[email protected] ~]# yum -y install memcached
2)啟動服務並檢視網路連線狀態驗證是否開啟成功:
[[email protected] ~]# systemctl restart memcached
[[email protected] ~]# netstat  -anptu  |  grep memcached
tcp	0	0 0.0.0.0:11211		0.0.0.0:*		LISTEN		2839/memcached
tcp	0	0 :::11211			:::*				LISTEN		2839/memcached
udp	0	0 0.0.0.0:11211		0.0.0.0:*					2839/memcached
udp	0	0 :::11211			:::*							2839/memcached
3)關閉SELinux、防火牆
[[email protected] ~]# setenforce 0
[[email protected] ~]# firewall-cmd --set-default-zone=trusted
步驟二:在後端LNMP伺服器上部署Session共享
注意:這些操作在兩臺後端Web伺服器上均需要執行,以下操作以Web1(192.168.2.100)伺服器為例。
1)為PHP新增memcache擴充套件
注意,因為後端兩臺web伺服器(web1,web2)都需要連線memcached資料庫,所以兩臺主機都需要安裝PHP擴充套件模組(下面也web1為例)。
[[email protected] ~]# yum -y install php-pecl-memcache
2)修改PHP-FPM配置檔案,並重啟服務
注意,因為後端兩臺web伺服器(web1,web2)都需要修改配置檔案(下面也web1為例)。
[[email protected] ~]# vim  /etc/php-fpm.d/www.conf			//修改該配置檔案的兩個引數
//檔案的最後2行
修改前效果如下:
php_value[session.save_handler] = files
php_value[session.save_path] = /var/lib/php/session
//原始檔案,預設定義Sessoin會話資訊本地計算機(預設在/var/lib/php/session)
+++++++++++++++++++++++++++++++++++++++++++++++++++++++++++++++++++++++++
修改後效果如下:
php_value[session.save_handler] = memcache
php_value[session.save_path] = "tcp://192.168.2.5:11211"
//定義Session資訊儲存在公共的memcached伺服器上,主機引數中為memcache(沒有d)
//通過path引數定義公共的memcached伺服器在哪(伺服器的IP和埠)
[[email protected] ~]# systemctl  restart  php-fpm
步驟三:客戶端測試
客戶端使用瀏覽器訪問兩臺不同的Web伺服器。
操作步驟與練習三一致,最終可以獲得相關的Session ID資訊。