
android mtp模式下連線PC後只顯示指定資料夾
轉載請註明文章出錯及作者
作者:Xandy
出處:http://blog.csdn.net/xl19862005
一、mtp概述
android在3.0以後的版本加入了mtp的支援,相對於mass storage模式,由於mtp優越性,現在幾乎所有的手機連線PC後都是以mtp的方式進行檔案訪問。
這裡簡單講述一下mtp的優點:
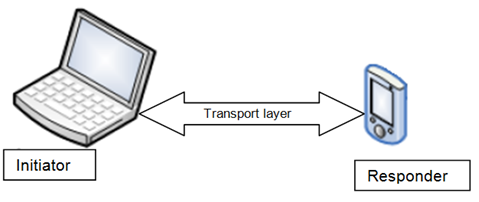
1、Initiator和Responder可同時對檔案進行儲存。相對於mass storage的模式,這種優點是顯而易見的。
PC連線上responder裝置之後,不是直接對裝置中的儲存分割槽進行訪問,而是通過vfs的方式間接訪問儲存分割槽中的檔案,這個作為Initiator端的PC裝置來說,就不再需要關心要訪問的responder儲存分割槽是什麼檔案系統了,通過公用的vfs就可以對不同檔案系統的儲存裝置進行讀寫了。
2、mtp模式下Initiator可以知道Responder所支援的媒體檔案格式有哪些
3、檔案訪問許可權可控。這點是筆者根據android下mtp的架構自加的,也正是本文所需要說的重點。
二、android mtp啟動流程
這裡要提到一點的是:android裝置啟動之後,當在MediaScannerReceiver(android_src/providers/MediaProvider/src/com/android/providers/media/MediaScannerReceiver.java)中監聽到開機完成廣播(android.intent.action.BOOT_COMPLETED)時,會啟動MeidaScannerService,對整個裝置內部的儲存裝置進行掃描,並將掃描到的檔案存入資料庫!
這裡要提一個原生android系統的bug:在開機完成之後,在android裝置上拍照或者截圖後,將裝置連線上PC,是無法找到剛拍的照片或截圖圖片的!這是因為MediaScannerService的啟動只在BOOT_COMPLETED時scan一次,此後新增加的檔案都還沒有更新到資料庫,需要重啟系統後在PC上才能發現新增加的檔案。
為了解決此bug,我在MediaScannerReceiver中增加了對USB_STATE狀態廣播的監聽,所以每次插拔USB時都會scan一次。
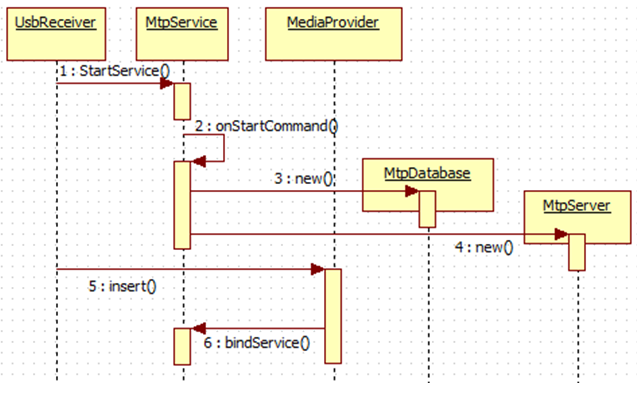
而從上圖可知,MtpService啟動後也是需要去資料庫(MtpDatabase)裡拿檔案的,所以可以通過修改資料庫的查詢規則來達到連線PC後只顯示指定檔案/資料夾的功能。
三、檔案過濾程式碼修改
首先來看看MtpDatabase(android_src/frameworks/base/media/java/android/mtp/MtpDatabase.java)裡關於建立資料庫查詢的方法:
private Cursor createObjectQuery(int storageID, int format, int parent) throws RemoteException {
String where;
String[] whereArgs;
if (storageID == 0xFFFFFFFF) {
// query all stores
if (format == 0) {
// query all formats
if 而方法query的定義如下:
public Cursor query(String callingPkg, Uri url, String[] projection, String selection, String[] selectionArgs, String sortOrder, IcancellationSignal cancellationSignal)throws RemoteExceptioin;不難理解,方法createObjectQuery中獲得的where 字串是用於到資料庫裡查詢與where匹配的檔案的,這裡還要說明一點的是mSubDirectoriersWhere,可以看到當這個subDirectoriersWhere不為空時,作了如下合併到where字串
where = where + " AND " + mSubDirectoriesWhere;那麼可以通過增加對這個mSubDirectoriesWhere的賦值(賦以指定需要到資料庫裡查詢的資料夾名),就可以達到想要的檔案過濾功能!
而mSubDirectoriesWhere只在MtpDatabase的構造方法裡進行賦值:
public MtpDatabase(Context context, Stirng volumeName, String storagePath, String[] subDirectories){
      ……
      if(subDirectories != null){
            StringBuilder builder = new StringBuilder();
            int count = subDirectories.lenght;
            for(int i=0;i<count;i++){
                  builder.append..........
                  ……
            }
            ……
            mSubDirectoriesWhere = builer.toString();
      }
}
那麼只要在建立 MtpDatabase的時候傳入這個subDirectories String陣列就可以達到想要的功能了!
在MtpService(android_src/packages/providers/MediaProvider/src/com/android/providers/media/MtpService.java)中增加如下程式碼:
private static final String[] MTP_DIRECTORIES_PRIVATE = new String[]{
    Environment.DIRECTORY_DCIM,
    Environment.DIRECTORY_PICTURES,
    Environment.DIRECTORY_MOVIES,
    Environment.XXXXXX,
    ……
};
……
@Override
public int onStartCommand(Intent intent, int flags, int startId){
    ……
    if(!mPtpMode){
        int num = MTP_DIRECTORIES_PRIVATE.length;
        subdirs = new String[num];
        for(int j=0;j<num;j++){
            File file = Environment.getExternalStoragePublicDirectory(MTP_DIRECTORIES_PRIVATE[j]);
            file.mkdirs();
            subdirs[j] = file.getPath();
        }
    }
    ……
    //最後在這裡建立MtpDatabase,並傳入subdirs到前面提到的where
    mDatabase = new MtpDatabase(this, MediaProvider.EXTERNAL_VOLUME, primary.getPath(), subdirs);
    ……
}