Spring原始碼——容器擴充套件ApplicationContext
前言
內容主要參考自《Spring原始碼深度解析》一書,算是讀書筆記或是原書的補充。進入正文後可能會引來各種不適,畢竟閱讀原始碼是件極其痛苦的事情。
前面的文章中,我們以 BeanFactory 介面以及它的實現類 XmlBeanFactory 為例分析了整個Spring載入配置檔案、建立獲取 bean 的過程。除此以外,Spring還有另一個介面 ApplicationContext,用於擴充套件 BeanFactory 中現有的功能。下面我們就仔細來研究一下這個介面及其實現類。
I. ApplicationContext使用
ApplicationContext 和 BeanFactory
ApplicationContext 提供了更多的功能,包含了 BeanFactory 的所有功能。通常情況下,在大多數應用中都使用的是 ApplicationContext,同時, XmlBeanFactory 在Spring3.1後已經被廢棄,標記為過時。
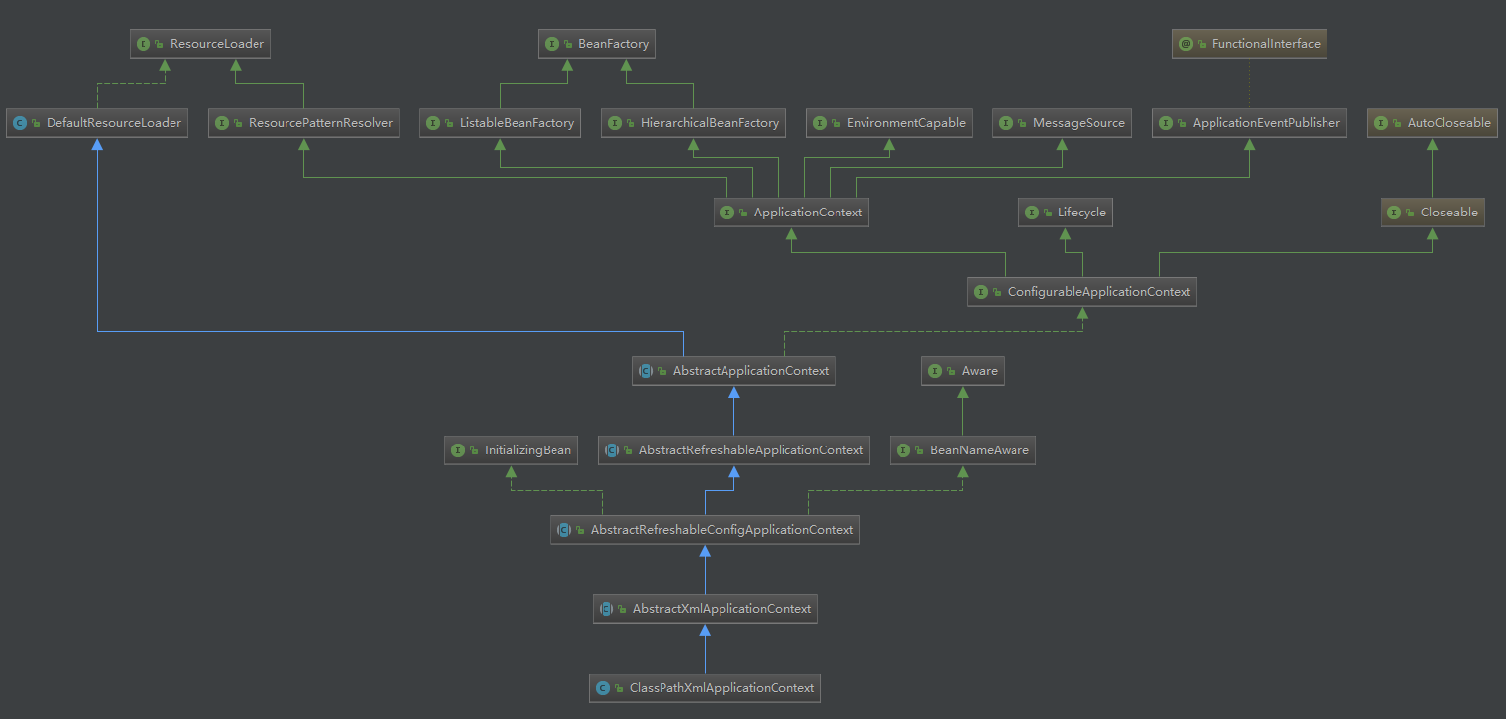
檢視 ClassPathXmlApplicationContext 類的繼承結構,發現其也實現了 BeanFactory 介面。
首先來看一下兩者在載入配置檔案的寫法差異:
-
使用
BeanFactory方式載入 XMLXmlBeanFactory context = new XmlBeanFactory(new ClassPathResource("customTag-Test.xml")); -
使用
ApplicationContext方式載入 XMLApplicationContext context = new ClassPathXmlApplicationContext("customTag-Test.xml");
同樣,我們從 ClassPathXmlApplicationContext 出發,開始一步步深入探究。
/**
* Create a new ClassPathXmlApplicationContext, loading the definitions
* from the given XML file and automatically refreshing the context.
* @param configLocation resource location
* @throws BeansException if context creation failed
*/ 檢視其建構函式,configLocation 代表了配置檔案的路徑,是必傳的引數。也可以設定多個路徑,作為陣列形式傳入。對於XML的解析和功能實現則都在 refresh() 中實現。
II. 設定配置檔案路徑
在 ClassPathXmlApplicationContext 中支援多個配置檔案以陣列方式同時傳入:
/**
 * 設定配置檔案們的路徑
 * Set the config locations for this application context.
 * <p>If not set, the implementation may use a default as appropriate.
 */
public void setConfigLocations(@Nullable String... locations) {
   if (locations != null) {
      Assert.noNullElements(locations, "Config locations must not be null");
      this.configLocations = new String[locations.length];
      for (int i = 0; i < locations.length; i++) {
         // 解析路徑
         this.configLocations[i] = resolvePath(locations[i]).trim();
      }
   }
   else {
      this.configLocations = null;
   }
}
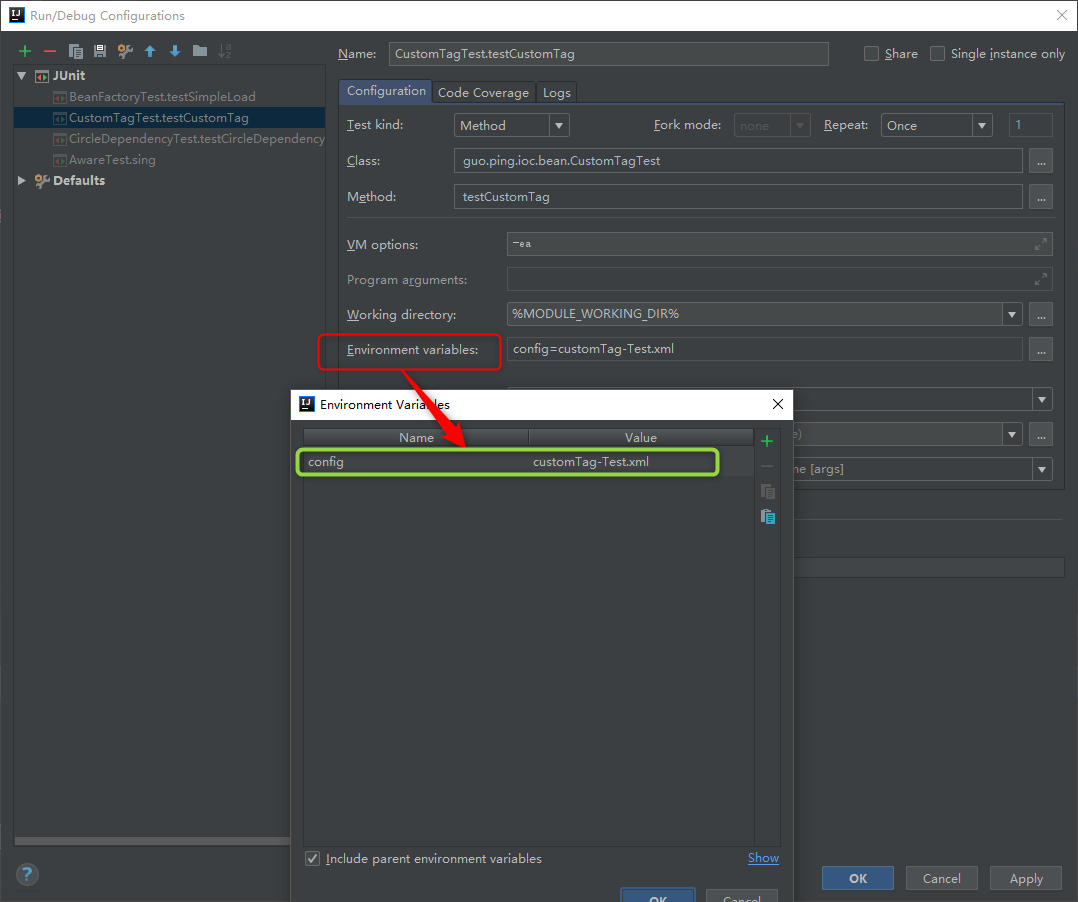
該函式通過 resolvePath() 解析給定的配置檔案路徑陣列,如果路徑包含特殊的符號,如 ${var},那麼將會搜尋配置的環境變數並進行替換。我們在IDEA中測試一下:
我們在呼叫的時候,替換成:
ApplicationContext context = new ClassPathXmlApplicationContext("${config}");
IDEA中我們配置了環境變數 config=custtomTag-Test.xml,Spring會解析出該值。
/**
 * Resolve the given path, replacing placeholders with corresponding
 * environment property values if necessary. Applied to config locations.
 * @param path the original file path
 * @return the resolved file path
 * @see org.springframework.core.env.Environment#resolveRequiredPlaceholders(String)
 */
protected String resolvePath(String path) {
   return getEnvironment().resolveRequiredPlaceholders(path);
}
resolvePath 通過 ConfigurableEnvironment 環境例項呼叫 resolveRequiredPlaceholders 方法進行解析,首先需要先獲取 Environment,如果 AbstractApplicationContext 的 this.environment 屬性為空,那麼需要初始新建 StandardEnvironment 例項進行初始化。
/**
 * Return the {@code Environment} for this application context in configurable
 * form, allowing for further customization.
 * <p>If none specified, a default environment will be initialized via
 * {@link #createEnvironment()}.
 */
@Override
public ConfigurableEnvironment getEnvironment() {
   if (this.environment == null) {
      this.environment = createEnvironment();
   }
   return this.environment;
}

/**
 * Create and return a new {@link StandardEnvironment}.
 * <p>Subclasses may override this method in order to supply
 * a custom {@link ConfigurableEnvironment} implementation.
 */
protected ConfigurableEnvironment createEnvironment() {
    return new StandardEnvironment();
}
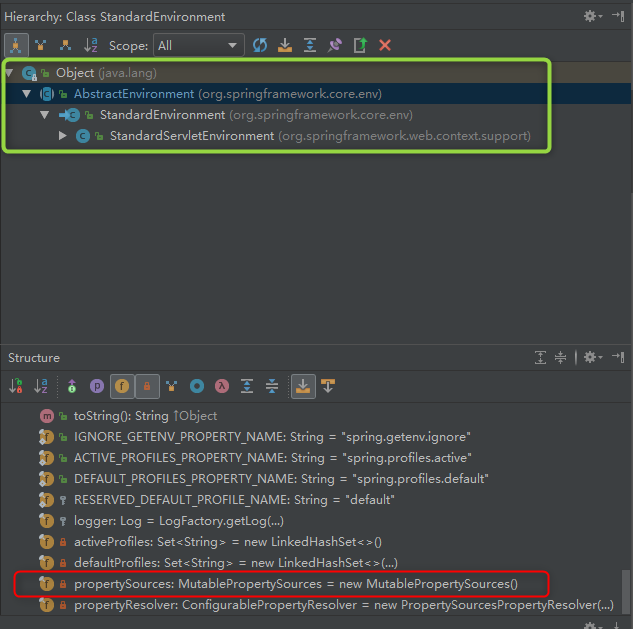
StandardEnvironment 繼承自 AbstractEnvironment, AbstractEnvironment 中有一個 MutablePropertySources 型別的屬性 propertySources,其中存放了我們配置的環境變數資訊。讀者可移自行debug進行驗證。而Spring接著需要做的就是從中依據 key=config 來獲取到 value=custtomTag-Test.xml。
解析提取的工作委託給了 AbstractEnvironment 的 AbstractPropertyResolver 例項 propertyResolver。
@Override
public String resolveRequiredPlaceholders(String text) throws IllegalArgumentException {
   return this.propertyResolver.resolveRequiredPlaceholders(text);
}

@Override
public String resolveRequiredPlaceholders(String text) throws IllegalArgumentException {
    if (this.strictHelper == null) {
        this.strictHelper = createPlaceholderHelper(false);
    }
    return doResolvePlaceholders(text, this.strictHelper);
}
最終在 doResolvePlaceholders 中層層呼叫,這裡就不繼續深入了,可以自行debug:
protected String parseStringValue(
      String value, PlaceholderResolver placeholderResolver, Set<String> visitedPlaceholders) {

   StringBuilder result = new StringBuilder(value);

   int startIndex = value.indexOf(this.placeholderPrefix);
   while (startIndex != -1) {
      int endIndex = findPlaceholderEndIndex(result, startIndex);
      if (endIndex != -1) {
         // 獲取${}中的內容
         String placeholder = result.substring(startIndex + this.placeholderPrefix.length(), endIndex);
         String originalPlaceholder = placeholder;
         if (!visitedPlaceholders.add(originalPlaceholder)) {
            throw new IllegalArgumentException(
                  "Circular placeholder reference '" + originalPlaceholder + "' in property definitions");
         }
         // Recursive invocation, parsing placeholders contained in the placeholder key.
         placeholder = parseStringValue(placeholder, placeholderResolver, visitedPlaceholders);
         // Now obtain the value for the fully resolved key...
         // 根據key=config獲取到value=custtomTag-Test.xml
         String propVal = placeholderResolver.resolvePlaceholder(placeholder);
         ....
      }
      else {
         startIndex = -1;
      }
   }

   return result.toString();
}
III. ApplicationContext擴充套件功能
解析完配置檔案路徑之後,儲存在 ApplicationContext 成員變數 this.configLocations 中,然後便能夠讀取配置檔案進行解析以及實現各種功能,這些都在 refresh() 中進行實現。
/**
 * 包含ApplicationContext所有功能
 * @throws BeansException
 * @throws IllegalStateException
 */
@Override
public void refresh() throws BeansException, IllegalStateException {
   synchronized (this.startupShutdownMonitor) {
      // 準備重新整理的上下文環境,初始化前準備工作,對環境變數的驗證
      prepareRefresh();

      // Tell the subclass to refresh the internal bean factory.
      // 初始化BeanFactory,並進行XML檔案讀取
      ConfigurableListableBeanFactory beanFactory = obtainFreshBeanFactory();

      // Prepare the bean factory for use in this context.
      // 對BeanFactory進行各種功能填充
      prepareBeanFactory(beanFactory);

      try {
         // Allows post-processing of the bean factory in context subclasses.
         // 允許子類覆蓋該方法做額外的處理
         postProcessBeanFactory(beanFactory);

         // Invoke factory processors registered as beans in the context.
         // 啟用各種BeanFactory處理器
         invokeBeanFactoryPostProcessors(beanFactory);

         // Register bean processors that intercept bean creation.
         // 註冊 攔截Bean建立的 Bean處理器,這裡只是註冊,真正的呼叫是在getBean時候
         registerBeanPostProcessors(beanFactory);

         // Initialize message source for this context.
         // 為上下文初始化Message訊息資源,即不同語言的訊息體,國際化處理
         initMessageSource();

         // Initialize event multicaster for this context.
         // 初始化應用訊息廣播器,並放入"applicationEventMulticaster"bean中,與Spring的事件監聽有關
         initApplicationEventMulticaster();

         // Initialize other special beans in specific context subclasses.
         // 留給子類來初始化其他bean
         onRefresh();

         // Check for listener beans and register them.
         // 在所有註冊的bean中查詢Listener bean,註冊到訊息廣播器中
         registerListeners();

         // Instantiate all remaining (non-lazy-init) singletons.
         // 初始化剩下的單例項(非惰性的)
         finishBeanFactoryInitialization(beanFactory);

         // Last step: publish corresponding event.
         // 完成重新整理過程,通知生命週期處理器 lifecycleProcessor 重新整理過程,同時發出 ContextRefreshEvent 通知別人
         finishRefresh();
      }

      catch (BeansException ex) {
         if (logger.isWarnEnabled()) {
            logger.warn("Exception encountered during context initialization - " +
                  "cancelling refresh attempt: " + ex);
         }

         // Destroy already created singletons to avoid dangling resources.
         destroyBeans();

         // Reset 'active' flag.
         cancelRefresh(ex);

         // Propagate exception to caller.
         throw ex;
      }

      finally {
         // Reset common introspection caches in Spring's core, since we
         // might not ever need metadata for singleton beans anymore...
         resetCommonCaches();
      }
   }
}
方法中包含了本文需要講的所有內容,每一個函式呼叫便是流程中的一個環節,我們先來配合註釋整體把握一下:
-
初始化 Context 前的準備工作,例如對系統屬性和環境變數進行準備以及驗證等。
在某種情況下,可能專案需要讀取系統變數,而系統變數的設定可能會影響系統的正確性,那麼
ClassPathXmlApplicationContext為我們提供的這個準備函式prepareRefresh()就顯得非常必要,它可以在Spring啟動的時候提前對必須的變數進行存在性驗證。 -
初始化 BeanFactory,並進行XML檔案讀取。
BeanFactory 作為
ClassPathXmlApplicationContext的成員變數,會在這裡進行初始化(賦值),擁有了 BeanFactory 所有的功能。這裡順便提一下,BeanFactory 就是常說的Spring容器,在 BeanFactory 的一些實現類如DefaultListableBeanFactory中存在著 beanDefinitionMap 這樣成員變數存放著所有的BeanDefinition物件,每一個BeanDefinition對應一個XML中的 <bean> 標籤。 -
對 BeanFactory 進行各種功能填充。
這一部分主要增加一些對Spring表示式語言的支援、一些屬性編輯器的註冊和其他一些擴充套件 beanFactory 瑣碎細節。
-
子類重寫 postProcessBeanFactory(beanFactory) 方法做額外處理。
Spring的強大另一方面在於它的完美架構,開放式的架構讓使用它的程式設計師容易的根據業務需要擴充套件已經存在的功能。這種開放式的設計在Spring中隨處可見,如
postProcessBeanFactory(beanFactory)在AbstractApplicationContext中是一個實現方法,子類可以重寫進行擴充套件。順便提一句,postprocess 可以翻譯為後期處理或後處理。 -
啟用各種 BeanFactory 處理器。
-
註冊攔截 bean 建立的 bean 處理器。
標題注意斷句!這裡只是註冊,真正呼叫是在
getBean()的時候。 -
為 Context 初始化 Message 源,即不同語言的訊息體進行國際化處理。
-
初始化應用訊息廣播器,並放入 applicationEventMulticaster 的 bean 中。
-
留給子類重寫來初始化其他的 bean。
-
在所有註冊的 bean 中查詢 listener bean,註冊到訊息廣播器中。
-
初始化剩下的單例項(非惰性)。
-
完成重新整理過程。
完成 Context 的重新整理,通知生命週期處理器 lifecycleProcessor 重新整理過程,同時發出 ContextRefreshEvent 通知其他監聽器做進一步處理。
下面,就對這12步驟一一進行細緻分析。
IV. 環境準備
prepareRefresh 函式主要是做些準備工作,例如對系統屬性及環境變數的初始化及驗證。
/**
 * 做一些準備工作,例如對系統屬性及環境變數的初始化及驗證
 * Prepare this context for refreshing, setting its startup date and
 * active flag as well as performing any initialization of property sources.
 */
protected void prepareRefresh() {
   this.startupDate = System.currentTimeMillis();
   this.closed.set(false); // AtomicBoolean型別,併發
   this.active.set(true); // AtomicBoolean型別,併發

   if (logger.isDebugEnabled()) {
      logger.debug("Refreshing " + this);
   }

   // Initialize any placeholder property sources in the context environment
   // 留給子類覆蓋實現
   initPropertySources();

   // 驗證需要的屬性檔案是否都已經放入環境中
   // see ConfigurablePropertyResolver#setRequiredProperties
   getEnvironment().validateRequiredProperties();

   // Allow for the collection of early ApplicationEvents,
   // to be published once the multicaster is available...
   this.earlyApplicationEvents = new LinkedHashSet<>();
}
該函式感覺好像沒什麼用處,因為主要就是中文註釋的兩個函式,然而 initPropertySources 是一個空函式,沒有任何邏輯,而 getEnvironment().validateRequiredProperties 也因為沒有需要驗證的屬性而沒做任何處理。其實不然。
initPropertySources 符合Spring開放式的結構設計,給使用者最大擴充套件Spring能力。使用者可以根據自身的需要重寫該方法,並在該方法進行個性化的屬性設定和處理;
validateRequiredProperties 是對屬性進行驗證,最終呼叫的其實是:
/**
 * 對屬性進行驗證
 */
@Override
public void validateRequiredProperties() {
   MissingRequiredPropertiesException ex = new MissingRequiredPropertiesException();
   // this.requiredProperties可以通過getEnvironment().setRequiredProperties()方法設定
   for (String key : this.requiredProperties) {
      if (this.getProperty(key) == null) {
         ex.addMissingRequiredProperty(key);
      }
   }
   if (!ex.getMissingRequiredProperties().isEmpty()) {
      throw ex;
   }
}
這裡驗證的過程中用了Spring自定義的 MissingRequiredPropertiesException 異常類:
public class MissingRequiredPropertiesException extends IllegalStateException {

   private final Set<String> missingRequiredProperties = new LinkedHashSet<>();

   void addMissingRequiredProperty(String key) {
      this.missingRequiredProperties.add(key);
   }

   @Override
   public String getMessage() {
      return "The following properties were declared as required but could not be resolved: " + getMissingRequiredProperties();
   }

   public Set<String> getMissingRequiredProperties() {
      return this.missingRequiredProperties;
   }

}
該異常類中包含 missingRequiredProperties 屬性,當 this.requiredProperties 中有屬性沒有時,會新增到其中。只要最後 missingRequiredProperties 屬性中存在沒有的,便會丟擲 MissingRequiredPropertiesException 異常。this.requiredProperties 可以通過 getEnvironment().setRequiredProperties() 方法設定。
為了更好的理解,舉個實際使用的例子。我們新建一個 ClassPathXmlApplicationContext 的子類,重寫 initPropertySources() 方法,在其中新增需要驗證的屬性。
package guo.ping.ioc.validateproperties;

import org.springframework.beans.BeansException;
import org.springframework.context.support.ClassPathXmlApplicationContext;

/**
 * @description: 自定義擴充套件ClassPathXmlApplicationContext
 * @author: guoping wang
 * @date: 2018/10/3 12:34
 * @project: spring
 */
public class MyClassPathXmlAppllicationContext extends ClassPathXmlApplicationContext {

   public MyClassPathXmlAppllicationContext(String... configLocations) throws BeansException {
      super(configLocations);
   }

   /**
    * 重寫方法新增需要驗證的Properties
    */
   @Override
   protected void initPropertySources() {
      getEnvironment().setRequiredProperties("VAR");
   }
}
新建我們繼承的類的測試類:
package guo.ping.ioc.bean;

import guo.ping.ioc.customtag.User;
import guo.ping.ioc.validateproperties.MyClassPathXmlAppllicationContext;
import org.junit.Test;
import org.springframework.context.ApplicationContext;

/**
 * @description: 測試驗證屬性
 * @author: guoping wang
 * @date: 2018/10/3 13:15
 * @project: spring
 */
public class ValidatePropertiesTest {

   @Test
   public void testValidateProperties() {
      ApplicationContext context = new MyClassPathXmlAppllicationContext("customTag-Test.xml");
      User user = (User) context.getBean("testUserBean");
   }
}
測試結果如下,如果系統並沒有檢測到對應 VAR 的環境變數,將丟擲異常。
按照之前在IDEA設定環境變數的方法,設定了 VAR 環境變數,即可解決異常。
V. 載入BeanFactory
obtainFreshBeanFactory() 方法字面意思獲取重新整理的 BeanFactory,就是初始化 ApplicationContext 的成員變數 beanFactory,經過 obtainFreshBeanFactory() 方法,ApplicationContext 就會擁有 BeanFactory 的全部功能。
/**
 * 經過該函式後,ApplicationContext就擁有BeanFactory的功能
 * Tell the subclass to refresh the internal bean factory.
 * @return the fresh BeanFactory instance
 * @see #refreshBeanFactory()
 * @see #getBeanFactory()
 */
protected ConfigurableListableBeanFactory obtainFreshBeanFactory() {
   // 初始化BeanFactory,並進行XML檔案讀取,將得到的BeanFactory記錄在當前實體的屬性中
   refreshBeanFactory();
   // 返回當前實體的beanFactory屬性
   return getBeanFactory();
}
真正的核心實現是在 refreshBeanFactory() 中,我們先看看 getBeanFactory():
@Override
public final ConfigurableListableBeanFactory getBeanFactory() {
   synchronized (this.beanFactoryMonitor) {
      if (this.beanFactory == null) {
         throw new IllegalStateException("BeanFactory not initialized or already closed - " +
               "call 'refresh' before accessing beans via the ApplicationContext");
      }
      return this.beanFactory;
   }
}
方法中主要是返回成員變數 this.beanFactory,我們可以推測出 this.beanFactory 在 refreshBeanFactory() 中進行了賦值初始化。
/**
 * 初始化BeanFactory,並進行XML檔案讀取,將得到的BeanFactory記錄在當前實體的屬性中
 * This implementation performs an actual refresh of this context's underlying
 * bean factory, shutting down the previous bean factory (if any) and
 * initializing a fresh bean factory for the next phase of the context's lifecycle.
 */
@Override
protected final void refreshBeanFactory() throws BeansException {
   if (hasBeanFactory()) {
      destroyBeans();
      closeBeanFactory();
   }
   try {
      // 建立DefaultListableBeanFactory,就是XmlBeanFactory繼承的
      DefaultListableBeanFactory beanFactory = createBeanFactory();
      // 為了序列化指定id,如果需要的話,讓這個BeanFactory從id反序列化到BeanFactory物件
      beanFactory.setSerializationId(getId());
      // 定製beanFactory,設定相關屬性,包括允許覆蓋同名稱的不同定義的物件、迴圈依賴
      // 可以被子類重新實現設定DefaultListableBeanFactory的任何配置
      customizeBeanFactory(beanFactory);
      // 初始化DocumentReader,並進行XML檔案的讀取和解析
      loadBeanDefinitions(beanFactory);
      // 使用全域性變數記錄BeanFactory類例項
      synchronized (this.beanFactoryMonitor) {
         this.beanFactory = beanFactory;
      }
   }
   catch (IOException ex) {
      throw new ApplicationContextException("I/O error parsing bean definition source for " + getDisplayName(), ex);
   }
}
主要的執行流程如下:
-
建立
DefaultListableBeanFactory。沒錯,就是之前研究的
XmlBeanFactory所繼承的,DefaultListableBeanFactory是容器的基礎,ApplicationContext想要實現容器的功能,必須執行例項化DefaultListableBeanFactory步驟。 -
指定序列化 ID。
-
定製
BeanFactory。 -
載入
BeanDefinition。 -
使用全域性變數記錄
BeanFactory類例項。第五步正是我們推測一般,將建立的 beanFactory 賦值給成員變數,便於之後所有函式能夠通過
getBeanFactory()獲得到 beanFactory 例項。
建立DefaultListableBeanFactory
建立該例項是通過 createBeanFactory() 方法實現的,呼叫 DefaultListableBeanFactory 的建構函式進行建立。
/**
 * Create an internal bean factory for this context.
 * Called for each {@link #refresh()} attempt.
 * <p>The default implementation creates a
 * {@link org.springframework.beans.factory.support.DefaultListableBeanFactory}
 * with the {@linkplain #getInternalParentBeanFactory() internal bean factory} of this
 * context's parent as parent bean factory. Can be overridden in subclasses,
 * for example to customize DefaultListableBeanFactory's settings.
 * @return the bean factory for this context
 * @see org.springframework.beans.factory.support.DefaultListableBeanFactory#setAllowBeanDefinitionOverriding
 * @see org.springframework.beans.factory.support.DefaultListableBeanFactory#setAllowEagerClassLoading
 * @see org.springframework.beans.factory.support.DefaultListableBeanFactory#setAllowCircularReferences
 * @see org.springframework.beans.factory.support.DefaultListableBeanFactory#setAllowRawInjectionDespiteWrapping
 */
protected DefaultListableBeanFactory createBeanFactory() {
   return new DefaultListableBeanFactory(getInternalParentBeanFactory());
}
指定序列化ID
BeanFactory 實現了序列化介面,BeanFactory 的序列化 id 通過獲取 applicationContext 的 id 屬性進行設定,applicationContext 的 id 屬性設定是通過
/** Unique id for this context, if any. */
private String id = ObjectUtils.identityToString(this);
方


