
Android朝花夕拾-介紹Bimap
這篇文章來介紹下安卓中操作圖片的 API: Bitmap
Bitmap的本質:
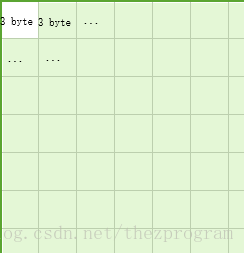
點陣圖,即用一些位儲存圖片資料的一種資料結構。

讓我們猜測下Bitmap的資料結構。
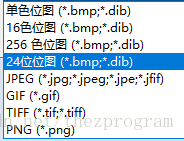
根據儲存的格式:24位點陣圖 ,推測每一個畫素要使用24位(bit)來儲存,也就是3個位元組(3*8bit)。
接下來,進入正題:Android的Bitmap API
官方對它沒有過多介紹。還是通過使用來認識。
Bitmap bitmap = Bitmap.createBitmap(96,96, Bitmap.Config.ARGB_8888);
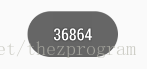
Bitmap的createBitmap可以建立一個bitmap。這裡建立了一個96x96畫素大小的bitmap。 檢視一下新建立的bitmap所佔用的記憶體大小,使用getByteCount():
Toast.makeText(this,bitmap.getByteCount()+"",Toast.LENGTH_SHORT).show();
createBitmap()方法使用寬,高,以及Config三個引數生成bitmap。Config表明了bitmap儲存空間大小:
ALPHA_8 :單色, RGB_565:每個畫素兩位元組,沒有透明度資訊, ARGB_4444:過時-不推薦使用, ARGB_8888:每個畫素4位元組,視覺效果拔群 RGBA_F16:每個畫素8位元組,用於顯示帶HDR效果的酷炫圖片。
之前使用ARGB_8888建立了一個96x96 畫素的bitmap例項,佔用記憶體大小:96x96x4位元組 = 36864 位元組。
Bitmap bitmap = Bitmap.createBitmap(96,96, Bitmap.Config.RGB_565);
如果改成RGB_565,則佔用記憶體為:

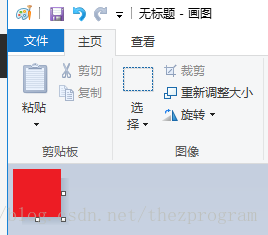
還記得文章開頭用畫筆建立的一個bmp檔案嗎,我們把它放到手機儲存卡里,載入成Bitmap。把這個檔案拷貝到了手機記憶體的這個根目錄。

        Bitmap fileBmp = BitmapFactory.decodeFile(Environment.getExternalStorageDirectory()
                +"/48px.bmp");
        Toast.makeText(this,fileBmp.getByteCount()+"",Toast.LENGTH_SHORT).show();

原始碼中decodeFile內容如下:
    public static Bitmap decodeFile(String pathName) {
        return decodeFile(pathName, null);
    }
    public static Bitmap decodeFile(String pathName, Options opts) {
        validate(opts);	                                                //1opts為空,不做任何操作
        Bitmap bm = null;
        InputStream stream = null;
        try {
            stream = new FileInputStream(pathName);
            bm = decodeStream(stream, null, opts);                      //2最終呼叫原生方法返回bitmap
        } catch (Exception e) {
            /*  do nothing.
                If the exception happened on open, bm will be null.
            */
            Log.e("BitmapFactory", "Unable to decode stream: " + e);
        } finally {
            if (stream != null) {
                try {
                    stream.close();
                } catch (IOException e) {
                    // do nothing here
                }
            }
        }
        return bm;
    }
Bitmap是一種無壓縮方式的影象儲存結構,來看下面的例子:
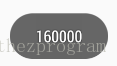
下面是一張網上下載的200x200的jpg格式圖片 檔名為200x200.jpg
大小為

我們同樣把這個檔案放入手機儲存卡中,使用載入為Bitmap例項。 並看載入後的bitmap佔多少記憶體。
        Bitmap fileBmp = BitmapFactory.decodeFile(Environment.getExternalStorageDirectory()
                +"/200x200.jpg");
        Toast.makeText(this,fileBmp.getByteCount()+"",Toast.LENGTH_SHORT).show();
我們的activity佈局檔案中,有一個imageview,大小為96x96,現在將這個160k的bitmap設定給這個imageview作為內容顯示出來。
<?xml version="1.0" encoding="utf-8"?>
<android.support.constraint.ConstraintLayout xmlns:android="http://schemas.android.com/apk/res/android"
    android:layout_width="match_parent"
    android:layout_height="match_parent"
    xmlns:app="http://schemas.android.com/apk/res-auto">

    <ImageView
        android:background="@color/colorAccent"
        app:layout_constraintTop_toTopOf="parent"
        app:layout_constraintBottom_toBottomOf="parent"
        app:layout_constraintStart_toStartOf="parent"
        app:layout_constraintEnd_toEndOf="parent"
        android:id="@+id/image"
        android:layout_width="96dp"
        android:layout_height="96dp" />
</android.support.constraint.ConstraintLayout>
        Bitmap fileBmp = BitmapFactory.decodeFile(Environment.getExternalStorageDirectory()
                +"/200x200.jpg");
        Toast.makeText(this,fileBmp.getByteCount()+"",Toast.LENGTH_SHORT).show();
        imageView.setImageBitmap(fileBmp);	//imageView是佈局中的imageView控制元件
我們的控制元件只有96的寬高,但載入了200x200的bitmap,浪費了記憶體,有沒有辦法優化呢?
答案是肯定的,BitmapFactory提供了過載方法用來decodeFile。

完整程式碼如下:
        BitmapFactory.Options options = new BitmapFactory.Options();
        options.inJustDecodeBounds = true;					           //通知載入時只加載影象資訊,不真正載入影象,以取得原始寬高
        BitmapFactory.decodeFile(Environment.getExternalStorageDirectory()
                +"/200x200.jpg",options);
        options.inSampleSize = calculateInSampleSize(options,96,96);   //options裡存放了原始寬高,結合需要的寬高參數進行計算inSampleSize
        //並設定給options
        options.inJustDecodeBounds = false;                            //接下來真正載入圖片,將inJustDecodeBounds置為false
        Bitmap fileBmp = BitmapFactory.decodeFile(Environment.getExternalStorageDirectory()
                +"/200x200.jpg",options);                                      //用設定了inSampleSize值的option真正載入影象bitmap
        imageView.setImageBitmap(fileBmp);
        Toast.makeText(this,fileBmp.getByteCount()+"",Toast.LENGTH_SHORT).show();
	//根據原始bitmap引數與實際的尺寸計算縮小倍率
    public static int calculateInSampleSize(BitmapFactory.Options options,int requestWidth,int requestHeight){

        int inSampleSize = 1;			//縮小倍率初始值

        int width = options.outWidth;
        int height = options.outHeight;
        if(width>requestWidth||height>requestHeight){
            int halfWidth = width/2;
            int halfHeight = height/2;				//計算原始尺寸的一半,是為了保證下一次計算後,原始尺寸縮小inSimpleSize倍後
            										//計算結果仍然大於所需尺寸,也就是最終能根據inSampleSize計算出大於所需尺寸的最小尺寸。
            while(halfHeight/inSampleSize>requestHeight&&
                    halfWidth/inSampleSize>requestWidth){
                inSampleSize*=2;
            }
        }

        return inSampleSize;
    }
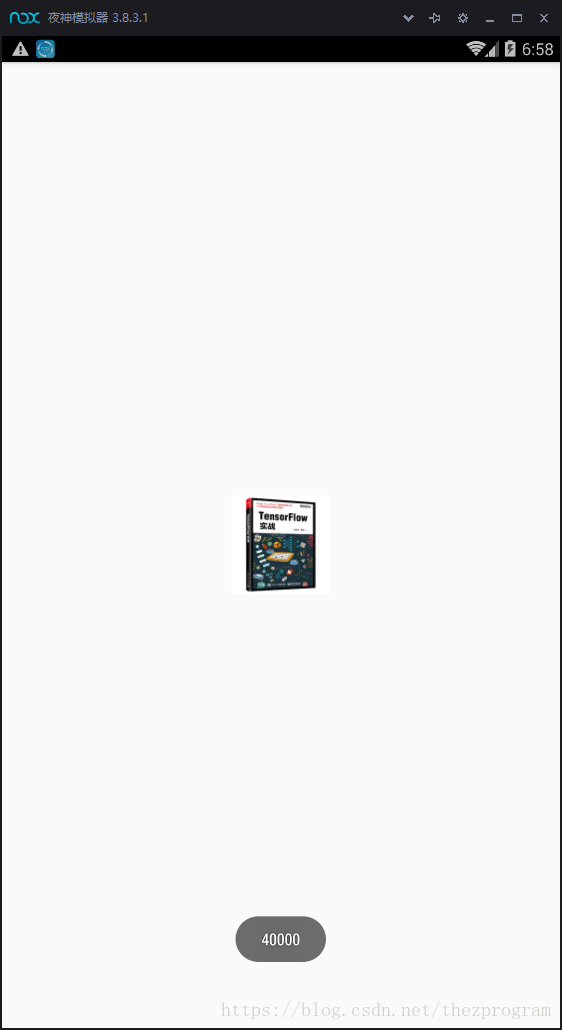
可以看到,現在顯示效果與之前完全尺寸bitmap載入效果用肉眼難以分辨,但記憶體佔用減少到了40k,省了3/4的記憶體佔用。
這也是大尺寸圖片載入的一個思路。
對於Bitmap,先介紹到這裡吧。後續會介紹影象載入相關的其他知識。 例如,如何正確選擇mipmap目錄(會影響記憶體佔用,影響效能);
例子中的200x200的jpg影象只有14k,但載入為Bitmap需要佔用十倍的記憶體,探究下能否直接使用壓縮圖片進行顯示?
現在很少直接使用bitmap這個API來載入圖片了,就結合流行的框架例如Glide來看框架是如何處理的;