Java軟體程式設計開發:Mybatis和Url路由詳細解析

1.3 Mybatis
MyBatis 本是apache的一個開源專案iBatis, 2010年這個專案由apache software foundation 遷移到了google code,並且改名為MyBatis 。MyBatis是一個基於Java的持久層框架。iBATIS提供的持久層框架包括SQL Maps和Data Access Objects(DAO)MyBatis 消除了幾乎所有的JDBC程式碼和引數的手工設定以及結果集的檢索。MyBatis 使用簡單的 XML或註解用於配置和原始對映,將介面和 Java 的POJOs(Plain Old Java Objects,普通的 Java物件)對映成資料庫中的記錄。
1.3.1 和Hibernate的區別
從效能角度考慮
由於 Hibernate 比 MyBatis 抽象封裝的程度更高,理論上單個語句執行的效能會低一點。
但 Hibernate 會設定快取,對於重複查詢有一定的優化,而且從編碼效率來說,Hibernate 的編碼效果肯定是會高一點的。所以,從整體的角度來看效能的話,其實兩者不能完全說誰勝誰劣。
從ORM角度考慮
Hibernate 是完備的 ORM 框架,是符合 JPA 規範的,但 MyBatis 不是。MyBatis 比單純寫 JDBC 肯定是方便一點,但無可避免還是要寫SQL,且無法做到跨資料庫 。
Hibernate 使用 JPA 就可以無需考慮資料庫的相容性問題。
使用 Hibernate 的一個難點是,如何來設計物件之間的關係。如果是關係型資料庫的話,表和表是通過外來鍵來進行關聯的。而在 ORM 中,則需要從面向物件的角度出發,設計物件之間的關聯關係。這個是需要思路上做一個轉變的。
結論
從網上的討論來看,新興網際網路公司更多地使用Mybatis,是因為其易於上手的特性,而舊的大型公司仍然會繼續維護他們的Hibernate專案。
1.3.2 連線資料庫
1、新增依賴
在pom.xml中新增MyBatis與相應資料庫的依賴
org.mybatis.spring.boot
mybatis-spring-boot-starter
1.3.1
mysql
mysql-connector-java
8.0.13
注意MySQL的Version節點中的版本號要與你使用的MySQL驅動的版本一致,8.0左右的高版本在連線串設定上也與低版本不同,會在下文說明新增依賴之後,IDEA會自動匯入相應的包。
1、建立與資料庫表對應的類(javabean)package com.example.dataObject;public class User {
private Long id;
private String name;
private Integer age;
public String getName() {
return name;
}
public void setName(String name) {
}
public User(){
}
} 這裡除了相應的屬性,還要新增get/set方法,例項化的物件才能獲取相應屬性的值,IDEA的快捷鍵是ALT+INSERT
1、三層結構及連線池
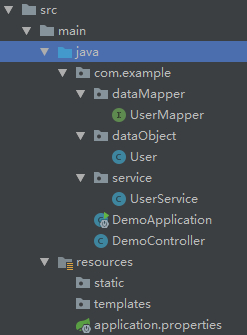
三層的結構如圖,我的理解是Mapper→Service→Controller

Mapperpackage com.example.dataMapper;import com.example.dataObject.User;import org.apache.ibatis.annotations.Insert;import org.apache.ibatis.annotations.Mapper;import org.apache.ibatis.annotations.Param;import org.apache.ibatis.annotations.Select;@Mapperpublic interface UserMapper {
@Select(“SELECT * FROM USER WHERE NAME = #{name}”)
User findByName(@Param(“name”) String name);
@Select(“SELECT * FROM USER WHERE ID = #{id}”)
User getById(@Param(“id”) Long id);
@Insert(“INSERT INTO USER(NAME, AGE) VALUES(#{name}, #{age})”)
int insert(@Param(“name”) String name,@Param(“age”) Integer age);
}Servicepackage com.example.service;import com.example.dataMapper.UserMapper;import com.example.dataObject.User;import org.springframework.beans.factory.annotation.Autowired;import org.springframework.stereotype.Service;@Servicepublic class UserService {
@Autowired
UserMapper userMapper;
public User findUser(Long id){
User user = userMapper.getById(id);
return user;
}
public User findUserByName(String name){
User user = userMapper.findByName(name);
return user;
}
}Controllerpackage com.example;import com.example.dataObject.User;import com.example.service.UserService;import org.springframework.beans.factory.annotation.Autowired;import org.springframework.stereotype.Controller;import org.springframework.web.bind.annotation.PathVariable;import org.springframework.web.bind.annotation.RequestMapping;import org.springframework.web.bind.annotation.ResponseBody;@Controllerpublic class DemoController {
@Autowired
UserService userService;
@RequestMapping("/")
@ResponseBody
public String index(){
return “Hello Spring Boot”;
}
@RequestMapping("/user/{id}")
@ResponseBody
public String getUser(@PathVariable(“id”) Long id){
User user = userService.findUser(id);
return user.getName();
} @RequestMapping("/username/{name}")
@ResponseBody
public User getUserByName(@PathVariable(“name”) String name){
User user = userService.findUserByName(name);
return user;
}
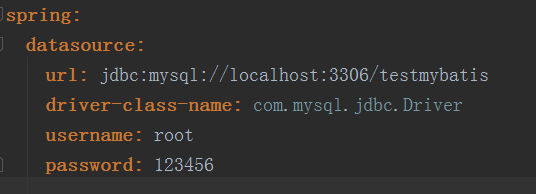
}連線串有兩種寫法,但是其實都是在application.properties這個檔案裡,但是可以把這個檔案的字尾改為.yml使用,這樣就是application.ymlapplication.propertiesspring.datasource.url=jdbc:mysql://localhost:3306/test?characterEncoding=utf-8&useSSL=false&useUnicode=true&useJDBCCompliantTimezoneShift=true&useLegacyDatetimeCode=false&serverTimezone=UTC
spring.datasource.username=root
spring.datasource.password=limingxu
spring.datasource.driver-class-name=com.mysql.jdbc.Driverapplication.yml

寫法的作用是一樣的,我沒用使用yml格式的,所以找了用了別人的圖,要注意的是url後面的那一串,這就是前面說的資料庫連線問題,正常使用5.x版本的MySQL可以直接使用這種普通的連線串,但是我一開始不知道,用了最新的8.x版本,直接連線資料庫會報錯,要像application.properties裡面的寫法在後面通過get傳值的方式加上一串說明,具體作用還沒有深入研究
2 URL路由
@Controller標註的類表示是一個處理HTTP請求的控制器(即MVC中的C),該類中所有被@RequestMapping標註的方法都會用來處理對應URL的請求。2.1 @RequestMapping
在Spring MVC框架中,使用@RequestMapping標註可以將URL與處理方法繫結起來,看一下上面的控制器例子package com.example;import com.example.dataObject.User;import com.example.service.UserService;import org.springframework.beans.factory.annotation.Autowired;import org.springframework.stereotype.Controller;import org.springframework.web.bind.annotation.PathVariable;import org.springframework.web.bind.annotation.RequestMapping;import org.springframework.web.bind.annotation.ResponseBody;@Controllerpublic class DemoController { @Autowired
UserService userService;
@RequestMapping("/")
@ResponseBody
public String index(){
return “Hello Spring Boot”;
} @RequestMapping("/user/{id}")
@ResponseBody
public String getUser(@PathVariable(“id”) Long id){
User user = userService.findUser(id);
return user.getName();
} @RequestMapping("/username/{name}")
@ResponseBody
public User getUserByName(@PathVariable(“name”) String name){
User user = userService.findUserByName(name);
return user;
}
}
用@Controller標註DemoController類,用@RequestMapping分別標註裡面的方法,當應用程式執行後,在瀏覽器中訪問http://localhost:8080/,請求會被Spring MVC框架分發到index()方法進行處理。同理,
2.2 @PathVariable
如果需要傳引數呢?路由中的{}就是引數,以http://localhost:8080/user/1 訪問就會將1作為入參即id傳入方法getUser(),http://127.0.0.1:8080/username/AAA 同理
2.3 不同的請求型別
在Web應用中常用的HTTP方法有四種:PUT方法用來新增的資源GET方法用來獲取已有的資源POST方法用來對資源進行狀態轉換DELETE方法用來刪除已有的資源這四個方法可以對應到CRUD操作(Create、Read、Update和Delete),每一個Web請求都是屬於其中一種,在Spring MVC中如果不特殊指定的話,預設是GET請求。實際上@RequestMapping("/")是@RequestMapping("/", method = RequestMethod.GET)的簡寫,即可以通過method屬性,設定請求的HTTP方法。比如PUT /hello請求,對應@RequestMapping("/hello", method = RequestMethod.PUT)Spring MVC最新的版本中提供了一種更加簡潔的配置HTTP方法的方式,增加了四個標註:@[email protected]@[email protected]
2.4 @ResponseBody
加了這個標註,返回值會被直接顯示在瀏覽器上,大致就是.NET裡面的Response.Write(),如果在這裡返回一個實體,會以json的格式顯示,要想顯示頁面,這裡就要返回相應的HTML格式的程式碼,但是這樣寫不利於瀏覽與維護,所以就需要路由到一個HTML的頁面Tips1、自動儲存:IDEA裡面是自動儲存的,你每一次輸入都會有儲存操作,一開始還會習慣性Ctrl+S,但慢慢就習慣了,如果有需要新的引用,也只要輸入就可以,IDEA會自動引用,和新增依賴一樣2、區分大小寫:IDEA本身對大小寫的區分很嚴格,如果你用大寫S開頭,自動提示裡面就不會出現小寫s開頭的提示。與C#不同,Java的型別通常是以大寫開頭。
文章來自:https://www.itjmd.com/news/show-4263.html
