
阿里雲Kubernetes實戰1
考慮到公司持續整合與docker容器技術實施已有一段時間,取得了不錯的效果,但對於裝置運維、系統隔離、裝置利用率和擴充套件性還有待提升,綜合目前比較成熟的微服務技術,打算把現有業務遷移到K8S叢集。
由於公司所有業務均部署在阿里雲上,最開始就調研了阿里雲自己提供的Kubernetes叢集,但後來還是放棄了,主要考慮幾方面:
- 阿里雲K8S叢集尚不成熟,使用的版本也相對較老,不能及時更新版本
- 阿里雲K8S叢集目前只支援多主多從結構,同時限定Master節點只能是3個,不能增減,這對於小型業務或者巨型業務均不適用
- 自建原生K8S叢集更有利於拓展和理解整體結構
接下來會詳細介紹在阿里雲搭建原生Kubernetes叢集的過程。
一、K8S叢集搭建
下面的實戰操作基於阿里雲的VPC網路,在4臺ECS上搭建K8S單主多從叢集,部署Gitlab,Gitlab的資料儲存在阿里雲NAS上,服務通過SLB暴露至外網
- 阿里雲VPC * 1
- EIP * 2
- NAT閘道器 * 1
- 共享流量包 * 1
- 阿里雲ECS(無外網IP) * 4
- 阿里雲SLB * 4
- 阿里雲NAS * 1
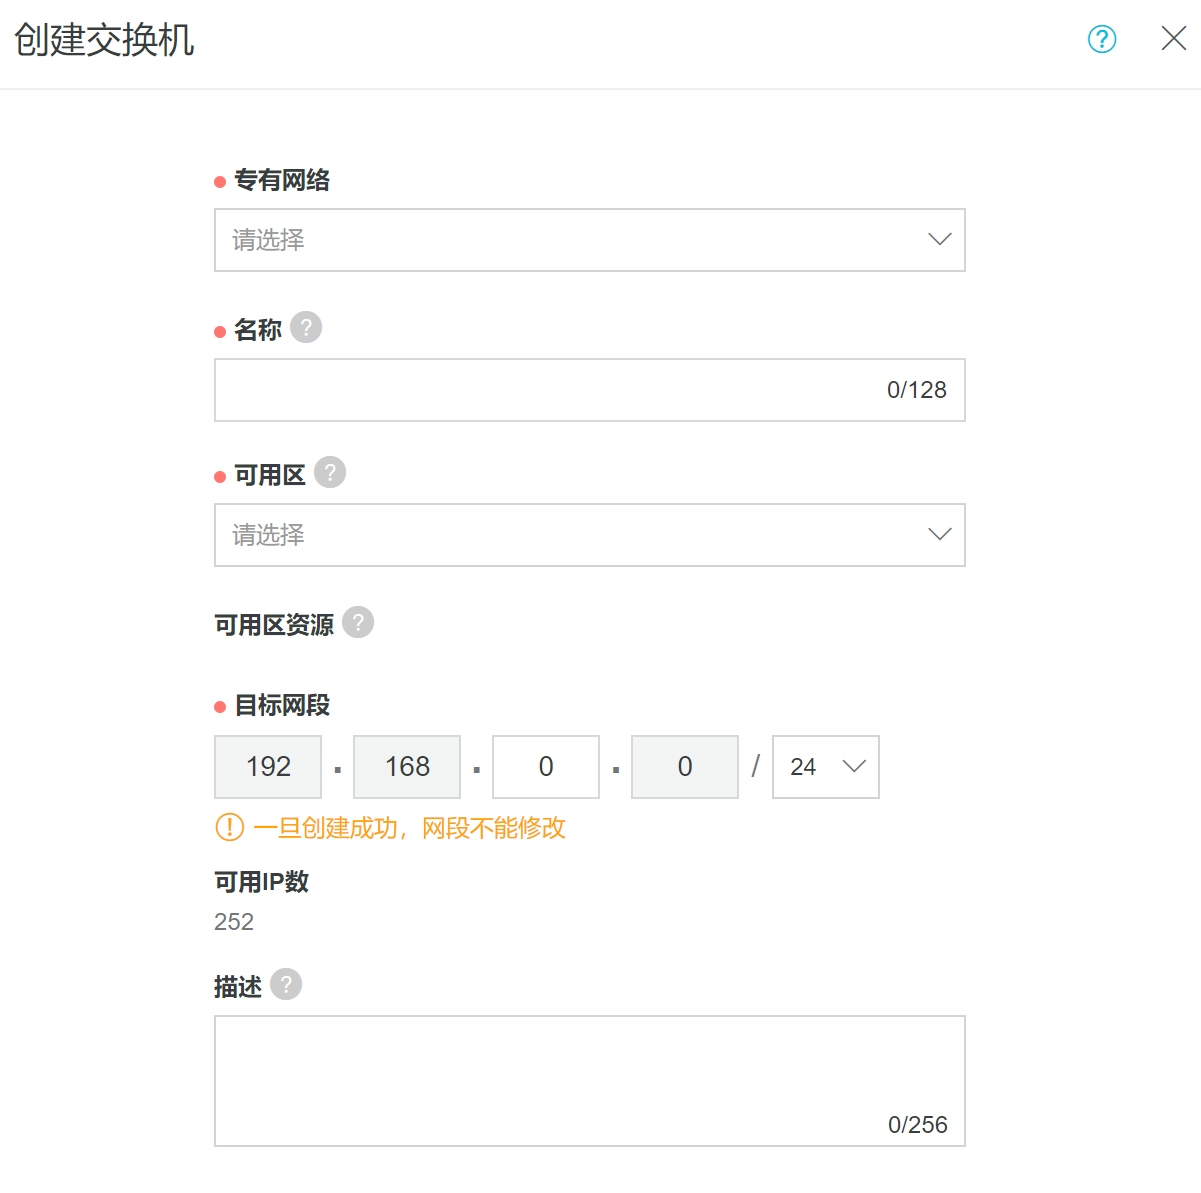
1.1 VPC組網
對於VPC,新建交換機,目標網段用192.168.0.0/24,4臺ECS的內網IP分別設定為192.168.0.1 ~ 192.168.0.4
1.2 NAT閘道器與EIP打通網路
由於VPC網路內,所有的ECS沒有配置外網IP,所以這裡要配置NAT閘道器和彈性IP來打通外網和VPC的通訊。
- 開通一個NAT閘道器,並加入到VPC內
- 開通兩個EIP,一個用於DNAT(VPC訪問外網),另一個用於SNAT(外網訪問EIP)
- 繫結EIP到NAT閘道器

- 配置DNAT(外網訪問VPC)

- 我們有4臺ECS,每臺機器的22埠分別對映到EIP的不同埠上,如23301~23304,該埠用於SSH訪問ECS
- 同時對映192.168.0.1的6443埠到EIP上,如對映至23443埠,該埠用於訪問K8S叢集的API,見第二章內容
- 配置SNAT(VPC訪問外網)

配置完成後,便可以使用繫結DNAT的EIP的對映埠通過SSH訪問ECS
1.3 使用Kubeasz部署K8S叢集
- 修改hosts檔案,根據實際環境配置master、node、etc的ip
- 這裡將192.168.0.1設定為master,使用單主多從的方式
- 配置完成後重啟所有ECS
二、部署Gitlab實戰
2.1 K8S Dashboard
部署好集群后,我們可以使用DNAT的EIP,通過對映埠23443訪問K8S API和Dashboard
- 進入後會要求輸入API的賬號密碼,與1.3章節hosts檔案裡配置的賬號密碼一致
- 通過賬號密碼驗證後可看到K8S Dashboard登入介面

- 令牌可在Master節點通過以下命令獲取
kubectl -n kube-system describe secret $(kubectl -n kube-system get secret | grep admin-user | awk '{print $1}')
2.2 PV與PVC
K8S中的PV和PVC的概念這裡不再多提,引用官方的一段解釋:
A PersistentVolume (PV) is a piece of storage in the cluster that has been provisioned by an administrator. It is a resource in the cluster just like a node is a cluster resource. PVs are volume plugins like Volumes, but have a lifecycle independent of any individual pod that uses the PV. This API object captures the details of the implementation of the storage, be that NFS, iSCSI, or a cloud-provider-specific storage system.
A PersistentVolumeClaim (PVC) is a request for storage by a user. It is similar to a pod. Pods consume node resources and PVCs consume PV resources. Pods can request specific levels of resources (CPU and Memory). Claims can request specific size and access modes (e.g., can be mounted once read/write or many times read-only).
在中,我們看到Volumes 有三個,如下表所示
| Local location | Container location | Usage |
|---|---|---|
/srv/gitlab/data |
/var/opt/gitlab |
For storing application data |
/srv/gitlab/logs |
/var/log/gitlab |
For storing logs |
/srv/gitlab/config |
/etc/gitlab |
For storing the GitLab configuration files |
所以我們也需要給Gitlab for K8S分配3個PV和PVC,這裡我們用到了阿里雲NAS
- 給NAS添加掛載點,選擇VPC網路和VPC的交換機
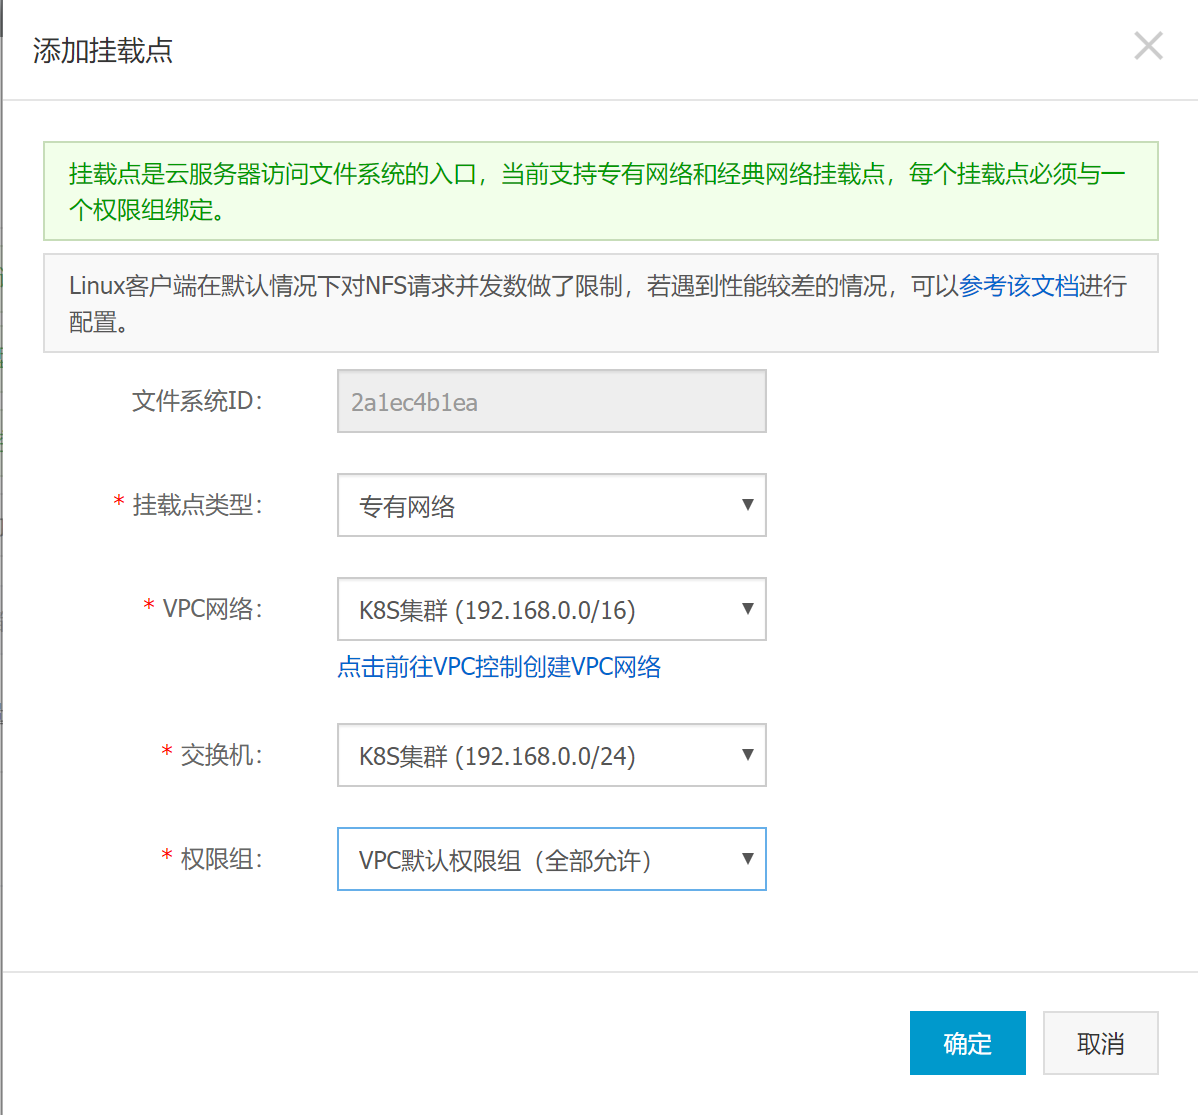
- 檢視掛載地址

- SSH登入Master節點,掛載NAS,並建立資料夾(注意PV的path必須已存在才可以成功建立,所以需要先在NAS中建立資料夾)
mkdir /nas
sudo mount -t nfs -o vers=4.0 xxx.xxx.nas.aliyuncs.com:/ /nas
mkdir -p /gitlab/data
mkdir -p /gitlab/logs
mkdir -p /gitlab/config
- 編寫PV和PVC的YAML,根據實際需求替換server節點的NAS掛載地址配置以及storage大小配置
apiVersionv1 kindNamespace metadata namegitlab labels namegitlab --- apiVersionv1 kindPersistentVolume metadata namegitlab-data labels releasegitlab-data namespacegitlab spec capacity storage500Gi accessModes ReadWriteMany persistentVolumeReclaimPolicyRetain nfs path/gitlab/data serverxxx.xxx.nas.aliyuncs.com --- apiVersionv1 kindPersistentVolume metadata namegitlab-config labels releasegitlab-config namespacegitlab spec capacity storage1Gi accessModes ReadWriteMany persistentVolumeReclaimPolicyRetain nfs path/gitlab/config serverxxx.xxx.nas.aliyuncs.com --- apiVersionv1 kindPersistentVolume metadata namegitlab-log labels releasegitlab-log namespacegitlab spec capacity storage1Gi accessModes ReadWriteMany persistentVolumeReclaimPolicyRetain nfs path/gitlab/log serverxxx.xxx.nas.aliyuncs.com --- apiVersionv1 kindPersistentVolumeClaim metadata namegitlab-data-claim namespacegitlab spec accessModes ReadWriteMany resources requests storage500Gi selector matchLabels releasegitlab-data --- apiVersionv1 kindPersistentVolumeClaim metadata namegitlab-config-claim namespacegitlab spec accessModes ReadWriteMany resources requests storage1Gi selector matchLabels releasegitlab-config --- apiVersionv1 kindPersistentVolumeClaim metadata namegitlab-log-claim namespacegitlab spec accessModes ReadWriteMany resources requests storage1Gi selector matchLabels releasegitlab-log
2.3 K8S部署Gitlab
接下來補全Gitlab的Deployment和Service
apiVersionapps/v1 kindDeployment metadata namegitlab namespacegitlab spec selector matchLabels appgitlab replicas1 strategy typeRecreate template metadata labels appgitlab spec containers imagegitlab/gitlab-celatest namegitlab ports containerPort80 namegitlab-http containerPort443 namegitlab-https containerPort22 namegitlab-ssh volumeMounts namegitlab-config mountPath/etc/gitlab namegitlab-log mountPath/var/log/gitlab namegitlab-data mountPath/var/opt/gitlab volumes namegitlab-data persistentVolumeClaim claimNamegitlab-data-claim namegitlab-config persistentVolumeClaim claimNamegitlab-config-claim namegitlab-log persistentVolumeClaim claimNamegitlab-log-claim --- kindService apiVersionv1 metadata namegitlab-service labels appgitlab-service namespacegitlab spec selector appgitlab ports protocolTCP namegitlab-https port443 targetPort443 protocolTCP namegitlab-http port80 targetPort80 --- kindService apiVersionv1 metadata namegitlab-ssh-service labels appgitlab-ssh-service namespacegitlab spec typeNodePort selector appgitlab ports protocolTCP namegitlab-ssh port22 targetPort22 nodePort30000
- 注意在Deployment中,開放了Gitlab Pod的80、443和22埠,用於Gitlab的HTTP、HTTPS和SSH的訪問
- 建立了2個Service,第一個只將80和443埠開放到Cluster IP上,第二個Service通過NodePort將22埠對映到NodeIp的30000埠上
- 我們將2.2章節PV與PVC中的相關程式碼和上面的程式碼合併,並命名成gitlab.yaml,上傳到Master節點,執行命令
kubectl apply -f gitlab.yaml - 接下來進入Gitlab的Pod,修改gitlab的域名,並啟用https訪問
kubectl get pod --namespace=gitlab
# 獲得gitlab pod名稱後
kubectl exec -it gitlab-xxxx-xxxx --namespace=gitlab /bin/bash
# 進入pod後
vi /etc/gitlab/gitlab.rb
# 修改external_url 'https://xxx.xxx.com',儲存後退出
gitlab-ctl reconfigure
exit
到這裡,配置與部署基本完成了,但我們還不能從外網訪問Gitlab,不過至少可以在叢集內驗證配置是否正確。
- 在Master節點檢視Service
kubectl get svc --namespace=gitlab
可以看到443和80埠已經開發給Cluster IP,同時22埠對映到了30000的NodePort上
- 通過curl命令檢視訪問結果
curl https://10.68.88.97 --insecure這時返回一串包含redirect的字元,如下
<html><body>You are being <a href="https://10.68.88.97/users/sign_in">redirected</a>.</body></html>表示服務已部署成功
- 如果有telnet客戶端,還可以驗證30000埠,在任何一個節點上執行任意一條命令
telnet 192.168.0.1:30000
telnet 192.168.0.2:30000
telnet 192.168.0.3:30000
telnet 192.168.0.4:30000
2.4 使用Ingress-Nginx和阿里雲SLB暴露服務
K8S暴露服務的方法有3種:
- ClusterIP:叢集內可訪問,但外部不可訪問
- NodePort:通過NodeIP:NodePort方式可以在叢集內訪問,結合EIP或者雲服務VPC負載均衡也可在叢集外訪問,但開放NodePort一方面不安全,另一方面隨著應用的增多不方便管理
- LoadBalancer:某些雲服務提供商會直接提供LoadBalancer模式,將服務對接到負載均衡,其原理是基於kubernetes的controller做二次開發,並整合到K8S叢集,使得叢集可以與雲服務SDK互動
由於我們的叢集搭建在阿里雲上,所以第一時間想到的是LoadBalancer方案,但很遺憾,沒辦法使用,原因如下:
迴歸到NodePort的方式,目前已有的解決方案是基於Ingress的幾款工具,如Ingress-Nginx、Traefik-Ingress,他們的對比如下(注意,目前的版本是IngressNginx 0.13.0、Traefik 1.6):
- IngressNginx和Traefik都是通過hostname方式反向代理已解決埠暴露問題
- IngressNginx依賴於Nginx,功能更多;Traefik不依賴Nginx,所以更輕量
- IngressNginx支援4層和7層LB,但4層也不好用,Traefik只支援7層代理
- 目前網上關於IngressNginx的文章都是beta 0.9.X版本的資訊,而IngressNginx在Github的地址也變化了,直接由Kubernetes維護,所以網上的文章基本沒參考性,還需看官方文件,但是官方文件極其混亂和不完善!!! 後面會有填坑指南。
最終我們還是選擇了Ingress-Nginx,結合阿里雲SLB,最終的拓撲圖如下所示:
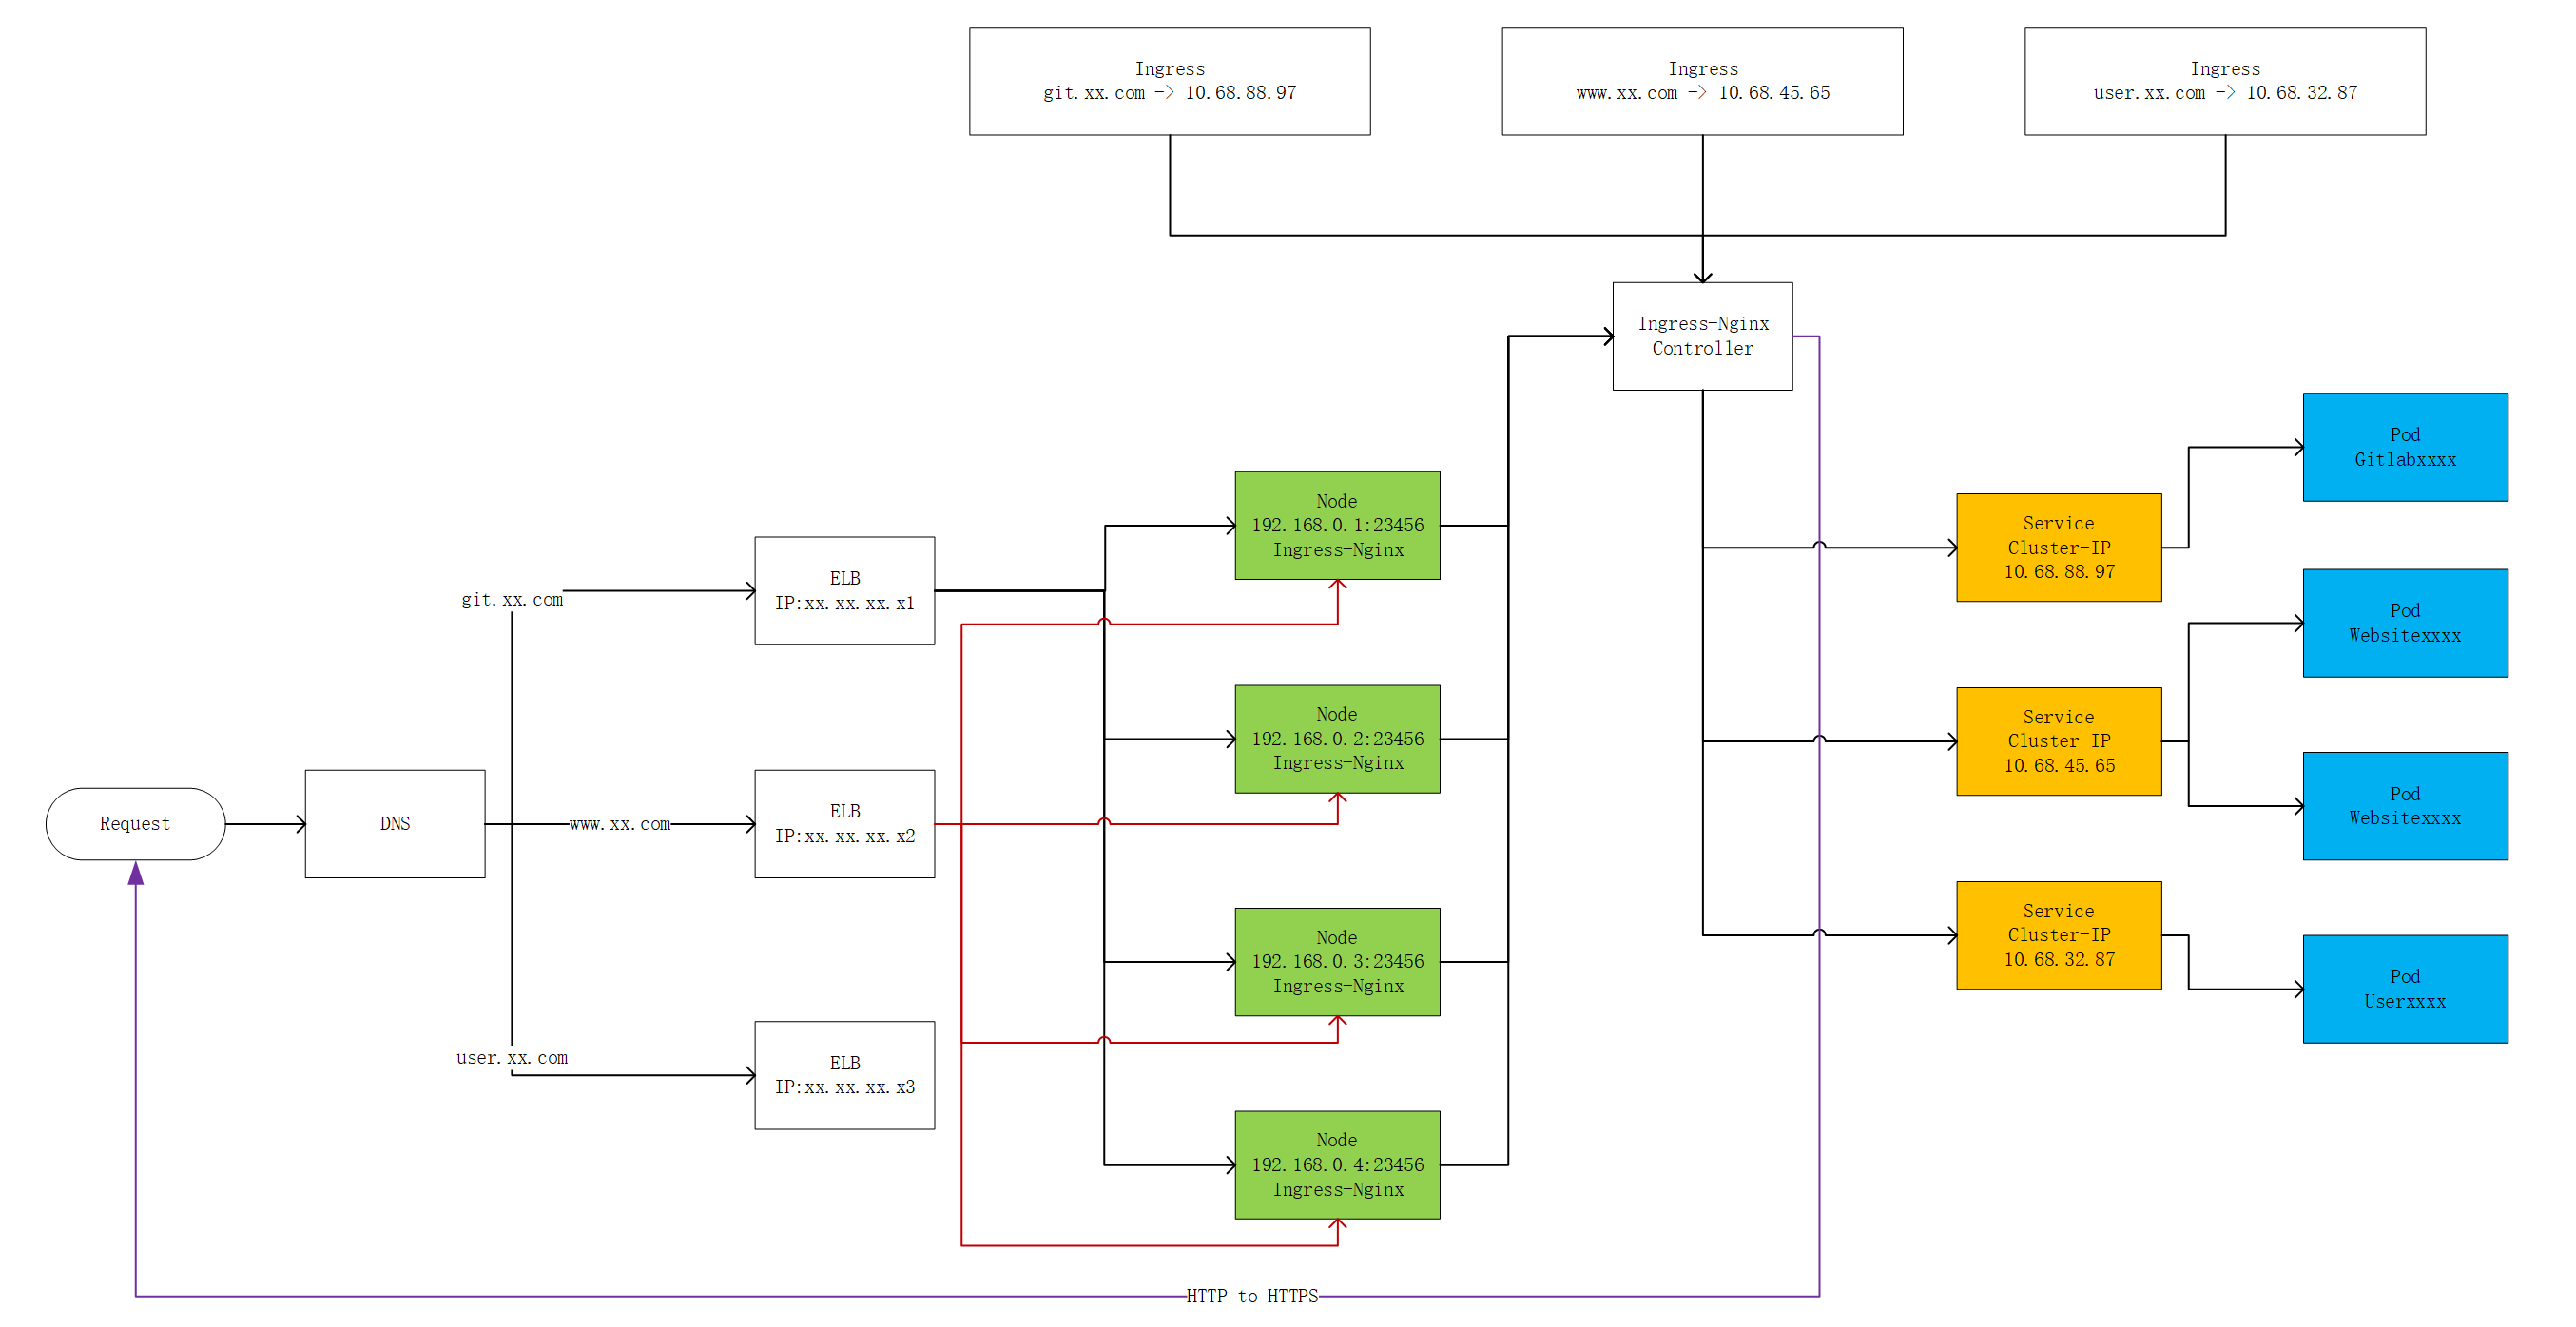
其原理是:
- 通過Service的ClusterIP負載Pod
- 通過Ingress-Nginx監聽Ingress配置,動態生成Nginx,並將Nginx暴露到23456的NodePort
- 通過阿里雲SLB監聽所有節點的23456埠
接下來看詳細步驟。
2.4.1 部署Ingress-Nginx
- 替換gcr.io的映象為阿里雲映象
- 暴露服務埠到NodePort 23456
- 整合成一個ingress-nginx.yaml
apiVersionv1 kindNamespace metadata nameingress-nginx --- apiVersionextensions/v1beta1 kindDeployment metadata namedefault-http-backend labels appdefault-http-backend namespaceingress-nginx spec replicas1 selector matchLabels appdefault-http-backend template metadata labels appdefault-http-backend spec terminationGracePeriodSeconds60 containers namedefault-http-backend # Any image is permissible as long as: # 1. It serves a 404 page at / # 2. It serves 200 on a /healthz endpoint imageregistry.cn-shenzhen.aliyuncs.com/heygears/defaultbackend1.4 livenessProbe httpGet path/healthz port8080 schemeHTTP initialDelaySeconds30 timeoutSeconds5 ports containerPort8080 resources limits cpu10m memory20Mi requests cpu10m memory20Mi --- apiVersionv1 kindService metadata namedefault-http-backend namespaceingress-nginx labels appdefault-http-backend spec ports port80 targetPort8080 selector appdefault-http-backend --- kindConfigMap apiVersionv1 metadata namenginx-configuration namespaceingress-nginx labels appingress-nginx --- kindConfigMap apiVersionv1 metadata nametcp-services namespaceingress-nginx --- kindConfigMap apiVersionv1 metadata nameudp-services namespaceingress-nginx --- apiVersionv1 kindServiceAccount metadata namenginx-ingress-serviceaccount namespaceingress-nginx --- apiVersionrbac.authorization.k8s.io/v1beta1 kindClusterRole metadata namenginx-ingress-clusterrole rules apiGroups "" resources configmaps endpoints nodes pods secrets verbs list watch apiGroups "" resources nodes verbs get apiGroups "" resources services verbs get list watch apiGroups "extensions" resources ingresses verbs get list watch apiGroups "" resources events verbs create patch apiGroups "extensions" resources ingresses/status verbs update --- apiVersionrbac.authorization.k8s.io/v1beta1 kindRole metadata namenginx-ingress-role namespaceingress-nginx rules apiGroups "" resources configmaps pods secrets namespaces verbs get apiGroups "" resources configmaps resourceNames # Defaults to "<election-id>-<ingress-class>" # Here: "<ingress-controller-leader>-<nginx>" # This has to be adapted if you change either parameter # when launching the nginx-ingress-controller. "ingress-controller-leader-nginx" verbs get update apiGroups "" resources configmaps verbs create apiGroups "" resources endpoints verbs get --- apiVersionrbac.authorization.k8s.io/v1beta1 kindRoleBinding metadata namenginx-ingress-role-nisa-binding namespaceingress-nginx roleRef apiGrouprbac.authorization.k8s.io kindRole namenginx-ingress-role subjects kindServiceAccount namenginx-ingress-serviceaccount namespaceingress-nginx --- apiVersionrbac.authorization.k8s.io/v1beta1 kindClusterRoleBinding metadata namenginx-ingress-clusterrole-nisa-binding roleRef apiGrouprbac.authorization.k8s.io kindClusterRole namenginx-ingress-clusterrole subjects kindServiceAccount namenginx-ingress-serviceaccount namespaceingress-nginx --- apiVersionextensions/v1beta1 kindDeployment metadata namenginx-ingress-controller namespaceingress-nginx spec replicas1 selector matchLabels appingress-nginx template metadata labels appingress-nginx annotations prometheus.io/port'10254' prometheus.io/scrape'true' spec serviceAccountNamenginx-ingress-serviceaccount containers namenginx-ingress-controller imageregistry.cn-shenzhen.aliyuncs.com/heygears/nginx-ingress-controller0.13.0