白話SpringCloud | 第八章:分散式配置中心的服務化及動態重新整理
前言
上一章節,簡單介紹了分散式配置中心
Spring Cloud Config的使用。同時,我們也遺漏了一些問題,比如如何配置實時生效,當服務端地址變更或者叢集部署時,如何指定服務端地址?回想,在服務註冊章節,服務提供者和服務消費者,同時往註冊中心進行註冊和獲取服務地址,而本身註冊中心又支援高可用配置。所以,對於配置中心,我們也可以將Server端和Client端往註冊中心進行註冊,藉此實現配置中心的服務化,無需指定具體的ip地址,直接根據服務名稱進行呼叫。
前言
關於高可用
將配置中心服務化,本身是為了實現高可用。而實現高可用的手段是很多的,最常用的就是負載均衡。客戶端不直連服務端,而是訪問負載均衡
負載均衡來動態選擇需要訪問的服務端。只是Spring Cloud Config天然的就能進行服務化配置,所以,實際中可以根據實際的業務需求來進行合理化抉擇的。
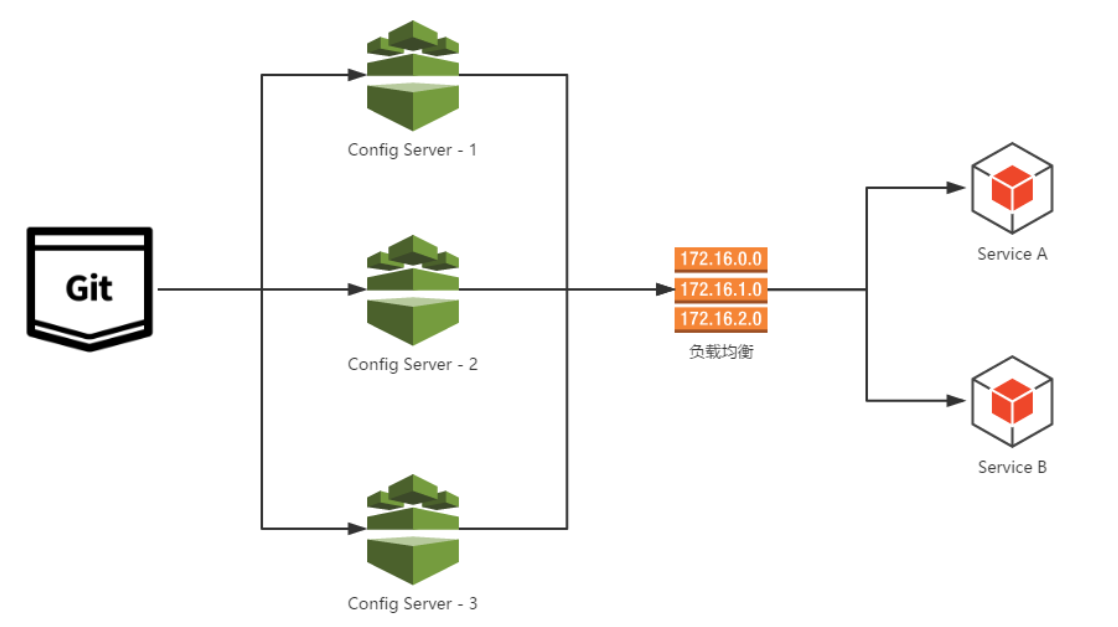
其次,對於使用了git或者svn作為儲存方式時,本身配置倉庫的高可用也是一個需要考慮的事項。本身如github或者碼雲這些第三方git倉庫而言,已經實現了高可用了。但一般上部署的微服務都是內網服務,所以一般上是使用如gitlab開源的git倉庫管理系統進行自建,此時就需要考慮本身倉庫的高可用了。
注意:本身教程為了不混淆各知識點,所以都是獨立專案進行例項,而不是在原工程上進行修改。
本章節教程採用了多模組工程進行構建例項。父類專案名為:spring-cloud-config-hamy-config-client-ha-dev.properties和my-config-client-ha-test.properties
my-config-client-ha-dev.properties
config=this is dev!my-config-client-ha-dev.properties
config=this is test!Server端
建立子工程:spring-cloud-confg-ha-server
0.加入pom依賴。
        <!-- config server 依賴 -->
        <dependency>
            <groupId>org.springframework.cloud</groupId>
            <artifactId>spring-cloud-config-server</artifactId>
        </dependency>
        <!-- 客戶端依賴 -->
        <dependency>
            <groupId>org.springframework.cloud</groupId>
            <artifactId>spring-cloud-starter-netflix-eureka-client</artifactId>
        </dependency>
1.配置檔案加入註冊中心相關配置。
spring.application.name=spring-cloud-config-ha-server
server.port=15678

#配置檔案git配置
spring.cloud.config.server.git.uri=https://github.com/xie19900123/spring-cloud-learning.git
# 搜尋路徑,即配置檔案的目錄,可配置多個,逗號分隔。預設為根目錄。
spring.cloud.config.server.git.searchPaths=spring-cloud-config-repo
# git使用者名稱和密碼 針對私有倉庫而言需要填寫
spring.cloud.config.server.git.username=
spring.cloud.config.server.git.password=

#添加註冊中心配置
# 註冊中心地址 -此為單機模式
eureka.client.service-url.defaultZone=http://127.0.0.1:1000/eureka
# 啟用ip配置 這樣在註冊中心列表中看見的是以ip+埠呈現的
eureka.instance.prefer-ip-address=true
# 例項名稱  最後呈現地址:ip:15678
eureka.instance.instance-id=${spring.cloud.client.ip-address}:${server.port}2.啟動類加入@EnableDiscoveryClient和@EnableConfigServer,前者開啟服務發現功能,後者宣告一個config server。
/**
 * config server 服務化
 *
 * @author oKong
 *
 */
@SpringBootApplication
@EnableConfigServer
//注意這裡也可使用@EnableEurekaClient
//但由於springcloud是靈活的,註冊中心支援eureka、consul、zookeeper等
//若寫了具體的註冊中心註解,則當替換成其他註冊中心時,又需要替換成對應的註解了。
//所以 直接使用@EnableDiscoveryClient 啟動發現。
//這樣在替換註冊中心時,只需要替換相關依賴即可。
@EnableDiscoveryClient
@Slf4j
public class ConfigServerHaApplication {
    public static void main(String[] args) throws Exception {
        SpringApplication.run(ConfigServerHaApplication.class, args);
        log.info("spring-cloud-config-ha-server啟動!");
    }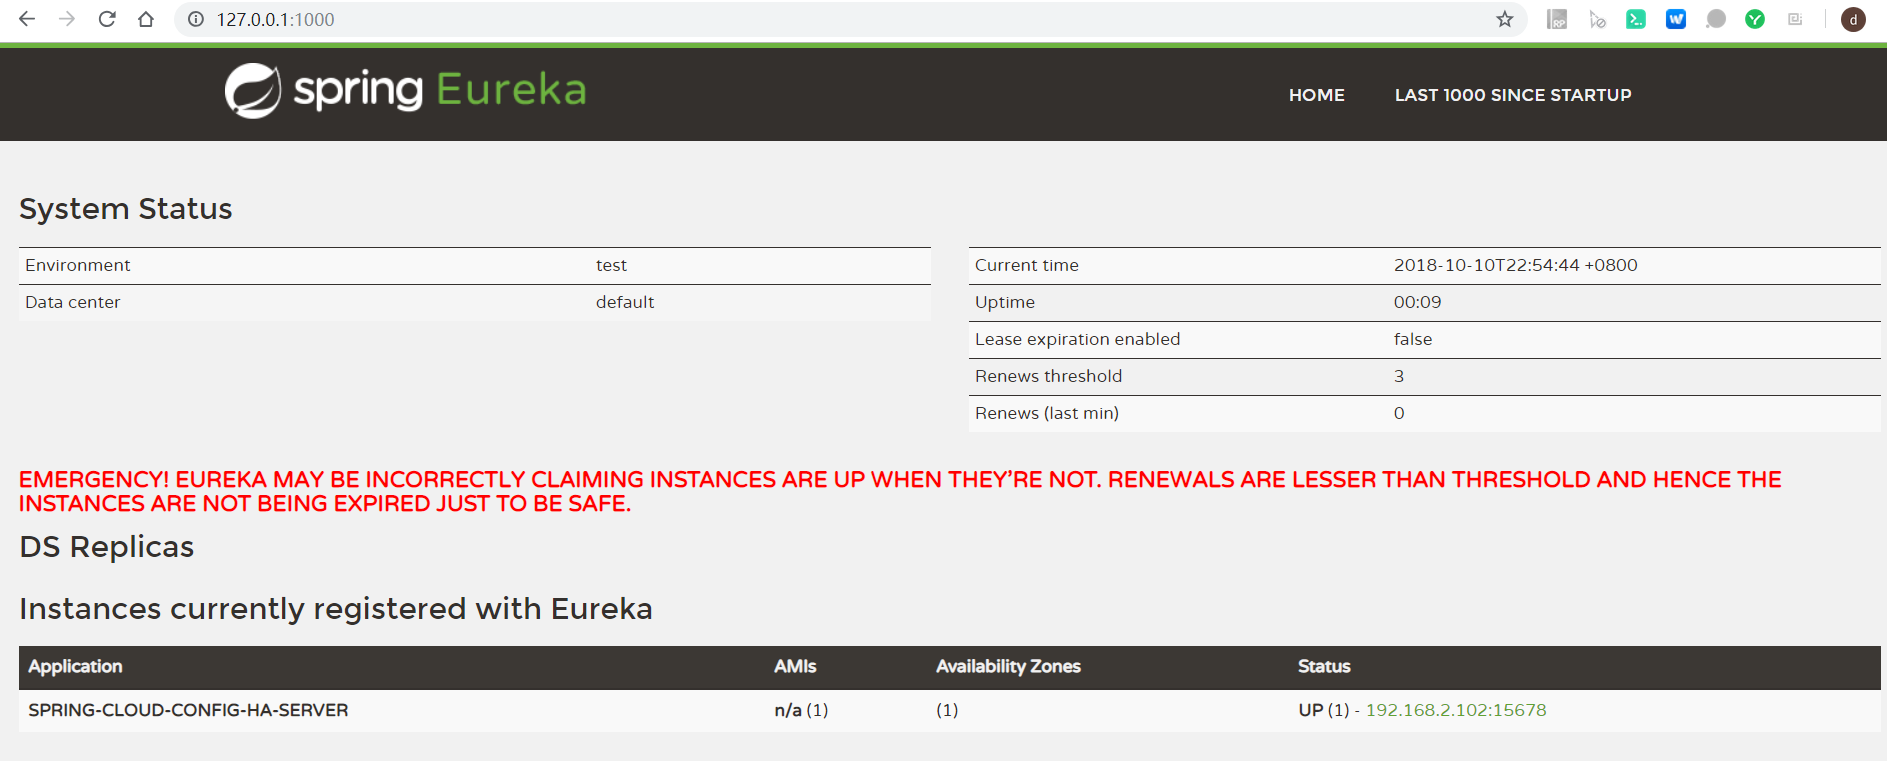
}3.啟動應用,同時啟動Eureka服務端。訪問下Eureka服務端地址:http://127.0.0.1:1000/ ,可以看見服務註冊成功了。
訪問:http://127.0.0.1:15678/my-config-client-ha-dev.properties 可以看見配置資訊了。

Client端
建立子工程:spring-cloud-confg-ha-client
0.加入pom依賴。
        <!-- config client 依賴 -->
        <dependency>
            <groupId>org.springframework.cloud</groupId>
            <artifactId>spring-cloud-starter-config</artifactId>
        </dependency>
        <!-- eureka client 依賴 -->
        <dependency>
            <groupId>org.springframework.cloud</groupId>
            <artifactId>spring-cloud-starter-netflix-eureka-client</artifactId>
        </dependency>
        <dependency>
            <groupId>org.springframework.boot</groupId>
            <artifactId>spring-boot-starter-web</artifactId>
</dependency>1.配置檔案修改,bootstrap.properties添加註冊中心配置。
bootstrap.properties
# 設定分支
spring.cloud.config.label=master
# 環境變數
spring.cloud.config.profile=dev
# 是否使用註冊中心方式進行獲取
spring.cloud.config.discovery.enabled=true
# 服務端地址
# 在不使用註冊中心模式下 直接填寫實際地址
#spring.cloud.config.uri=http://127.0.0.1:5678
# 註冊中心應用id
spring.cloud.config.discovery.service-id=spring-cloud-config-ha-server

#添加註冊中心配置
# 註冊中心地址 -此為單機模式
eureka.client.service-url.defaultZone=http://127.0.0.1:1000/eureka
# 啟用ip配置 這樣在註冊中心列表中看見的是以ip+埠呈現的
eureka.instance.prefer-ip-address=true
# 例項名稱  最後呈現地址:ip:15678
eureka.instance.instance-id=${spring.cloud.client.ip-address}:${server.port}
application.properties
# 設定應用名稱,需要和配置檔案匹配
spring.application.name=my-config-client-ha
server.port=15666
注意:註冊中心的相關配置需要放在bootstrap.properties中,這樣才能利用註冊中心進行服務端服務地址獲取。
2.啟動類,加入@EnableDiscoveryClient,開啟服務發現功能。
/**
 * 服務化方式呼叫config server
 *
 * @author oKong
 *
 */
@SpringBootApplication
@EnableDiscoveryClient
@Slf4j
public class ConfigClientHaApplication {
    public static void main(String[] args) throws Exception {
        SpringApplication.run(ConfigClientHaApplication.class, args);
        log.info("spring-cloud-config-ha-client啟動!");
    }

}
3.建立控制層,測試配置引數。
/**
 * config client 簡單示例
 * @author oKong
 *
 */
@RestController
public class DemoController {

    @Value("${config}")
    String config;

    @GetMapping("/")
    public String demo() {
        return "返回的config引數值為:" + config;
    }
}
4.啟動應用。一般上應用能啟動成功,就說明服務化已經成功了。 啟動時,可以看見已經往註冊中心去獲取服務端地址了。
2018-10-10 23:15:15.302 INFO 26412 --- [ main] c.c.c.ConfigServicePropertySourceLocator : Fetching config from server at : http://192.168.2.102:15678/
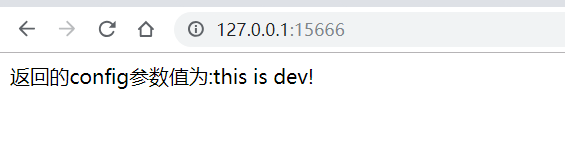
2018-10-10 23:15:20.728 INFO 26412 --- [ main] c.c.c.ConfigServicePropertySourceLocator : Located environment: name=my-config-client-ha, profiles=[dev], label=master, version=f2645253a37db433d806914b1d04d6aba428831c, state=null此時,我們訪問:http://127.0.0.1:15666/ ,即可看見配置資訊返回了。
refresh實現重新整理
在預設情況下,客戶端是不會自動感知配置的變化的。此時,我們可以使用/refresh端點來進行配置更新。
現在,我們改造下客戶端。
0.加入端點依賴。
        <dependency>
            <groupId>org.springframework.boot</groupId>
            <artifactId>spring-boot-starter-actuator</artifactId>
</dependency>1.修改下變數使用類,加入@RefreshScope註解,標記在訪問/refresh時,進行變數的更新操作。
/**
 * config client 簡單示例
 * @author oKong
 *
 */
@RestController
@RefreshScope//使用該註解的類,會在接到SpringCloud配置中心配置重新整理的時候,自動將新的配置更新到該類對應的欄位中。
public class DemoController {

    @Value("${config}")
    String config;

    @GetMapping("/")
    public String demo() {
        return "返回的config引數值為:" + config;
    }
}重點就是註解@RefreshScope了。
2.配置檔案開啟端點refresh。這裡需要注意,2.0之後,預設只開啟了端點info、health。其他的需要通過management.endpoints.web.exposure.include進行額外配置。
#開啟監控端點
management.endpoints.web.exposure.include=refresh3.啟動應用,此時,動態修改下遠端倉庫的引數值為:config=this is dev refresh!!!,
使用Postman使用POST訪問:http://127.0.0.1:15666/actuator/refresh。
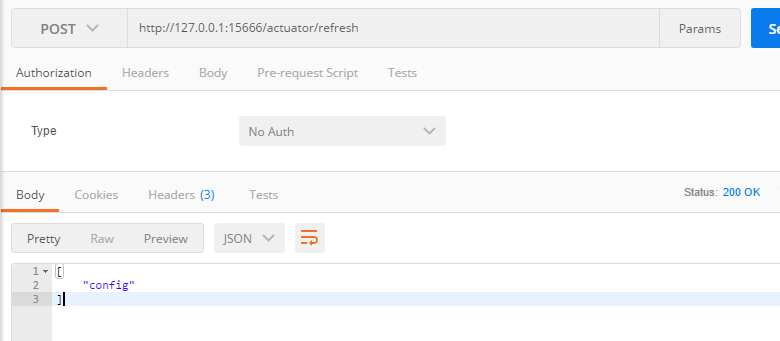
返回值即為有變動的引數值。
再次訪問:http://127.0.0.1:15666/ 可以看見已經是最新的配置引數值了。

參考資料
總結
本章節主要講解了如何將配置中心註冊為一個服務,客戶端像普通的服務消費者一樣,根據服務名即可獲取服務端地址,進而進行引數的獲取。同時講解了當屬性引數有變時,客戶端如何進行感知變化進行引數動態更新。大家應該可以想到,當我們客戶端越來越多時,一個個去執行
refresh時不太現實的,雖然我們可以通過類似webhook功能當有提交記錄時,主動去觸發各客戶端的refresh方法,在前期專案比較少的情況下,不失為一個好方法,只需要維護一份待更新的客戶端地址列表即可。但當服務越來越多時,維護此列表也是令人頭疼的。此時,我們可以使用Spring cloud bus訊息匯流排進行通知。由於目前Spring cloud bus知識點尚未開始講解,同時作者也比較少使用訊息匯流排,所以待查閱相關之後介紹Spring Cloud bus章節時,再來進行講解如何使用訊息匯流排進行全自動的配置更新操作。
最後
目前網際網路上大佬都有分享
SpringCloud系列教程,內容可能會類似,望多多包涵了。原創不易,碼字不易,還希望大家多多支援。若文中有錯誤之處,還望提出,謝謝。
老生常談
- 個人QQ:
499452441 - 微信公眾號:
lqdevOps